Save as PDF
01.A. Introduction to eDoctrina
eDoctrina is a web-based program full of user-friendly tools that make educator's jobs easier!
This comprehensive system can be used for planning, curriculum mapping, student assessments, RTI tracking, data reporting, student learning objectives and teacher observations. Below is an image of the eDoctrina homepage, the very first place you will be taken after logging in:

What is eDoctrina?
eDoctrina is a web-based education software that helps educators: (1) prioritize state standards, (2) create curriculum maps and standards-based lesson/unit plans, (3) build standards-based paper and online assessments, (4) print answer sheets, (5) scan assessment results (no more hand-correcting!), (6) quickly pin-point students who are falling behind and what standards/skills they are having trouble with, (7) manage school/district SMART goals, (8) track student-centered goals (RTI and IEP) and (9) manage teacher observations.
Its use and development is based on several of education’s most impactful best practices, including data-driven decision making, common formative assessments, Assessment for Learning, and Response to Intervention.
How can it help?
01.B. How to Navigate Within eDoctrina
There are two basic ways to navigate within eDoctrina:

A navigation bar is located at the top of the home screen and can be found on nearly every page. Please note that not all of the menu options are available to all user types. For example, teachers do not have access to some of the school/district setup options under the “Settings” menu.
The second method of getting around is via navigation buttons. The two most notable locations in which navigation buttons exist are the “Home” (shown above) and “Teacher Dashboard” screens.
One of the core values at eDoctrina is simplicity. We value that all it takes is a little experimentation to experience how easily one can navigate throughout eDoctrina.
How to Identify Common Action Buttons
One of the reasons eDoctrina is so user-friendly is that it relies on repetition. That is, many of the screens resemble each other. In fact, most of its pages feature Common Action Buttons, icons that, when clicked, carry out the same function on every page.
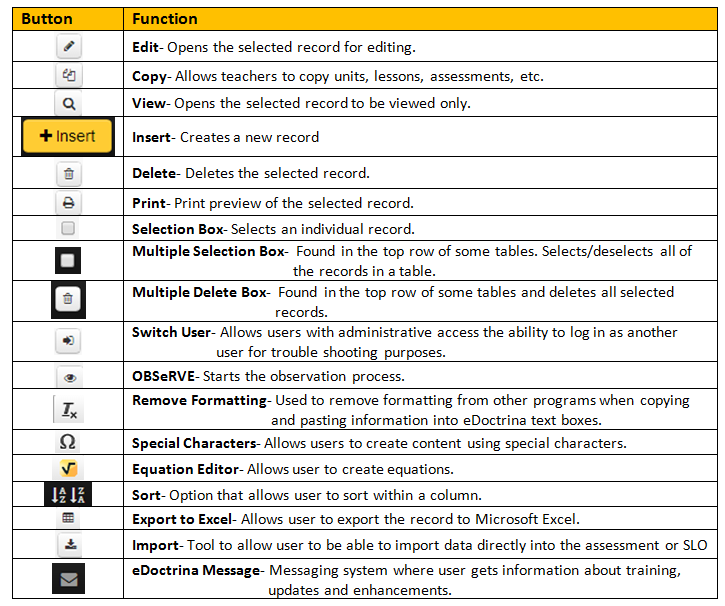
The most frequently used Common Action Buttons are identified and explained below:
Please note: The INSERT button has been updated to CREATE
01.C. How to Customize Personal Settings in eDoctrina
Click here to view the Help Video
When logging in to eDoctrina for the first time, it is very easy and advantageous to customize your personal account settings. These pre-set options will save you time on every page!
Click on your name in the upper right corner of the home page, then click on My Account.

Your account information can be customized to help save you time each time you use the eDoctrina.
General Information
This section is where you can view and edit some of the basic information about your user profile in eDoctrina. The First Name and Last Name will be how you are displayed throughout the system. The E-mail is extremely important because there are many automatic notifications that are triggered by certain actions in the system and this will be the destination that these will be sent to.
Password Change
Although this option may not be availble for some district depending on whether or not some Single-Sign-On(SSO) application is being used for account management, this is where most users will go to update their eDoctrina password by typying in their Current Password and re-typing their New Password twice.
Defaults
The default may be the most important aspect of this screen because setting defaults could save a lot of time when creating content in eDoctrina. Of course, there are many options to select, but if any user uses the same selection frequently, it may be a good idea to set some defaults so selections are made automatically.
- Standard Set: Select one of the available standard sets to ensure that this set is selected for all screens that are visited so standards within can be quickly be selected to add to content.
- Subject: There are some cases where some teachers will only teach one subject and will only be creating content for this subject. In these cases, it is a good practice to set a subject default so all created content is automatically linked to the selected default subject.
- Grade: There are some cases where some teachers will only teach one grade and will only be creating content for this grade. In these cases, it is a good practice to set a grade default so all created content is automatically linked to the selected default grade.
- Proficiency Table: Setting a default proficiency table helps to automatically link the selected item to all created assessments. This is a great tool because proficiency tables will need to be manually linked otherwise and linking one is essential for many data reports & snapshots to be more insightful.
- Test Type: Setting the Test type as the default will ensure that the selected test type is linked to all assessments that are being created by the user. This is a great tool because sometimes a district has a global default test type that is used and this tool will let the signed-in user use a default test type that is different. This is a great tool for individuals who are creating district assessments or some other subset of tests.
- Courses: There are some cases where some teachers will only teach one or few courses and will only be creating content for such courses. In these cases, it is a good practice to set some courses defaults so all created content is automatically linked to the selected courses.
- Online Results This is a default setting that ensures that all created assessments will always have the checkbox in the assessment editor "Results Visible Online" selected. This will ensure that students will be able to see their assessment results when signing into their Progress accounts. Of course some results may not post if there is incomplete data that needs to be verified.
- Select myself as the default creator Sometimes the list of assessments, units, and lessons could be really overwhelming as content created by other users will also be displayed in the lists. If desired, select this checkbox and each list will only show content that is created by the logged-in user because the Creator filter will be automatically selected.

Notifications
There are many email notifications that can be triggered through actions within eDoctrina. If, for some reason, an email notification message is deemed unnecessary and it should no longer be sent to your email, uncheck the email notification here in the Notifications section.

01.D. How to Reset Your Password from Login Page
All eDoctrina users (Staff AND Students) can reset their own passwords IF their email is in the program. When the user navigates to the login page, they can do this by clicking on the Forgot password? button as shown in the screenshot below.

The user will then be prompted to enter the email address associated with the account and click the Reset password button:

The user will then receive an email within a few minutes with a link they must click to reset their password.
The final step will require the user to enter their new password two times and then click the Reset button:

02.A. Adding and Linking Standards
To add Standards to eDoctrina, a District Admin User can navigate to the Standards page by following the path Planning > Standards.

Next, utilize the filters to choosing the District Set and any other appropriate filters. Please keep in mind that if creating custom Standards for a district, choosing the district from the pull-down is required.

Standards follow a Parent-Child relationship and can be customized . Create a Parent first by clicking on the  button. The Create Standard pop-up will appear. It is required to select the District, Subject, Grade level assignment for this standard. Entering a description is also required and will represent the Name/Title of the standard.

Click  to finalize the entries and add the Parent Standard to the list.

NOTE: After adding the Standard, it will default to being on the top of the list. Refreshing the page will alphabetize the the list.
When adding the Child Standard using this method, most of the required information (including the Parent Standard) will already be filled in. Simply provide a Name by filling in the Description for the Standard.

Once a child standard has been added to any parent, a blue plus next to the Standard will appear. Click to expand the embedded standards and view all of the linked Child Standards:

Linking Standards Sets
eDoctrina has a goal to stay current with the Standard Sets that are available. If a Standard Set is not available for selection in a district, it is most likely that the set already exists and has yet to be linked. To request that an existing set of standards be linked to your district, please contact the help desk:
Scaffolding Standards from Other Sets
Those with administrative accounts are able to add or unwrap standards in banks that already exist. These additional standards will be visible throughout eDoctrina (in units, assessments, lessons, etc.). Such standards will be visible only within the creator's own district.
The process of adding the standards is exactly the same: just choose your desired District/Set, then click the button.


Creating Test Sections
eDoctrina's design of how standards are entered into a district database offers extensive flexibility. To add to that flexibility, there is a "Test Section" checkbox available for each entered standard. By selecting this option, it is possible to utilize the standards module to create "standards" that are actually sections/parts of an assessment. When assessment results are available for an assessment with attached "Test Sections", a special version of the Individual Student Report is available that will provide assessment results based on the included "Test Sections" along with all the other necessary data.

Within the Assessment Editor, it is possible to filter for these "Test Section" standards and drag/drop them to the corresponding questions within the assessment as shown below:

After the assessment has been linked to "Test Section" standards and assessment data has been processed, reports applicable to these "Test Sections" are available in the Individual Student Report by selecting the Multi-Part Score Summary option.
For more information regarding generation of the Individual Student Report please refer to:
How to Use the Individual Student Report
If you have any questions about anything in this guide, please feel free to e-mail [email protected] for assistance.
02.B.1. How to Create a Unit Plan
Navigate to the Unit Plans page by clicking on the "Unit Plans" button on the eDoctrina Home Screen or by using the navigation bar at the top of the screen under Planning => Units. Please note that many district have created a custom homepage so your homepage may look a bit different!
A new unit can be created by clicking the  button or an existing unit can be edited by clicking the
  button for the corresponding unit.
Important: If you are creating a new unit plan and the unit plan screen is not opening a new window, it is highly likely there is a pop-up blocker preventing it from opening. Check in the URL bar to see if there is a red X. Simply allow eDoctrina to access pop-ups and filter to find the unit plan you just created. You will not need to create a new unit plan again.

If a new Unit is being created, clicking the button will result in a pop-up window where you will be prompted to enter some general information about the Unit Plan you are creating. Within this pop-up, it is required to:
- Select the Type: It is recommended to choose "Teacher unit" for general Unit Plans
- Provide a Name: This field is searchable so choose your Unit Plan name wisely.
- Select the Year, Grade, and Subject that is most applicable to the Unit Plan.
- The most common Workflow state is "Visbile" but workflow states are custom, so it is possible that your district may have a different naming convention.
- Selecting a Course is not required, but linking one provides the option to share the Unit Plan with other users that instruct the same course.
Once the required fields are entered, select the  button to be directed to the Unit Plan editor.

Once the Unit Editor the option to "jump to" the various sections of the unit plan is available using the Navigation Buttons along the top:

-
Navigation Buttons:
- Expand/Collapse All: This will expand or collapse the view of all the sections within the unit plan.
- General/Content/Standards/Assessments/Lessons/Attachments/Discussion Board/Notes: Will navigate to the corresponding section of the unit plan.
-
Save/Save & Close/Close Buttons:
- Saves: Will save all current changes and stay on the same webpage.
- Saves & Closes: Will save all current changes and exit out of the unit editor browsing tab.
- Cancel & Close: Will NOT save the most recent changes and will exit out of the unit editor browsing tab.
-
Select Template
- Select the unit plan template that is most relevant to the unit of instruction.
Please remember to save whenever a change is made to ensure that no work is lost.
The General Section
Click the or button to open the Unit Editor. To be able to save the Unit Plan to the database, the mandatory fields marked with a red asterisk (*), must be filled in or selected.
-
Type:
- Teacher Unit: Selecting this type will allow users to include Content, Assessments, Lessons, and Attachments to the Unit Plan.
- Student Online Unit: Selecting this type will enable the ability to add a Student Online Learning Experience (SOLe) to the Unit Plan.
- Teacher and Student Unit: Selecting this type is like selecting both the Teacher Unit and the Student Online Unit and provides access to all features.
- Descriptive Information: The Name, School, Year, Grade, and Subject are important to select to define a Unit Plan and make it easier to locate when searching for the unit plan at a later date.
-
Sharing/Privacy If selected, all teachers who teacher the same course can edit this Unit Plan. Otherwise, only the creator and administrator can edit.
- Team Can Edit: If checked - other teachers teaching the same course can edit this unit. For this to work a course will need to be linked to the unit plan.
- Do Not Share - Exclude From List: If checked - only district admins and the owner will be able to see this unit in the unit listing.
- Do Not Allow Copy: If checked - teachers and school admins cannot copy the unit.
- Shared With: It is possible to only share a unit plan (enable editing access) with one or many users by adding their name to this field.
- Visibility & Workflow: These selections are available for administrative profiles ONLY. The usage of these fields will vary by district.
- Active/Inactive: If available, unit plans can be made active or inactive.
- Time Stamps: The Start/End Date and the Duration (days) are descriptive as well, but can assist with district-wide collaboration efforts as they are tied to some Planning Reports.For units to display in their appropriate sequence on the Scope & Sequence Report and the Curriculum Map, Start/End Dates must be entered. Any district can be configured to make this a required field.
- Courses: Filter for and select ALL courses that will be using this Unit Plan. This is a searchable field and also defines what a "Team" is for this Unit.
The Standards Section
The Standards Section is where any standards that will be covered in this specific unit will be added:

To add a standard to the unit you will need to:
- Use the filters to find the standard(s) to link to the unit plan.
- After finding the standard, drag and drop it into the Standards field on the left.
Take notice a the blank text field that appears below the added standard(s). This is where it is possible to unwrap standards using the WYSIWYG Editor tools.
Why Unwrap Standards? In many cases, state standards are either vague or compound (they include multiple skills embedded within a single standard). The ability to Unwrap Standards allows users to re-write standards into clearer or student-friendly language and breakdown a single standard into multiple components.
The benefits of this process are: (1) Re-written standards can build student engagement and demystify the learning process for learners and (2) Broken-down standards allow for more accurate and applicable assessment data reports.
The standards re-written/scaffolded on this screen will be accessible throughout eDoctrina. They will be able to be used with unit/lesson plans, assessments and data reports.
While powerful, the process of unwrapping standards is optional.
The Content Section
This section contains multiple headings that can be customized according to district preferences. Each box contains a WYSIWYG text editor that allows entry of pertinent information for each content component of the Unit Plan. Add content directly within each component or copy/paste information from another source. If copy/paste is the preference, it is best practice to highlight the pasted text and remove unwanted formatting by clicking the  button.

The Assessments, Lessons, and Attachments Sections
In these sections, it is possible to create new assessments and lessons that will automatically link to the unit. It also provides the opportunity to edit existing linked assessments or lessons. The Attachments section allows for easy upload/download of relevant attachments:

NOTE: District Admins have the ability to control what content is visible within these sections, but this must be configured within the active unit template. For more information on how to do this please visit our help guide on How to Create Unit and Lesson Plan Templates.
The Discussion Board & Notes Sections
These sections provide ample opportunity for teachers and administrators to collaborate with eachother to continually develop the Unit Plan. The discussion board is configured to send email notifications to all users involved in the discussion. The Notes section allows users to enter any relevant information about the Unit Plan to save for later. It should be noted that when copying a Unit Plan, the comments made in the discussion board will not be copied, but the notes will.

02.B.2. Copying a Unit Plan
Click here to view the Help Video
Copying units within eDoctrina is a very simple process. Copying units can save educators hundreds of hours since their unit can be copied and edited from a previous year into the current year.
Copying a Unit Plan
In order to copy a unit, navigate to the Units Homepage by finding "Curriculum" in the pull-down menu in the eDoctrina "navigation bar.

On the Units page, it is possible to search for a specific unit by the unit name, unit ID # or any tags that are entered for the unit. If none of this information is known, try manipulating the other available filters to display units that are relevant to the selected filters.

In the unit list, there are a couple important icons to be aware of:
-
 The "Edit" pencil will only be available for units that are created by the signed in user, or for users that have received editing permissions to the unit.
 -
 The "Copy" button will be available for all units unless the unit has copy restrictions. This option should be selected when copying a unit.
- To copy a unit, simply find and the desired unit in the list on the Units Homepage.

NOTE: If a user cannot edit a unit created by a different user, copying it will provide access to the content contained in the unit and the ability to edit accordingly. This action will not change the original unit. - Once it is determined which unit plan is exactly what is needed, click the button next to the unit. This will generate a pop-up window where some options will need to be selected. Set the Course, School Year, Subject, Creator, and Start/End Date. When copying a Unit, the Unit Name will remain the same. On this menu a user can choose to keep or remove the word "Copy" in the title. This menu also gives the user an option to copy assessments and lessons that are linked to the unit. Copying the assessments/lessons when copying the unit plan can save time by copying everything at once.

- Once the
 button is selected, eDoctrina will navigate directly to the Unit Editor, displaying an exact copy of the unit, providing a new unit ID#. The user can now customize the unit name and options accordingly.
Mass Copying Unit Plans
Users can also copy more than one unit plan at a time. Simply select the checkbox next to the units that need to be copied, then click the  button at the top of the screen.

A similar pop-up will appear as when copying a single assessment. The selected settings will apply to all copies that are created.

This process differs only in the fact the the user will not be navigated directly to the Unit Editor, but a resulting pop-up will appear indicating the copying process is complete.

If the "Copy Unit(s)" box does not automatically open, it is likely being blocked by a pop up blocker. Make sure to check the URL bar on the top of the page to “Allow pop-ups” or check the browser preferences.
02.C.1. How to Create a New Lesson Plan or Edit an Existing Lesson Plan
Creating a New Lesson or Editing an Existing Lesson
When a user desires to create a new lesson plan they can navigate to the Lesson Plan page by clicking on the "Lesson Plans" button on the eDoctrina Home Screen, or by utilizing the Planning > Lesson Plans option in the top Navbar:

A user can insert a new lesson plan by using the  button. This will prompt the user to fill out some basic information about the newly created lesson plan. All fields marked with a red asterisk must be populated:

If the district has multiple templates available for the created lesson the user will be prompted to select a template to apply to the Lesson.
Additionally, an existing lesson can be edited by utilizing the ![]() button:
button:

Once the Lesson Editor opens the user can navigate to the various sections of the lesson plan using the Navigation Buttons along the top row
- The Expand/Collapse All buttons will expand or collapse the view of all the sections within the lesson plan. The General/Standards/Assessments/Student Attachments/Discussion Board buttons will navigate straight to the corresponding section of the lesson plan.
- Save, Save & Close, or Close the Lesson Editor respectively. Users should remember to save any work before closing the window.
- The View Lesson button will allow the user to preview how this unit will appear to a student accessing this lesson online. Alternatively, the Print Lesson button allows the user to generate a preview of the print format of this lesson, which can then be printed from the generated file if desired.
The General Section
The topmost section of the Lesson Editor is the General section and contains fields for all of the organizational information.

- These important fields must be completed when creating a lesson. All fields marked with a red asterisk (*) are required fields.
- These filters allow you to link the lesson to Course, Class, and Unit information. Even though linking a lesson to a Unit is optional it is recommended so you can access and link any of the "unwrapped" sections of the standard to the lesson plan. It also helps to keep all lessons related to that unit in one place.
- Calendar Color allows you to color each lesson individually, so it will be easier to find it on the Lesson Calendar.
- The "Active Toggle" will set the lesson as active or inactive. NOTE: If a lesson is "deleted" it is set to an inactive status, and may be restored by switching this toggle back to "Yes". Only administrators can reactivate deleted items.
- The Date and Start/End Time fields allow you to specify a date and time for your lesson. This is especially useful if you wish to use the Calendar View. You can enter more than one date and time.
The Standards Section
This is the section where the user can link standards to the lesson plan. The way this section appears depends on whether or not this lesson is linked to a unit plan in the "General" section.
Adding Standards When Lesson is NOT Linked to a Unit
- Use the filters to find the standards you wish to link to this lesson plan.
- Drag and drop the standards into the "Standards" box.
Adding Standards When Lesson is Linked to a Unit

- Select the unit the lesson is linked to. This will cause the standards list below to show only the standards linked to the unit for faster access to the relevant standards. Additionally, unwrapped standards from the linked unit will also appear here for the user to incorporate into the lesson.
- Drag and drop or double-click on the standard(s) to populate the "Standards" box.
The Assessments Section
This section will display any linked assessments and allow the user to create a new linked assessment and/or link an existing assessment to the lesson.
The Content Section
The Content Section contains headings that have been customized to the school district's specifications. Each box contains a WYSIWYG Editor that allows the user to enter important information for the Lesson Plan. The user can choose to add content directly within each component or copy and paste information from another source. If the user chooses to copy and paste information, the  button in the editor will remove unwanted formatting.
The Attachments Section
This section allows you to attach any supporting materials the user wishes to include in their lesson. The "Add link" button will prompt the user to enter a URL to attach to the lesson. The "Upload file" button will cause the computer's file manager to appear to allow the user to select the file they wish to attach to the assessment.
The Student Attachments Section
This section will house any files attached to the lesson by a student if this lesson is assigned online.

Teachers now have the ability to simply hover over an attachment link that was uploaded by a student to get a preview of the attachment first. This is extremely beneficial so the teacher does not have to download every attachment uploaded by every student:

Discussion Board Section (OPTIONAL)
This section allows lesson editors, Admins and students the ability to post comments within a Discussion Board.
There are 2 options available when enabling the Discussion Board options:
1. Only creator and admins can view/edit:
This option enables the Discussion Board as well as allowing the creator and Admins the ability to view or edit items on the Discussion Board.
2. All editors can view/edit:
This options allows anyone that has editing access to the Lesson the ability to view/edit items on the Discussion Board.
Once the Discussion Board is enabled Users will see 2 sections (Teacher Discussions and Student Discussions). In order to add to the Discussion Board the User will simply type the comment in the text box and then select "Post" or "Post as Draft" to add to the Discussion Board Once a comment is added the User can then choose to "Reply", "Edit", "Delete" or "Publish" (for Draft comments).
Teacher Discussions:
This option is to be used for the teachers and Admins to be able to add comments to the Discussion Board.
Student Discussions:
This option can be used for the teacher and students to communicate with each other. The teacher can add the comment in the Discussion Board as shown above and then if the "Show on Progress" option is selected the student will be able to comment within the Lesson to add to the Discussion Board.
02.C.2. How to Utilize Lesson Planning's “Calendar View”
The Calendar View of eDoctrina's Lessons module has great utility to help teachers organize the flow of their lessons throughout the school year. To access this feature, navigate to the Lessons Homepage by selecting Lesson Plans under the Planning pull-down on the navigation bar.

The default view of the Lessons Homepage is the "List View". This view allows users to edit, copy, and print existing lesson plans while displaying a list of all lessons that match the selected filters. Select the "Calendar View" option at the top of the screen to toggle over to the Lesson Planning "Calendar View".

In the "Calendar view", eDoctrina will display all lesson plans that exist within the selected dates. The default view is the month view.

-
 : The navigation arrows allow users to quickly modify the displayed month and year. The single arrows change the month, while the double arrows will change the year.
- Selecting
 will navigate directly to the current date.
- Each lesson requires a description. By default, the calendar view displays only the lesson plan title to keep the screen concise. To view the description in the "Calendar view". Selecting the
 button will display(if entered) the description, unit, classes, learning standards of all lesson plans on the screen.

- The
 button allows users to quickly select the desired date that they would like to view.
- The "Calendar view" can be displayed by month, week, or day allowing users to see more details about a specific time period. The month view will sort lessons by time within each day. Selecting week or day will allow users to view a more detailed overview of how lesson plans are organized in the week or day, respectively.
The "Calendar view" offers the same tools as the "List View" as users can easily create, edit, copy, or print lesson plans by selecting the appropriate icons.

One of the main advantages of the "Calendar View" is that it is simple to move a lesson plan from one date to another. If the signed in user has editing permissions to a selected lesson plan, they can easily click and drag a lesson plan from one date to another. If the week or day view is selected, users can also move a lesson plan from one time to another.

It should also be noted that eDoctrina offers the ability to import the displayed lessons to a third-party calendar application, such a Google Calendar. Simply select the "Import to My Calendar" option at the top of the screen and follow the prompts to add each of the displayed lessons to a calendar. If only a few of the displayed lessons need to be imported, modify the filters to display only the lessons that are to be added to your third-party calendar.
02.C.3. Document Camera Tool
eDoctrina's Document Camera tool increases the functionality of any compatible document camera beyond scanning answer sheets. This tool can be used to project any document or resource, quickly add a resource to any lesson plan, or quickly save an image directly to the computer.
Projecting a Document
The only requirement for projecting a document is to have a camera that is compatible with the computer being used. Although all cameras may be compatible, it is recommended to use a document camera. To project a document through eDoctrina, navigate to the "Document Camera" link under the "Planning" tab.

This page will often open utilizing the default camera for the computer being used. Most computers will default to the built-in camera. To modify the active camera, which is done differently depending on the browser being used. The images below show how to do this on Google Chrome and Mozilla Firefox.
Once the desired camera is selected, the screen will now be projecting the viewable screen allowing for live interaction.

NOTE: Select the
 option hide the pull-downs on the left and make the projected screen larger.
Adding a Document to a Lesson Plan
The Document Camera tool can also be used to quickly add an image as a resource for a selected lesson plan. This can be done if and only if the lesson has already been created within eDoctrina.
If the desired lesson plan exists, simply select the appropriate options in the pull-down menus on the left to help identify the correct lesson to add the captured image to.

Once the image is properly placed in the viewable region, click the  button located at the top-right of the screen to capture the image.
A pop-up will appear prompting the user to enter the file name of the captured image. This field will be auto-populated with the current date/time, but should be modified here if needed.

Once the name has been entered, click the SAVE button. A confirmation will appear and the image will be immediately attached to the selected Lesson Plan.
This document will now be visible to students in their online Progress Account, if the Lesson is being shared.
Saving a Document to Your Computer
The Document Camera tool also allows users to save a captured image directly to their computers. To do so, place the document or resource in the viewable region of the camera and click the  button.

A similar pop-up will appear prompting the user to enter the Name of the image. The only difference in theis pop-up is that it allows the user to enter in a comment to accompany the scanned image.
Once the name and/or comments have been entered, click the SAVE button.
A PDF will be downloaded to the computer immediately. Accessing the save downloaded file depends on the browser settings, but can often be found in the "Downloads" folder.
The PDF will display the title at top and the comments on the bottom of the image.
2.C.4. Editing a Lesson in the Engage NY Set with Attachments Only
To navigate to the Engage NY unit plans, go to Planning>Units, then select "Engage NY Content" in the District/Set drop-down menu.
Some units and lessons in the EngageNY Content district/set have the PDF and Word versions of the units/lessons attached.
To view or print these units, click on the printer icon:

For these units/lessons to be edited, make sure "Engage NY Content" is selected in the District/Set filter, then click on the copy paper icon. This will allow you to copy the unit to your district's bank.

In the pop-up screen, select "Copy Lessons" and your district's name. You can also select school, course, subject, year and dates for the target unit/lessons. Once the destination is selected, click "copy".
Once the "copy" button is clicked, the new copied unit will automatically open.
To view the lesson plan attachments within the unit editor, scroll to the "Lessons" section or click on the "Lessons" heading at the top of the unit plan.

There are two ways to open/save the lesson plan attachments.
1) Click on the attachment links from the lesson section of the unit editor. This will allow you to quickly download the attachment.

2) Click on the edit pencil to open the lesson editor.

Click on the "Attachments" heading at the top of the page or scroll down to find the lesson attachments.

One way to edit the lesson is to save the Word version of the lesson to your computer, make your new changes, save the document again with a different name, then upload the new version in the lesson editor as an attachment.

(The original lesson plan attachment could either be saved as it is, or it could be deleted by clicking on the trash can icon to the far right.)
Additionally, you could record your modifications and notes right in the lesson template boxes.

Once you've made the desired modifications, don't forget to click "Save" before closing the screen.

02.D. Curriculum Reports in eDoctrina
All of the Planning Reports in eDoctrina are under the "Reports" dropdown located in the menu bar.

How to Run the Scope and Sequence Report
The Scope and Sequence report is designed to show how much you are going to teach of a subject over the course of a semester/year and in what order.
This report can be filtered by year, course, grade, subject, and creator of the unit(s). We also recommend including Standard Descriptions (by clicking the "Show Standard Descriptions" button which print any unwrapped statements broken down in a Unit Plan) and Parent Standards (by clicking the "Show Parent Standards" button that will show standard set headings).
Users also have the option to change what content they are pulling from the unit plan using the "Column 1, Column 2, and Column 3" drop-downs. These categories are based on the fields within each unit template.

The report can be printed in both PDF and Excel formats.
How to Run the Curriculum Map Report
The Curriculum Map report is great for vertical planning and helps teachers find a "common thread" of understanding among subjects and/or units. This flexible report clarifies how different subjects, grades and courses relate in terms of sequence and dependency.
The filters allow a user to select more than one: -Grade -Subject -Focus areas (listed under "What to Show" dropdown)

The report separates the grades and subject in different columns to allow the user to compare the timeframe of the unit in addition to specific content.

Like most other reports, the Curriculum Map report can be printed in both PDF and Excel formats.
02.E. How to Use the Standards Usage Report
The Standards Usage Report allows users to easily view where standards have been linked to Units and Assessments in eDoctrina. Having a report that lists usage of all relevant standards provides teachers and administrators with a more comprehensive view of how and where standards have been used for a specifc standard set, school, school year, subject area, course, and/or grade level.
This report is accessible from the Standards Homepage, which can be accessed under the Planning pull-down within the navigation bar.


A pop-up window will appear prompting to select various report settings for this report (shown below). Although none of these options is a required field, each selection will filter the generated report accordingly. This allows users to view standards usage for a specific subject, grade level, year, and/or course.

NOTE: Selecting the "Show linked Standard only" checkbox will significantly reduce the length of the generated report as it will only display standards that have been linked to a Unit or Assessment.
The Standards Usage Report provides the user with information on where standards were used:

Assessment names are displayed as hyperlinks that navigate directly to the item-analysis report and question where this standard has been linked.

02.F. How to Create Multiple Unit and Lesson Templates
Many districts use a standard format for Unit/Lesson Plans that are created using eDoctrina within their district. If a standard format exists, it is a good practice to create/configure a customized template before creating any Units or Lessons in eDoctrina. This will enforce consistency and allow for proper alignment when viewing a Curriculum Map or Scope & Sequence Report. This task can only be completed by a District Admin profile type.
To create or manage Unit or Lesson plan templates, follow the steps below, use the navigation bar to find the District Homepage (Settings==>Student Information Data==>Districts).

Locate the district in the displayed list and click the  button to enter the District Editor.
Scroll down the District Editor until the Unit Descriptions and Lesson Descriptions are displayed on the screen. All existing Unit and Lesson Plan Templates will be listed in the respective box. A template named -Default description- will be the first option for all districts and will be the first option that users see when creating a Unit or Lesson in eDoctrina's Units Module. This template cannot be deleted and the title of this template cannot be modified; but the fields within can be updated if needed. All other templates that have been created will be listed here and can be modified by District Admins.
 button at any time, but it is recommended to keep these the same throughout the year to maintain consistency.
Click the  button to create a new template.

One the "Create unit description" pop-up window, there are many configuration options that will vary by district and/or template:
- Choose which school(s) within the district that will have access to the the Unit/Lesson Plan template. Leave this field blank if all schools in the district should have access to the template.
- Choose which grade(s) will have access to the the Unit/Lesson Plan template. Leave this field blank if all grade levels will be using the template.
- Choose which subject(s) areas will have access to the the Unit/Lesson Plan template. Leave this field blank if all subjects will be using the template.
- Choose which course(s) will be using to the the Unit/Lesson Plan template. Leave this field blank if all courses will be using the template.
- Provide a Name for the Unit/Lesson Plan template. This is how the template will appear in the pull-down menu within the Unit Editor.
- Control visibility of linked content: Select this checkbox to allow District Admins to control which linked assessments, lesson plans, and attachments will be visible to teachers within the Unit Plan. This feature is mostly used for creating master Unit Plans that allow multiple users to link content to a Unit Plan without it being visible to all users that have access to edit.
- The Description defines what the Title of the field within the Content section of the Unit Editor. Some example descriptions would be Anticipatory Set, Learning Activities, Essential Questions, etc...
- Lock for teacher edit restricts Teacher profile types from editing the fields within Unit Plans that utilize this template. This is a great option if Unit Plans are standardized because teachers will not be able to edit the Content fields with this option enabled.
- Content fields can be pre-populated by entering the information into the Pre-fill box. This is often used if there is a specific template to follow for one or many of the Content fields.
Once new unit or lesson plan template has been saved, it will appear in a drop down menu when a new unit or lesson is created.

03.A. How to Create an Assessment Answer Key
There are two main options when creating an assessment in eDoctrina. Users can build it from scratch -- that is, writing questions or selecting them from an existing question bank -- or they can create an answer key, matching up question types and choosing the correct responses. This would occur if an educator has an existing assessment they would like to continue to use. In this case, all that is necessary is an answer key.
Click here to view the Help Video
To create an Answer Key, begin by navigating to the Assessments Homepage.

Click the
 button in the top left of the Assessments screen to create a new assessment.

A pop-up will appear prompting the creator to enter some required information about the assessment being created. Fill in the general information (indicated with red asterisk) and select "Answer Key Only".

The next step allows the creator to define how eDoctrina will “Add Questions” to this assessment.
It is best practice to enter the number of questions on their assessment, select the most-commonly used question type, the most common number of choices for each question (if applicable), the default correct answer (if applicable), and the default point value of each question. Once the desired information is entered, click “Create Assessment” to enter the Assessment Editor.
The next step is verify and/or modify the options that have been selected for each question. If using Multiple Choice or True/False question types, the correct answer and number of available choices will have to be selected if they differ from what was initially created. If questions are valued differently throughout the assessment, this will need to be modifed as well.
Additional questions may be added by clicking "Add Questions".

Questions can be re-ordered by clicking and dragging the question boxes to the desired location. Questions can also be removed from the assessment by selecting the  located in the top-right of each question.
Linking Learning Standards
Each question can be linked to one or more learning standards. To link standards to questions, utilize the filters to identify the standards to be added to each question and simply drag and drop them to the bottom portion of the respective question box. For more information about how to add standards to eDoctrina, please see our help guide on How to Add Standards.

If the user is linking one particular standard to multiple Assessment Questions, double click on the standard to select the question numbers it should be linked to.

NOTE: If the assessment is linked to a unit plan, only standards from the unit will be available to link to questions.
For more information about uploading a PDF to use in an Online Assessment Click Here
04.C.1. Scanning Answer Sheets
Scanning answer sheets using a copy machine or scanner is one of the most popular ways to collect assessment data using eDoctrina answer sheets.
Listed below is some basic information about scanning answer sheets:
Scanning is typically done using a photo copy machine or scanner.
It is important to follow district specific scanning instructions. There are often special settings to be selected on the copier to ensure best scanning results. Failure to follow these scanning instructions can result in missing or incorrect data.
Each answer sheet MUST be completely filled out. Do NOT let students leave blank answers and be sure students clearly erase any mistakes or crossed out responses.
Answer sheets can take up to 24 hours to process during high volume scanning times. However, turn around time is generally much quicker!
An automated email will be generated once the data has processed. If this email is not received, verify the email address is in eDoctrina and that the assessment has been linked to the proper course. Please DO NOT RESCAN without checking for the results on the Teacher Dashboard.
If the data has not processed after 24 hours AND this has been verified through the Teacher Dashboard, please contact the school's technology department to confirm the executed scanning procedures are correct. If there are further scanning issues, they can work with the eDoctrina team to troubleshoot any problems.**
*WEB CAM Scanning: Don't forget that it is possible to scan web cam only answer sheets using a document camera or our mobile application for instant data. Please visit our help guide on Web-Camera Answer Sheet Scanning for more information on this option.
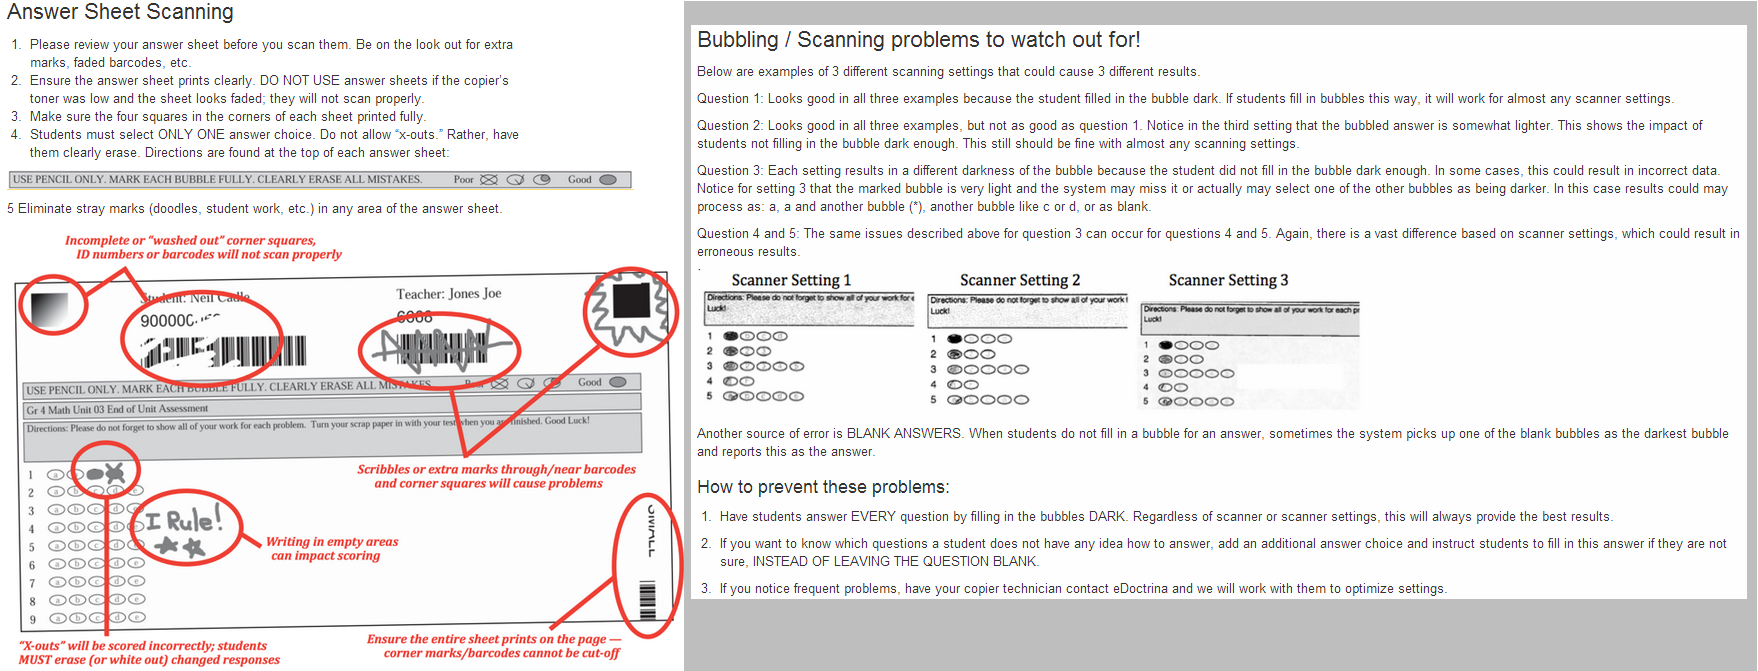
For more information on answer sheet scanning and ensuring the highest quality of data, please review the images below.

04.C.2. Web-Camera Answer Sheet Scanning
eDoctrina offers many options for teachers and administrators to gather assessment data. Web-camera Answer Sheets are the best and most comprehensive option if a traditional scanner is unavailable, while providing ultimate flexibility for our users to process assessment data immediately from within their classroom or wherever they may be.
Click here to view the Webcam Scanning Help Video
Webcam Answer Sheets can be processed using the built-in camera on any computer, compatible document cameras, and our eDoctrina Scanning Application. For these tools to work, it is important to note that the only type of Answer Sheet that is supported is the WEB answer sheets that can be printed from the Teacher Dashboard. For more information about how to print answer sheets, please visit our help guide on Printing Answer Sheets

Scanning Web Answer Sheets
After the WEB Answer Sheets have been printed and student responses have been recorded on them, it is now time to scan and get the assessment data into eDoctrina.
To begin the scanning process, navigate to the Teacher Dashboard, and select the "SCAN Web Answer Sheets" button to open the OCR Camera.

The OCR Camera can also be accessed within the Answer entry/verification screen, as there is a button in the top-right of the screen.

After navigating to the eDoctrina scanning tool, please select the appropriate camera for the active browser, as eDoctrina may default to the built-in camera if available. This tool is designed to identify any connected devices that are cameras and changing which one is active could be as easy as finding the camera icon in the browser's address bar.
| USING MOZILLA FIREFOX | USING GOOGLE CHROME |
 |
 |
NOTE: The scanning tool is not supported using SAFARI.
Once the desired document camera is selected, it is now time to scan the student's completed WEB answer sheets.
Place the completed WEB answer sheet in the viewable area of the active camera, so it appears on the screen with their natural orientation (not upside-down) and with the QR Code and corner markings clearly visible.
The scanning tool will make a sound when the WEB answer sheet is scanned. An image of the processed scan will appear on the right side of the screen and the recorded answers will display on the bottom.

- This area is a live display of the viewable area of the camera. Each time the camera discovers a new answer sheet (by analyzing the QR Code), the rest of the screen will reflect what information is on the answer sheet.
- Once a WEB answer sheet is successfully scanned, eDoctrina will display some basic information regarding the scan. The Assessment Name, Assessment ID#, Student, Student ID, and Score will display so teachers can quickly verify that the scanned information is correct. If the information is incorrect or the scan has been corrupted in any way, the option to
 is available so teachers can correct any mistakes.
- The successfully scanned image will display in this area. This image will display colored circles to identify the information that was retrieved during the scan. If the information looks to be obstructed for any reason, it is best practice to rescan the image so that it is scanned correctly.
- The scanned responses for each answer sheet will display in the "Student Answers" portion of the screen. It is possible to manually select a student response for each question (if needed) by accessing the pull-down for the desired question.
- The
 button allows the teacher to scan web answer sheets without displaying the results. This is often used if this screen is projected somewhere in the classroom.
- The
 button allows the teacher to display the correct answers for each question on the screen while scanning.

- The
- If the active document camera is having trouble scanning web answer sheets, adjust the sensitivity setting. This can often help to increase scanning efficiency.

- This information button contains a legend that describes the possible colors that are displayed, as a quick reference.

Scanning Tips & Tricks
- Try moving the answer sheet. In some cases it recogonizes better when the sheet is aligned towards the upper left corner of the viewing window. Different locations work better depending on camera and lighting conditions.
- Adjust the lighting from your camera or in your room or modify the brightness and/or contrast settings (described above). Shadows can cause problems with scanning.
- Try selecting button as this will force the camera to look for a new QR Code.
- Ensure the answer sheet is showing upright. Upside-down sheets will not scan.
- Ensure no other programs are using the camera. Close all other browsers and programs that might be using it.
- Ensure the camera is plugged into the computer.
- Restart the browser and log back into eDoctrina AFTER connecting the camera.
- Test the camera on http://webqr.com/ by clicking on the webcam option. If the camera is not recognized here, the school's technical support should be contacted. If an image displays here, but not in eDoctrina, please email [email protected] with screen shots and information about your camera.
05.A. How to Use Answer Entry/Verification from Teacher Dashboard
Data verification after scanning student answer sheets if often required as it is difficult to predict how students fill in the bubbles on answer sheets. This tool provides teachers the opportunity to take a second look at any questions where a student left an answer blank, selected more than one answer, and/or provide a score for any "Teacher Scored" questions.
The Answer Entry/Verification tool is accessible from the Teacher Dashboard for a particular assessment OR a user can access a place that outlines ALL assessments where student answers need to be verified.
To learn how to verify data using our Answer Verification Screen, click here
Verifying Data for Specific Students
Once a user scans assessment data, chances are that at least one student's bubble sheet will need to have answers verified. There is a way to see if student data is in need of verification.
STEP 1. In the Teacher Dashboard, use "Select students" filters to select the students to be included. Please note that the "Course" and "Class" are the only required selections, while the "Select Student(s)" pull-down will automatically populate with the students enrolled in the selected classes. The "Select Student(s)" option should only be used to select an individual student or group of students.
STEP 2. Manipulate the second row of filters to locate the desired assessment. The list of assessments can be rather extensive and it is often helpful to type the assessment ID, name, or affiliated "tags" in the search bar to easily locate the desired assessment.*
STEP 3. Select the "Class Summary Report" to view the student data that needs to be verified

In selecting the "Class Summary Report", there are a few formatting options to choose from. The students can be sorted by last name, first name, or student ID number. There is also an option to export the report as a CSV, or for data to only be shown where the assessment is linked to the course.

Once the Class Summary Report runs, any students that have data that needs to be verified will have a message in the Score column, under their name, stating:


Clicking the blue link will open up the Answer Verification screen for that student alone. Any data in yellow can be verified by the teacher and teacher scored questions can be given point values. Once any data is updated, or a decision is made the keep the data as is, the "Ver" checkbox should be selected to indicate that the data has been verified by the teacher.

Once the student data has been verified, the Answer Verification screen can be closed and the Class Summary report can be re-run to view if more student data needs to be verified.
CHECK Screen Verification
Data can also be verified using the CHECK screen.
From the Teacher Dashboard, select the appropriate students and assessment, then click the "Check Student Answers" button to open the "Answer entry/verification" screen.
Select the "CHECK Student Answers" button to open the Answer entry/verification screen for all selected students


Click here for more information about the color schemes.
Answer Entry/Verification

(1)This section represents all of the data that has been recorded for the selected student(s) and assessment.
(2) This column contains the current percentage of the points earned for each student, on the selected assessment. It also serves as a hyperlink to the Individual Student Report. If any changes have been made to student responses, please save and refresh the page to display the most recent percent.

(3) This column will display three different icons (if applicable):
 : The computer icon will display if the assessment has been assigned to the student online. Hovering over the icon will display when the student first accessed the assessment and when they finished the assessment.

 : The camera icon will display if there has been an answer sheet scanned for this student. This is an extremely helpful resource because it allows the teacher to review answer sheets without carrying around a stack of papers. Click on the icon to view the image to the right of the data.

(b) Bubbles highlighted in RED are incorrect answers.
(c) Bubbles highlighted in BLUE are Teacher Scored answers.
(d) Bubbles highlighted in yellow indicate the student left the question blank or the student selected more than one answer choices for the question (when only one answer is needed).
(4) This checkbox will be automatically be marked if a student has completed the assessment and submitted the results.
(5) The "Ver" checkbox will need to be checked ONLY if a teacher has verified they are leaving a yellow (invalid) answer uncorrected for a student. For example, if Johnny left a question blank on the answer sheet it would scan in to eDoctrina as a yellow box on the Answer Entry screen. The teacher would have two options… (1) to conference with the student to get an answer and fix it in Answer Entry or (2) leave the answer as blank because it was the students error. If the teacher chooses option 1, the teacher fixes the mistake and does not worry about the “Ver” box, if the teacher chooses option 2 then they would click the “Ver” checkbox to verify that that they have approved the mistakes on the answer sheet.
(6) The "Vis" checkbox must be checked in order for students to see their results when logging into their PROGReSS Student account.
(7) The Min/Max buttons allow a user to make all of a student's responses incorrect or correct. Some users find that it is easier to use the max buttons so they only need to enter the student's incorrect answers manually, which can save time.

Use caution when using these buttons, especially when changing all student scores Min or Max. To prevent unintended use of this button you will receive a pop-up warning.

Teacher Scored Questions
The cells with a WHITE background and a "black triangle" in the top right corner indicate that the question is a Teacher Scored question. Clicking on the "black triangle" will open a pop-up window that allows the teacher to view student responses that have been entered online. If applicable, this pop-up window will provide the option to view any scoring guides or rubrics attached to the question, as well as a passage.

Select the
 button to view any attached rubrics, scoring guides, or passages.
A pop-up will appear containing three tabs to choose from: the scoring guide, rubric or passage:

The earned points for the question can be entered by selecting them in the "Answer Points" pull-down. Teacher comments, which have the option to display on the Individual Student Report are entered here.
The answer verification screen is also a great place to enter scores manually. Teachers have the option click the appropriate box and a drop-down menu will display the options available. Click the appropriate response from the drop-down and it will show in the box (which is color-coded).

This page automatically saves, so once you are done working, simply click the "Close" button in the top right corner of the screen.
04.C.3. eDoctrina Mobile Scanning Application
It is possible to scan Web Answer Sheets using the eDoctrina Answers Scanner app. All that needs to be done is to download the free eDoctrina Answers Scanner app from the Apple App Store or Google Play Store.
Logging In Without Single Sign On
After the app has completed downloading you may tap the eDoctrina Answers Scanner icon and log in using your regular eDoctrina login credentials:

Logging In With Single Sign On
If your district uses a Single Sign On solution such as ADFS then you will need to log in to eDoctrina from your mobile device. Once logged in you will see a button on the Home Page titled "Launch Mobile Scanning App". Tap on this button to open the eDoctrina Scanning App and be automatically logged in:

Scanning
After logging in you're ready to scan your web answer sheets. Use the red guide marks to help you align your camera to the answer sheet:

You'll hear a "beeping" sound to indicate that you have scanned the answer sheet successfully:

From here you can save the result by touching the "Save Button" or discard the result by touching the "Skip" button.
Logging Out
Once you have finished scanning your answer sheets you may log out by touching the menu button and then selecting "Log out":

03.B.1. Building Questions
Click here to view the Help Video
Navigation to the Assessment Editor
- Navigate to the Assessments homepage and select the
 button in the top left corner.
- Enter the assessment’s general information. Mandatory fields are denoted with a red asterisk.
- The next prompt will ask how the creator would like to enter the questions for this assessment: by creating an answer key only assessment, building questions, or building a rubric.
- By selecting "Build Questions", the creator will see another pop-up prompting the creator the enter the initial information on how to “Add Questions” (see below). Here, users enter the number of questions on their assessment as well as the most-commonly used question type, the most common number of choices for each question, the default correct answer, as well as the default point value of each question. Click
 to enter the Assessment Editor.

Entering Questions in the Assessment Editor
Once inside the Assessment Editor, eDoctrina offers various tools to help the assessment creator add their desired questions to the assessment. It is important to know that questions are entered using a WYSIWYG editor, giving the creator ultimate flexibility to enter questions how they desire. Each individual will develop their desired methods or habits when entering questions, but it is important to know the tools that are available, so no time is wasted. The ONLY view that will allow question entry is the "Questions" view:
To enter information into the question body, hover the cursor over the blank space below the word "Question" and click in the highlighted area once the "click to edit" prompt appears. This will open the WYSIWYG editor for the selected question and allow the creator to enter their desired question text:
Type the question directly in question area.
The process is nearly the same for entering the answer choices for Multiple Choice questions. Click the area next to each answer choice:

After question/answer information has been added/edited, a few new buttons appear for each question:


|
The Print button displays how the question appears in the two or one column printing options. This is a great tool to use to ensure a question is formatted properly before printing a hard copy of the assessment. |
 |
The Manage Print Settings button allows the creator to set number of lines, the line height, and whether or not to show lines on the printed assessment. These options apply to teacher-scored questions and will not affect any other question type. |
 |
The Edit Metadata button allows the creator to include more descriptive information within the question, such as Bloom's Taxonomy, Webb's Depth of Knowledge, Difficulty levels, informational tags, error codes, and much more. Although this extra information is not required, it often enhances the assessment database significantly. |
 |
The Online Tools button should be used if offering online assessments. For more information on the tools available, please see the Online Assessment Features help guide. |
 |
The Parse button automatically distributes answers from the question box and is a great tool to use if multiple choice questions are being copied and pasted from another source. For more information on how to use the tool properly, please visit the Parse for Answers Tool help guide. |
 |
The Record button records an audio file that is attached to the question for students to access while taking this assessment online. For more information on recording audio files, please visit the Online Assessment Features help guide. |
 |
The Upload to Question button allows the creator to include an attachment to the specified question. Students will be able to access the uploaded file when taking the assessment online. |
 |
The Move Question button will be available to the creator of the assessment. It will not be available if the user does not have editing permissions to this assessment. If questions need to be moved within the assessment and the button is unavailable, consider Copying the Assessment |
 |
The Edit Question button will navigate the user to the Question Editor for the specific question. |
 |
The Hint button allows the user to link a hint to the question that can be seen by the student when taking the assessment online. |
 |
The Special Instructions button opens a WYSIWYG text box to enter Special Instructions for this question. Text in this box will appear printed above the question on the printed test. |
 |
The Scoring Guide button opens a WYSIWYG Text Box to enter a Scoring Guide or Teacher Instructions for this question. Text in this box will appear printed on the "Assessment Map" should the user choose to print it. |
 |
The Delete button will remove the question from the assessment. |
03.H.1. Parse for Answers Tool
The task of entering multiple choice questions into eDoctrina (or any assessment software) is often a difficult and time consuming because it is required to not only enter the question, but all of the answer choices as well. The "Parse for Answers" tool is designed to make this process less arduous. With this tools, it is possible to "copy & paste" the entire question (with the answer choices) into the question body and have eDoctrina distribute the answer choices to the required fields.
This tool is often used when taking pre-made questions from another source and adding them to an eDoctrina assessment with the Assessment Editor.
The Parse for Answer button appears in the question tools located in the header of each question:

Directions:
- Find the multiple choice question on the website or doucment that needs to be added and copy it. A sample question from a random website is used in the example below.

NOTE: Copying a question can be done by using the keyboard shortcut CTRL + V on a PC or command + V on a MAC. - Paste the entire question with all answer choices in the Question box for the desired question.
NOTE: Pasting into eDoctrina must be done by using the keyboard shortcut CTRL + V on a PC or command + V on a MAC - When copying and pasting from an outside source, it is highly recommended to highlight the text and click the
 button to remove any foreign formatting. This clears any "behind the scenes junk" that may have copied over from MS Word or another source that may prevent the "Parse for Answers" tool function properly.

- Click the Parse for Answers button. The result should distribute the answer choices to their designated answer boxes.

NOTE: The number of answer choices will update to what has been distributed, but the correct answer still needs to be selected.
Extra Hints:
- Although the Parse for Answers tool is great, it still has some restrictions. It seems to be most effective when using the following answer choice formats.

With this in mind, some questions require a little extra formatting in order for the Parse for Answers tool to work properly. - It should also be noted that the Parse for Answers tool looks for a consistent pattern that included punctuation(.) or closing parentheses(")"). If the question body or the answer choices include one or many of these characters, it could prevent the tool from working as desired. Try to remove this type of formatting before the parse button is selected.
- Once the answer choices are distributed, the function cannot be undone. If a mistake has been made, the best option is to delete the question and start over. Otherwise, each answer choice must be deleted manually.
The Parse for Answers tool is also available within the Question Editor:

Once the answer choices have been distributed in the Question Editor, simply click the "Save & Close" button in the top right corner of the screen to navigate back to the Assessment Editor. The changes will be reflected there.
How to Use the Advanced Search Features
To help locate items within the database, the Question Bank has a more advanced set of filters available to all users. Simply click, “More filters” to access this feature.

A new box will appear displaying tabs and filters to navigate for finding questions and assessments. The Basic and Advanced Attributes can be used to narrow your search for items from any available Question Bank. You can choose which filters you would like to use to locate items. You do not need to fill in all filters for items to complete a search. Simply use the filters that are most useful to you.

The Education Frameworks vary according to the Question Bank you are searching. The chart below illustrates which Banks contain the metadata for each Education Framework.

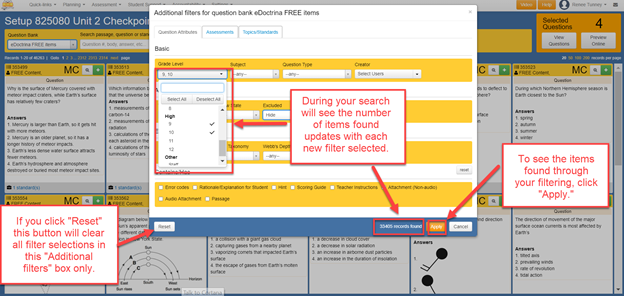
You can continue to narrow your search using the “Contains/Has” elements shown at the bottom of the filters window. By checking each additional box, you are focusing your search to items containing the element(s) you have selected.

The chart below illustrates which banks currently have items containing these elements. Please note that at any time, users are able to enter features such as Teacher Instructions, Attachments and Hints to questions they select and/or create.

As you filter, the number of records containing the information you have filtered for will automatically update here in the additional filters box. To see the items found through your search, click “Apply.” This will redirect you to the Setup screen where all items matching your search will be populated. If for any reason you need or want to clear your filter selections, simply click “Reset” and all filters will be reset within the "Additional features" box only.
Current Assignment Dashboard
Click here to view the Help Video
The Current Assignment Dashboard is designed to be a teacher's go-to screen for managing assessments. It displays all the tests that you have assigned during the school year and shows you how many students have submitted the assessments, how many have not yet submitted the assessment and if any of the assessments need scoring and verification.

How to open the Current Assignment Dashboard
To open the Current Assignment Dashboard, start on the Teacher Dashboard and click the "Assignment Dashboard" button on the top-right.

The columns on the far right shows the number of Verified out of the total number of students assigned the test. When the number of Verified students equals the number of assigned students you will see a green checkmark indicating that the assessment in that row has been completed for all students.

Parts of the Dashboard
The dashboard is interactive so that you can drill down into the data by clicking on different parts of the screen.

Legend - Interactive Parts of the Assignment Dashboard
- (1) Click the (+) icon to the left of the assessment name to breakdown the data by class section
- (2) Use the filters on the top of the screen to change to a previous school year or to display data for just a specific course that you teach.
-
(3) Change the sort order by clicking the sort buttons
 in any of the column headers.
 - (4) Click a number hyperlink in the "Unverified" column to open the Answer Entry screen and see which students have Unverified tests that need to be scored.
- (5) Click a number hyperlink in the "Not Submitted" to easily reassign students to a test if the testing date range has passed.
- (6) Click the number hyperlink in the "Assigned" column to open the Answer Entry screen and see ALL students you've assigned the test.
- (7) Click the report icon to the left of the class name to open the Assignment Status Report in a new tab for that class section.
- (8) Click the class section name to open the Teacher Dashboard and automatically select the assessment and class. This is a great short cut if you wish to run other reports without having to search for the students and the assessment again.
- (9) Click the Assessment Name to open the Assessment Editor and edit question data or test configuration options. ( If you do not have edit rights for an assessment , the assessment name will be displayed as plain text and not as a hyperlink).
Student Access column values
The "Student Access" column indicates if students are within the Assignment Date Range and whether or not they can still access the test. If some students have not submitted the test and the "Student Access" columns indicates that the window has closed, you can easily reassign the test to the students by clicking on the number hyperlink in the "Not Submitted" column.

03.C.1. Using Assessment Banks
Creating assessments in eDoctrina is a great way to collaborate and share content with other teachers in the district. If any user creates an assessment in eDoctrina, the assessment will be available in the district's assessment bank and can be copied by any other user in the district for their own use and customization. At eDoctrina, we understand that creating assessments can often be a very time-consuming task. Knowing this, we offer extra assessment banks, such as the eDoctrina Items Bank, that allows users from any district to copy the content and use in their own classrooms. There is also an extensive list of outside vendors that provide questions and assessments to subscribing districts within eDoctrina. This help guide will outline how to use assessments that exist in all of these assessment banks.
- All available assessment banks can be viewed from the Assessments Homepage. Navigate to this page under the Assessments pull-down in the navigation bar or by selecting the "Assessments" button on the Home Page.

- On the Assessments Homepage, locate the Test Bank filter. The options within this filter will be the user's district (which contains all ditrict created assessments), eDoctrina Items Bank (which contains all complementary assessments entered by eDoctrina), and any other assessment bank that the district subscribes to.

- Selecting the desired Test Bank will display a list of all available assessments. Users only have the ability to edit assessments that they have permission to, so the only options for these listed assessments will be to copy the assessment, view the assessment online, and print the assessment.

NOTE: Before copying an assessment, it is a good idea to view the assessment first to make sure it contains questions that are relevant. - Once it is determined that an assessment is exactly what is needed, select click the
 button next to the assessment. This will generate a pop-up window where some options will need to be selected. Set the School Year, Date, and the Marking Period (if using report cards). By default, copying an assessment will also copy the linked learning standards. If the linked learning standards are not applicable to the district, unselect the "Copy Standards" checkbox.

- Once the button is selected, eDoctrina will navigate directly to the Assessment Editor, displaying an exact copy of the assessment, creating a new Assessment ID#, that now lives in the user's district Test Bank. The only difference will be that the Assessment Name will have the word (COPY) at the end of the title, so be sure to customize the title accordingly.

Users can also copy more than one assessment in one action. Simply select the checkbox next to the assessments that need to be copied, then click the button at the top of the screen.

A pop-up will appear similar to when copying a single assessment. The selected settings will apply to all copies that are created.

This process differs only in the fact that the user will not be navigated directly to the Assessment Editor, but a resulting pop-up will appear indicating the new assessment ID#'s that have been assigned to the copied assessments. To navigate to the Assessment Editor, just click the "Resulting Assessment ID" to navigate to the the Assessment Editor for the desired assessment in a new tab on the browser.

NOTE: Keep the tab with the pop-up open in order to visit each assessment. Otherwise, it is a good practice to write down the resulting Assessment ID#'s.
03.H.3. Using Error Codes
Setting up an assessment for error codes
Error codes are assigned to a question in the question editor.
From the assessment editor, click on the edit pencil for the question / rubric item you want to add error codes for:

Once the editor is open, scroll down to the question area and find the error code tool to the right of the question.
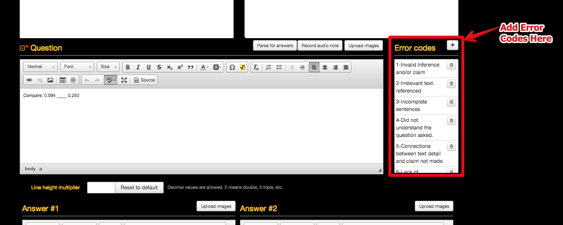
Assigning Error Codes using the Teacher Completed Assessment Screen
Open the Teacher Completed Assessment Screen from the Teacher Dashboard
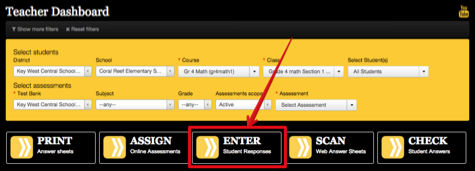
Each question that has Error Codes assign will have a drop-down option to select the appropriate Error Codes for the current student.
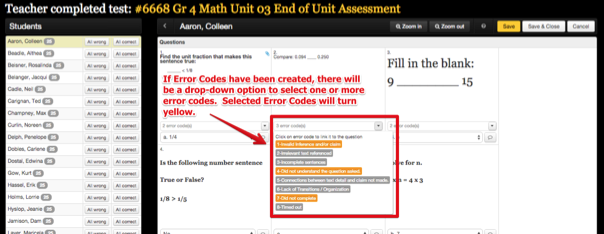
Please refer to the Help Guide on the Teacher Completed Assessment screen for more information
Once Error Codes have been entered, the Error Code Report can be run from the Teacher Dashboard
Select the Additional Reports Button

Then select the Error Code Report
03.E.1. Proficiency Tables
The are many variations of assessments that can be created within eDoctrina and many different approaches to grading these assessments. eDoctrina's solution to accommodate for all these variations is a proficiency table. Questions within an assessment are assigned point values, then students earn a score out of the total points on the assessment. This produces a percentage score for each student and it is up to the assessment creator to tell eDoctrina what proficiency level is to be assigned to the earned percentage scores. Grading scales are unique by nature, so linking a proficiency table to an assessment becomes an essential part of creating a quality assessment.
Proficiency Tables have their own section within the assessment editor. Once an assessment has been created and the appropriate point values have been assigned to each question, click on the "Proficiency Table" tab.

- The
 button should be used when creating a new proficiency table. This option should only be used if the proficiency table will ONLY be used on this assessment. Upon selecting this option, a pop-up window will appear prompting the user to enter some basic information about the level.

-
Required Fields: Enter the minimum and maximum percent that will be mapped to the selected level. The Proficiency Level also needs to be selected for the available options in the pull-down menu. Once these aspects have been assigned, the minimum requirements have been met to create a proficiency line.
NOTE: If a desired level does not exist within the options in the pull-down, contact a district administrator at your location to add it. To add levels to the database, please visit our help guide on Result Proficiency Levels -
Optional Fields:
- RTI Target: When using the student goal module, setting an RTI Target is essential to identifying when an intervention may be appropriate for a specific student. The RTI Progress Monitoring Report will highlight the RTI target on the report. It is a best practice to indicate only one RTI target per assessment to indicate what the target level should be.
- Levels 2 through 5: There are some scenarios where multiple levels should be assigned to a specific earned percentage score. If more than one level has been assigned to a specific range of scores, data reports will display all levels separating them by a comma.
- Score: The score field exists so users can openly define a result level. If entered, data reports will display the entered score. There is no character limitation for this field, but it is recommended to keep the Score concise so the format of the data reports is not jeopardized.
Most districts will have the 4-level proficiency table available by default and this is shown, as an example, below.
-
Required Fields: Enter the minimum and maximum percent that will be mapped to the selected level. The Proficiency Level also needs to be selected for the available options in the pull-down menu. Once these aspects have been assigned, the minimum requirements have been met to create a proficiency line.
- eDoctrina offers two types of proficiency tables. The default type is the Standard, percent-based, which is the most widely used proficiency table type. Some assessments hold grading schemes that are more advanced and require modified calculations to arrive at the result levels. For more information about this, please visit our help guide on Creating a Two-Dimensional Proficiency Table.
-
 allows users to link an existing proficiency table to the assessment. In many occasions, proficiency tables are standard across a district and will already exist in the district database. If a proficiency table like this is necessary, find it in the pull-down and select it.
NOTE: If this option is selected and a proficiency table already exists, the selection will overwrite any previously entered lines.
If there is a proficiency table that will be used on more than one assessment, it is recommended to add it to the available selections by navigating to SETTINGS==>DATABASE SETUP==>ASSESSMENTS==>PROFICIENCY TABLES.
For more information on how to add a proficiency table to the district database, please visit our help guide on Creating a Custom Proficiency Table.
Once the proficiency table is added to the district database, users across the district can easily link the table to any assessment as well as set it as the default table for their profile. By default, eDoctrina will not automatically link a proficiency table unless it has been set as a default with the user's account. For more information on how to do this, please see our help guide on Customizing Personal Settings. -
 allows user to quickly enter multiple line s in the proficiency table. Once the button is selected, a pop-up window will appear prompting the user to enter the amount of lines that should be added to the proficiency table.

After the desired amount of lines have been entered, a proficiency table will be added to the assessment by evenly distributing each result level amongst 100%. By default, the result levels will be automatically assigned starting at 0 increasing by one unit for each successive result level.
- By default, eDoctrina will only display the primary level that has been entered for each respective result level. If more details have been entered, select the
 button to display attributes related to Levels 2 through 5 and the Score (if applicable). When the additinal attributes are displayed, the proficiency table will look simlar to the following image.
03.F. How to Print an Assessment
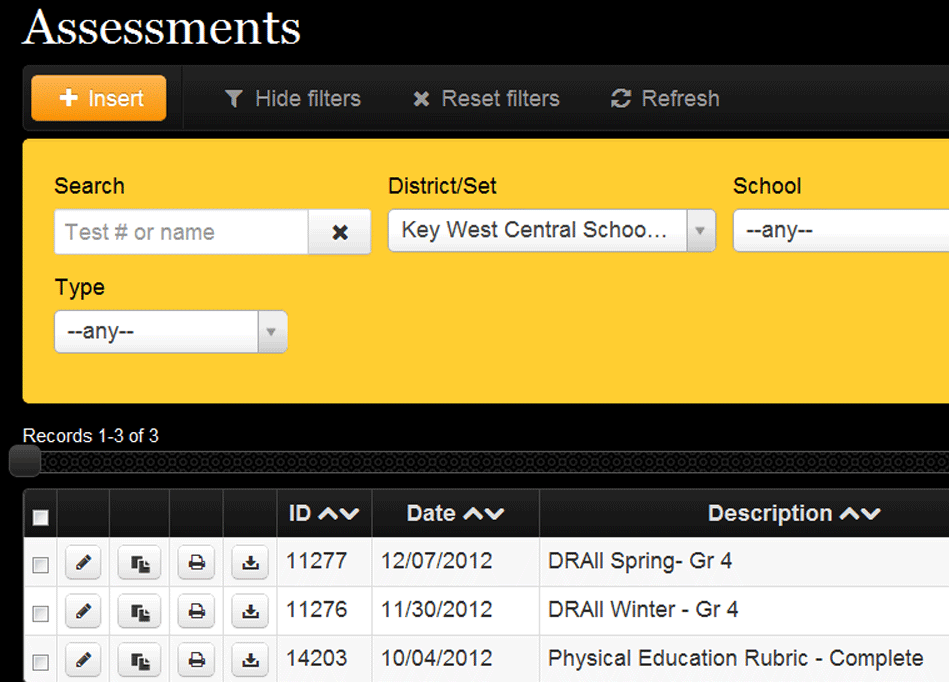
To print an assessment to give to students or an assessment map for your use:
1.From the "Assessments" screen (see above), click the printer icon.
2.A pop-up menu (see below) appears with a number of options. One box must be checked in each of the two categories, “Report format” and “Reports to include," to proceed. The first set has four options relating to the format in which the assessment will print. They include: HTML (viewable on the screen), DOC (viewable and editable in Word), PDF - One Column and PDF - Two Columns. The last two are viewable/printable in an Adobe PDF file. Select one.
The second set includes three options: Assessment questions (click this to print the assessment for student use), Assessment map (a printable answer key-like report that includes questions, answers and standards), and Assessment grades (a report on the grade formats and colors selected within the Grade Conversion table). Select at least one.
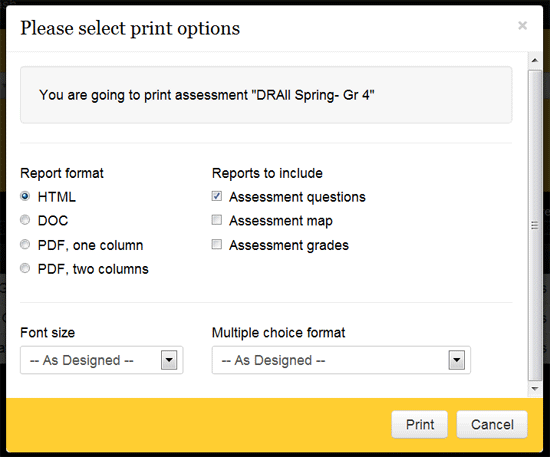
3.The last two options, "Font size" and "Multiple choice format" allow users to override the assessment's formatting and print out using a single font size and multiple choice format (numerical or alphabetical).
4.Once the appopriate selections have been made, click “Print."
Adding Audio Files
(While there are other uses, this feature was designed for when students need test instructions read aloud when taking online assessments)
- After you have typed your question in the “Question” box (1a.), scroll down to the bottom of the window where you are able to click on the button: “Record audio note” (1b.) It may be helpful to put written directions directly in the question box as well.
1a
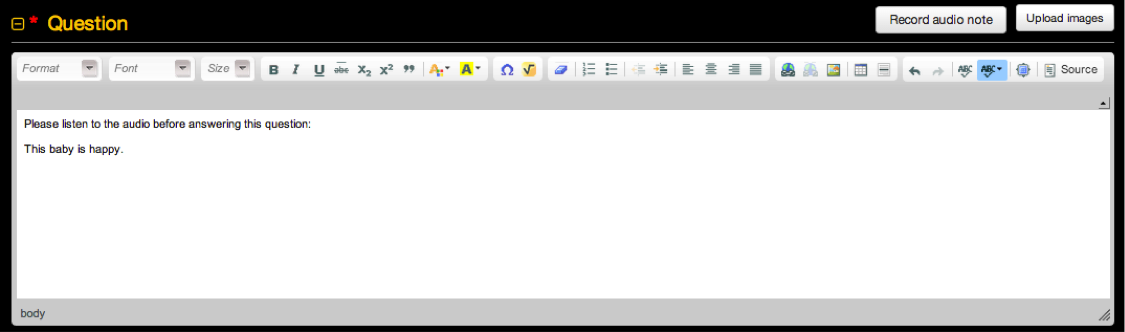
1b (This step is for when you are ready to add audio instructions for an online assessment question)

2.A new window will open, prompting you to name the recorded file:
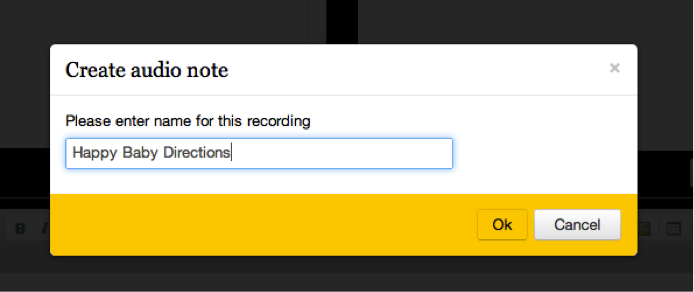
3.Once the file is named and you click OK, the following screen will appear and you will need to begin speaking immediately. Please note there is no “Start” button.
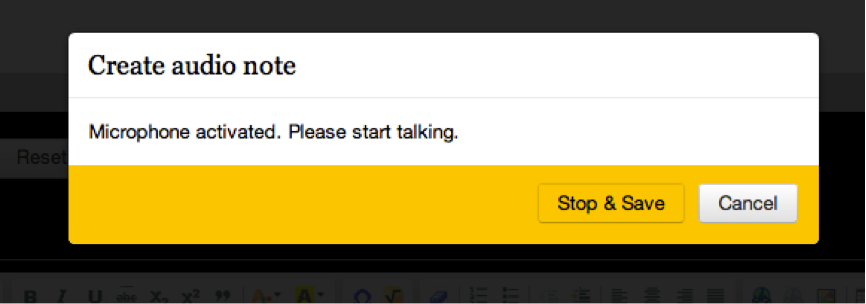
When you finish speaking, click “Stop & Save” – the file will automatically appear in the Attachments section at the bottom of the page.
4.From here, you will have the option to select who the audio instructions will be available for. Most likely, you will either choose “Everyone” or “Assigned Students Only.”

5.Finally, select how many times you would like this audio note to be available for a student to play. By clicking directly in the area under “Plays limit”, a blinking cursor will appear where you able to enter a number. Leaving “Plays limit” blank allows the audio note to be played an unlimited amount of times. If a number is entered, click the “Enter” key button on your keyboard to save the change.
6.If you are making these spoken question directions available to a group of students because you have chosen “Assigned Students Only,” you will need to go to the Teacher Dashboard to choose the specific students:

7.Use the filters to find both the students who are taking this online assessment, as well as the assessment itself, then click the “ASSIGN” button:
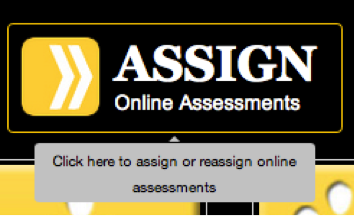
8.Once the class list appears, simply check the box directly to the right of the student’s name, under the “Allow audio” column. This controls which students will have access to the audio notes when they take the assessment online. Lastly, click the “Assign” button.
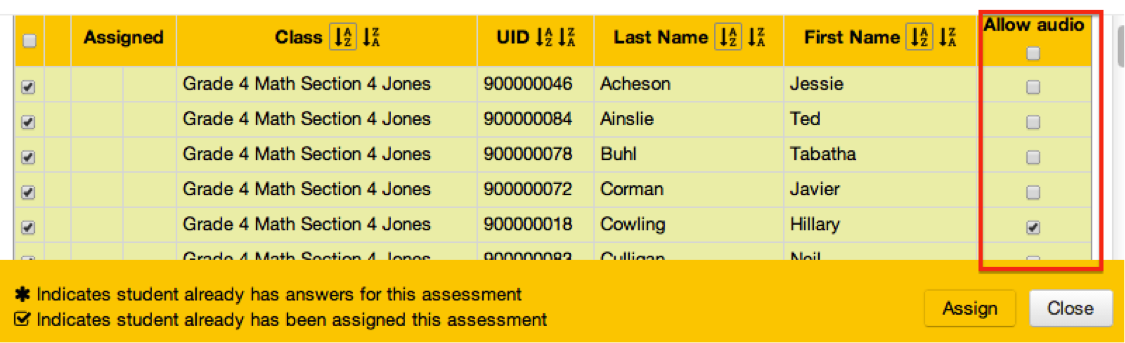
Uploading Audio Files Within A Question
- After you have typed your question in the “Question” box (1a.), scroll down to the bottom of window where you are able to click on the button: “Upload File” (1b.)
* 1a
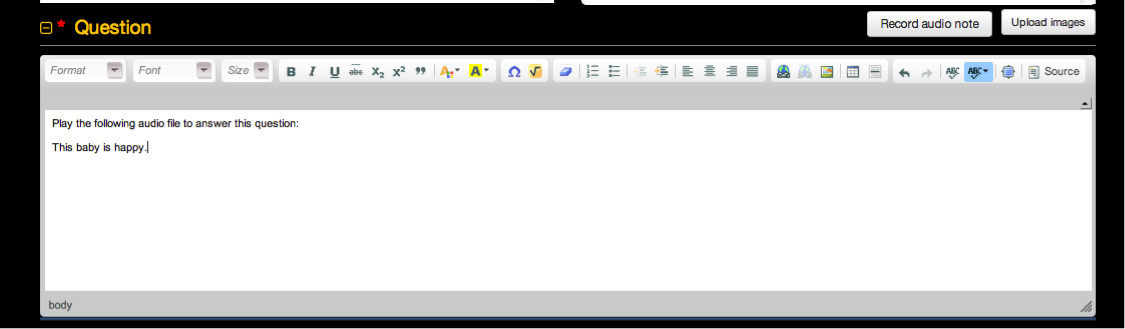
* 1b

2.Once you select the audio file you would like to attach, it will appear under the “Attachments” tab. Feel free to preview your audio file using the play button that is available.

3.PLEASE leave the “Available to” option defaulted to Everyone. This is VERY Important!

4.Finally, select how many times you would like this audio file to be available to play. By clicking directly in the area under “Plays limit,” a blinking cursor will appear where you are able to enter a number. Leaving “Plays limit” blank allows audio file to be played unlimited amount of times. Once the number is entered, click the “Enter” button on your keyboard to save.

When you have finished editing your audio file, simply click Save & Close at the top right of your screen.
03.D.3. Assigning Online Assessments
When an online assessment has been created and configured, the next step is to assign the assessment to the student(s) who will be taking the assessment.
There are many options to explore when offering online assessments, so the process of assigning begins when the assessment is being created. Please visit our help guide on Online Assessment Features for more information on the features available within eDoctrina.
There are currently two ways that online assessments can be assigned to students. The first way is from the Teacher Dashboard, which can be found under Quick Links in the eDoctrina menu bar.
Assign Students from the Teacher Dashboard
Within the Teacher Dashboard, use filters to select the students and assessment to be assigned.
The "Assign students" pop-up window will appear upon clicking the ASSIGN button. Select the checkbox next to the student names that the assessment will be assigned to. Then, click "Proceed".

Test Dates: The next window will allow the user to select the dates that the assessment will be available to students. The test window is a required field that determines the time period that students will be able to access the online assessment. It is required to select a start date/time and end date/time when assigning the asssessment.

Additional Online Settings
-
Test Options: Additional online settings can be set up in this window, for an entire class, or for selected students, rather than within an assessment. Access these setting in the "Test Options" tab in the popup window.

NOTE: Except for the font family and font size options, these features are the same that are available within the assessment, they can just be selected for a specific assignment or students, on this screen.
In the above image, notice that a lot of these additional settings say "Default". The default setting is what has been set in the assessment. For example, if the "Scramble Questions" option has been enabled in the assessment, the test is defaulted to scramble questions for all students. If there are certain students that the teacher does not want the questions scrambled for, clicking here and selecting "No" will turn it off for those students only. - Questions: In the "Questions" tab the user can select a range of question numbers, or manually select questions to assign to students. These settings will apply to the date and time range selected after choosing assignment settings.
-
Assign & Un-Assign: If you are assigning a test to students for the very first time, you would select to Assign the assessment. If a students have already started an assessment and data exists for some questions, selecting Assign again, will give you the option to "Clear Responses for students who have already eentered responses on this test." If you assign an assessment to a student (or students) accidentally, selecting Unassign will remove the test from their dashboard (Please note that if they have started the assessment, their data will still live in the system).
NOTE: If a student has already started an assessment and the test is ASSIGNED to them a second time, all pre-existing data will continue to exist unless you select "Clear Responses" before re-assigning the assessment. - Search: The search filter will allow teachers to search the list of students by the student UID, First name, or Last Name. This search query will only search the list of students in this pop-up, which is based off the filters selected on the Teacher Dashboard.
- Scope: The scope filter allows the teacher to reduce the list of students displayed to show All students,only students who have already been Assigned, students who have been Assigned and Completed, only students who have Completed the assessment, or just students who are Unassigned.
- Checkbox: Select the student(s) to be assigned the online assessment. Select all students by clicking the checkbox in the column header, but remember this list is initially populated based off of the filters selected in the Teacher Dashboard.
-
Assigned: The icons that exist in the Assigned column carry important information that is integral to understanding the status of students taking the online assessment.
-
 : If a student has this icon next to their name, it means that the student has already started the assessment and may have some answers already entered. If the student(s) already has answers and needs to revisit the assessment, it is best to "re-assign" the student to preserve the student responses.
-
 : If the student has this icon next to their name, it means that the student has already been assigned the assessment. If this icon appears and the student claims they could not access the assessment, look to the calendar icon to identify the assigned test window.
- The status column will display whether the student is In progress or Completed. This column will also provide the teacher the opportunity to Unassign the online assessment if needed.
-
- Email Students When Available: Checking this box will send each student an email notifying the student of their newly created assignment, when the testing window opens. These emails will only be sent to students with a valid email address entered into their User Account.
- Proceed: Select Proceed once you have selected all of the appropriate settings and are ready to assign or un-assign, an assessment.

Assign Students from the Assessment Homepage
The second way to assign an online assessment is from the Assessments homepage, which can be accessed by selecting "Setup Assessments" in the Assessments menu in the eDoctrina menu bar.

Within the Assessments Homepage, use the filters to locate the online assessment in the eDoctrina database, then click the
 button to navigate to the Teacher Dashboard screen with the assessment pre-selected.

Auto-Assign an Assessment to Linked Courses (for District Administrators)
The final way to assign an online assessment is to utilize the "Auto Assign to Linked Courses" checkbox. However, it is important to note that this functionality is intended to assign large numbers of students, en masse, for a common assessment during a common assignment window. The assessment must be linked to the same course(s) as the class(es) that the students are scheduled under for this functionality to operate as intended. Additionally, all students in these classes will be assigned the assessment during the selected testing window(s).
For example, if Mr. Jones and Ms. Smith both teach classes linked to the same Global Studies I course, then both Mr. Jones' and Ms. Smith's students will be assigned the assessment during the same testing window(s). If this result is not desired then it is recommended to use one of the methods detailed above to assign the assessment to the intended students for the intended assignment window(s).
The "Auto Assign to Linked Courses" checkbox can be found under "Additonal Settings" in the Assessment Editor.
Once this option is selected the user can use the  button to choose the desired date range(s) for the automatic assignment:

A popup will appear prompting the user to select a date range. A singular date can be selected by clicking on the specific day, or a range of dates can be selected by clicking on the first day and "dragging" to the desired end date:

After a date or date range is selected another popup will appear prompting the user to select whether the assignment should have a specified access window for students.
- Select Yes if you wish to specify a timeframe for the selected date or date range. A selection of "No" will allow access durinbg the selected date(s) from 12:00AM-11:59PM for the selected date(s).
- A Start/End time will need to be selected here if "Yes" was selected for specification of a timeframe.
After the timeframe has been set the Calendar view will display the dates and times of the assignment:

 icon and redefine the desired date/time ranges.
05.C. Student Online Assessments
To view the updated help doc on managing student accounts click here
Helping Students Navigate PROGReSS
Students will be logging into eDoctrina the same way that teachers log in, but will be navigated to eDoctrina's Student Portal (PROGReSS) when they enter their login credentials properly.
The Assignments section has three relevent sub-sections: To Do, Completed, and Expired.
The items that are displayed in these lists are dependent on the Class filter (which allows students to view "All my classes" or select a specific one) and the Year filter (which is defaulted to the current year).

Each section of the Student Portal provides the student the ability to communicate with their teacher using the eDoctrina email option. All users can access their eDoctrina mail by clicking the mail icon  .
.

![]()
In the To Do section of the Student Portal, students will see a list of all active assessments assigned to them. The Title will be displayed along with the Assessment ID. For ongoing assessments, there will be a Progress bar showing the percentage of the assessment that has been completed so far. The Date will display the Window(s) that has been entered by the teacher in the Assessment Editor.
The last column will display different options depending on the online assessment settings. If a student has never accessed the assessment, they will always have the ability to  the assessment. If "Allow Reopen" is selected in the online assessment settings for this assessment, students will have the opportunity to
  the assessment.
In the Assignments "Completed" section, the student will be able to view the score, grade, and/or percentage along with the selected version of the Individual Student Report by selecting the  button.
Taking an Online Assessment
eDoctrina offers many options to educators for creating online assessments. With this said, students may encounter different features depending on the specific assessment settings that have been selected for each assessment. Some features can be assigned per question while others can be assigned to the entire test.
If an assessment has been set up to "Lock students to test", each time they access the assessment they will encounter a pop-up stating "This assessment is locked"
If the option to use the Safe Exam Browser was selected in the assessment, Click Here to see the Help Guide for setup/usage instructions.
If an assessment has been set up to have an "Online Time Limit", the student will receive a pop-up notification informing them that "This is a timed test" and stating how much of the allotted time is remaining.

If an assessment has been set up to have a "Password", the student will receive a pop-up window prompting them to "Please enter test password".

Below is a basic view student of what students will see when they begin their assessment. Some of the features displayed here are optional and are configured in the Assessment Editor. To learn more about configuration, please refer to our help guide on Online Assessment Settings.

- If the assessment has a time limit, it will display here.
- Students should click Submit when they have completed the assessment. If selected, the student will not be able to re-open the assessment unless it it is reassigned.
- If the option to "Allow Re-Open" is selected in the online assessment settings, this button will appear allowing the students to close the assessment and complete their responses at a later time (if that time is within the available test window).
- By default, students will be able to toggle between questions using the navigation arrows along the right and left sides of each question.
- The "next unanswered question" button assists students in navigating through the online assessment. If clicked, eDoctrina will navigate the student to the next question in line that does not have an answer recorded. This invaluable button will change to blue once all questions have been answered.
- It is possible to navigate directly to a specific question by selecting the the corresponding box in this section. These buttons are also be color coded to provide the student a better test taking experience.
- The Reading ruler, Magnifier and Highlight mode are tools that are available by default.
- The ability to Zoom In/ Zoom Out is available in case it is needed.
- This area is where the assessment will appear. There are a few variations on how assessments are displayed. Displayed above is the page view when there is not a PDF uploaded and the questions have been individually entered.
When answering a multiple choice question, all the student needs to do is click the desired response and a checkmark with appear indicating the answer has been selected.

If the online assessment setting has been selected to allow the students to eliminate answer choices, the student will see an "X" next to each choice. They can simply click it to eliminate that answer choice.

To ensure that students are aware that they have some unanswered questions on their assessment, they will receive this message when they click on "Submit" test if there are any questions without a response.

Additionally, if a student's internet connection becomes interrupted a banner message will display at the top of their screen to notify them of the event:

For more information on setting up specific Online Assessment features, Click Here.
03.D.5. Grading Online Assessments
Click here to view the Help Video
Student responses and other details for Online Assessments are available for teacher review as soon as the student enters their responses in their PROGReSS accounts.
To grade or review student responses for an assessment, the user must begin by navigating to the Teacher Dashboard from the eDoctrina homepage or Quick Links menu.

On the Teacher Dashboard, select the students and the assessment that need to be graded, by manipulating the filters. Once the appropriate filters have been selected, proceed to click the "CHECK Student Answers" button to visit the Answer entry/verification screen.

On this screen, many details about the progress and performance can be gathered.

- The Answer Verification screen will be very colorful. Each color is described in the color key that can be accessed by selecting the
 button. A pop-up will appear.
NOTE: For multiple choice questions, green is the only color that will reward points to the student.
- To view details about the online assessment, such as when the student started and finished the assessment, it is possible to hover over the icon in this column to gain this information.
- Teacher Scored questions need to be graded and are easily identified as the boxes with the black triangles in the top-right corner. Click on the black triangle to view the responses entered by the student(s).
When grading online Teacher Scored questions, it is important to know what the colors and contents of the cells mean to ensure proper entry of grades:
- A cell the is has a GRAY background indicates that the student has not visited this question in the assessment. This counts as an INCORRECT answer.
- If a student has visited a question AND has provided a response, the cell background will be WHITE, as eDoctrina does not reward points to the student automatically.
A WHITE cell containing a "0" indicates that the student response has not yet been graded OR the student has been graded earning zero points.
A WHITE cell containing a value indicates that the student response has been graded
NOTE: If the question type is "Fill-in-the-Blank", the student responses will be graded according the the acceptable responses entered for the question in the Assessment Editor. If a change has been made to the acceptable responses within the assessment then you can use the  button to apply the new changes.
 - If a student has visited a question AND has NOT provided a response, the cell background will be YELLOW. This counts as an INCORRECT answer.

If the
 option is selected, the GRAY box will change to white with the point value of the question within the cell.
If the
 option is selected, the GRAY box will change to white with a "0" within the cell.
Viewing/Entering Student Responses for Teacher Scored Questions
Scores for questions can be selected directly from the Answer entry/verification screen by clicking the desired cell. If the question has a point value of 10 or less, a pull-down will appear will all possible values for easy selection. If a teacher scored question has a point value greater than 10, the pull-down will not display all point values and the score will have to be manually entered using the keypad.
To enter scores using the keypad, utilize the directional arrows on the keyboard to move the cursor over the desired cell. The cursor always starts in the top-left cell and will be displayed with a black outline.

To quickly key in scores on the Answer entry/verification screen, here are some keyboard shortcuts:
- Click the black triangle in the upper right corner of the cell to view the student responses. A pop-up window will appear that contains many tools to make grading a question much easier.

- The Question pull-down allows the user to select the question that they would like to view.
- This area will display the question body of the selected question. If the question does not fit in the viewable area, select the "Expand" button at the top-right to view a larger window that will contain the whole body of the question.
- This area will display the student's response. If the student response does not fit in the viewable area, select the "Expand" button at the top-right to view a larger window that will contain all contents of the student response.
NOTE: This area will contain all possible response types. This includes the Text Editor, the Sketchpad, and Uploaded files(which will display as a link). - The opportunity to enter a Teacher Comment regarding the student's response is possible in the "Feedback" area. If desired, it is possible to display this comment on a student's Individual Student Report to enhance the communication between teacher and student.
- The Answer points option allows the user to assign a point value to the selected question by selected the earned score from the pull-down or entering the score using the keypad.
- If there is a Scoring Guide or Rubric tied to a specific question, the option to view these attributes is available by selecting the
 button.
- The arrows on the bottom of this pop-up window allow the user to toggle between students and/or questions with ease. The arrows navigate to the previous and next question, respectively, for a student.
The arrows navigate to the student below and above, respectively, for the selected question. These arrows simply move the cursor from one adjacent cell to another on the Answer entry/verification screen.
NOTE: If a score has been entered and one of these arrows is selected, the entered score will be saved. - It is important to select the
 button to save the most recent entered grade. The "Cancel" button will neglect any changes made on the current pop-up.
For more information about managing and verifying student responses, please visit our help guide on Answer Verification.
For an alternative means of grading assessments, please see our help guide on the Teacher Completed Screen.
03.D.2b. Online Assessment Features (Whole Assessment)
When offering an online assessment in eDoctrina, it is important to be confident that the assessment being offered will be presented to students as intended. This help guide will provide some insight on the different online assessment settings that are available for use.
To learn more about how to assign an assessment to a group of students online, click here to see our "Assigning Online Assessments" help guide.
There are many tools that can be applied to each question and numerous assessment settings that apply to the entire assessment.

Online Settings: Layout/View

There are multiple other views that can also be set within an assessment. Similar to the NYS CBT view, eDoctrina also offers the "PARCC LOCKED" view, which will mirror what students would see on the PARCC exam. The Scroll and Page view allows students to decide if they'd rather their questions scroll on the page, or appear one question at a time. Users also have the option to lock students to one view using the "Locked" variation of each view.


WARNING #2: If audio has been recorded that lists answer choices, DO NOT USE this feature.

After a file has been uploaded, the look & feel of the online assessment view will be modified to include the uploaded PDF and will look somewhat similar to the image below.

 button will allow the user to designate which questions to exclude from this feature.

The image below shows what students will see during an online assessment:

Online Settings: General Tools

The image below shows what the student will see during an online assessment:


Online Settings: Controls
The Online Time Limit should be entered in minutes (m). If a limit is entered, the students taking the assessment will have m minutes to complete the assessment. The timer will start when the student begins the online assessment. The timer will run continuously until the entered time has elapsed. The default is a [blank] field and will allow students unlimited time to complete the assessment.

A Password can be entered for each assessment created in eDoctrina. If entered, all students will be required to enter this password to gain access to the assessment. The password is not restricted by special characters, but is case sensitive. It can be changed as needed, but the most recent or current password will be the ONLY password that works for students. To remove the password, simply delete the characters from this field and "Save" or "Save & Close" the assessment.

Additional Controls

eDoctrina Locker is an extension districts can download and push to student devices that will not allow students to open new tabs in Chrome, or maneuver to other websites they may have already had open.
Safe Exam Browser is a browser that can be downloaded onto student devices and when in use, students will be locked into the browser while testing. They will be unable to maneuver out of the browser until the exam is finished, and attempting to do so will lock them out of the test. Learn more about this browser by clicking Here


Online Settings: Student Tools
Math Tools
The following options will determine which online tools will be offered and how they will be used. These tools can be offered for the whole assessment or for specific questions. If "Default" is selected, eDoctrina will default to the selections made for the specific questions. If "Show" is selected, the tool will be available for every question on the assessment. If "Hide" is selected, the tool will be unavailable for every question, regardless of the specific question settings.

This option will disable the ability for students to use the "Handwritten Mode" in their WYSIWYG editor when using the standard equation editor.

Language Tools

03.H.2. How to Use the Flex Rubric Tool
Creating A New Rubric
To create a new rubric assessment, select the  button within the Assessments Homepage.

A pop-up screen will be generated. Fill in the required fields (each required field is noted by an asterik). Select "Build a Rubric".

Note: Select this option if the entire assessment is a rubric. If an assessment has a mix of question types, it's best to select a different assessment option first and then build rubrics within specific questions.
An additional pop-up will ask the user to identify both the number of categories in the rubric and the maximum number of points for each category. (In the example below, for instance, students are assessed on the four categories. Each category is worth 3 points.) After filling in the data, the user should select  .
.

Upon selecting , the user will be routed immediately to the Assessment Editor. The information that was entered in the previous pop-up screen will be populated in the General section of the Assessment Editor, and the user will be directed to the "Rubric" view, which is a more "friendly" view for creating rubric questions.
Each category is considered to be a question and the entered Category Description will display as the title of the rubric category.

The user has the ability to customize how the column headings will display on the rubric. These headings represent the "points values" for each category. If not customized (left blank), the column heading will default to the points values listed above each column.
The user can then enter a name or description for each category in the "Category Description" box. Next, the user can insert rubric text that aligns to each specific point value.
NOTE: If the point value for a given category is greater than 10, users can select the "Show More" icon to see the additional point value description.

It is also possible to color-code each category level by clicking in the box next to the point value.

Upon selection of a color for a specific category, the user will be prompted, via pop-up, to choose the same color for that point value in each rubric category.
If "Yes" is selected, each category will be assigned identical colors for the corresponding point values.

These color codes can help easily identify strengths and weaknesses of one or many students.
Continue to set up the rubric assessment by linking standards via double click or drag and drop.

Users also have the option of constructing a a grade conversion table for the rubric assessment.

When finished, click  or
or  .
.
Collecting Data
There are two primary ways to collect data for performance-based rubric assessments: FLeX Rubric Answer Sheets or direct data entry using the Teacher Completed Screen.
Teacher Completed Screen
Rubric data for performance-based assessments can be entered directly into eDoctrina using the Teacher Completed screen. The data is auto-saved and reports are available immediately. To access this screen, users should click on the "Answer Entry" button from the home screen or navigate to Assessments>Answer Entry from the menu bar at the top of the screen.

The user will be routed to the Teacher Dashboard. Here, the user will filter of the course(s), class(es), student(s), test bank, and assessment. Then, users should select "Enter Student Responses."

The user will be routed to the Teacher Completed screen:

A list of students in the class will be shown to the left of the screen. The student for whom grades are being entered will be highlighted in yellow.
The rubric categories will display to the right of the student list (note: please make sure you are in the rubric view of the screen). The name of the student for whom grades are being entered will populate in the top right-hand corner of the screen. Data can be added to each category by simply clicking inside the field to enter the score. If the wrong category is accidentally selected, you can simply click on the correct value and the score will update automatically.

As data is entered for a student, the "answers" box for that student will automatically update, as will the student's percentage.
For each rubric category, there is an option for a user to add comments. To do so, the user can click on the comment icon for a category:

A pop-up window will be generated. The left side of the pop-up window houses a scripting area. Here, the user can type their own comments or link pre-made comments about a student's performance. These comments will be available to the students in reports.

The user can also generate unique comments.
Users can add comments specifically for an assessment or can make comments available to the entire school.
Users can also create private comments that will be viewable to only that user and district administrators.

Finally, users can create multiple "type" categories, allowing compartmentalization of comments by subject, grade level, etc.
FLeX Rubric Answer Sheets
To print the FLeX Rubric answer sheets, users should click on the “Answer Sheets” button from the home screen or navigate to Assessments > Answer Sheets from the menu bar at the top of the screen.

The user will use three simple steps to navigate the Teacher Dashboard:
- Select your students using the "course" and "class" filters.
- Select your test using the "assessment" filter.
- Select the action "PRINT" to print bubble sheets.

Upon selecting "Print Answer Sheets," a pop-up screen will be generated. Here, users are able to select both a specific answer sheet type and the students for whom to print answer sheets. When working with rubric assessments, it is important that the user select one of the two FLeX Rubric answer sheet options.


Once answer sheets are printed, the user can bubble in a score for each rubric category for each student. The answer sheets would then be scanned to eDoctrina for processing.

Data Reports for Flex Rubrics
Users are able to run data reports for assessments as soon as data is entered into the Teacher Completed Screen. There are three reports that can be run specifically for rubric-based assessments:
- Individual Student
- Student Standards
- RTI Progress
Individual Student Report There are a couple of different layouts that can be selected using the Individual Student Report.
The first option is called the "Student Rubric" format. This option will print a fully graded rubric for each student selected on the dashboard. To run this report, select the "Individual Student Report" icon on the Teacher Dashboard and use the following settings:

The report will run with one rubric per student, which can be exported to a PDF (either as a whole class, or one particular student at a time). The student's point score, percent score, and proficiency score (if included on the assessment) will appear at the bottom of the rubric.

A second format of the Individual Student Report is the "Standard with Rubric Text Instead of Standards" option, where teacher comments can also be included on the print out. While the data is the same, the layout of this format is a bit different than the "Student Rubric".

Each rubric line will adhere to the color code that was initially selected in the creation of the rubric assessment.

Student Standards Report
The Student Standards Report can be run with settings that will allow the user to see how students did in each category individually, but includes the entire selected class on one report. The options below will give the user the ability to include the rubric text in the generated report.

Just like with the Individual Student Report, the Student Standards will adhere to the color code that was initially selected in the creation of the rubric assessment.

RTI Summary Report
The RTI Summary Report can be run to show rubric text instead of standards by using the following settings:

The top of the report with the table and graph will not change, but the data below will show the student's rubric category results as opposed to their standard results:

04.B.2 Print Answer (Bubble) Sheets
Once an assessment has been created, educators will want to print out the accompanying answer sheets. This process is simple and allows users to print sheets for one student, all students in one class, or all those enrolled in a particular course.
Click here to view the Help Video
To begin printing answer sheets, navigate to the Teacher Dashboard by clicking the "Answer Sheets" button on the home screen or find the link to the Teacher Dashboard under Quick Links in the navigation bar.
Please keep in mind that your Home Page may look different then the one shown above
The Teacher Dashboard offers many tools that are useful for teachers. It is important to know that many of these tools require selection of student(s) and assessment(s).

- Once on the dashboard (see below), use the first row of filters to select the students you'll be printing answer sheets for. Please note that "Course" and "Class" are mandatory drop-downs. The "Select Students" option allows you to select individual students but this is **NOT** a mandatory filter. Leave filter as "Select Students" if printing for multiple students.
-
Manipulating the second row of filters will help to locate the assessment to print answer sheets for. Test Bank and Assessment are the mandatory fields here. When selecting an assessment, use the easy search option to type in the name, the assessment ID, or any tags that have been entered for the desired assessment.

- When done filtering, click "Print" and the "Print Answer Sheets" pop-up screen will open (see below).

- Across the top of this menu are a number of different answer sheets that are pre-loaded within eDoctrina. The list that shows here is district specific, so some sheets will not be viewable by some users. The most commonly used answer sheets inclue: “FASTeST Small Bubbles,” “FASTeST Big Bubbles,” (larger bubbles for younger students), "100 Points" (used when test contains teacher-scored questions worth more than 10 pts.) and "Flex Rubric (customizable rubric-based sheet)." Choose one and click it.
- When all selections have been made and answer sheets are ready to be generated, select one to the two `Print Answer Sheets` buttons available on this pop-up window. The option to print that hard copy of the actual test is avaiable from this pop-up window as well (if the questions have been entered into eDoctrina).
- By default, the
 option will be selected. It is important to note that if there is a "Teacher Scored" question that is valued at more than 10 points, the 100 Points answer sheet may the only suitable answer sheet for that specific assessment.
- Although the group of students listed in the pop-up window are selected from filtering on the Teacher Dashboard, the ability to search for a specific student is available here. Simply enter the student ID# or part of their first or last name.
- By default, all students will be selected/checked so they will have an answer sheet generated for them. If desired, the teacher can modify these selections to only print answer sheets for a specific subset of students.
- By clicking on the "More Printing Options" button on the bottom right corner of the screen, a user can print blank answer sheets for students and/or choose to include only specific range of questions.
NOTE: For quality, users are reminded to use a black and white laser printer to print bubble sheets.
05.C. Teacher Completed Screen
The Teacher Completed tool is designed to be used for electronic grading, as well as performance based assessments, screening, conferencing, or observing students. It is easy to access on both a computer or a tablet.
To learn more about using our Teacher Completed tool, please Click Here to see our help video.
To enter data using the Teacher Completed tool, users should first navigate to the Teacher Dashboard (Quick Links ---> Teacher Dashboard)

- On the Teacher Dashboard, the first step is to manipulate the filters to find the students and assessment the user would like to enter data for.
- Once the filters have been selected, the GRADE icon should be selected to open the Teacher Completed Screen.
Understanding Each Teacher Completed Screen Component
Upon first glance, the Teacher Completed Screen can seem a bit overwhelming. It only takes understanding a few steps to become an expert at the layout of the page!

- On the left side of the page, users will see the students that were previously selected on the Teacher Dashboard, listed alphabetically. There are two check boxes under each student name. The (Com) box will automatically have a check mark if the student completed the assessment. The (Ver) check box will need to be checked by the teacher after the student's data has been verified.
Additionally, next to each student's name is a number in a colored circle. The number indicates how many responses have been recorded for this student. (Please note that this number is not referencing how many questions the student answered correctly, only how many questions they have completed). A green circle represents a completed and verified assessment. An orange circle represents a completed assessment that is unverified. A blue circle represents an assessment that is not complete.
Selecting the "Min" or "Max" icons will automatically set that student's score to the maximum or minimum score.
NOTE: The min/max icons also exist for the entire class so that all students on the page can have their scores set to the min/max score.
- The Teacher Completed Screen has multiple different layouts. Each layout can be very useful, depending on what type of assessment is being graded.
- Users have the ability to change the font family and/or font size of the questions/answer appearing on the page. This can come in handy if a student is sitting next to the user for conferencing and is used to seeing a specific font or having the text appear larger than the standard 12 pt.
- The questions (and student answers if data has been entered) will appear based on the selected layout format.
Layouts
Selecting the correct layout is going to be dependent on what kind of assessment users are grading. The five possible layouts are:
1. List
2. Grid
3. Page
4. Rubric
5. TCs
2. Grid
3. Page
4. Rubric
5. TCs
Within each view, it is important to note a couple of important icons that users have access to.
 : This icon represents teacher comments. When selected, users will have a pop-up where comments can be typed, or entered from a pre-set list (see below)

 : This icon stands for "Excluded". In the case that a question needs to be excluded for a student for any reason, clicking this button will exclude the question for that student alone and the data will not be counted toward their final score.
 : In the event that a question has a linked scoring guide or rubric, clicking this icon will allow users to see it.
 : These icons can be used to set a student's answers to all incorrect (min) or all correct (max).
List and Grid View
These two options are best when grading or viewing data for multiple choice assessments. The list view will list each question out one after another and allow users to see the selected answers for each question in the drop-down menu. These options can be updated by users by clicking the down arrow and updating the answer choice.

The grid view works in a very similar way with the main difference being each question is contained in a small box, appearing like a grid.

Page View
The page view allows users to see the following components of a question all on one screen:
Questions will appear on the screen one at a time and users can use the arrows on either side of the screen to toggle to the next/previous question. A question menu is also available so users can jump around the different questions if they so choose.

Rubric View
Rubric view is a fantastic way for teachers to grade writing pieces, performance-based tests, projects, etc. When a rubric is created in eDoctrina, these screen can be used by teachers to grade student work based on the rubric criteria with ease. Clicking a box (or touching, if the device has a touch-screen) will select that rubric level for the student. If the rubric was color coded, the background will fill with the color set up upon creation (as shown below).

TCs View
The TCs View (which stands for Teacher Comments) is very similar to the Page View. Users are able to see the questions and student responses listed, as well as add comments and scores with ease.
NOTE: In this view there are a few differences from the Page View:

Scoring Multiple Assessments
It is possible to utilize the Teacher Completed screen to score multiple assessments at once. The process detailed above remains the same, except the user must select more than one assessment from the "Assessment" dropdown menu:

Scoring multiple assessments at once will result in a column being present for each assessment. The "Highlighted" column is the assessment that is currently active and clicking on the "Grayed out" area will shift the active assessment to the assessment listed in that specific column:

Grading the active assessment remains the same as the process described above.
06.A.1. How to Use the Individual Student Report
The Individual Student Report is designed to help teachers view & print assessment results for individual students. The standard format is configured to display the standards linked to each question, the student’s responses, the correct responses, and the student’s overall score. eDoctrina offers many options for this report. This help guide will give a brief overview of how to use each one of these options.
Click here to view the Help Video
Navigation
To print this report, navigate to the "Teacher Dashboard" by finding it under the "Quick Links" in the navigation bar or simply select "Reports" from the eDoctrina homepage.
Once on the "Teacher Dashboard", utilize the filters to choose the student or group of students and the assessment to generate an Individual Student Report for. Click the “Individual Student” button once the desired selections have been made.
A pop-up window generates prompting users to select which version of the report they wish to view/print. Select the desired report options, then click the  button to generate the report.

All reports, regardless of the options selected, will have a similar header that will include the report details, such as the student name, assessment name, assessment ID#, subject, grade level, assessment type, and date.

It is important to know that when any report is generated using eDoctrina, a unique URL is generated for that report. This URL can be shared with any eDoctrina user if the user has login credentials. If they are logged in to eDoctrina, entering the URL in their web browser will navigate them directly to the report. If they are not signed in, entering the URL in their web browser will navigate them to the eDoctrina login page. The report will display immediately after they enter their login credentials successfully.
The opportunity to generate a PDF for each student exists in the top right corner of the report for each respective student by selecting the Export student to PDF button in the top-right of the student's report.
If desired, a PDF can be generated for the entire report by selecting the Export to PDF button that is ONLY available at the top-right of the browsing window.
The generated PDFs will also have a unique URL tied to them, which can also be shared with any eDoctrina user, if a PDF is the desired format.
Report Details
All formats of the Individual Student Report contain the same basic qualities: the student's Score (points earned out of total points), the earned Percent Score, and the Grade (if and only if a Grade Conversion Table is linked to the assessment).

The other contents that are displayed on the report are dependent on the Individual Student Report Options that are selected prior to generating the report.
- Show Excluded Questions: Excluding a question will omit the question from the individual student report unless this option is selected. This is a display only option as the student's score will still be calculated considering the exclusions.
- Show Question Text: Select this option to display the text of each question in the assessment in place of standards.
- Show Student Response:: This option is applicable to online assessment (Fill-in-the-Blank and Teacher-Scored) questions. Selecting this option will display the student's entered response below each question that allows it.
- Show Answer Rationale: Answer Rationale can be entered to provide automatic feedback to students if they select a specific response for a multiple-choice question. Rationale is entered within the Question Editor for each question. If the time has been spent to enter this feedback, it is a good idea to use the option when generating the report.
- Show Teacher Comment: There are many places where teacher comments can be entered as feedback for specific questions. Selecting this option will display the entered comments below each question that they are entered for.
- Show Proficiency Level Only: Select this option to hide the Score (earned points out of total points) and the student's earned percent. A grade conversion table must be linked to the assessment if this option is enabled.
- Show Revision History:
- Show Answer Sheets: This option is intended for assessments with "Results visible online" selected. When customizing the Individual Student Report for students to view this option allows students to review their answer sheets and cover pages.
- Show Error Codes: Error Codes that have been entered for student responses can be included on the Individual Student Report on select formats. The applied error codes will display in column 2 of the report when the option is enabled.
- Hide Student Answer: Select this option to hide the student's response to the assessment questions.
- Check to Hide Questions and Standards: This option will eliminate the question by question breakdown of the individual student's performance and only display the Score, Percent, and Grade.
- Hide Correct Answers: This option will eliminate the correct answers for all questions from the report. This is a great tool to provide student's feedback without giving them the answers to the assessment.
- Calculate rubric % based on passing % of:
- Show Report Average: Select this option to display the averages of correct responses or points earned for each question in the selected data set.
Available Formats
There are currently nine different formats, two different sort methods, and thirteen preferences that can be selected. These options provide users with extreme flexibility to chose how the generated Individual Student Report looks. To describe each of the formats, a sample assessment with 5 multiple choice questions and 2 teacher scored questions will be used.
-
Standards

-
Standard with Statistics

- Rubric Text
-
Question Text

-
Condensed

- Learning (AFL) This version provides information on the specific standards each question relates to and includes areas for students to reflect and self-identify those skills they understand and those they struggled with. This report (purposely) does not list the student’s assessment score to prevent those that may have done poorly from “shutting down.”
-
Multi-Part Score Summary provides information on how students did on each section of an assessment. This version of report will work only if there are standards that are marked as "Test Sections" linked to each question.

-
Student Response Only:

-
Student Rubric

Multi Assessment Formats
-
Summary by Standards:

-
Summary by Rubric Categories:

06.A.2. How to Use the Class Summary Report
Click here to view the Help Video
The Class Summary Report is designed to provide teachers with a quick, visual summary of how one or many classes performed on a selected assessment. Like all the other tools available on the Teacher Dashboard, the information that is displayed on the report depends on what is selected in the filters. This report can be generated for multiple classes and assessments. The generated report will be grouped by class and assessment.

Once the students and assessments have been selected, the report can be generated by selecting the "Class Summary" option (shown above).
A pop-up window will appear allows the user to select the "Class Summary Report Options" for the generated report.

- Student Name Format: This option allows the report to be generated displaying student names as Last Name first or First Name first. This does not effect the sort order of the report as the default sorting method is alphabetical by last name.
- Student ID Only: This option will hide student names from the report. This is a great option to maintain confidentiality is this report is to be posted somewhere in the classroom.
- CSV Export Only: By default, the Class Summary Report is generated in an HTML, which can then be download as a PDF or exported as a CSV. Selecting this option will bypass the HTML report generation and immediately export the file as a CSV.
- Only show data where the assessment is linked to the course: This option allows for users to select many courses/classes, but only display assessment results for assessments that have the selected courses linked to them.
Report Details
For each assessment that is selected, a list of students will be listed for each class that is selected. In this list will be displayed each student's assessment Score(earned points), Out of (Max points on the assessment), earned Percent, and Proficiency Level (if applicable). The student will be displayed in color, bold, and/or italics only if a Proficiency Level table has been linked to the selected assessment.
If a student is displayed with the  hyperlink, it means that there are some student responses that need to be verified. Clicking the hyperlink will navigate directly to the Answer entry/verification screen for the selected student. If there are many links of this type on the Class Summary report, it is recommended to visit the Answer entry/verification screen for the entire class. For more information on this, please visit our help guide about How to Use Answer Entry/Verification.
This report also includes the  button for each student in the report, which provides a direct link to the Student Profile Page. For more information about this page, please visit our help guide regarding the Student Profile Page .
The Class Summary report also includes some basic statistical information related to the earned scores of the students that are included in the report. If a Proficiency Level Table has been linked to the assessment, a breakdown of the level distribution will be displayed accompanied by a pie chart as a visual representation. A comparable statistical breakdown is also provided on this report allowing teachers to see how the students selected in the report are performing on the selected assessment in comparison to all students that have taken the assessment in the entire district.

06.A.3. How to Use the Item Analysis Report
Click here to view the Help Video
The Item Analysis report displays the distribution of recorded student responses on a per question basis. Usage of this report will presents educators with important information about assessment questions that is often overlooked. For example, if a teacher sees that all students provided a correct response for a question, there is no need to spend any extra time on the concepts covered within the question. On the contrary, if a question has a high variability of responses, it could be an indication that the topic needs to be revisited to reinforce student knowledge. If the IteM Analysis Report shows that many students got a single question wrong on the assessment, this report may provide supporting information for "excluding" the question from the students' grades.
This report can be accessed from the Teacher Dashboard. Before generating the report, it is important to select the subset of students to be included in the analysis and, of course, the assessment(s) in question. This report can be generated for one or many courses, classes, or students.
Once the desired subset of students and assessment(s) are selected, select the "Item Analysis" button. A pop-up containing the "Item Analysis Options" will appear.

- Include "Excluded" Questions: By default, questions that have been marked as "excluded" within the assessment will not be included in this report. Select this option if the student responses for excluded questions should be displayed.
- Hide Filter Settings: By default, the Item Analysis Report displays the filters that were selected to generate each report. Some cases require that this information be removed to ensure confidentiality. Enable this option to only show data releavant to student repsonses.
- Show school and district statistics: This option allows teachers to view the distribution of student responses for the entire district. All that is required when generating an Item Analysis like this is selection of the assessment in question.
- Group by question: Selecting this option will display the questions by Question ID rather than by their position in the selected assessment(s). This option is best utilized when there are multiple assessments selected that share identical questions.
- Group by teacher: This option will break down the Item Analysis report by teacher of the selected class section(s).
- Display rubric category: This option will display the title of the rubric category for any teacher scored question with a rubric data setup.
- Display advanced question attributes: The "attributes" are considered to be the linked metadata that is tied to the question. If applicable, enable this option to display, for each question, the Bloom's Taxonomy, Webb's Depth of Knowledge, Difficulty Level, Question Tags, and other relevant question details.
-
Dynamic or Static?:
- Dynamic View: will open the report and then automatically update every 3 seconds to reflect the most current changes. This is a great tool for monitoring online assessments.
- Static View: will open the report based upon the current data at the time of running the report and it will not change, unless the report is run again.
NOTE: If the Dynamic View is selected, the option to toggle between Dynamic and Static will be available in the top-right corner of the HTML version of the report.

Report Details
Once the report settings have been selected, run the report by selecting the  button. The report will be initially generated in HTML format. If desired, a PDF can be generated by selecting the
  button in the top-right corner.


The PDF Format has been cleaned up to be more presentable as a printed report, but it does not provide the utility that the HTML Format offers. Within the HTML Format of the Item Analysis Report is the option to view the question (not applicable to Answer Key Only assessments) by selecting the corresponding  button. It is also possible to view the students that responded to each answer choice of all the questions by clicking the corresponding hyperlink next to the question.

If the questions have been built in eDoctrina or pulled from a Question Bank, a "?" button will appear next to the Question number. When the "?" is clicked, a pop-up will appear that shows the question and answer(s)- as shown above.
06.A.4. How to Use the Class Comparison Report
The Class Comparison Report is designed to display a direct comparison of two or more classes on a specific assessment. Generating this report is a great opportunity for teachers who instruct the same class to view relative assessment data providing identifiable instructional gaps. If there are any apparent differences, teachers can collaborate to improve any noticeable shortfalls. The intent of this report is to facilitate positive discussions between teachers about what is working/not working in their classrooms.
The Class Comparison can be accessed through the Teacher Dashboard. The report design requires that more than one class is selected and it only supports one assessment per report.
 NOTE: If more than one assessment is selected, the following error message will be generated.

After selecting the desired assessment and classes, select the Class Comparison button on the Teacher Dashboard. A pop-up will appear allowing user to select "Class Comparison Options".

-
Pick a Color Scheme?
The default available options are:- Class Comparison 2 Color Compare to Row Avg: Red(-10% or worse) and Green(+10% or better).
- Student-Standards: less than 60% Red, less than 76% Yellow.
- Column average 2 Color Compare: Red (-10% or worse) and Green (+10% or better).
- Administrator Snapshot: (less 60% Red, 60-70% Yellow, greater than 77% Green)
- Class Comparison 7 Color Compare to Row Average: 20% less Red, between 10% and 20% less Orange, within 5% White, between 5% and 10% greater Blue, between 10% and 20% greater Purple, 20% more Green.
NOTE: It is possible to create a unique color scheme by navigating to SETTINGS==>DATABASE SETUP==>ASSESSMENT==> CUSTOM REPORT COLORS. -
Data Format
Select which numeric measure should be displayed in the report. Options such as Score, number of students, standard deviation, and grade table score are available. -
Avg Format
Select the number format of how the selected metrics should be displayed (not applicable to some Data Formats). -
Hide Classes
By default, the classes will display at the top of each column. To keep this information confidential, select this checkbox to keep this columns anonymous.
Once the desired report settings are selected, click the  button to generate an HTML version of the Class Comparison Report.
Report Details
The Class Comparison Report will generate four(4) different formats so assessment data can be compared for the selected classes on many levels. Depending on the report format, the first columns will be question, standard, and/or standard description(the unwrapped standard). The difficulty column will be included if and only if there has been a difficulty entered for at least one question within the assessment that is being analyzed. These columns all can be sorted ascending or descending by selecting the  option in the column headers.
The contents of the report will be the row Average and the corresponding assessment data for each of the selected Classes. The last The last two columns in each of the report formats display the School and District performance allowing for class comparison against the entire student body who has taken the assessment.


 button in the top-right corner of the HTML version of the report to generate an equivalent Excel file.
06.A.5. How to Use the Student-Standards Report
The Student-Standards Report is designed to show individual student data related to each learning standard that has been linked to one or many assessments. It is a great report to view specific skills which individual students are mastering or struggling with. If the efforts have been made to link learning standards to specific assessment questions, this report has unlimited utility.
The report can be accessed from the Teacher Dashboard. All that needs to be done to run the report properly is select the group of students to be included in the report and the assessments that have relevant assessment data. The report can be generated to view students in one or many classes and assessments.

NOTE: If more than one assessment is selected, the report will combine scores of similar standards that are linked to each assessment.
After the student(s) and assessment(s) are selected, click the "Student Standards" button. A Student Standards Options pop-up window will appear where report options can be selected to customize how the report gets generated.

-
Show Total:
By selecting any or all three of these options, the report will add a column that displays each students's points earned, percent grade, or grade conversion table equivalent for the assessments selected.
NOTE: If more than one assessment is selected, the Grade option will be unavailable. -
Show Excluded Questions:
The default report will not display questions that have been excluded from the selected assessments. If assessment data for these questions is needed for analysis, select this checkbox to include the data for these questions. -
Show Rubric Text Instead of Standards:
This option modifies the format of the assessment to display entered rubric text instead of the learning standards. By selecting this option, the displayed data will be relevant to the earned scores grouped by the categories that have been set up. This is a great option for rubrics that have been created in eDoctrina, expecially Fountas & Pinnel. To obtain ultimate utility of this option, it is recommended to view our help guide on FLeX Rubrics. -
Sort Students by Class:
This option will only be available if multiple classes have been selected on the Teacher Dashboard. When selected, the initial generation of the report will be sorted by class, then by student last name. If unselected, the report will be generated sorted only by student. -
Pick a Color Scheme?
The default available options are:- Class Comparison 2 Color Compare to Row Avg: Red(-10% or worse) and Green(+10% or better).
- Student-Standards: less than 60% Red, less than 76% Yellow.
- Column average 2 Color Compare: Red (-10% or worse) and Green (+10% or better).
- Administrator Snapshot: (less 60% Red, 60-70% Yellow, greater than 77% Green)
- Class Comparison 7 Color Compare to Row Average: 20% less Red, between 10% and 20% less Orange, within 5% White, between 5% and 10% greater Blue, between 10% and 20% greater Purple, 20% more Green.
NOTE: It is possible to create a unique color scheme by navigating to SETTINGS==>DATABASE SETUP==>ASSESSMENT==> CUSTOM REPORT COLORS. -
Standards to Show:
-
Regular:
This option is selected by default. "Regular" standards mean all standards that have been entered through the Standards Homepage. For more information about standards of this type, please visit out help guide on Creating Learning Standards. -
Report Card:
This option is selected by default and is only applicable to standards that have been entered that will be used on eDoctrina's standards-based report cards. Selecting this option is imperative if a district is using this module. -
Unit:
This option is selected by default. If selected, the report generate including all learning standards that have been linked to a Unit Plan in eDoctrina. For more information on how to do this, please visit our help guide regarding Unit Plans. -
Include Direct Parent::
Selecting this option will add additional column to the report that will display summative information regarding the categories in which the included standards on the report are from. For example, if a report is generated using standards that are both Algebra and Geometry, a column will be added for each "direct parent" and the contents will be the sum of all standards that exist in the report for their respective category. -
Include All Parents:
Selecting this option will add additional column to the report that will display summative information about ALL categories of the standards that are included on the report. For example, if a report is generated using standards that are both Algebra and Geometry, a column will be added for each "direct parent" and for any other parent that exists. In this example, a column will be added for "Mathematics" because both Algebra and Geometry are "children" of this subject.
-
Regular:
Once the desired Student Standard Report options are selected, click the  button to generate an HTML version of the report.
Report Details
The header of the report will list all assessments, and their respective Assessment ID#, for all assessments that are included on the report. It will also display the name of all classes that have been selected to be on the report.

If multiple classes have been selected, the each student will be listed accompanied by the class that they are enrolled in.


If all of the options in the Report Settings are enabled, there will be a few extra columns added. If the summative details about the assessment(s) selected is needed, be sure to enable the Grade, Score, or Percent options in the Report Settings. If the "Include Direct Parents" or "Include All Parents" is selected, an extra column will be added that will include summative data based on the categories of the standards that are included in the report.

The HTML version of this report also offers the ability to drill down further and identify the questions and/or assessments that comprise the data that is displayed. To obtain this information, simply click the hyperlink for each piece of data in the table. The first pop-up will display the scores of the questions that make up the data.

Selecting the  button next to each question will generate another pop-up that will display the question details.

06.A.6. How to Use the RTI Monitoring Report
Click here to view the Help Video
The RTI Progress Monitoring Report can be considered one of the most powerful reports within eDoctrina. This report can be used as supplemental evidence of student performance during RTI meetings or as an individual student report that can be provided to students throughout the school year. To generate a valuable RTI Progress Monitoring Report, it is recommended to administer more than one assessment for the desired student of group of students. To access the report, navigate to the Teacher Dashboard, select the group of students, select the assessments, then select the "RTI Progress" button.

After the students and assessments have been selected and the "RTI Progress" button has been selected, a pop-up will display allowing for selection of Report Options.

- Show standards data for Excluded Questions: By default, any excluded questions will be omitted from the assessment data that is displayed on this report. Selecting this option will include the recorded data in the standards data at the bottom of the report.
- Show Rubric Text Instead of Standards: If the goal is to display performance on specific rubric categories, enabling this option will display the rubric text and the relative data related to the student performance in each category. This option will only work if scoring rubrics have been entered within the Assessment Editor. For more information on how to create a rubric, please visit our help guide on FLeX Rubrics
- Exclude standards data: Select this option to remove the bottom section of the report. This option is useful if the assessment data is the only information that is needed for the report.
- Show Overall Average Row: Select this option to add a row at the bottom of the table to show the overall average of the student's assessment scores.
- Exclude Assessments with No Data for a Student If the student does not have data for one of the selected assessments, selecting this option will keep that assessment from showing up on their report.
Please note that certain fields of data can also be hidden from the report. You can select those fields on the right (Grade, Raw Score Data, Percent Score Data, Out of Values for Raw Score).
Once the desired Report Options are selected, click the  to generate an HTML version of the RTI Progress Monitoring Report.

NOTE: This entire report or a specific student can be generated as a PDF by selecting the  or the
  , respectively.
Report Details
The top section of the report contains the assessment data for each student regarding the selected assessments. The standard information in this section is the assessment date, the student Score, the student Percent Score, and the corresponding district average's. The Grade will display if and only if a grade conversion table has been linked to the included assessments. Furthermore, the RTI Target Score and Percent will display for each assessment if there has been one indicated on the linked grade conversion table. For more information on how to add grades and target values, please view our help guide on Grade Conversion Tables.

The next section of the report is a graphical representation of the assessment data above. It provides an easier way to view trends and relative student performance. The height of bar in the graph is equivalent to the students earned percent score. The line allows for direct comparison of the individual student in relationship to all other students that have taken the assessment within the district. The RTI Target, if included in the assessment, allows teachers to see if each student is exceeding or failing to meet the expected target. The report average is also included on this bar graph, which is the average of the students that have been selected upon report generation. This report average is extremely valuable because it provides the opportunity to compare an individual student against students that are most comparable. Of course, it would not be beneficial to compare a remedial level student against a group of honors level students.

If last section of the report, if included, will display the student performance data regarding the learning standards that have been linked to the questions within the selected assessments. This information can be extremely valuable as it allows teachers to pin-point what skills or proficiencies each student is struggling with. If there is an obvious difference, this is a prime indicator of of what skill needs to be improved from an instructional or interventional point view of view. If there is an intervention opportunity, a student goal can be created for this student to monitor their progress.

The displayed data for each data could come from many assessments. If it is necessary to track down which assessments have contributed to specific standard data, click on the percentage or bar and a pop-up window will be generated that displays the assessments and their respective score for the selected standard. You can also select the down arrow in the upper right corner of each cell to expand the assessment data within the standards statistics.
Pop-up:

Expanded standard statistics:

06.A.7. How to Run the Multi-Assessment Report
The Multi-Assessment Report is designed to view student data for one or many assessments on a single report. The report provides data on many different levels as the assessment data can be displayed at the highest level (per district) all the way down to the lowest level (per student). The option to display assessment data in many different formats and the ability to export this report to Microsoft Excel gives ultimate utility to teachers and administrators to view and analyze assessment data according to their preferences.
Comparable to most reports in eDoctrina, the Multi-Assessment Report can be accessed from the Teacher Dashboard. Simply select the students to include in the report by manipulating the "Select students" filters, then select the one or many assessments to display side-by-side.

After the "Multi Assessment" report button has been selected, a pop-up message will appear allowing the user to select the desired Report Options.

Hierarchy Levels: The Multi-Assessment Report is designed to display grouped data that can be broken down all the way down to the individual student. The report will always generate displaying the overall district data for the selected student(s) and assessment(s). These options allow the users to view more specific groupings of data by selecting school, course, and/or class as an additional hierarchy level. Coloring Mode: The data contained in the chart will display in colors according to the grade conversion tables that have been attached to each assessment. Selecting Font will highlight the text in the these colors, while selecting Cell background will highlight to entire cell. Additional Hierarchy Levels: There are many student fields that are linked to students in eDoctrina. If this information exists, selecting any one or combination of these options will enable the ability to compare data according as it will be added to the report hierarchy.
Once the Report Settings have been selected, click the  button to generate the Multi-Assessment Report.
The initial view of the report will be minimal as it will only display the assessment data about the school, which is the highest hierarchy level.

- Data Format: There are many ways that assessment data can be displayed. Changing the data format will make the report display values that are related to assessment scores, the number of student who have taken the assessment, basic statistical information, or Grades(if a grade conversion table has been linked to the selected assessments).
- Avg Format: This option controls how the numerical data will display in the "Average" column.
- Excluded Questions: By default, excluded questions will be omitted from the data on this report. If the included assessments contain questions that have been excluded from the assessment scores, selecting "YES" will modify the assessment scores to include the questions that have been excluded.
- Show no data: Selecting "YES" here will include students within the selected classes that have no assessment data linked to the selected assessments. Selecting "NO" will exclude all students with no data from the report.
- Expand/collapse level: Depending on the hierarchy levels selected in the report settings, expanding and collapsing these levels will modify how the data displays within the report. The highest level displays relevant assessment data for the district. The following hierarchy levels will display assessment data broken down by schools in the district, then the courses within those schools, then any selected additional hierarchy levels, then on an individual student level.
- Export to Excel: The option to export this report to Microsoft Excel is available so further data analysis can be performed.
THe image below shows the Multi-Assessment Report that has been expanded to show all hierarchy levels all the way down to the individual student. This report will display assessment statistics by grouped by, district, school, course, class, and for each student on the selected assessments.
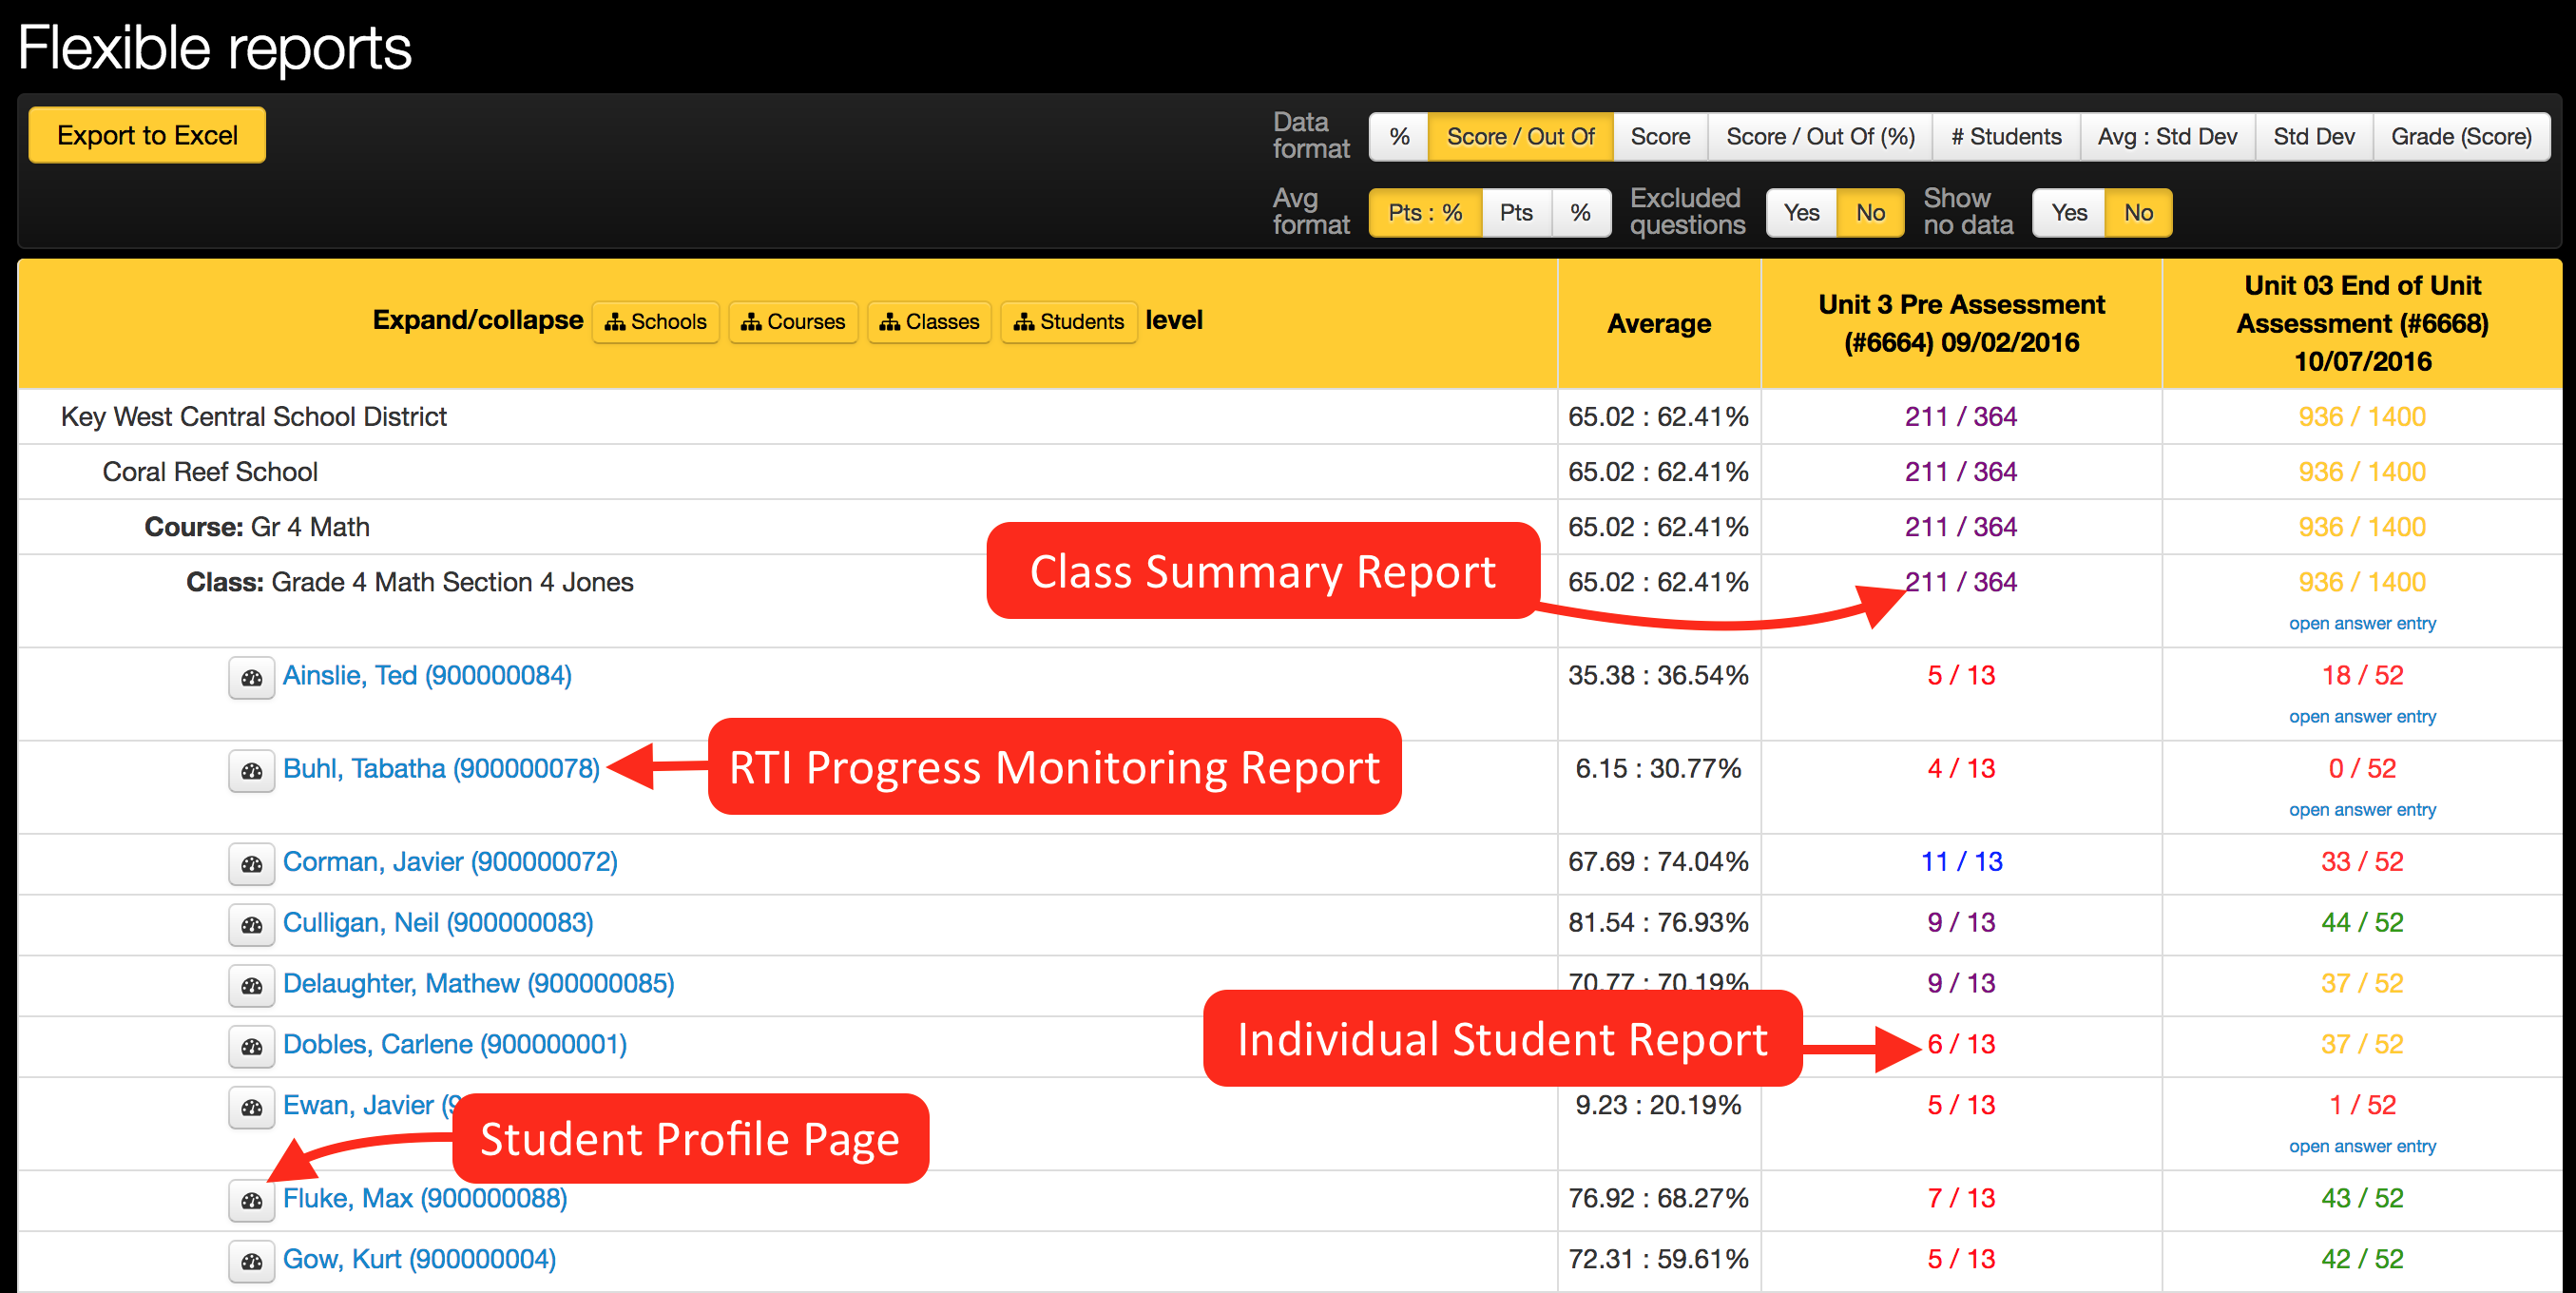
This report has ultimate utility as it is possible to generate Individual Student, Class Summary, RTI Progress Monitoring, and Student Profile reports. For more information about these reports, please refer to our help guides regarding Basic Reporting.
06.B.1. Item Response Report
The Item Response Report is designed to display the responses to each question on the selected assessment for all of the selected students. The report will show all responses that exist in eDoctrina while providing a student score and summative information about each question.
To generate this report, navigate to the Teacher Dashboard, select the group of students to pull the report for, select the assessment(s) that should be included, then click the Item Response button.

After the desired students are selected and the "Item Response" button is selected, a pop-up window will be generated allowing the user to select the Item Response Report Options".

There are two versions of the report: the Standard Report and the Comments Report.
Standard Report
The Standard Report is more widely used and has some extra options to customize the report according to different preferences:
- Show Question ID: Selecting this option will add a row to the column labels of the report that will contain each of the questions' identification numbers.
- Show Rubric Labels: Selecting this option will display the titles of all of the rubric categories instead of the question number. This feature will work if and only if rubric lavels have been entered for the selected assessment.
- Show Rubric Values: Selecting this option will display the description of the earned rubric score instead of the point value.
- Color cells instead of text: By default, correct responses will display in green font and incorrect will display in red font. Selecting this checkbox will highlight the entire cell with the matching color, leaving the font color as white.
It is also possible to select between two different Cell formats: Standard or X/Y.
- Standard: This option will display the recorded response. For example, if the question is multiple choice, the cell will display the student's recorded answer for each question.
- X/Y: This option will display the earned points for each question in relation to the provided student response.
If the default settings are used to generate the Item Response Report, it will look similar to the following image.
 NOTE: This report is extremely helpful if the goal is to move specific student responses to another third-party platform.
  Here are a few examples of what you can see when clicking on the student responses:


Comments Report
The Comments Report should be used if and only if the time has been taken to enter comments electronically through eDoctrina. If these comments have been entered, the Comments version of the Item Response Report will display all of the Teacher Comments that have been made for each student on each question for the selected assessment(s).

Notice how the full comment does not display initially, but can easily be viewed by selecting the  hyperlink next to the comment.
Both of the Standard Report and Comment Report can both be exported to Microsoft Excel by selecting the  button in the top-right of the report.
06.B.2. How to Use the Regional Assessment Report
This report gives educators the ability to see the results on common assessments within the district and schools. Report represents average score for the chosen assessment within district and school.
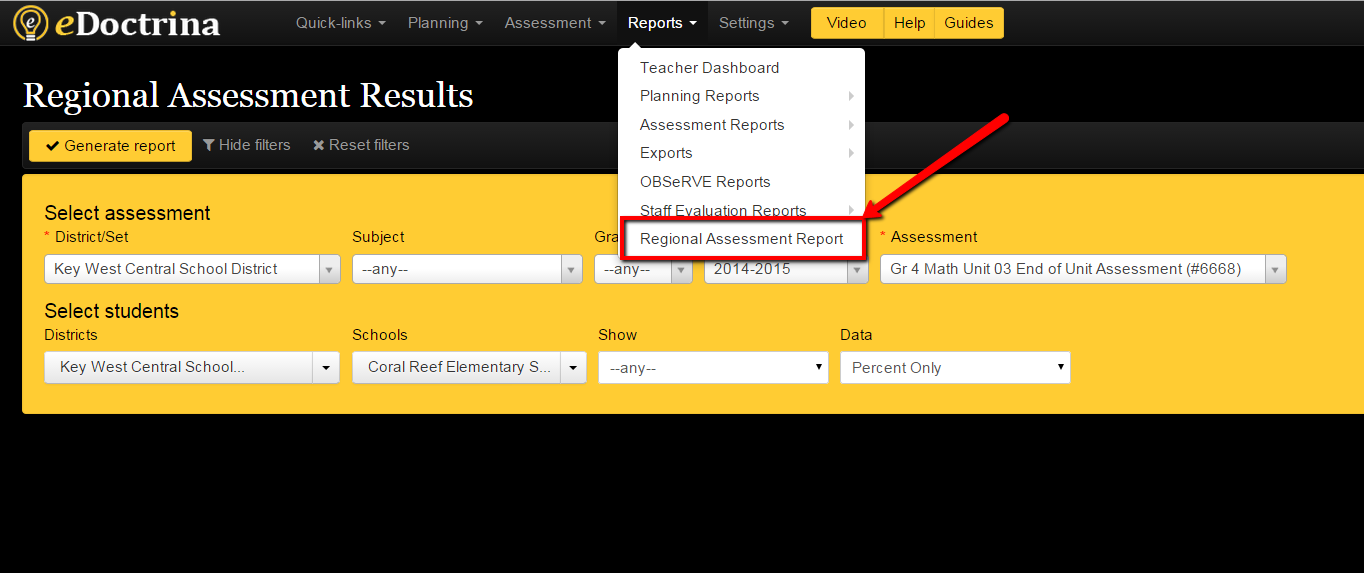
After selecting this report from the navigation bar of eDoctrina (shown above), user will see Regional Assessment Results screen. User should set filter settings for the report and click on “Generate Report” button.
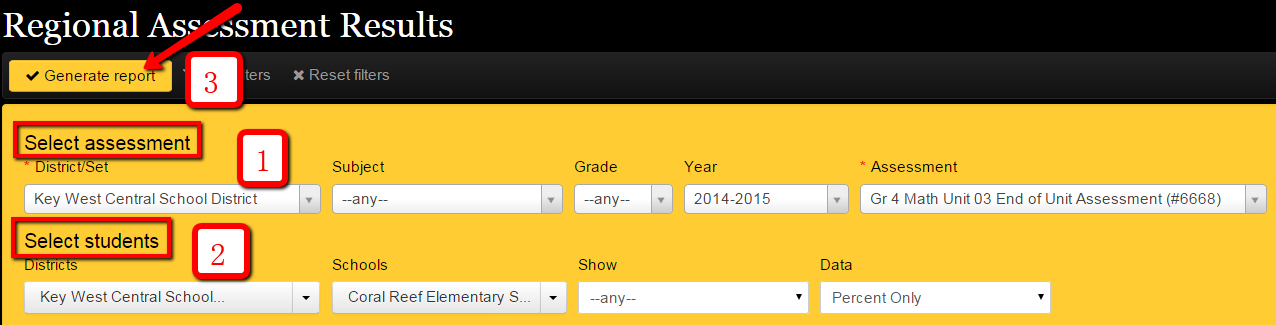
The Regional Assessment Report is showing up how students (from the chosen school and district) performed on every question of the assessment.
User can see more detailed data on every question in item analysis report. To see this report user can simply click on the score in Regional Assessment Report:
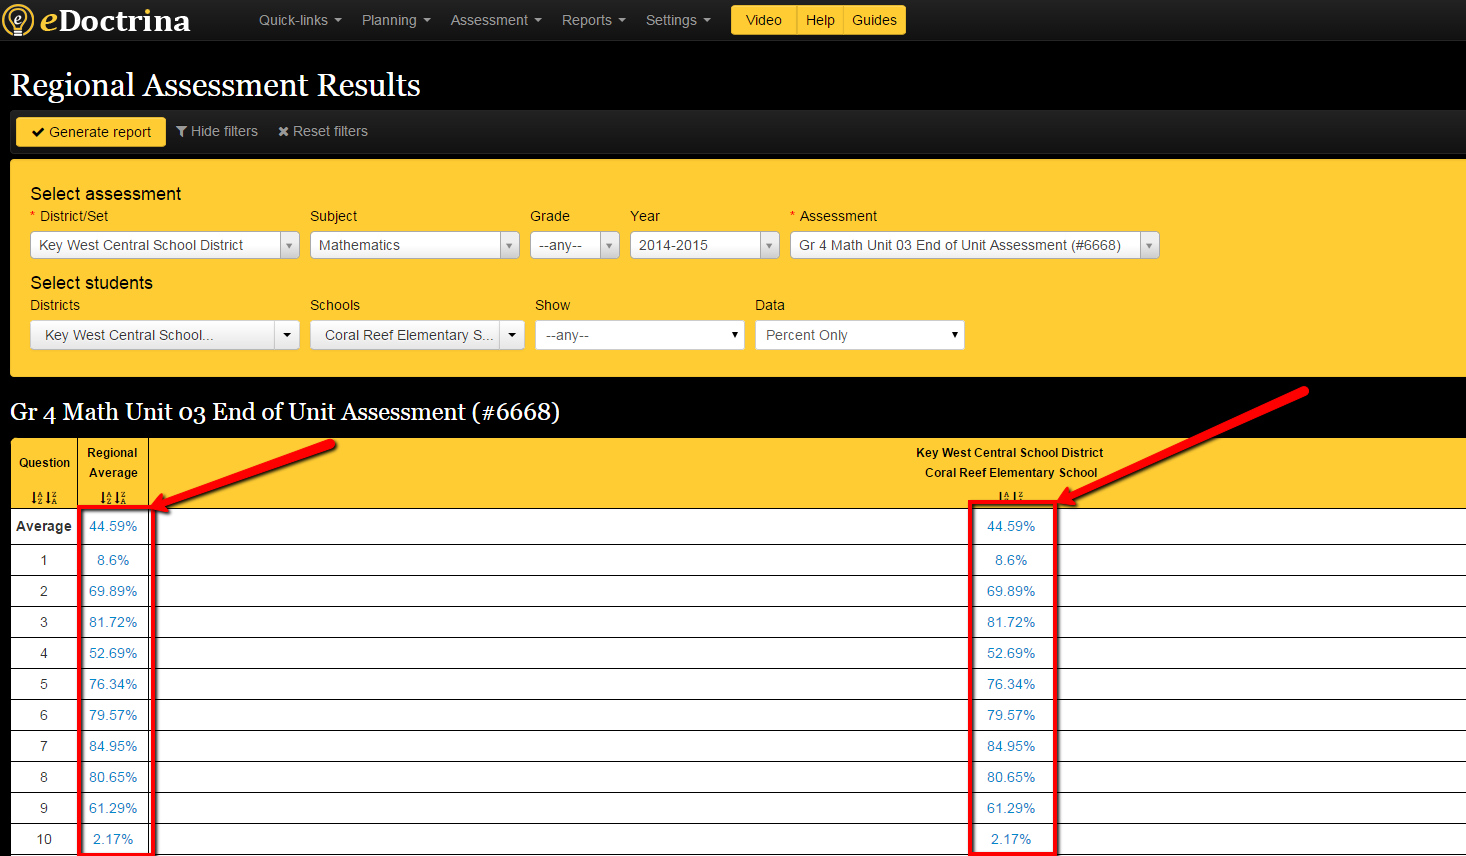
When user scrolls to the bottom of the report, he will see how students performed on every standard (linked to the chosen assessment):
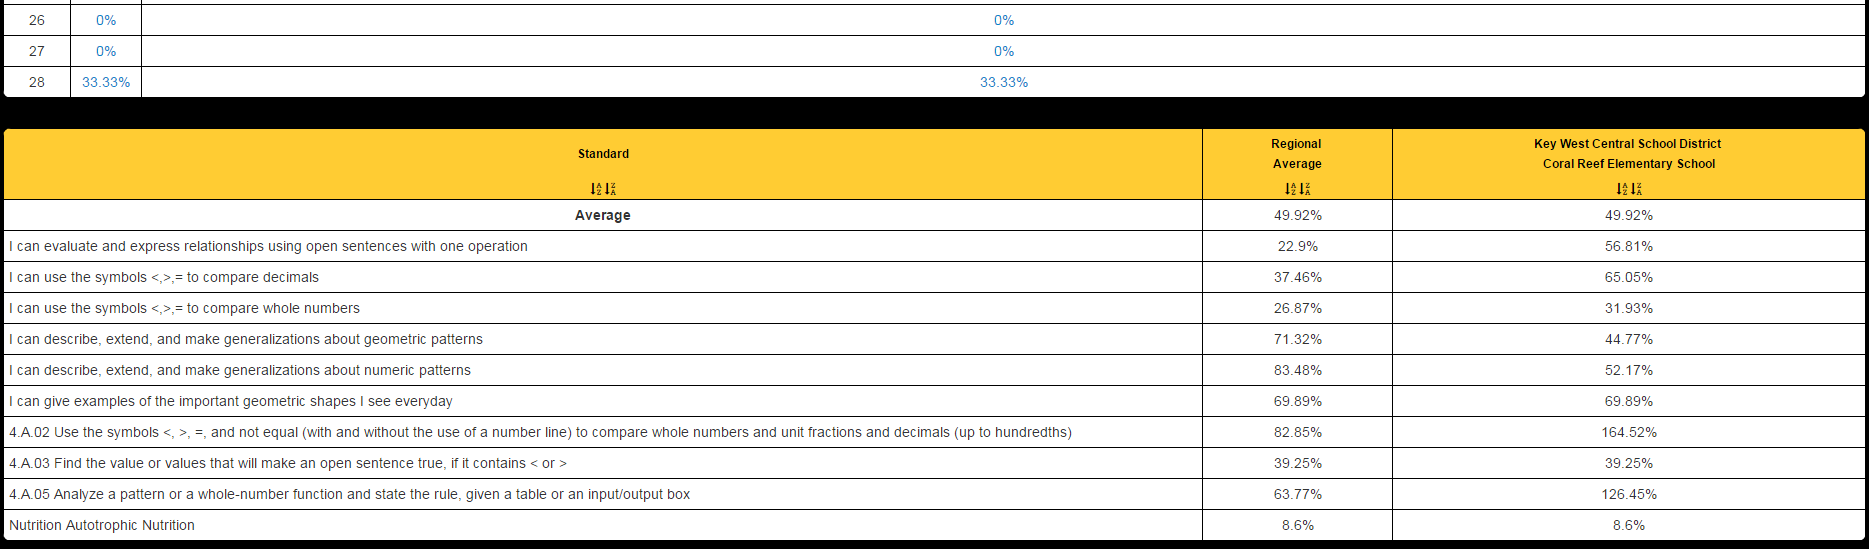
*Note: This report can be exported to Excel as well as many other reports in eDoctrina.
06.B.3. How to Use the Custom Export Report
The Custom Export Report can be found under Advanced Reports on the Teacher Dashboard.
After filtering for the Course(s), Class(es), and Assessment(s) select the "Custom Export" option:

The following popup will appear, which allows you to select which value will populate specific columns within the report. You may select up to eleven columns, where the fields are selected from the drop down. The available fields are as follows:
- Student UID
- Student Secondary UID
- Student First Name
- Student Last Name
- Student Last, First Name
- Student Grade
- Student School Name
- Test Name
- Test ID
- Student Score X / Y
- Student Score X
- Student Score %
- Proficiency Table
- Test Administration Type
- Question Points Earned
- Standard Points Earned
- Test Date
- Test Grade
- Question Rubric Score
- User defined value:
Users also have the option to "Show Excluded Questions":

Once the data is selected in the desired columns and applicable excluded question checkboxes selected, click the "Show Report" button to view an HTML report that can be easily exported to Excel:

06.B.4. Assessment Statistics Report
The Assessment Statistics Report can be used to examine the validity and reliability of an assessment.


07.A. RTI Tracker (Student Goals)
The eDoctrina RTI Tracker is a tool for teachers and support staff to use when creating and tracking student goals. This tool allows students to have multiple goals, as well as multiple goal types.
To navigate to the Student Goals Homepage, users can find the Student Goals option in the Planning pull-down within the navigation bar at the top of the screen.

The Student Goals page will open and be shown as it is below. Please see the menu to learn more about each key feature on the Student Goals page.

-
Filters: The student and goal filters can be used to find particular students to view/create goals for, or to narrow down the search by existing goal data (such as goal status, goal type, etc.). Users will have access to view students that they have access to in the district's SIS, while admins will have access to the entire school or district.
-
Student Checkbox: Users can select specific students (and in turn, all of their existing goals) using this checkbox to utilize icons 14-19.
-
 : The copy icon allows you to copy all goals for a particular student. Users can select what data from the goals they'd like copied, as well as a target year.
-
 : The Student Profile Page icon allows users to easily navigate to the Student Profile page without having to utilize additional filters. Clicking this icon will open a new tab where users can see all of the students assessment data, BeHave codes, goals, and forms for a given school year.
-
Student Information This section will show users the students they have access to view/create/edit goals for. The student's name, UID, and school are listed in this column.
-
 : The plus icon allows users to create new goals for their students. Selecting this button will bring the user to the student goal editor where they can being a new goal.
-
Individual Goal Checkbox: This checkbox allows users to select specific goals as opposed to all goals for a particular student, as exemplified in the Student Checkbox (#2).
-
 : If the user sees an edit pencil icon next to a goal, this means they have editing rights to this goal (whether as the creator or because they were given access as a service provider or linked teacher). Editing permissions are different for every district. If you are not seeing an edit pencil for a student but should be, please contact our help desk at [email protected] for assistance.
-
 : This copy icon is for a specific goal as opposed to the one exemplified by icon #3, which is for all goals linked to a particular student. Users can use this copy icon to copy just one goal as opposed to all goals for a particular student.
-
 : The print icon allows users to print a student goal report or any forms that have been created and linked to the student goal platform. When printing a goal report, users can select what data from the goal they'd like included or excluded from the report.
-
Goal Information: This section will show users any existing goals for a student, as well as some general information from the goal(s), such as the description, creator, linked subject, goal type, and school year.
-
Dates:This second will show users the start and target dates for the goal, as well as the end date (if one exists).
-
 : The trashcan icon allows users to deactivate any goals they have rights to. Goals can be deactivated individually using the icon next to the particular goal, or in mass using the goal checkboxes and trashcan at the top of the column.
-
 : When a user selects multiple student checkboxes, they will have the option to use this icon to create a similar goal and link it to multiple students at once. Once this icon is selected, the user will be able to fill in all general information in the goal editor and link it to the selected student. This icon is best used when users are seeing students with a similar goal in a small group setting.
-
 : When students have a similar goal created for them, this icon can be used to enter progress monitoring data for multiple students at a time. This icon can be paired with the individual goal checkbox so that the correct goals are selected to enter data for.
-
 : While users can print student goal reports and forms for individual goals, they can also select multiple goals to print at a time. Once goals have been selected using the individual goal checkbox, they can mass print them using this icon.
-
 : Goals can be selected to be exported into an Excel spreadsheet. When exporting data, the student and goal information are automatically included but users can choose to include progress monitoring data and/or any discussion board comments.
-
 : While goals can be copied one at a time or by student, they can also be mass copied using the student and individual goal checkboxes. Multiple goals can be copied at a time allowing the user to select what data is copied and what school year to copy them into.
-
 : Users who have utilized the "Create Goals for Multiple Students" icon find a lot of use with this icon, as it allows them to then mass edit those goals easily and quickly if a mistake was made or if data needs to be changed/updated.
07.D. How To Create a Flex Schedule Course & Class (and Flex User if needed)
The Flex Scheduling tool allows users to manually create unique classes that do not have to be set up in the district's student information system. This tool can be helpful when creating specific classes for RTI or Intervention purposes. Students can easily be enrolled and un-enrolled into the flexible classes as groupings may change throughout the year. This can all be managed at the teacher level. Please note that only eDoctrina users with District Administrator rights can create Flex Courses and Flex Users.
Creating the FLeX Course
To navigate to the Flex Schedule Tool to create a new course, click on SETTINGS > STUDENT INFORMATION DATA > COURSES.

Once you are on the 'Courses' screen, click on the '+ Insert' button. It is recommended to create a new course for each of your buildings using the screenshot below to identify the mandatory fields. The UID can be something unique like “Flex Course 01”

Creating the FLeX Class(es)
Just like creating a FLeX Course, to create a new class, click on SETTINGS > STUDENT INFORMATION DATA > CLASSES. Click on the '+ Insert' button directly below the 'Classes' heading.
A new window will open with several drop down filters that looks like this:
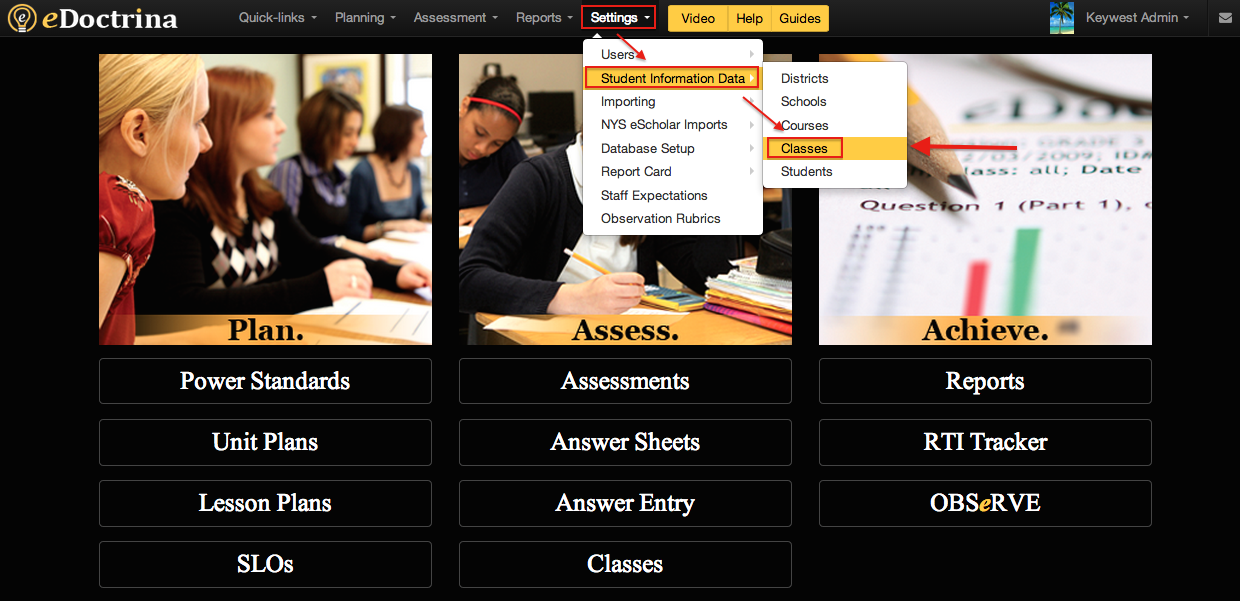
Once you are on the 'Classes' screen, click on the '+ Insert' button directly below the 'Classes' heading.

A new window will open with several drop down filters that looks like this:

In the "Create Class" pop-up, simply click on each of the mandatory filters to select the desired information you want your new class to be linked to.
All fields marked with a red asterisk are mandatory, and must be filled out before eDoctrina will allow you to save and close the window.
To make this class "flexible," switch the option to 'Yes' so it is highlighted in gold/yellow.
The UID for the class can be your choice. However, please make sure it does not match any UID's in your Student Information System. If you are creating multiple classes linked to one course, you can continue this naming convention: NameofClass002, NameofClass003, etc.
Also from this screen, you have the option of linking co-teachers to this class. There is no limit to how many co-teachers you link to each flex class - just click the checkbox next to the name of the co-teacher you are linking.
Please note: Any staff linked to this Class as a co-teacher will have the ability to edit content linked to this class and access all data reports for this class.
When the class is setup and linked accordingly, click the 'Save' button and you will be taken back to the 'Classes' screen.
Your newly created class will show in the list of classes below the records bar.

Assigning Students to the Class
To assign students to this class, click on the 'person' icon, located to the right of the edit pencil.
This will take you to the 'Student Schedules' page. This is where you can assign/remove students from a class and assign dates outlining when each student will be enrolled in the class.
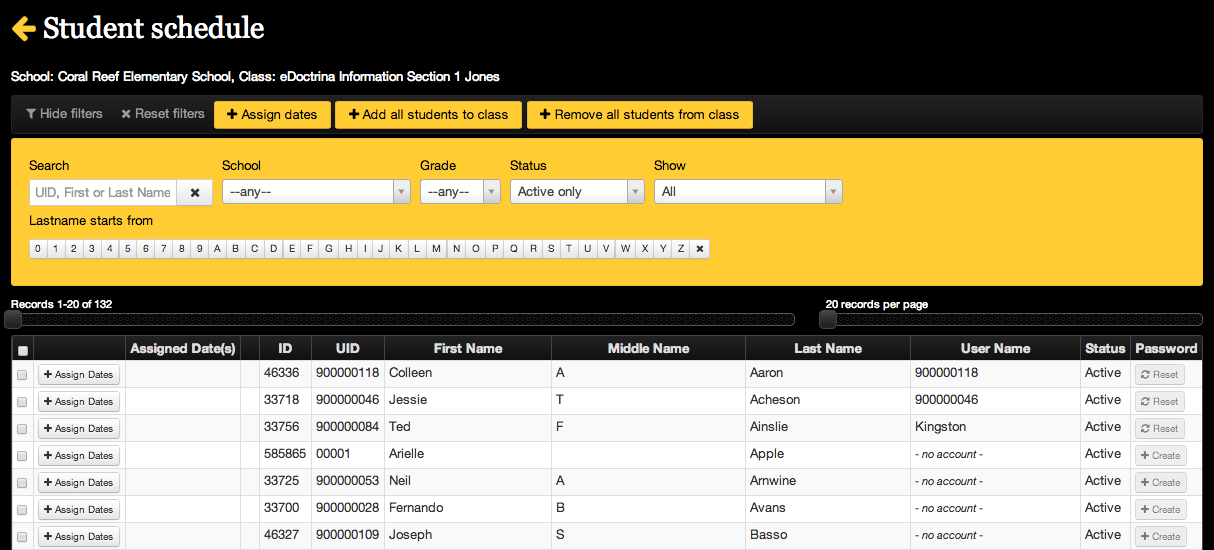
To assign date ranges for students to be enrolled in a flex class, you will click on the '+ Assign Dates' button to the left of the students name:
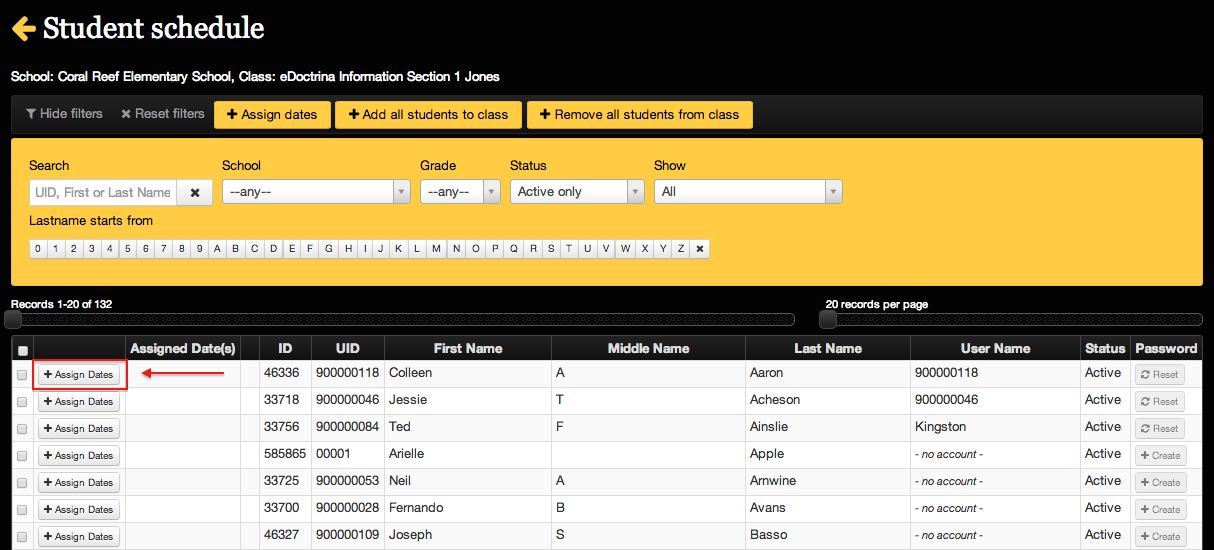
A small pop-up window will open, and allow you to select the dates for each student:
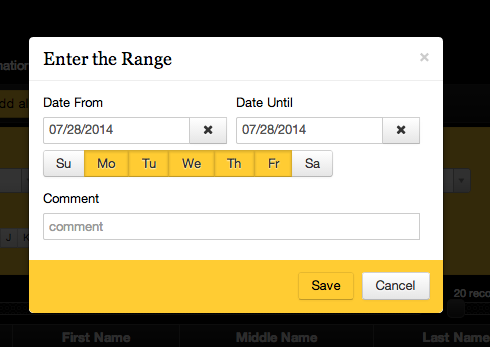
You also have the option of using the multiple selection check box which will allow you to select groups (or all) students in the list to assign dates to:
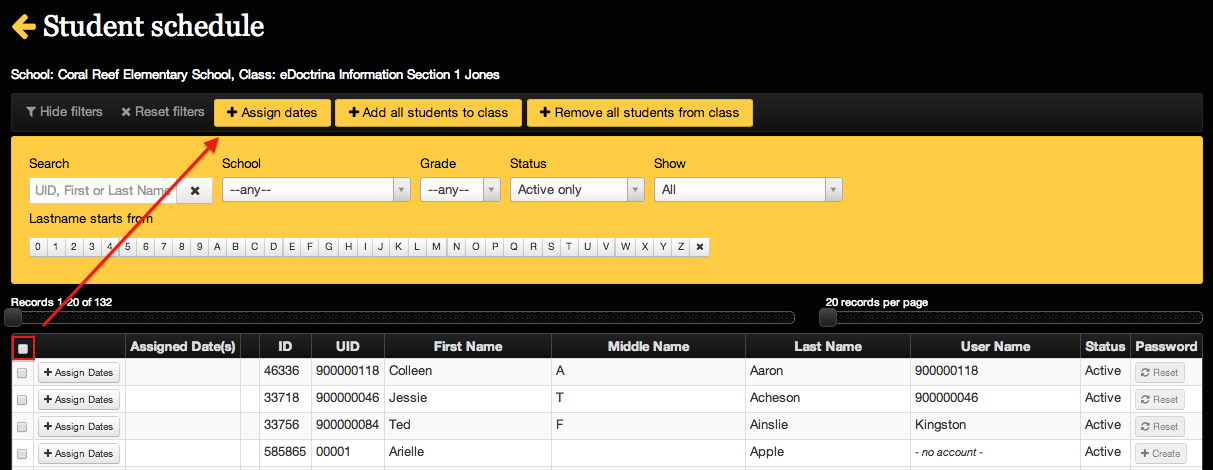
Please keep in mind, when creating a unique Flex class, you may need to create a unique Course first. This will depend on the Course you want your class linked to. Please contact [email protected] for assistance before manually adding courses to your district.
Creating the FLeX User
To navigate to create a new Flex user account, click on SETTINGS > USERS > USERS. Users should only be created as flex users if the staff members are not being imported automatically from your student information system. Click the "Insert" button to create a new user.
(1) Complete the basic mandatory information for the new user including First Name, Last Name and Email.
(2) Choose Type: Teacher and the school the Flex User works in. The UID should be something consistent and unique for each Flex User (example: UID: flxusr01, flxusr02, etc.)
(3) Confirm the Account State is Active
(4) Choose a login and password for the user
(5) Click the "Flex User" checkbox located further down the page under Advanced Setting options. This will ensure the user account will not be deactivated by the district's nightly imports.


07.E. FLeX Scheduler
The FLeX Scheduler is used to create flexible classes for situations like AIS, after-school intevention programs... It is important to know that only an administrator can create a FLeX class. This needs to be done prior to the teacher enrolling students as described below.
Assigning Students to Classes
To assign students, go to the classes editing screen, either by selecting Settings > Student Information Data > Classes from the menu bar OR by clicking on the Classes button on the home page.
 Find the class you would like to assign students to and click on the students button.
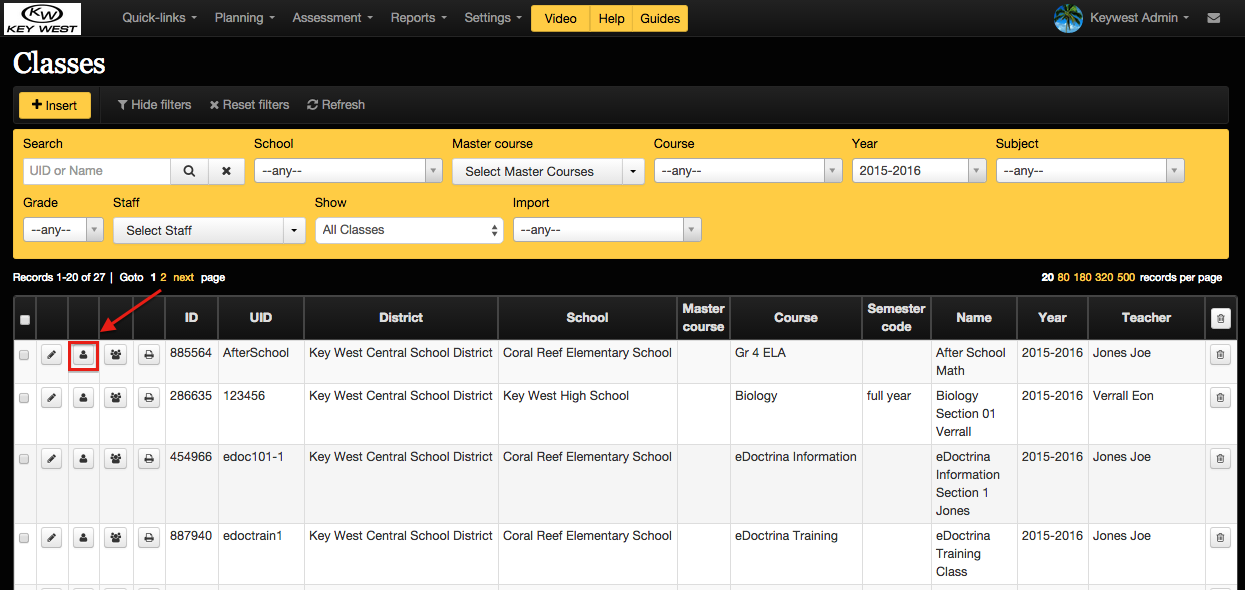
Use filters to find the student(s) you want to enroll in the FLeX Class. Click the checkbox for the students you would like to add and then click the "Add selected students to class" button.
(Students in list highlighted in gold are enrolled in the class, students in list who are highlighted in white are not in the class, but available to be added.)

Students can be assigned certain date ranges they are enrolled in this FLeX class. There are 2 ways to assign dates for the students to be in the class:
(1) To assign specific date ranges for individual students, click on the "Assign Dates" button located to the left of the students name. Once clicked you will be prompted to fill out the date ranges. Select the date range, enter comments / assignments and save.
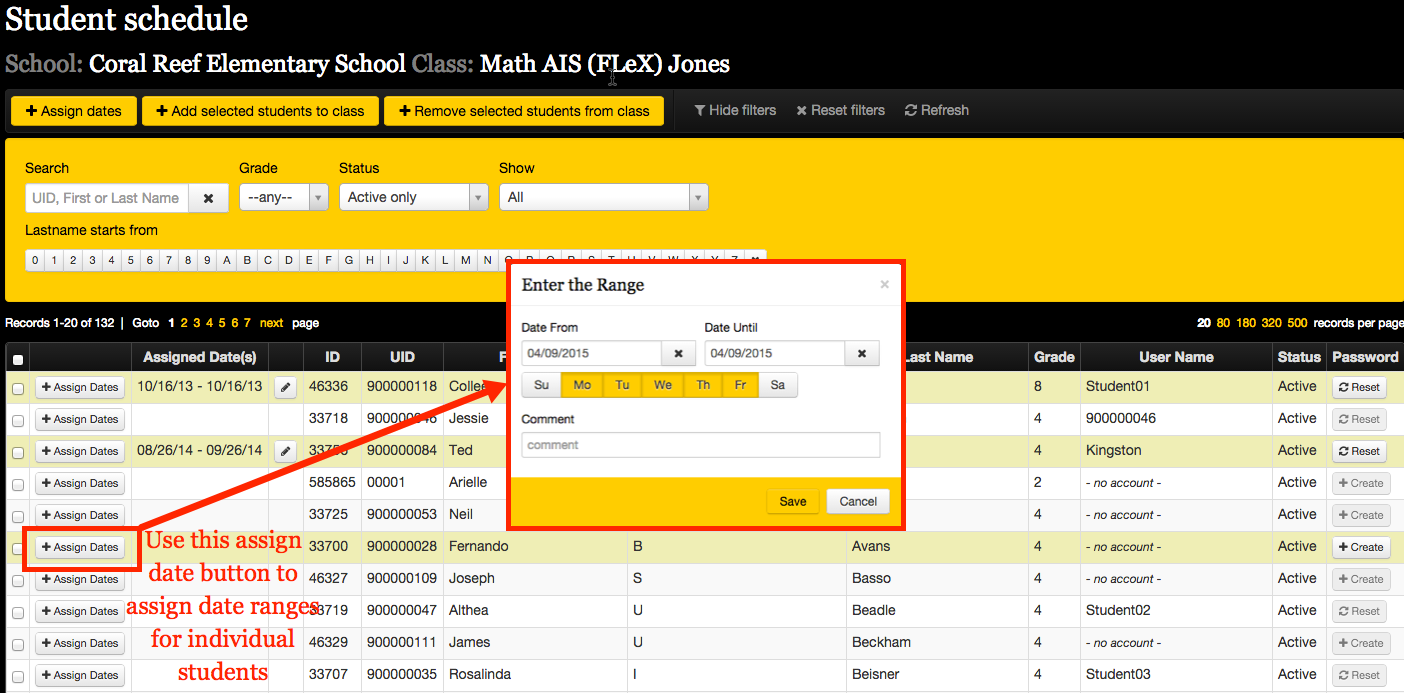
(2) To assign the same date ranges for the entire class or a portion of the class, use the checkboxes to choose the group of student you'd like to assign the same date ranges then click the "+Assign dates" button in the upper left corner of the page.
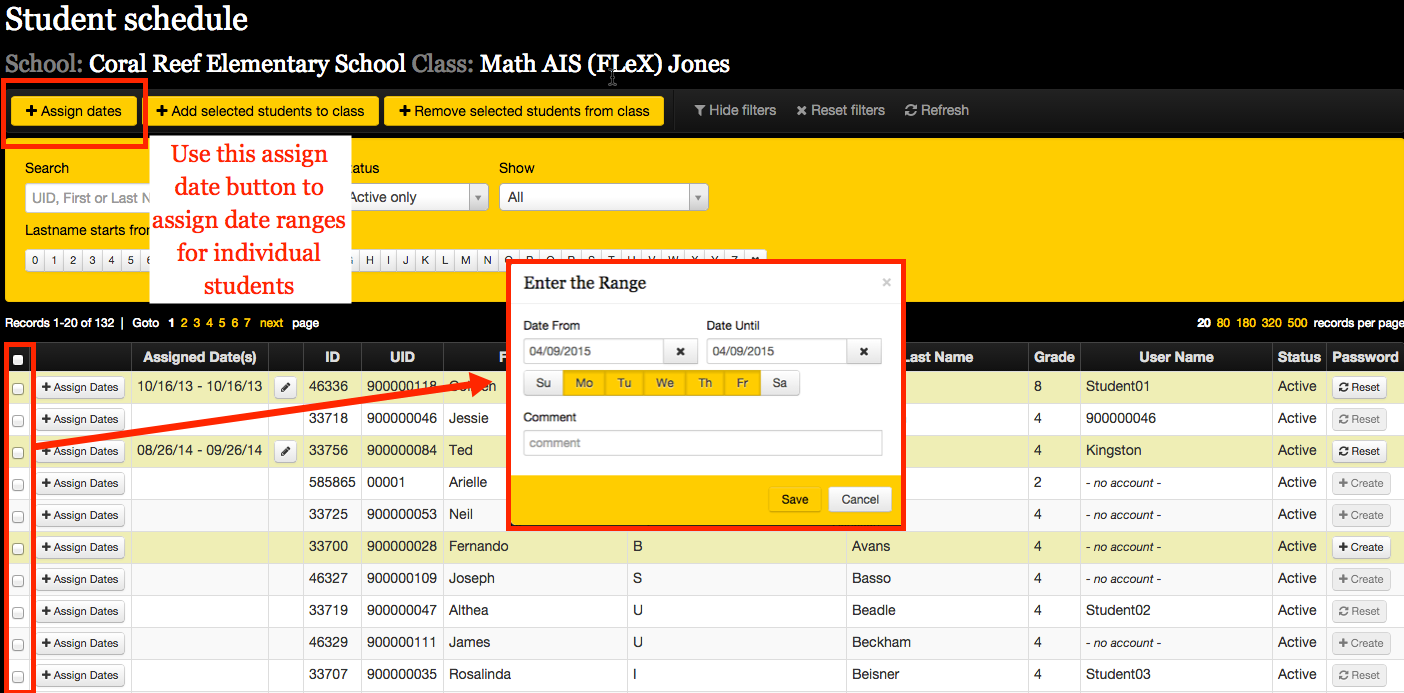
Lastly, change the "Show" filter back to "Enrolled Students Only" to view the class roster and assigned date ranges.
Document Assignments and Student Comments
It is easy to document assignments and comments about students so you can easily run a report on their current standings. To enter notes about assignments, practiced skills, etc... click on the edit pencil next to the students name to add comments for a particular day.
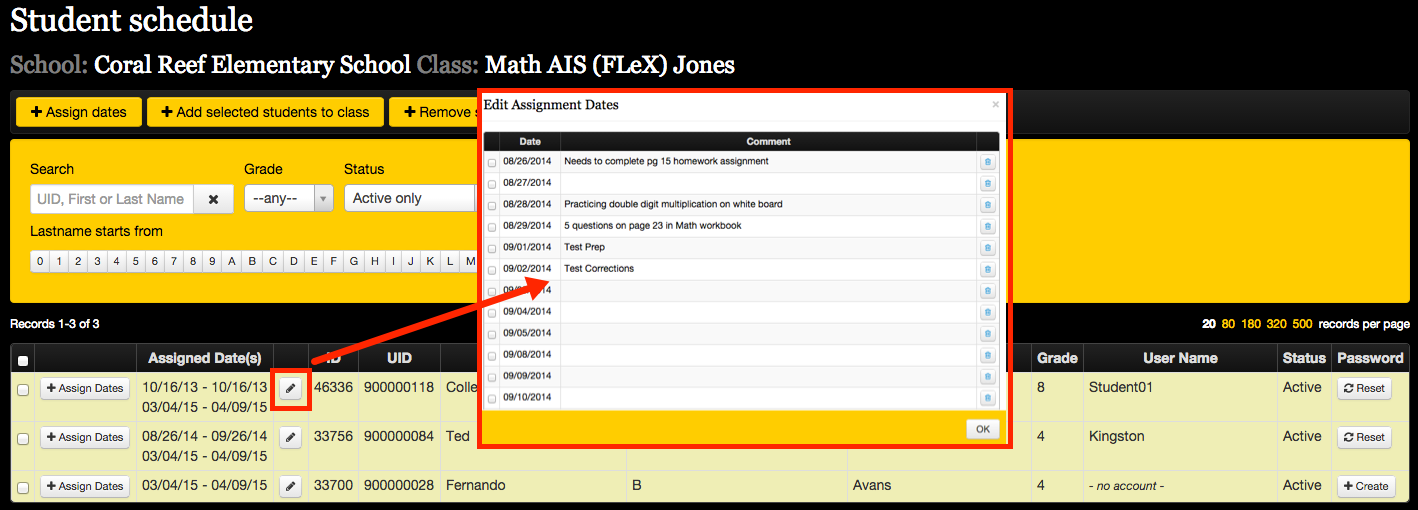
To print a FLeX class report that includes the assignments/comments navigate to the Teacher Dashboard.
Use the "Select Students" filters to choose the FLeX class. You do not need to choose an assessment.

The FLeX Schedule Report (Activity Report) can be run for one day or a series of days.

13.E. How to Set Up an Observation Rubric
Setting up an Observation Rubric
Setting up a teacher observation rubric/form within eDoctrina is a task that can only be completed by a user at the "Administrator” level (school or district). There are many controls that need to be understood, which means it is important to reach out the the eDoctrina team before taking on this task to ensure a high quality rubric/form is built in your district.
The first step is to navigate to the Observation Rubrics option in the Settings menu as this is where the shell of the rubric/form is managed.

This page will list all of the observation rubrics that are linked/assigned to the district in accordance with the selected filters.

- The
 button will exist for any user that has permissions to create new observation rubrics. But please make note that some rubrics entail a very complicated score calculation methodology and it is a good practice to contact the eDoctrina team for gidance in configuration of such rubrics.
 - The will be filters to show which rubrics are linked to specific schools and school years. Just rememeber that a single observation rubric can be linked to one or many schools and/or years.
- The
 edit button will be available for any observation rubric that the signed-in user has access to. For some rubrics, this will not be available because an eDoctrina team member may have configured the rubric and this rubric should not be able to be edited by some other user. If you would like to make changes to one of these rubrics, then please contact the eDoctrina team.
- The
 copy button will be available for any observation rubric that the signed in user has access to. Please be careful when using this tool as copying a rubric will also copy all rubric assignments and may lead to duplicate rubrics displaying. If you are looking to move a rubric into the next school year, you are probably looking to add another rubric assignment, not another rubric.
- The Hide from teachers checkbox is available to ensure that teachers cannot view observations within eDoctrina. This control is currently only applicable to the electronic access, so you should keep in mind that email notifications still may apply.
NOTE: If eDoctrina has configured this rubric for the district, the edit pencil may be unavailable. In this scenario, any changes that need to be made will have to be done by an eDoctrina team member. The copy button will be available to all users with access to this page, but it is strongly recommended to not copy the rubric unless there are significant change to the rubric. In any scenario, it is best to reach out to the eDoctrina team to receive some basic training on this before changing any rubric configurations or settings.
Creating a New Observation Rubric
To create a new rubric, begin by selecting the button.
A pop-up window will appear that requires a name to be entered for the rubric. This name will be how this rubric displays on many printed forms and in the rubric filters throughout eDoctrina. Some examples of this name may be "Teacher Observation Rubric" or "Goal Setting Form".

The next step would be to designate an assignment for the rubric. If you are unsure about how the rubric will be assigned and would like to start building the staff expectations within the rubric, just click save and navigate over to the staff expectations page to start building. There are some qualities that will be determined, such as categories (i.e. announced), in the staff expectation configuration, which means that it is sometimes better to leave the configuration of the rubric assignments until after the rubric starts to take form in the staff expectations.
If the rubric assignment is ready to be made, click on the button to generate another pop-up where many of the details of the observation rubric assignment will be determined.

- Name: The name of the rubric assignment will be how the rubric will display on the Assignments layout view of the OBSeRVE Dashboard. Most rubrics will only need one assignment, but there are some scenarios where more than one assignment needs to be created for a specific rubric. Some examples of this would be if there are different minimum observation requirements for the rubric (ex: Non-tenured received 2 announced observation and Tenured recieves only 1). There may also be unique print settings for each school or different electronic signature statements. If there are any differences in the settings within this pop-up, a unique assignment must be made and the name is the best way to differentiate these differences.
- Year: The year selection determines which year the rubric will be available in on the OBSeRVE Dashboard.
- District (if applicable): This selection will only be available to users who have accounts in multiple districts. This occassion is rare and this selection is mostly not applicable to district users.
- School: If an observation rubric is to only be available in one school within the district, the school indication should be made here. If the rubric is to be available across the entire district, please keep the School pull-down as "--All schools within district--"
- Locked: Selecting this assignment setting prevents any new observations from being created within the assignment and also prevents any future updates to be made on observations that have already been conducted. This setting is best described as an "ice down" for the specific rubric assignment.
- Show Points: Many observation rubrics/forms are linked to related point values as the observer selects the associated ratings. If the associated point values are to be displayed on the observation form and the printouts, this setting should be selected. If the points are to be hidden, keep this setting unselected.
- Sign with button only: This setting applies to observation rubrics where electronic signatures are enabled. By enabling this setting, an electronic signature can be applied without having to enter the signed in users Username or Password. It is suggested that this only be used for non-performance related observation rubrics as electronic signatures are important for data validity.
- Collapse by Default: Each observation form is designed with a specific parent-child relationship among the staff expectations that have been entered. Enabling this setting in the rubric assignment will load the observation form initially by displaying only the first subcategory (child) underneath the main parent. This is a great setting for observation forms that have a few main categories and each of these categories will be rated in separate instances. The recommendation is to keep this setting unselected until the staff expectations are built so the collapse feature can be better understood.
- Show not previously rated message: Depending on the configuration of the staff expectations, there may be a default rating selected that makes it difficult for an observer to recognize which expectations have been previously rated. Enabling this setting will display a message underneath the rating of the staff expectation indicating the the rating has not been previously rated.
- View assignments by observer: This setting is to be used for calibration training as observations performed by other observers will not count towards the minimum requirements that the signed in observer will see. In other words, if there are two minimum required observations, each observer will be able to complete the two observations without the observations of other observers counting towards this minimum requirement. In application, one would set a minimum of one observation for this rubric assignment, enable this feature, add a calibration video, then ask the observers to fill out the observation form in accordance. This will allow for comparable data and great conversations about calibration.
- Rubric Code: The rubric code is applicable to the "Auto Assign Rubric" function within eDoctrina. Assigning a rubric to each staff member is an essential step to being successful using the OBSeRVE module. If it is desired to manage rubric assignments through automated imports, each staff member should have an associated rubric code imported in column 13 of the staff import file. Maintaining rubric assignments in this manner will automatically update rubric assignments as long as the assigned rubric code for the staff member matches the rubric code in the rubric. There are many configuration steps required to get this set up properly, so it is recommended to reach out to an eDoctrina team member if this sounds like a good fit for your district.
- Ignore unobserved expectations: Selecting this setting will not consider any unrated staff expectations in the total calculation for the rubric or category. This is a common configuration setting as many rubrics do not require that every staff expectation is rated to complete the observation event. If this setting is not enabled, unrated expectations will be counted as 0 and be averaged in accordingly.
- Hide Notes and Attachments Column Enabling this option will remove the Notes & Attachments column within the observation form. The Notes & Attachments column is used when there are mini-discussion boards and dropboxes for a specific staff expectation. Not all rubrics use this option and it is a good practice to hide this column to optimize space on the observation form. This is unrelated to the main discussion board and attachments as these are configured for the main parent staff expectation.
General
- Within group summary type: This is the first setting related to how the main parent staff expectations and their associated ratings should be calculated. By selecting average within the group, the highest level children (underneath the main parent)and their selected/calculated ratings will be averaged to arrive at a single value for each main parent, respectively. Selecting sum will add all of the highest level children together to arrive at a single total value.
- Across group summary type: This is the second setting related to how the main parent staff expectations and their associated ratings should be calculated. This setting is only applicable if there exists two main parents with calculated values associated with them. As each main parent is expected to result in a single value, selecting average will take the average between all of the main parent values within the observation rubric, while selecting sum will simply add the calculated values for all of the main parents.
-
Calculation type:
- Based on average scores: Selecting this calculation type will consider all observations within each category (if applicable) and average the scores for each expectation to produce a total score.
- Based on most recent scores: this calculation type is applicable if and only if there has been a minimum number on observations set for a rubric or category within a specific rubric. For example, if there is a minimum of 2 observations required and, for some reason, 3 observations occur the most recent 2 observations will be considered into the calculated score for the respective rubric or category. This most common use case for this is if a teacher requests an extra observation beyond the minimum requirements and only the most recent are to be considered. This is a very specific setting, therefore the recommended setting is to use "Based on average scores" for the calculation type.
- Based on average scores & Based on most recent scores: This setting exists in cases where there may be a combined way of determining the total score for a rubric or category. Choosing this option will display both the average and most recent calculated values on the observation reports.
- Custom Calculations: If a specific calculation type cannot be achieved using the existing functionality of eDoctrina, we will build specific calculation methods to accommodate for this. It is recommended to speak with an eDoctrina team member to conduct a feasibility analysis. This option should not be explored unless all existing options do not work for the nature of the rubric calculation methodology.
OBSeRVE report
- Always use default print options: Default print settings can be selected in this section and every print out that is generated will follow these defaults. If it is preferred to keep all printouts consistent, it is recommended to always use default prints settings to keep all observation reports uniform. If this checkbox is not selected, the user who is generating the report will be able to modify the generated printout according to the available selections. It should also be noted that if checked, the the other options will be preselected by default so do not ignore the other default print options.
- Include header with report scope: The report scope is a top-level section of the observation report that summarizes the selected filters upon generation of the report. The report scope will assist users in generating a report in eDoctrina that is similar to another. Most districts prefer to omit the report scope as it does not contain any information sensitive data.
- Include all observation ratings: The observation ratings are the values that are selected for each staff expectation. This option provides the opportunity to hide or display these ratings.
- Include script: The scripting area is used for many different purposes. The option to include the information that has been entered into the main script is available here.
- Include suppporting information: If there has been supporting information that has been entered for a specific staff expectations, the option to display them on the print out exists here.
- Include score summary table: Depending on the configuration of the district's rubric, it may be beneficial to include the Score Summary table in the report, which will display the weighted score for the observee's observation events and the number of observations that contribute to this score. Also, if the Final Rating has been selected, this will also display in this table.
- Include discussion board: The discussion board can be used for many different purposes. If desired, the discussion board comments can be included on the print-out. The name of the user, the date the comment was posted, and the comment will display.
- Include notes: If an observation rubric is designed to allow notes to be posted for each staff expectation, the option to include them is available.
- Include attachments/links: If there has been any hyperlinks or attachments linked to the observation or a specific staff expectation, enabling this setting will include them on the printout.
- Include Calculations: Including calculations will display basic calculations and how an observee performs for each staff expectation for each category(if applicable).
- Include weighted points: This option does not display unless the calculations page has been also enabled. If an observation rubric is set up to apply special weighting to observation scores, displaying the weighted points will show the product respective observation score and its weight (ex: 4.0 X 90% = 3.6).
- Include unweighted points: This option does not display unless the calculations page has been also enabled. The unweighted points option will display the observation score for each category(if applicable). The calculation method varies, but the calculated score for each category is displayed.
- Include totals: The totals will display the current calculated score for each observee according to the rubrics calculation method.
- Observer/Date/Time location: The most concise way of displaying the observer and the date/time of any observation is to include it in the header of the observation. This is the best option to choose when a single observer is conducting an observation. In other cases where there are more than one person contributing to an observation or evaluation, it can be beneficial to change this setting to "In row" as each selected rating will then show the person who selected it and when they selected it.
- Orientation: Setting the default orientation helps to pick the optimal format when printing observations. Some forms benefit from printing in the wider landscape orientation, but the default for many rubrics is portrait because it provides more vertical space per page.
OBSeRVE report: Default print options

For more information on OBSeRVE reports, please visit our help guide on the OBSeRVE Report Dashboard.
Assignment Requirements
The assignment requirements section of the rubric assignment determines the minimum and maximum number of observation events that must occur for the specific rubric assignment. It is possible to set minimums and maximums for the main parent staff expectation as well as any categories that have been set up within the rubric's staff expectations. A sample configuration may look like the below image.

NOTE: In this setup, there is a minimum of 2 announced observations (no maximum) and a minimum of 1 unannounced observation (no maximum).
TE Export Configuration
If your district is utilizing the Teacher Effectiveness System (where Student Learning Objectives and Professional Practice scores are combined), configuring the TE Export section allows scores determined on the OBSeRVE Dashboard to be sent to the TE System. The information and data that is transferred to the TE System varies by district and is usually linked to custom reports, so it is recommended to speak with an eDoctrina team member to ensure the results are as expected. Here is an example of a rubric assignment that has been configured to only send the Final Rating to the TE System.

Electronic Signature Statement
The electronic signature statement is only applicable to observation rubrics/forms that have electronic signatures enabled. The entered electronic signature statement will display on the the pop-up window where both the observer and observee apply their electronic signature.
eDoctrina has conveniently made this a WYSIWYG text editor so many variations of an electronic signature can be be displayed upon user signature.

Report Header & Footer
It is possible to enter any additional text to be printed in the OBSeRVE report header and/or footer. Although these fields are usually used for aesthetic purposes, they allow for extra information to be included on the observation forms. Many districts use the report header to add their school logo, while others will use the report footer to include an additional signature line.

Configuring the Staff Expectations for an Observation Rubric
After the observation rubric has been added to the district database (by following the steps above), it will now be possible build the staff expectations within the rubric. A Staff Expectation can be best described as the individual lines within the rubric form where ratings will be selected, supporting data will be entered, or just be added for a placeholder. These staff expectations are highly customizable. The different features available for staff expectations will described below in this document.
To begin building the staff expectations, start by navigating to the Staff Expectations option located in the SETTINGS menu.

To create or modify a specific observation rubric, simply choose the desired rubric from the pull-down menu. It is possible that an observation rubric to be linked to one or many years (as controlled by the rubric assignment). The Observation Rubric pull-down menu will be populated with all rubrics that are linked to the selected year. It is also possible for a created rubric to not be linked to a year. In these cases, choose "--any--" in the year filer to open up the search.
Although the filters are some of the most simple in eDoctrina, the complexity of the staff expectations page lies within the actual staff expectations. Before diving into the multitude of configuration options, it is important to understand the structure of how staff expectations are built.
Staff expectations are designed with high consideration to the parent-child relationship that is setup. To help to understand this we shall refer to the highest level staff expectations as the parent. The staff expectations one level down will be referred to as children. The next level will be referred to as the grandchildren, and so on. The expand and collapse each of the different levels, click on the  and
and  , respectively.

If changes need to be made for a staff expectation without an edit pencil, please reach out to eDoctrina at
[email protected].
The highest level parent staff expectation defines the name of the of the observation event as it displays throughout eDoctrina. Most importantly, it is the title of the resulting individual staff report that will be generated. The main parents will also be a filtering option for Rubric Category on the OBSeRVE Dashboard. So choose these wisely as sometimes it is better to keep these separate and other times the rubric should be configured all underneath one main parent expectation.
 . . . .
 . . . .
The main parent also includes some vital configuration options:

1. Enabling the Discussion Board for an Observation Form
The primary discussion board for observations is configured at the main parent of the rubric configuration. Set the option to Enabled (Yearly) if all discussion comments should be available for all observations for each teacher throughout the year OR set the option to Enabled (Observation) if each discussion board should be unique to each observation. There are some configuration options also available for email notifications on discussion boards.
2. Enabling Attachments for an Observation Form
The primary attachments.dropbox for observations is configured at the main parent of the rubric configuration. Set the option to Enabled (Yearly) if all attachments should be available for all observations for each teacher throughout the year OR set the option to Enabled (Observation) if each attachment should be unique to each observation. If this option is changed and there are already attachments made, the changes will not be applied retroactively.
3. Enabling Electronic Signatures for an Observation Form
Turning on the ability to electronically sign observations is as easy as checking the Electronic Signatures report checkbox for any of the main parent staff expectations. If enabled, end-users will find a signature option located in or around the observation they are looking to sign. Notice how you can only toggle this option on or off for a main parent staff expectation. If there are occasions where there exists some observation type within the main parent that does not require electronic signaturea(but others do require it), then do not worry because there is an option to disable electronic signatures at the observation type level if the main parent happens to be enabled for electronic signature. This will be explained later in this document. We should also note that there are some configuration options for electronic signatures that also exist within district settings.
Explaining the different Rating Types and their Utility
Each staff expectation can be configured using different rating types to modify how they behave in the observation form. It is important to understand each of these as each option can have a significant impact on the calculation methodology and general behavior of the observation rubric.

Observation Type
The observation type staff expectation may be the most improtant one to configure because this allows us to create different categories of observations within a main parent expectation. So if there is a scenario where we configure a rubric that has two categories, "Announced" and "Unannounced", then we can create a staff expectation with the Observation Type selected and this enables us to configure these different categories, their associated behaviors, and apply a weighting schema for accurate calculation methods. There can only be one Observation TYpe staff expectation per each main parent.
Scripting Area
Show Average
Show Category Average
Show Category Sum
Final
--none--
When “Insert” (plus button) is clicked, a pop-up menu will prompt you to enter the name of a Teacher Expectation. (Again, ensure you are editing the correct rubric in the drop-down menu at the top.)
Enter the expectation in the “Name” text box with the red asterisk. Note: eDoctrina lists expectations alphabetically, so if the rubric being entered doesn’t contain numbered or lettered expectations, a sorting system should be added. For example, in order for “Students Engaged” to come before “Rules and Procedures,” either a letter or number must be added (ex. “A. Students Engaged” and “B. Rules and Procedures”).

Then “Domain 1: Within Classroom Expectations” would not have a parent itself, “1.A. Classroom management” would have a parent of “Domain 1: Within Classroom Expectations,” etc.
In this example in the screen shot below, "2.0 In-Class Observation" might be one of the parent expectations. Nothing would therefore be selected in the "Parent" drop-down menu.

Selecting insert again would allow me to create a child of this parent expectation ("2.1 Students appear to learn"):
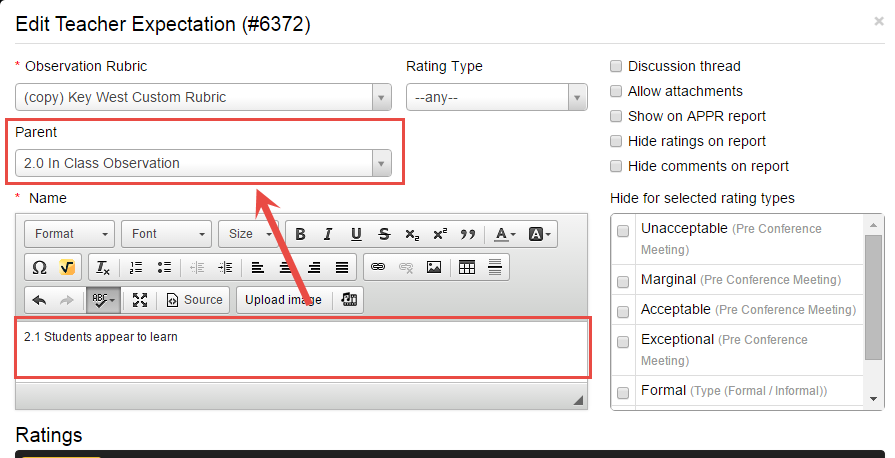
Once entered, this is what parent and child expectations look like from the Staff Expectations screen:

Note that in the screen shot above, Standard 2 has not been expanded as indicated by the blue plus button next to its name.
Any staff expectation may be deleted by clicking on the trash can to the right; however, child expectations must be deleted first:

Entering Ratings
Ratings for this expectation may be added by clicking "Insert" in the Ratings section.
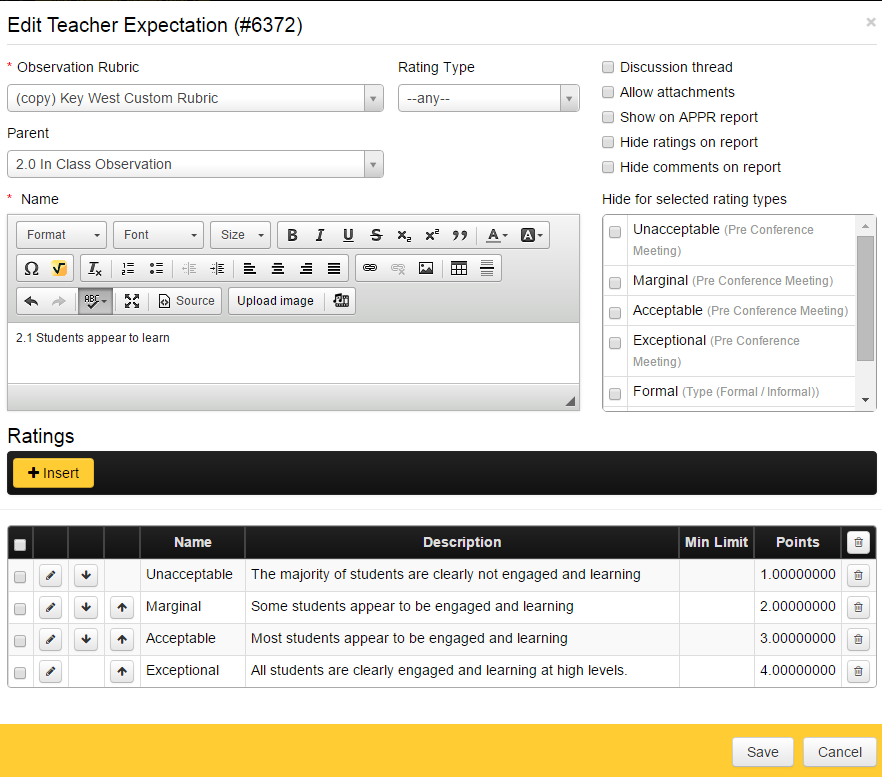
This pop-up will appear:

A name for the rating is required, such as "Developing" or "Exemplary". It is recommended that the first item in the list be “Not Observed,” as this will be the default option. Users can enter narrative information that clarifies what the particular rating looks like in the Description box. These details help the observer select the most appropriate rating. For example, for an expectation of “Content,” the rating of “Distinguished” is described as “Teacher displays extensive knowledge of the discipline and how it relates to others.” “Points,” is optional. If your school/district is assigning point values to particular ratings, that number would be entered here. If points aren’t being used, that field can be left empty.
Please note that not all expectations require ratings. In the example used above, “Domain 1. Within Classroom Expectations” and even the next level, “1.A. Classroom management” are just headings. It’s not until the next level down, “1.A.1. Students engaged” and “1.A.2. Rules and procedures posted” that ratings are necessary. Knowing which skills will be rated/not rated is much easier if users have a good, working knowledge of the rubric prior to entering it.
Selecting Observation Type
Another optional step is manipulating the “Type” drop-down menu (see below).
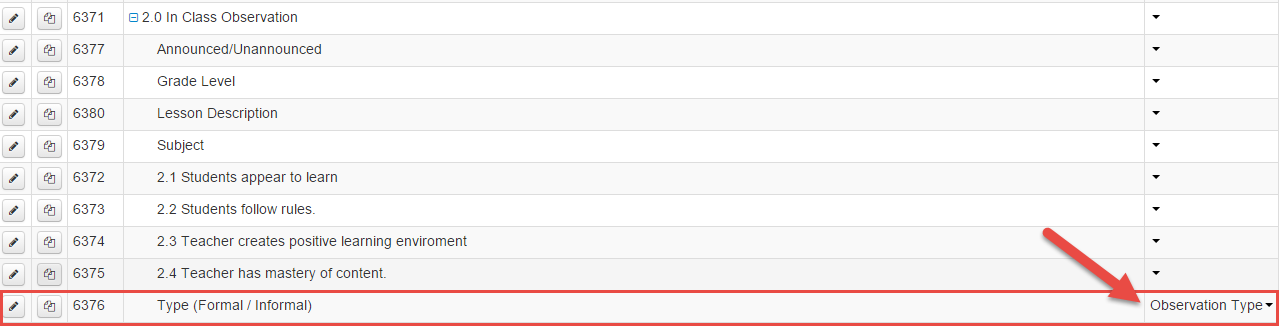
Clicking the edit pencil next to the Staff Expectation brings you back to this pop-up, where a Rating Type can be identified:

Most expectations can be left with the default (any/no observation type ). However, if selected, this option allows users to weigh different types of observations. For example, a district uses calculations to weigh both their formal (70%) and informal (30%) observations. In this case, a user would select “Observation Type” in the “Rating Type” drop-down and then insert two ratings in the “Ratings” section below: “Formal” with points equal to 70 and “Informal” with points equal to 30.

In addition, users have the option enter the number of observations required for each observation type under the "# Required" column. This works in conjunction with the "Required" feature on the OBSeRVE Dashboard. (For more information, please refer to the OBSeRVE Report Dashboard help guide.)

The "Send schedule Email" option helps in managing whether a user will receive an email notification once their observation is complete. There are 3 choices to select here:
1. Per user selection: This will allow Observers the choice of whether they want to send an email or not. This is determined when Scheduling an Observation:
 2. Always: This option will always send and email notification when an Observation is scheduled. You will not see the "Send to Observee" check box if this option is chosen.
3. Never: This option will never send and email notification when an Observation is scheduled. You will not see the "Send to Observee" check box if this option is chosen.
2. Always: This option will always send and email notification when an Observation is scheduled. You will not see the "Send to Observee" check box if this option is chosen.
3. Never: This option will never send and email notification when an Observation is scheduled. You will not see the "Send to Observee" check box if this option is chosen.
Observation Type: Final
In most cases, you must create a Staff Expectation that is assigned the Observation Type "Final".


When an observation is started for a teacher under this Final Staff Expectation, all prior ratings will feed into this screen (per the calculation type selected), and the observer will be able to confirm the final rating by selecting the appropriate score. (If the APPR report will be used, this "final" number will then flow into the APPR report.)


Once finished, click “Save.”
Please note that observation rubrics can be complicated, especially if point values and weighted scores are required. In these cases, don’t hesitate to contact eDoctrina’s Technical Support team at 1 (888) 537-3348 or [email protected].
Accountability: Creating a Teacher Observation/Evaluation
Introduction:
eDoctrina's OBSeRVE module allows specific users within the district (usually School and District Admins) to observe, rate, and communicate with staff members at their associated school or district. There are various configurations and processes that districts may use for their yearly staff observations, but the OBSeRVE Dashboard is designed to make these processes easier by providing the tools to ensure that minimum observations are completed for each staff member that they are prescribed to.
Starting an Observation with Assignments
If the appropriate rubric assignments have been made at the beginning of the year, it is a best practice to begin all observations from the Assignments layout of OBSeRVE Dashboard. Navigate to OBSeRVE Dashboard by clicking on the Accountability option in the side bar on the left, then click on the OBSerRVE Dashboard option.
After successfully arriving at the OBSeRVE Dashboard, it is important to ensure that the Assignments layout view is selected because this is where observations will be managed if assignments have been made. While all filters have a utility that cannot be understated, it is ultimately very important to select the appropriate rubric in the filters because assignments will ONLY display for each selected rubric.
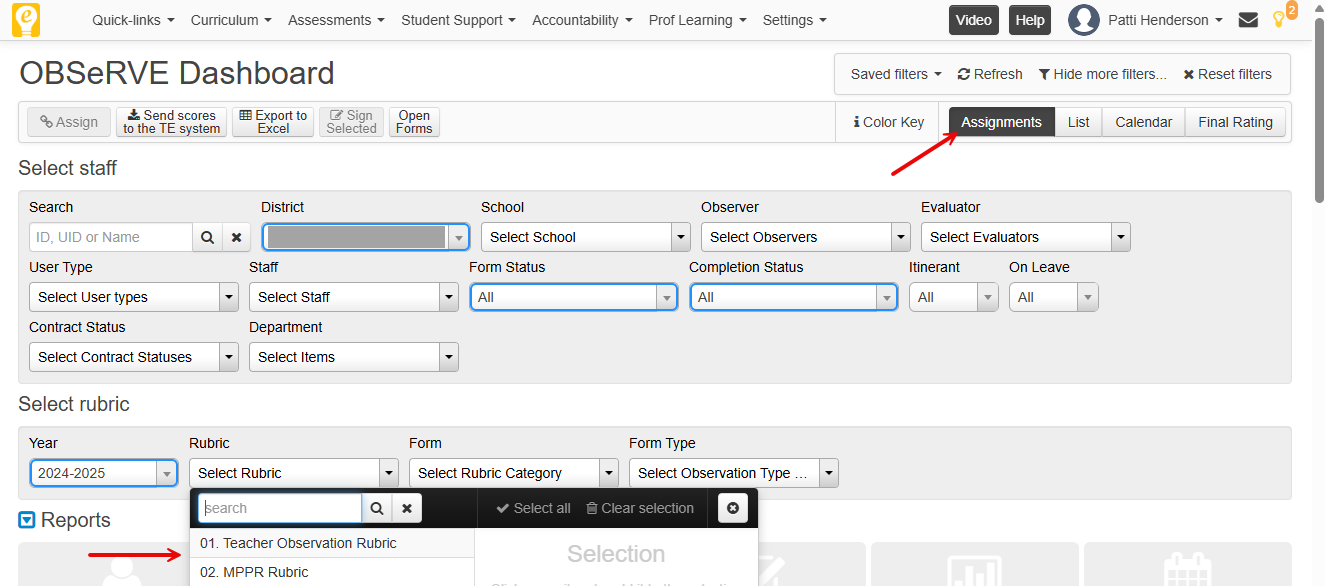
If the assignments have been made and the filters have been selected properly, the required observations for each respective observee should display in the list in a manner that looks very similar to the image below. Each logged in user will only be able to find teachers of staff members that they have access to which is determined by role or specific assignment. If it is necessary to observe or evaluate a staff member that is not accessible, please reach out to a district admin or the eDoctrina team for assistance.

To begin a required observation, simply click on the appropriate  to enter into the OBSeRVE Editor.
Starting an Observation without Assignments
If eDoctrina's assignment feature is NOT being used, a new observation can always be started by searching for the staff member by name and the clicking on the observee's name
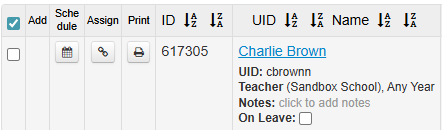
If this approach is taken, it is up to the observer to select the appropriate rubric or observation type from the pop-up menu that results. Click on "Create" then choose the appropriate rubric and add the form.
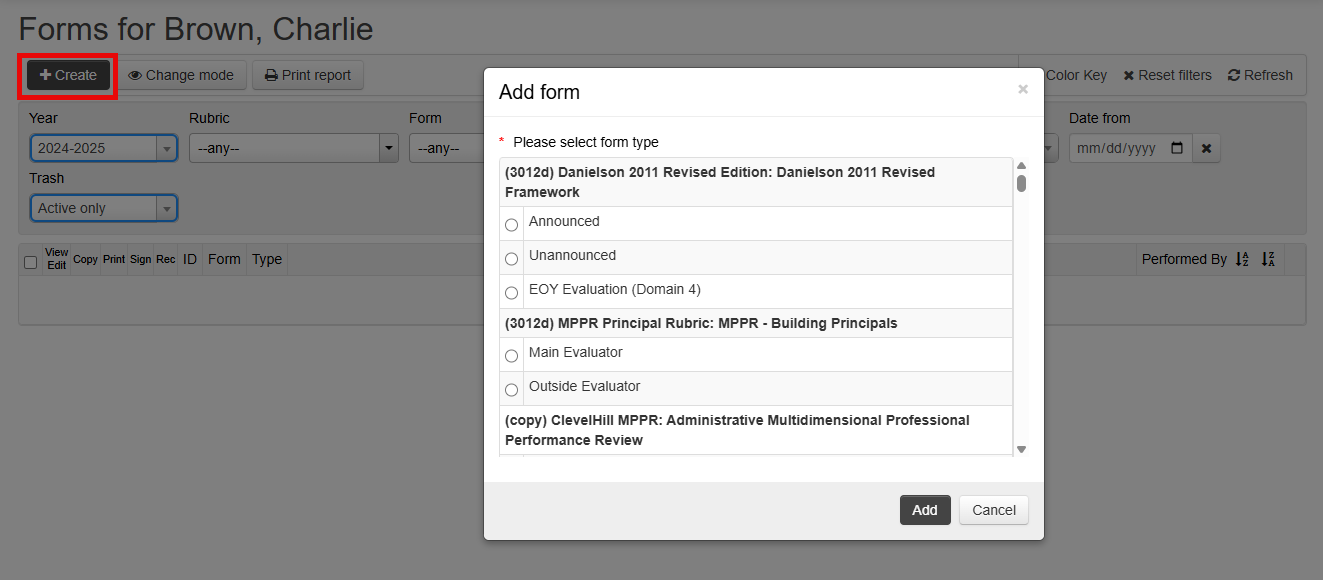
Maximum Constraints
A rubric and/or observation type can be configured to have a maximum limitation. This is usually done for better management of the database as well as to ensure overall calculations are correct.
If the creation of a new observation will result in a violation of this maximum constraint, then the logged in user will be presented with the following message listing the other observations/evaluations that already exist in the selected rubric or observation type. Sometimes this alert will simply remind the observer that they have already started this observation in which they can simply click the observation ID# to navigate to that observation instead.

Staff Folders for Observations
If assignments are not being used, observers can begin an observation by selecting the  in other screens as well. The most popular screen to begin an observation outside of the OBSeRVE Dashboard is the User Acconts screen. Find the observee in the list here by utilizing the filters, then click the next to the observee to begin an observation.
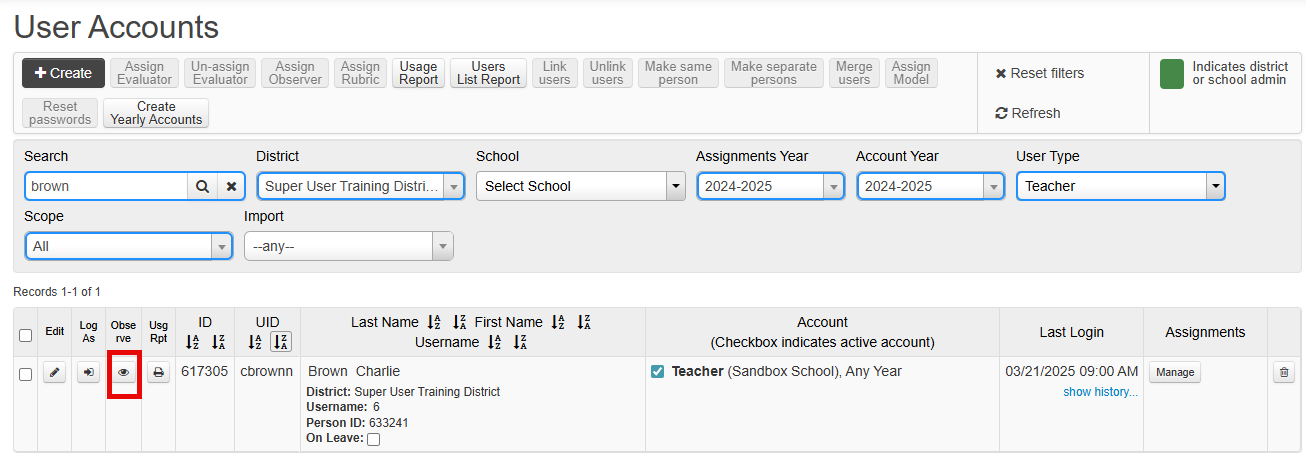
After clicking the , eDoctrina will navigate the observer to the "Observation Form" page for the respective observee. This page allows for observers to add a new, edit existing, and/or view observations for this teacher. In any scenario, it is required to select the appropriate filters before any task is performed here. It is also a best practice to view the existing observations for each observee before adding a new observation to ensure that there is not an existing observation for this observee completed, scheduled, or drafted.
For information about how to use the observation form, please see our help guide regarding the Observation Form here.
OBSeRVE Reports
eDoctrina offers various reports to summarize information that has been entered regarding staff observations. Running OBSeRVE reports is simple and can provide valuable insight on staff expectations and how teachers are being observed.
Click here to view the Help Video
For any administrative duties regarding staff observations, navigate to the OBSeRVE Dashboard(shown below) by clicking the OBSeRVE Reports under the Reports pull-down in the navigation bar ~or~ find the OBSeRVE Dashboard under Quick Links.
To be able to pull reports, the OBSeRVE Dashboard relies on filter selections for both staff and for observation rubric. This allows the person generating the report to choose which staff members should be included in the resulting report and target a specific rubric, rubric category, and/or observation type. Many reports can be generated from any of the layout views (Assignments, Observations, etc...), but some reports may only exist for one view or another.

-
Use the Select staff set of filters to identify what staff members are to be included the the generated report.
NOTE: The filters displayed vary by profile. If a user is tied to many schools, they will have an extra option to select a school. The default listing is to display ONLY teachers who have accounts at the users assigned school(s).
-
Use the Select rubric set of filters to select the exact Rubric, Year and Dates to include in the generated report.
NOTE: Upon selecting a rubric, ONLY assignments for the specified rubric will display.
The Layout allows the user to change the view between Assignments (Shown), Observations (List of all observations), Calendar (Shows scheduled observations), and Final Rating. Printable reports can be generated from all layout views besides the calendar view.
Once the desired subset of teachers/observees is selected, click the button for the desired report to generate a PDF that can be later saved or printed. If no staff members have been selected with the checkbox, the application will assume that you are generating the report for all lines that are displayed in the list.
"Common Action Buttons" will appear in every layout view besides the calendar view. The options available vary per user, but the option to print, schedule, and add new observation exist for most administrators.
If assignments have been made, the assignments layout view presents the opportunity to see the status of all relevant observations.
- Required: The observation needs to be performed for this teacher using this rubric.
- Scheduled: The observation has been scheduled by an observer.
- Complete: The observation has been marked as complete by the observer.
- Draft: The observation has been started by an observer, but is not completed.
- Inactive: The observation has been marked as inactive or has been deleted. Inactive observations cannot be viewed from the assignments layout view.
Individual Teacher Report

The Individual Teacher report is a report that displays all relevant information regarding observations in correlation with how the staff expectations have been set up according to district preferences. Printing options are also determined by district personnel and a default format is often selected. If a default print setting is not selected, the option to choose what will be included in the print out will be available.

Different combinations of these Report Printing Options will generate different report contents and/or formats. Below is a short explanation of each option to help determine what settings are appropriate for use.
-
Include header with report scope: The report scope can be valuable in displaying what conditions/filters have been selected to generate the report. Being that different filters can produce significantly different reports, the report scope can contain important information on how the report was generated. It is important to know that whatever filters are selected will be what is displayed in this header type.
- Include all observation ratings: The observation ratings are the values that are selected for each staff expectation. This option provides the opportunity to hide or display these ratings.
- Include script: The scripting area is used for many different purposes. The option to include the information that has been entered into the main script is available here. The script should not print if the observation form scripting area has not been made visible to the teacher.
- Include supporting information: If there has been supporting information that has been entered for a specific staff expectations, the option to display them on the print out exists here.
-
Include score summary report: Depending on the configuration of the district's rubric, it may be beneficial to include the Score Summary table in the report, which will display the weighted score for the observee's observation events and the number of observations that contribute to this score. Also, if the Final Rating has been selected, this will also display in this table.

-
Include discussion board: The discussion board can be used for many different purposes. If desired, the discussion board comments can be included on the print-out. The name of the user, the date the comment was posted, and the comment will display.

- Include calculation: Including calculations will display basic calculations and how an observee performs for each staff expectation for each category(if applicable). This page will vary dramatically depending on how eDoctrina is desgined to calculate final scores.
- Include weighted points: If an observation rubric is set up to apply special weighting to observation scores, displaying the weighted points will show the product respective observation score and its weight (ex: 4.0 X 90% = 3.6).
- Include unweighted points: The unweighted points option will display the observation score for each category(if applicable). The calculation method varies, but the calculated score for each category is displayed.
-
Include totals: The totals will display the current calculated score for each observee according to the rubrics calculation method.

- Include notes: If an observation rubric is designed to allow notes to be posted for each staff expectation, the option to include them is available.
- Observer/Date location: This option exists to accomodate scenarios where multiple observers will be working on the same observation. In these scenarios, it is a good idea to display the Name and Date in the same row as the staff expectation that was observed. Otherwise, keep the Name and Date in the header to generate a PDF that is more concise.
- Output format: The current options for output formats are HTML and PDF. If an excel spreadsheet needs to be generated, it is possible to do this by initially generating an HTML file.
- Orientation: Choose to generate a printout that is oriented in portrait (default) or landscape.
Staff Summary Report:
The Staff Summary Report is designed to be able to view more information in one place without having to jump from screen to screen. The filters are extremely important when generating this report because it determines what information is included in the report. Basically, this report will have a row for each teacher/observee included in the report and a column for every staff expectation that is included in the selected rubric. Upon clicking the Staff Summary Report button, a pop-up window will appear prompting to select the Report Printing options as shown below.

If Show number of ratings is selected, then eDoctrina will generate a frequency report of how many time a certain staff expectation has been rated. If Show ratings is selected, then eDoctrina will generate a report that contains the actual ratings for each staff expectation. Choosing to Exclude ratings without points will only return staff expectations that have ratings (points) tied to the selection. Show staff UID will simply add the staff UID to the report.
Score Summary Report:
The Score Summary Report is a direct upload to Microsoft Excel that will list all selected (or filtered for) users. The columns in the report will display the user's Last Name, First Name, UID (teachID), the State ID (Staff Statewide Identification Number), the selected year, the selected rubric, the Final Overall Score(if applicable), and information regarding each rubric category (Raw Score, Weight, & Weighted Score)
Staff Expectations Report:
The Staff Expectations Report provides administrators with an overall view of how staff have performed according the ratings that have been entered. This is an extremely valuable report because it shows a percentage breakdown of how the observed population performed accordingly to the rubric they have been rated on. Below is an example of one element that has been rated 42 times.


Observer Comparison Report:
This report is very similar to the Staff Expectations report because it provides an overall view of how observers have rated observees. The only difference in this report is that it breaks down the assigned ratings for each staff expectation by the observer. This allows users to see a side-by-side comparison of how each observer is rating each staff expectation in comparison with their colleagues.
13.G. OBSeRVE iPad APP
This document assumes you have downloaded the eDoctrina OBSeRVE APP on your iPad. If you have not, please do so before proceeding.
When you open the iPad APP you will see the following screen:

The first thing you must do before trying to log in is click on the Sync button in the upper right corner of the screen:
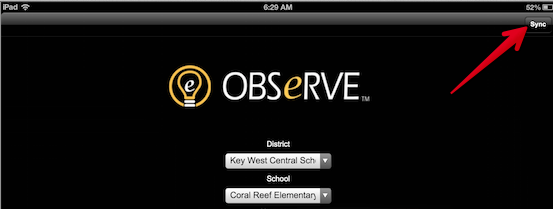
The sync function could take several minutes so please be patient.
After your initial sync, you can log in by selecting your District, School, Username and Password.
Important Notes About Logging In
- The USERNAME field IS CASE SENSITIVE when using the OBSeRVE app. Your username may have caps in it but you did not know because the eDoctrina username is not case sensitive when logging into eDoctrina's website. If you have trouble logging in, this could be one of the problems.
- DO NOT SELECT A SCHOOL IF YOU ARE A DISTRICT ADMIN.
Each time you log into OBSeRVE you must Sync again to update your database.

Performing Observations
Use the filters at the top of the page to help find the user who you want to observe and then click on that staff members name to start the observation.

Begin your observation by ensuring you have the correct school year selected and then selecting the portion of the rubric you will rate.
Click on the Add Rating button to start.
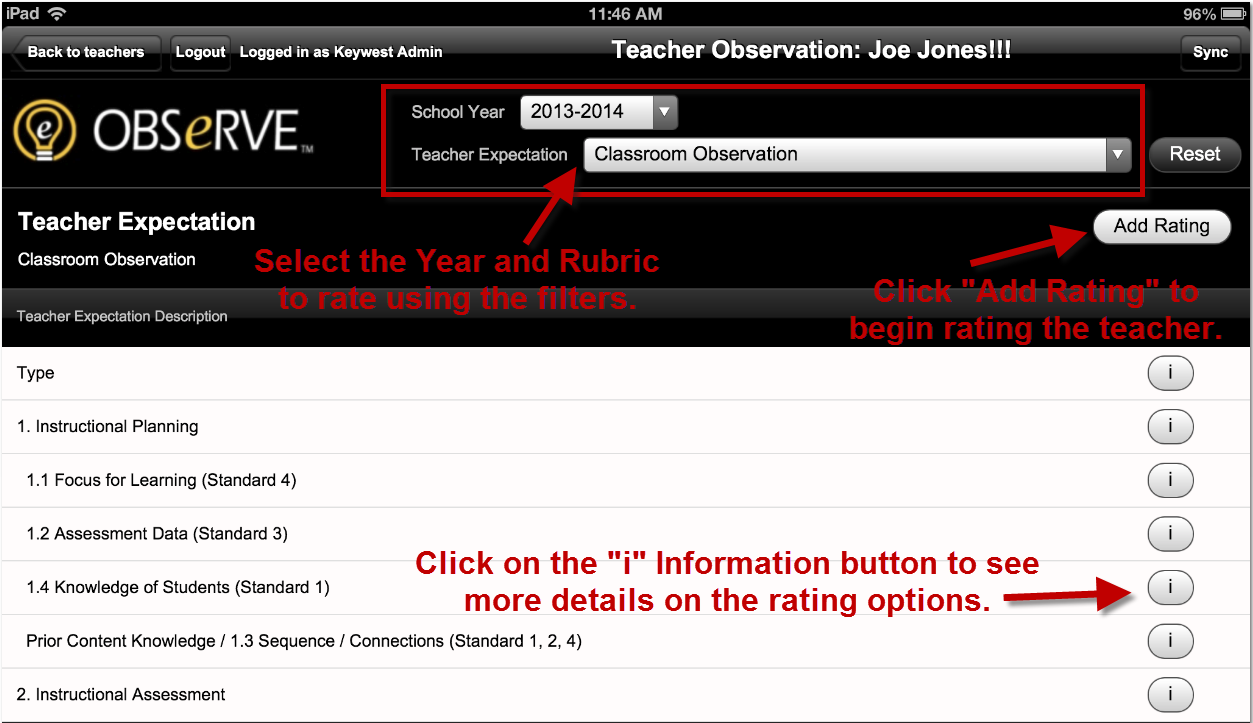
Use the drop-downs to rate the categories of the rubric.
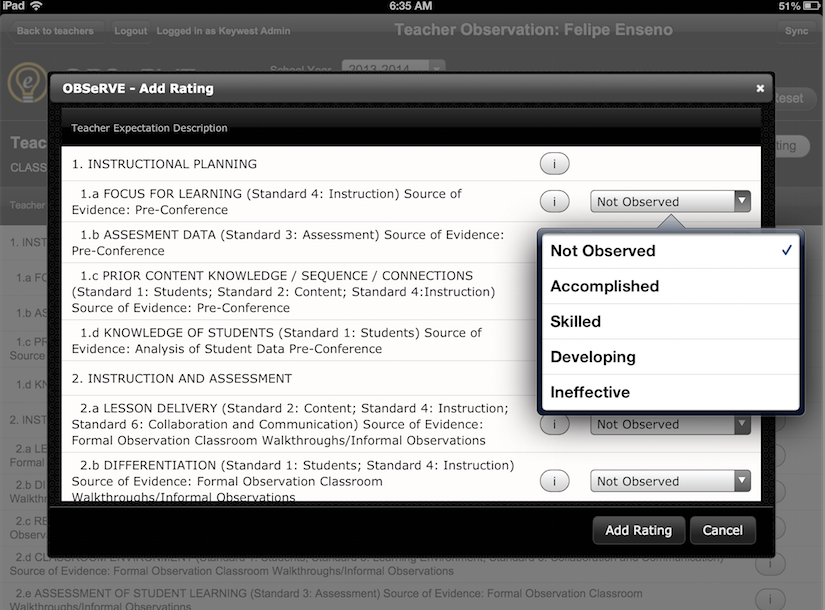
The information button (i) will give you more detail on the ratings.

When you are finished with your ratings, you must SYNC again to send the data back to eDoctrina. If you do not SYNC, the data will remain on your iPad until you are able to SYNC. This allows you to conduct observations in areas of your school that do not have a wireless connection.
09.E. Setting up Teachers as Observers
Step 1: Configure District Settings to use Access Rights. (Settings -> Student Information Data -> Districts

Step 2: Configure each "Teacher Observer" with additional observation rights.
Check the OBSERVER checkbox:

Note that if ALL teachers will be given these rights, then apply the additional rights below to the Teacher User Type instead of to individual teachers.
Scroll down to the permissions area. Search for Users and add the "Observe", "Access data about other people" and "Access" actions. Check the box for the same department code for the "Observe" and "Access" actions to limit the user to observe people within the same department.

Search for Observe and give the "Access" action. Again, check the box to limit to the same department code if desired.

In order to limit users access to a selected group of teachers, it is best to do this by department code. Based on the settings above, the user will only have access to teachers with the same department code. The department code can be added to the district data extracts that are sent to eDoctrina or manually entered in the user editor:

At this point, the user has the ability to conduct any observation on any teacher who has the same department code as them. To further refine the assignment process, you may want to assign a specific observation rubric or more specifically a specific type of observation within an observation rubric. Currently in order to do this you must temporarily adjust a district setting to allow the assignment feature to work for teachers. Temporarily UNCHECK the option to "Use access rights...".
After un-checking, SAVE AND CLOSE.
Go to the users page (Settings -> Users -> Users)

- Find the teacher you would like to assign an observer to and click the Assign button.
- Find the "observer" in the list and click on their name.
- Find the rubric / rubric type you would like to assign and select it.
- Select the proceed button.
** NOTE: You can assign multiple observers to the same teacher and you can assign the same observer to use multiple rubrics / rubric types.**
You can assign a single observer to multiple teachers at one time by selecting the check boxes next to multiple teachers in the left column and then clicking the Assign Observer button at the top of the page.

IMPORTANT
Once you are done assigning observers, you must go back and adjust the district settings to check the option to "Use Access Rights..."
03.E.2. Creating A Custom Proficiency Table
eDoctrina allows users the opportunity to create a customized Proficiency table. Through the use of this tool, users can create a customized report that color codes assessment results in order to provide a quick snap shot of student performance.
This learning module is broken into two sections. Section A pertains to All users and Section B pertains to District Administrators.
Section A: ALL Users
From the eDoctrina Home screen: 1. Click on Assessments pull-down. 2. Click Settings & Config. 3. Click Proficiency Table.

To create a new Proficiency Table simply click the "Create" button.

The "Create Proficiency conversion table" tab will appear. District Administrators can customize the result grades (which will be explained in Section B) but all users can customize the grade parameters and color code the document accordingly. To begin creation, simply provide a name for your Proficiency Table, then click on the "+ Insert" button to add a new Proficiency Conversion Table

Once the "+ Create" button is clicked a "Create Grade" pop up will appear in which you will be given a number of options that can help build the table.
- Min. Percent - Allows you to set the minimum score a user can receive to be in this range.
- Max. Percent - Allows you to set the maximum score a user can receive to be in this range.
- RTI Target - Allows you to set a specific RTI goal for an individual student that will show when running the RTI Progress Monitoring Report.
- Grade - Allows you to set the Proficiency level from a variety of options preloaded into eDoctrina (ex. HEDI, 1-4, etc.). Grades can be customized and added by a District Admin user, if need be. Multiple Grades can be set up if you would like to designate more than 1 grade to a score range, by simply completing Grade 2-5, as above. (Ex. if you wanted to show a result as 4, Highly Effective).
- Color - Allows you to designate a color to the score range.
- Font Style - Allows the font to be italic or bold.
- Save / Cancel - Allows you to save or cancel the changes you have made.
Note: when setting your Min. and Max. Percent, make sure the values overlap.
For example: if the first column's Max. Percent is 60 then the Min. Percent in column 2 should also be 60.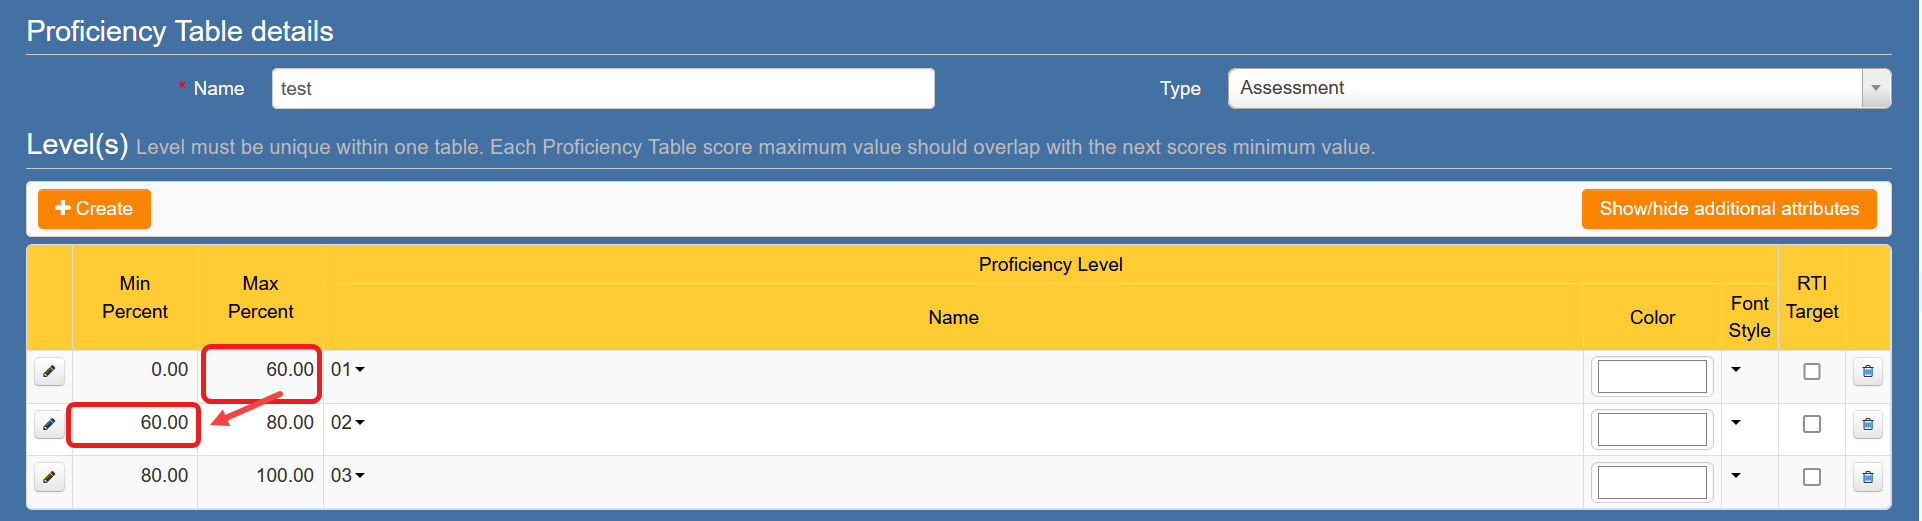
To add more columns, simply click the "Create" button again and repeat the process as above. Once you have all the data that you want click the "Save & Close" button.
Your Proficiency Level Table will now be added to the list.

Section B: District Administrators ONLY
As a District Administrator, you have the ability to customize the result levels, which are the available Proficiency levels to select in the Proficiency tables.
From the eDoctrina Home screen:
1. Click on Assessments.
2. Click Settings & Config.
3. Click Proficiency Levels.

District Administrators can choose which result levels are used in the eDoctrina. It is possible to choose existing result levels or create new ones by clicking on the "Create" button.

You will now get a pop-up window that allows you to create the result level. Type the name that you would like and then click on the "Save & Close" button.

The resulting levels that were entered will now be available for anyone that wants to create a Proficiency Table.
08.A. eDoctrina Positive Behavior Management System
There are 6 menu options under Student Support to supopot the BeHAVE module

NOTE: These menu options will be visible for District Administrators ONLY
Behavior Codes: Go here to add behavior codes you would like available to your staff.
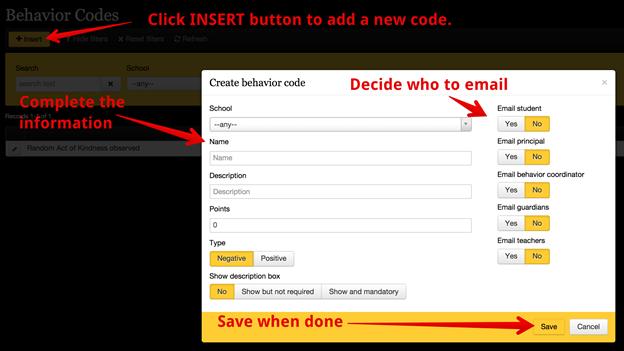
NOTE: To create an outline format with categories you can use the NEW Parent field.
First you must create behavior codes that will be used as category headers. This is simply done by creating a behavior code as shown above and selecting YES for the Category Header Field:

To organize behavior codes into a category, you simply edit the behavior code and select the category header as the PARENT.
If you wanted a category of “Good Stuff” and “Bad Stuff” to differentiate the good codes from the bad codes you would simply create two new behavior codes called “Good Stuff” and “Bad Stuff” and be sure to select YES for Category Heading.
You would then select “Good Stuff” as the parent for all of the behavior codes that should fall within that category and select “Bad Stuff” as the parent for all behavior codes that should fall into that category.
Note that the system sorts the codes alphabetically so if you want “Good Stuff” to be at the top of the list you might want to name them “1. Good Stuff” and “2.Bad Stuff”.

Students List: Go here to search for students to assign behavior codes to them. You are able to see points they've earned in the upper left corner.

NOTE: We recommend you create a shortcut to this link on your home page. Contact eDoctrina for assistance with that.
Store items: Go here to add items to the store to make them available for purchase using points from the behavior system.

Manage Purchases: Go here to redeem printed vouchers from students.

14.B. Accountability: How to Create SLOs
Select the SLOs button from the home page OR select Student Learning Objectives from the Accountability Menu.
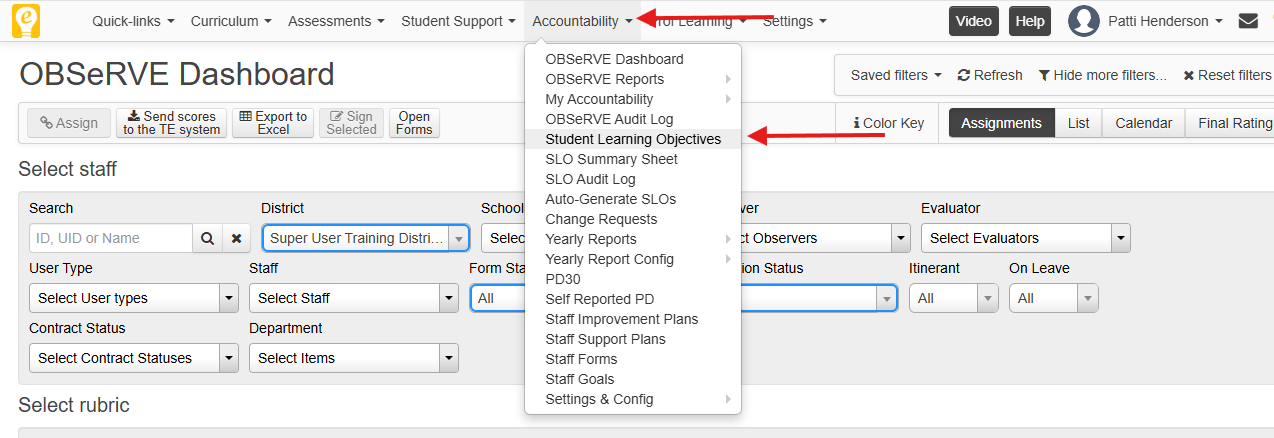
Click on the + Create button to create a new SLO.
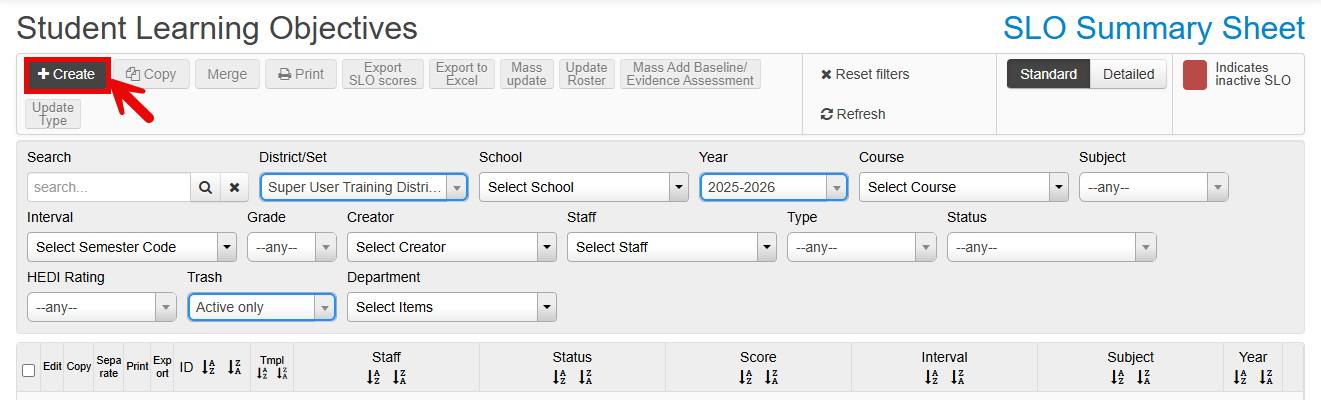
This will open the SLO Editor.
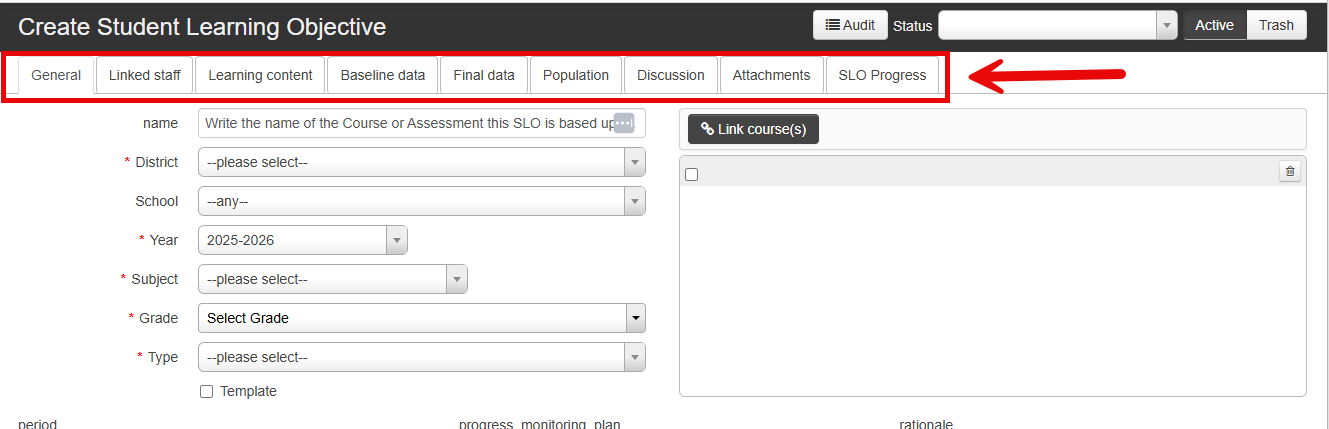
Click on a tab (General, Learning Content, Baseline data, etc.) to jump to that section of the SLO Editor.
Take note that the SLO ID # will not be assigned until this SLO has been saved. Once assigned, it is a good idea to record this number for your records. Searching for an SLO using this ID # proves to be the fastest way to locate elements in eDoctrina.
General Information Section
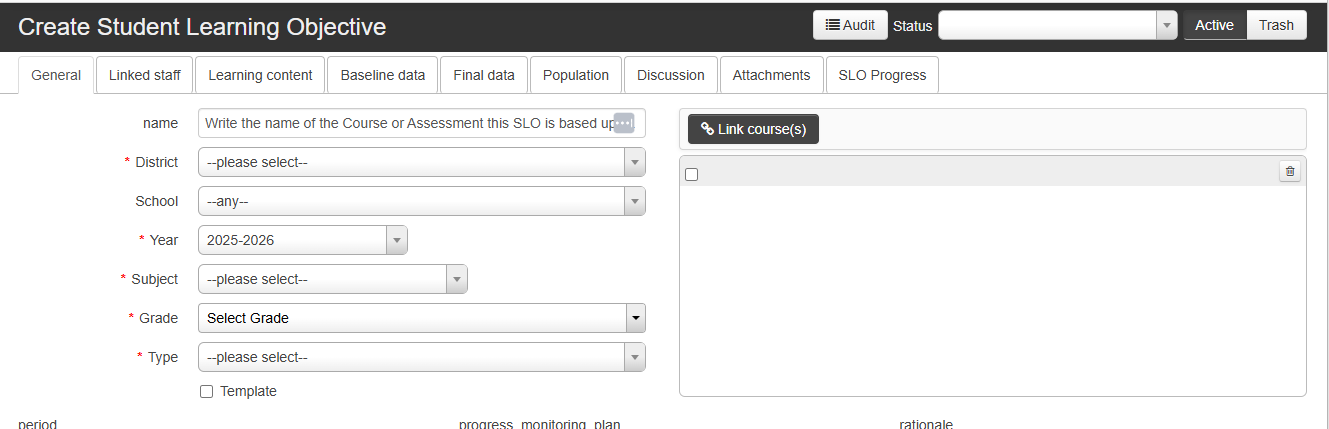
Provide this SLO with an appropriate Title and enter the information requested. Fields labeled with a red asterisk (*) are REQUIRED. NOTE: The template option is controlled from the SLO homescreen.
Linked Staff Section
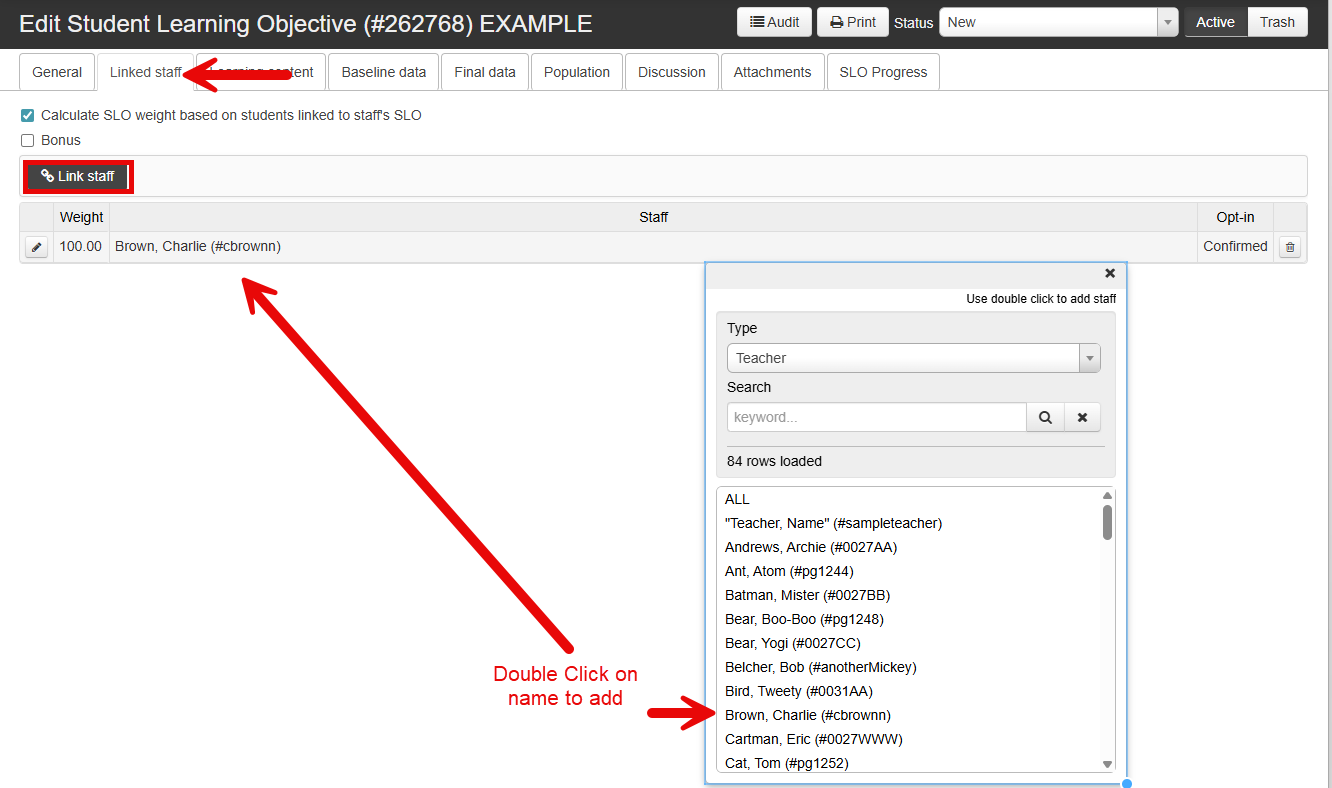
Click on the Linked Staff tab, then click the link to load staff members. To search for a specific staff member, use the filters to select the user Type or use the search box to type in a first/last name. To link staff to this SLO, double click on the staff member name in the list If eDoctrina is going to be weighting each SLO connected to the staff member(s) linked to this SLO then the weight box should be left as 100, which is the default. Check to make sure the "Calculate SLO weight based on students linked to teacher's SLO checkbox is selected (this should automatically be selected as a default). As long as the "Calculate SLO weight..." checkbox is checked, the program will take care of weighting each SLO correctly for the Teacher Evaluation Summary Report.
Learning Content Section
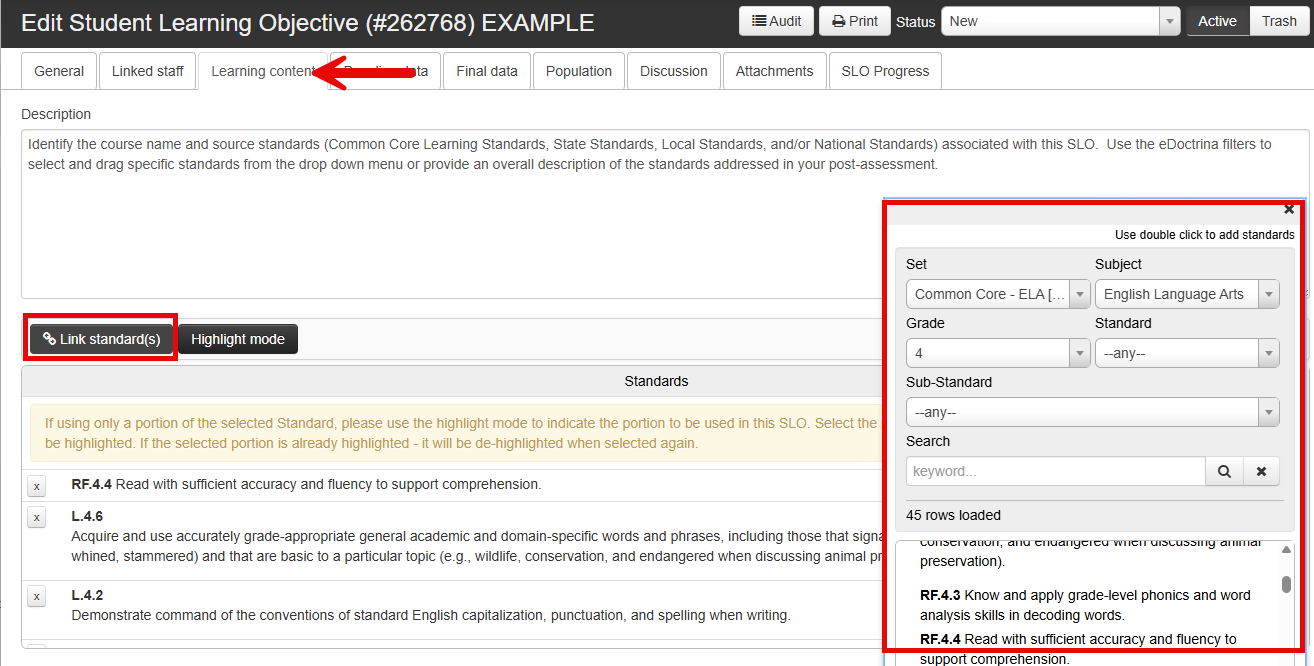
Click on the Learning Content tab, then click on the "Link Standard(s)" option to edit the desired standard(s)for this SLO. Double click on the standard in the pop up box to add it to the list on the left. If using only a portion of the selected standard, utilize the "Highlight" option
Baseline Assessments Section
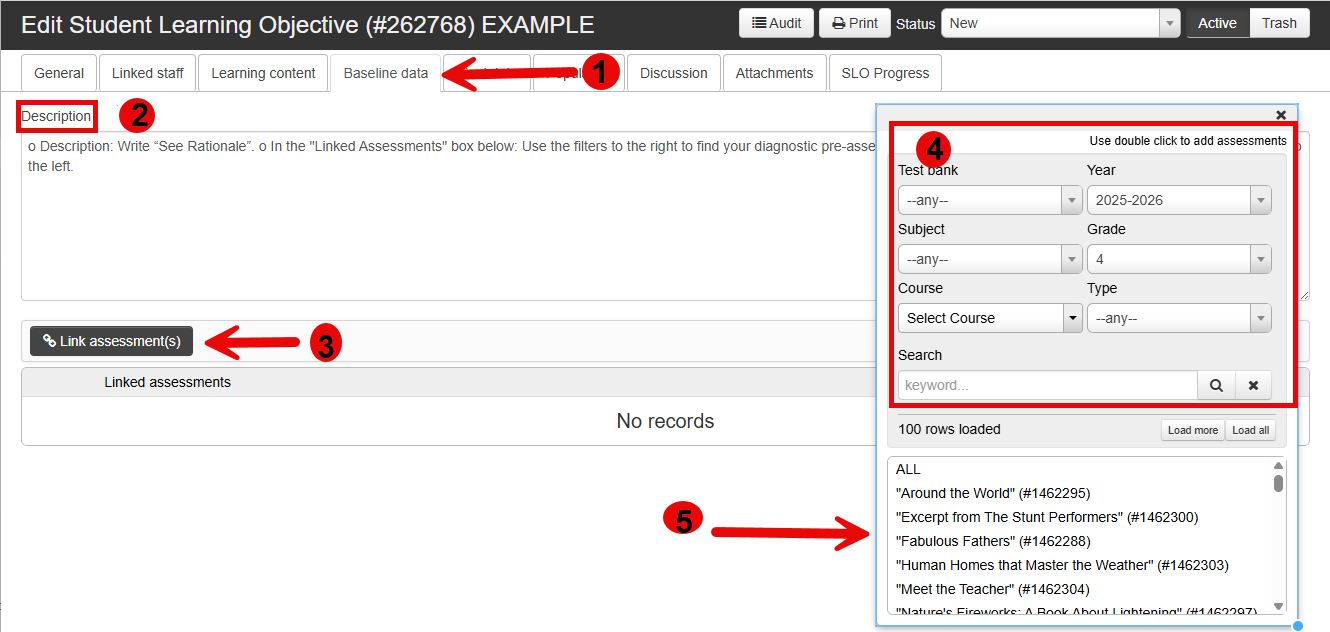
Click on the Baseline data tab, add a description in the box, then click on the "Link Assessment(s)" option to link a baseline assessment to a SLO. Use the filters in the pop up box to locate the desired assessment. Double click on the assessment to add it to the box on the left. If more than one assessment is linked eDoctrina will average the two scores to generate a baseline score.
A baseline assessment can be linked to a SLO prior to data being imported or scanned into the program. The data will automatically filter into the SLO once available.
Final Data (Evidence Assessment) Tab

To link an evidence assessment to a SLO, use the filters to find the assessment and drag and drop it into the Linked Assessments box on the left. If more than one assessment is linked eDoctrina will average the two scores to generate an evidence score. Even though the evidence assessment is likely a SECURE assessment, teachers WILL be able to filter for the secure assessment and link it . (It is important to know that teachers will NOT be able to locate this assessment to edit or view it in other sections of the program.)
An evidence assessment can be linked prior to data being imported or scanned into the program. The data will automatically filter into the SLO once available.
Population Section
Step 1: Complete the Population and Target Description information in the box provided.
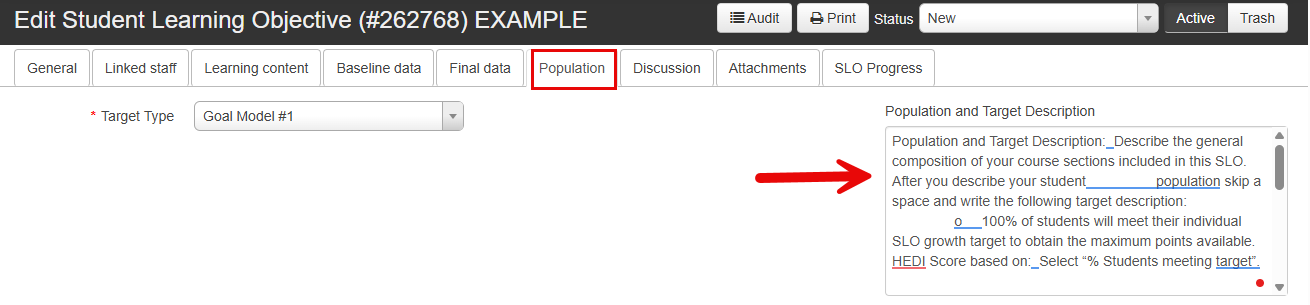
Step 2: Locate the students who need to be linked to this SLO. To link a whole section/class at once, choose the correct filters, click the ALL STUDENTS heading, individual students may be added in the same manner by double clicking on student name(s) to add them to the left side.
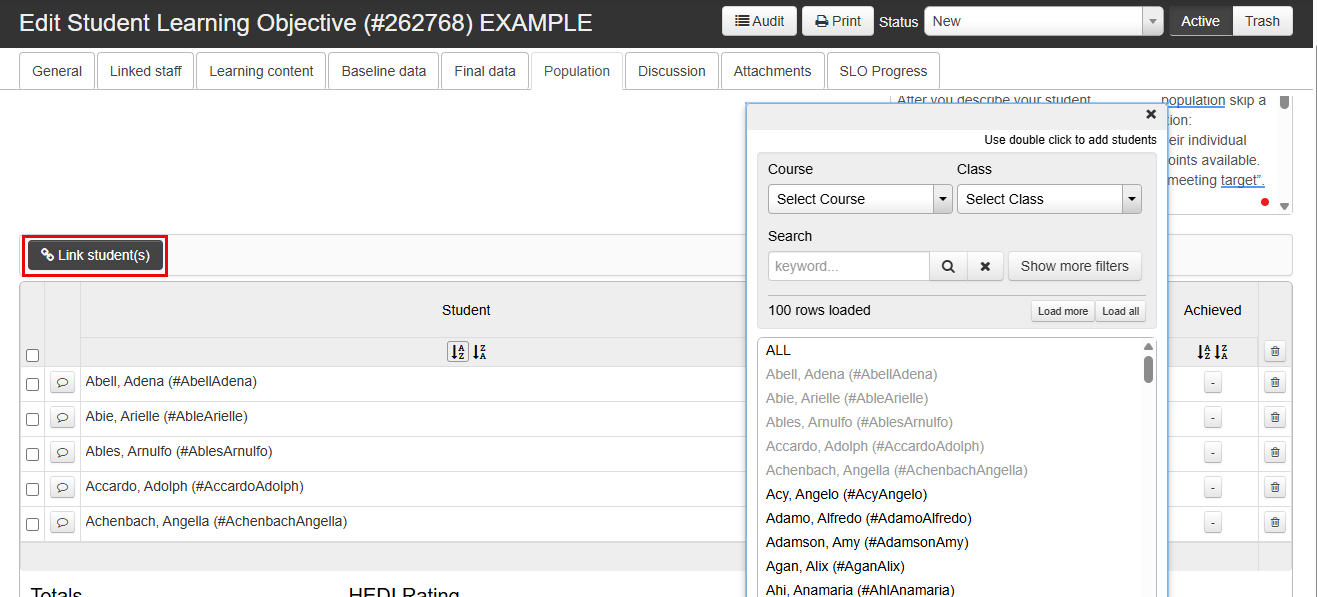
Step 3: Use the various filters located on the top of the Population section to set the target type, targets, bands, etc. based on your districts requirements/guidelines. Please reference help document SLO Target Setting Options.
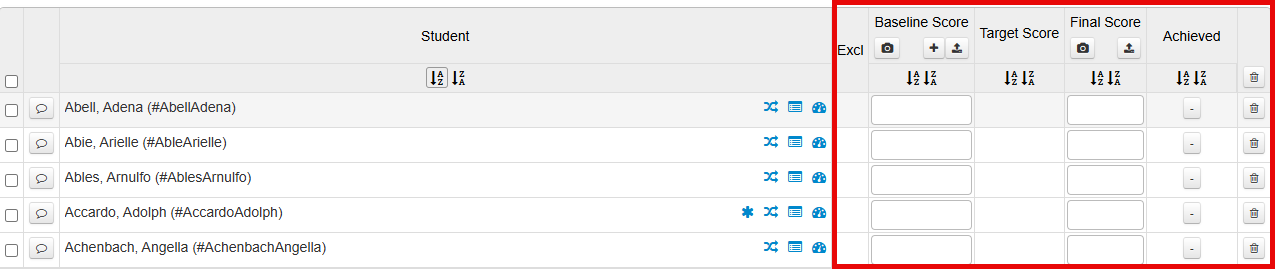
BUTTON EXPLANATIONS
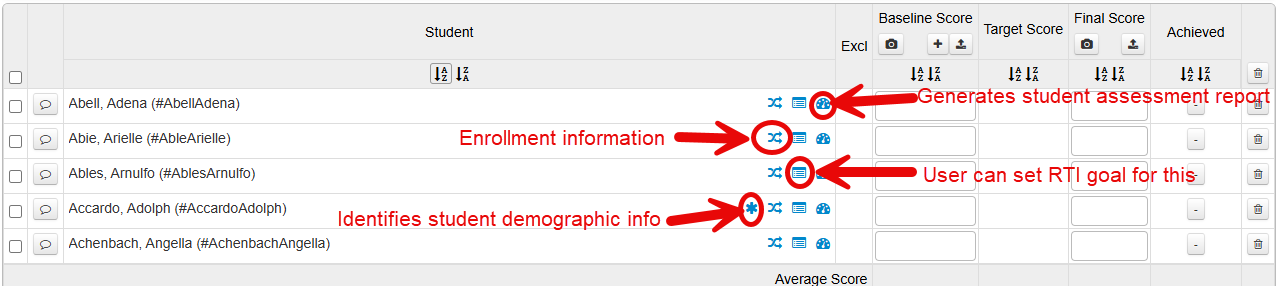
HEDI Scoring Section
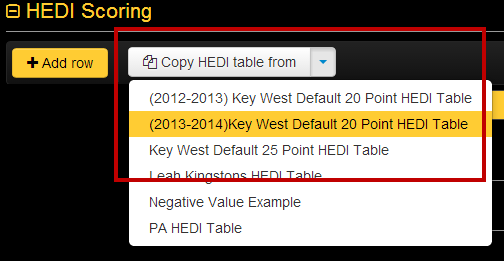
Each SLO must be linked to a HEDI Table in order for a final score to be given. The HEDI table must be set up by a district administrator. (Please reference document 30 for more information on how to set up a HEDI table.) A user can select the appropriate HEDI table from the "Copy HEDI table from" dropdown menu. This will automatically link the HEDI table to this SLO.
The HEDI table will automatically update to reflect the scoring information from the Population section . In the example above, the recommended HEDI score is 13/Effective and is highlighted in light green. To confirm this HEDI score, an administrator must click the Final button for the approved HEDI Score.
Discussion Section (optional)

This section is optional and is a great place to document feedback/comments about the SLO. This discussion board is available for both the teacher(s) and administrator(s) involved in creating/finalizing the SLO.
Attachments Section

This section is designed for storing any additional documents related to the SLO. Documents can be attached by both teachers and administrators. Note: There is a 20Mb limit to file size here
Changes Audit Section

This section documents any workflow state changes that were made to the SLO by all users.
14.C.1. SLO Target Setting Options
"HEDI / Attainment Score based on..." Options
There are several options that control how SLO assessment scores are calculated based on the HEDI/Attainment Table.
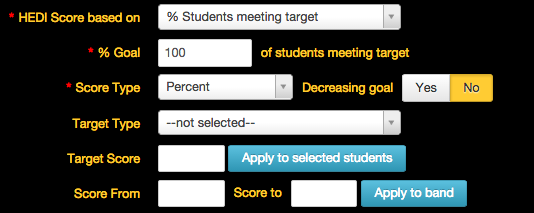
% Students meeting target
This is the default setting and is the most commonly used.
% Goal ___ of students meeting target
This is an optional setting that can be set to show/or not show when creating a SLO based on the district's SLO settings. This field would need to be formatted if teachers have written goals such as "45% of my students will meet their target." If it is assumed that 100% of students linked to the SLO are expected to meet the target, this option does not apply. **(If % goal is not 100 and is customized to another %, note that the HEDI table score will adjust accordingly.) This feature will not adjust the HEDI score UNLESS there is a setting that is enabled on the back-end for your district.
Average on final assessments
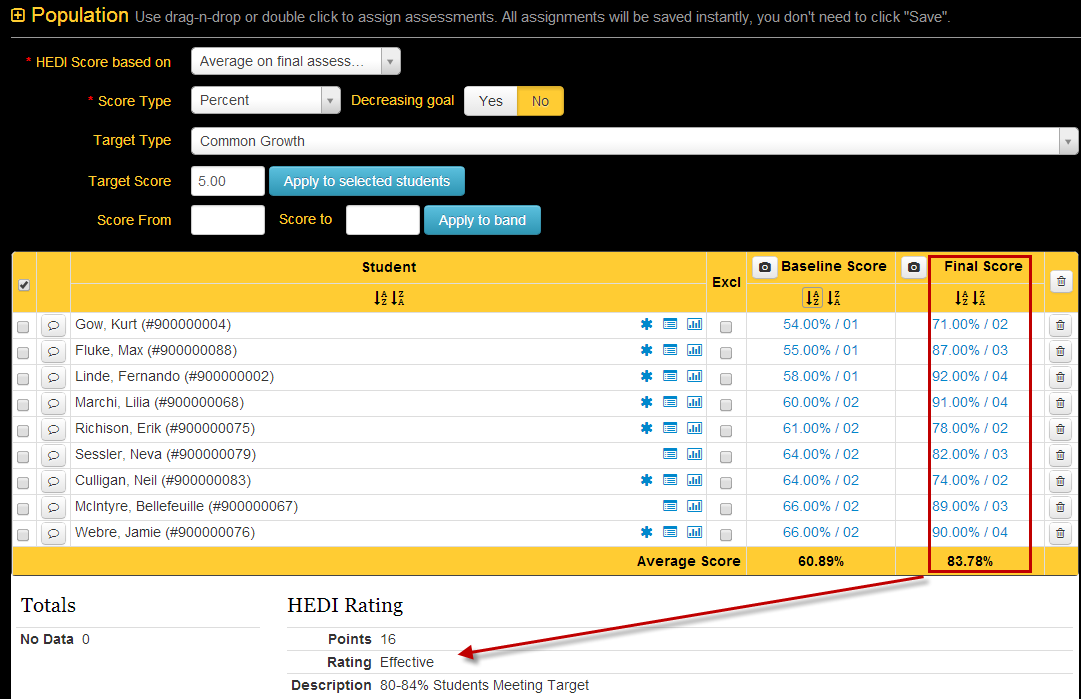
This option uses the average of the student's evidence assessment scores to calculate the HEDI table rating.
Average growth from baseline to final
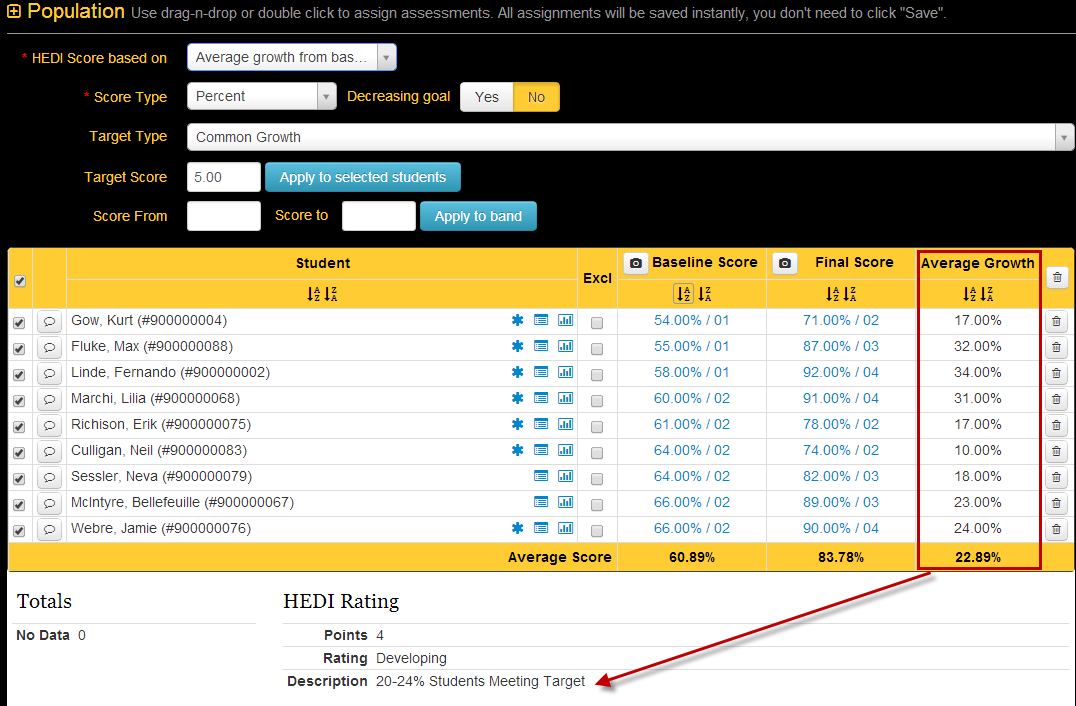
This option uses the average growth the students made from their baseline to final scores to calculate the HEDI table rating.
Average % gap closed
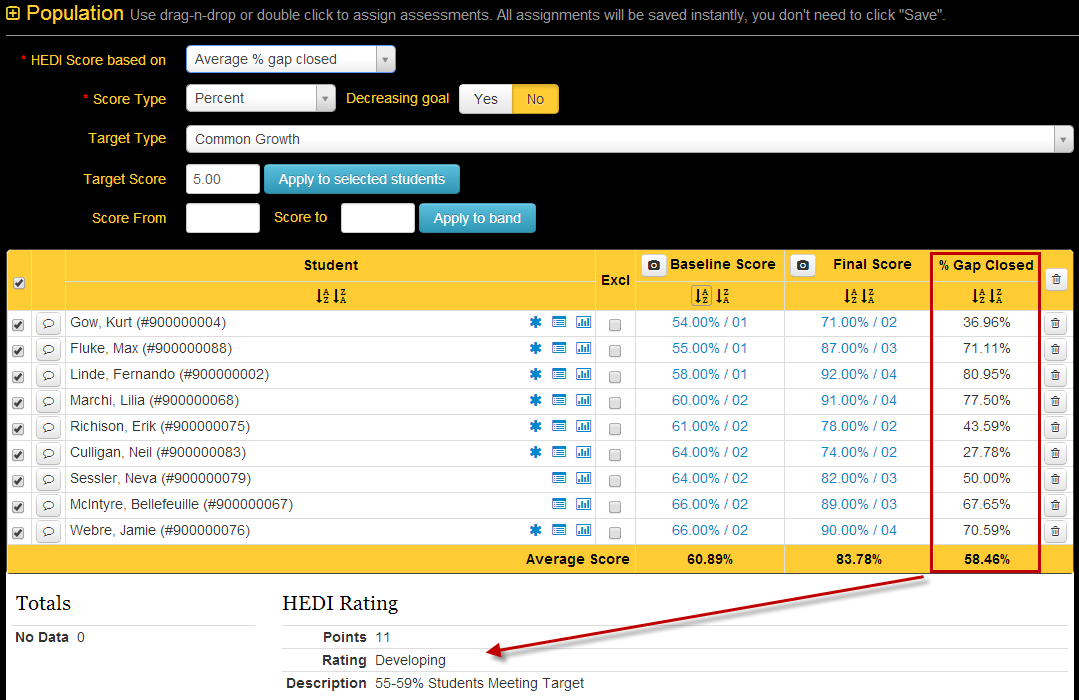
This option uses the % gap closed average to calculate the HEDI table rating.
Average Achieved
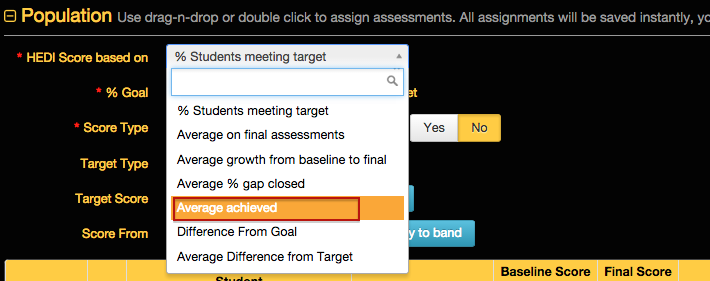 This option is designed for users who have multi-point targets. For example, students could earn .25 if they met "Target A", they could earn .5 if they met "Target B", etc. This takes the average of all targets achieved.
Difference From Goal
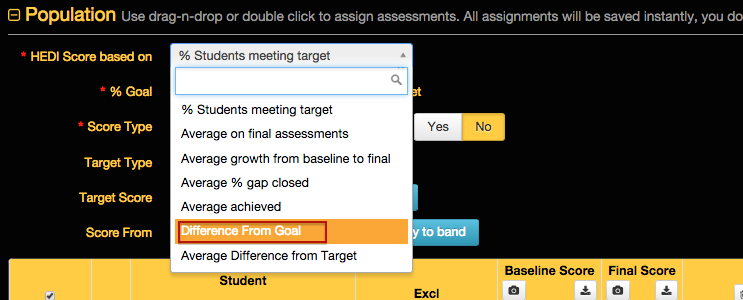 To utilize this option, users have to put a value in "% goal ____ of students meeting target" box. This then calculates the % of students who met the target and and subtracts "% goal" from this number to find HEDI score.
Average Difference From Target
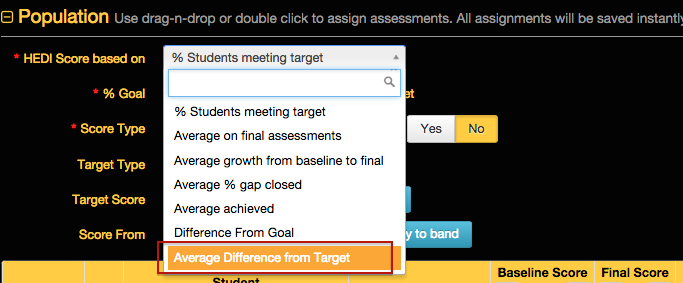 This option changes the last column (Target Achieved) of saying "yes/no" to reflect the difference from the students final score to their target score. This number could be negative or positive, it takes the average of all students for that column and calculates HEDI score.
Score Type
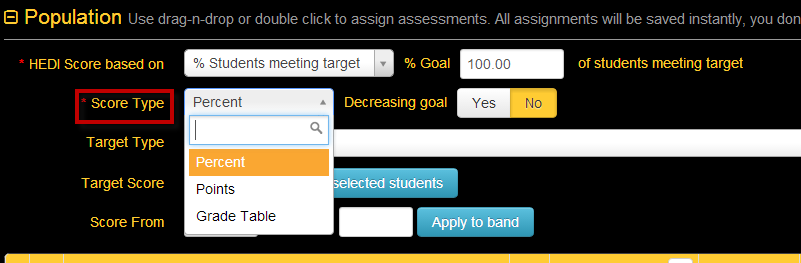
Percent
Selecting this score type will set goals based on the student's percentage shown in the Baseline Score column (ex. 5/10 would be 50%). If scores are hand-entered in the Baseline Score column, eDoctrina will treat them as percentages.
Points
Selecting this score type will set goals based on the student's raw score shown in the Baseline Score column (ex. 5/10 would be 5). If scores are hand-entered in the Baseline Score column, eDoctrina will treat them as points, not percentages.
Grade Table
Selecting this score type will set goals based on the student's grade-table score shown in the Baseline Score column. This option does not apply to hand-entered scores.
Decreasing Goal Option
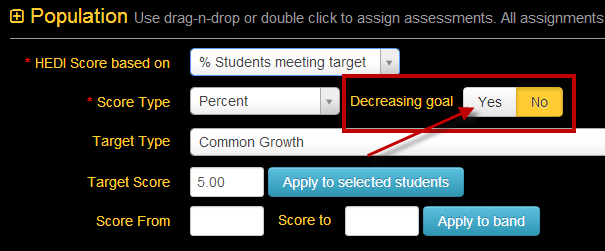
This option allows users to set targets for students when target values are smaller/lower than the baseline score. For example, if a student runs a mile in 10:24 minutes for their Baseline Score time, the target time may be set as 8:45. If the Final score time is 8:30 then the student will have met the target.
Target Type
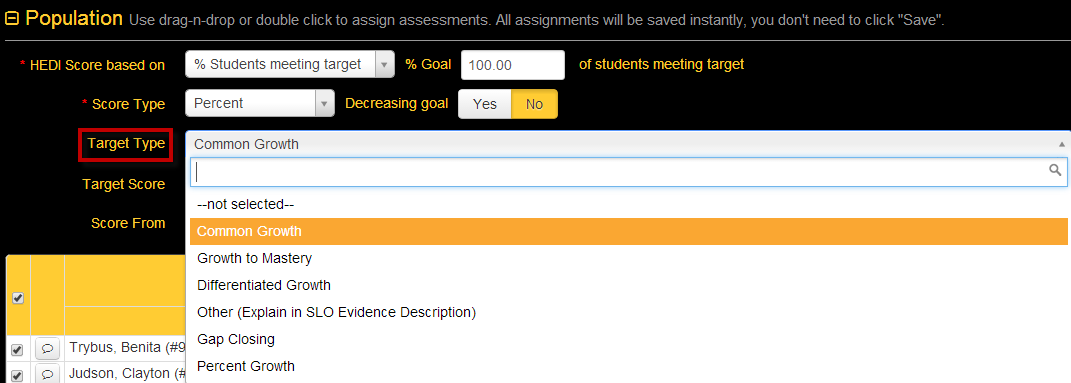
Common Growth
The same percentage or point value will be added to all selected students Baseline Scores. Select this option and enter the amount you want each student to grow by in the Target Score cell and then select the "Apply to Selected Students" button.
If using the Grade Table Score Type, enter the number of levels on the grade table you want the student to grow. So if you have 5 levels in the Grade Table and you want each student to "move up" 2 levels, enter 2 in the Target Score. Note that the value eDoctrina places in the Target Score column will be the minimum raw score needed to reach that target level.
Growth to Mastery
The same target will be set for all selected students, regardless of baseline scores. Select this option and enter the amount you want each student to achieve in the Target Score cell and then select the "Apply to Selected Students" button.
If using the Grade Table Score Type, enter the relative number of the level on the Grade Table you want the student to achieve. For example, if you had a Grade Table that contains 7 separate leves ("grades") and you wanted all students to achieve at least the 4th level, you would enter a 4 in the Target Score cell. Note that the value eDoctrina places in the Target Score column will be the minimum raw score needed to reach that target level.
Differentiated Growth
The user must manually enter a target for each student.
Note the Grade Table score type option should NOT be used with Differentiated Growth. If you want to base targets on a grade table, select the Points option and use the minimum scores required to reach a particular level in the grade table as the targets.
Other (Explain in SLO Evidence Description)
Same as differentiated growth.
Gap Closing
Only used with Percent values. This will close a certain percentage of the gap between the selected students’ baseline scores and 100%. For example, if you select Gap Closing and enter a value of 40% and a student had a baseline score of 20%, the target will be set at 52%, calculated as shown:
- Gap = 100% - baseline score = 100% - 20% = 80%
- Percent of Gap = Percent Increase x Gap = 40% x 80% = 32%
- Target = Baseline + Percent of Gap = 20% + 32% = 52%
Percent Growth
This will increase the selected students’ baseline scores by a certain percentage. For example, if a student had a baseline score of 50% and you selected Percentage Growth with a value of 25%, the target would be 62.5%, calculated as follows:
Note the Grade Table score type option should NOT be used with the Percent Growth option.
- Increase = Baseline Score x Percentage Growth = 50% X 25% = 12.5%
- Target = Baseline + Increase = 50% + 12.5% = 62.5%
Banded Scoring Tool
To use the banded scoring tool, you simply follow the steps above for goal setting, but instead of clicking on "Apply to selected students" button, enter the baseline score range in the SCORE FROM and SCORE TO spaces and select the "APPLY TO BAND" button.

SLOs with multiple target levels
REFER to guide section 26.b for general information on creating an SLO and 28.a on Target Setting Options
eDoctrina now allows multiple target levels to be set in a SLO. To add more target levels, simply click on the + button in the Target Score column.
When you have more than one target, you must assign a score or weight to each target level. The highest target should always be 1. Lower targets will be assigned partial points so if students score below the highest target, but above one of the lower targets, they can earn some points toward the HEDI rating.
NOTE: In some cases your district controls the weighting when you add multiple target levels so this will prefill for you and you will not be able to change it.
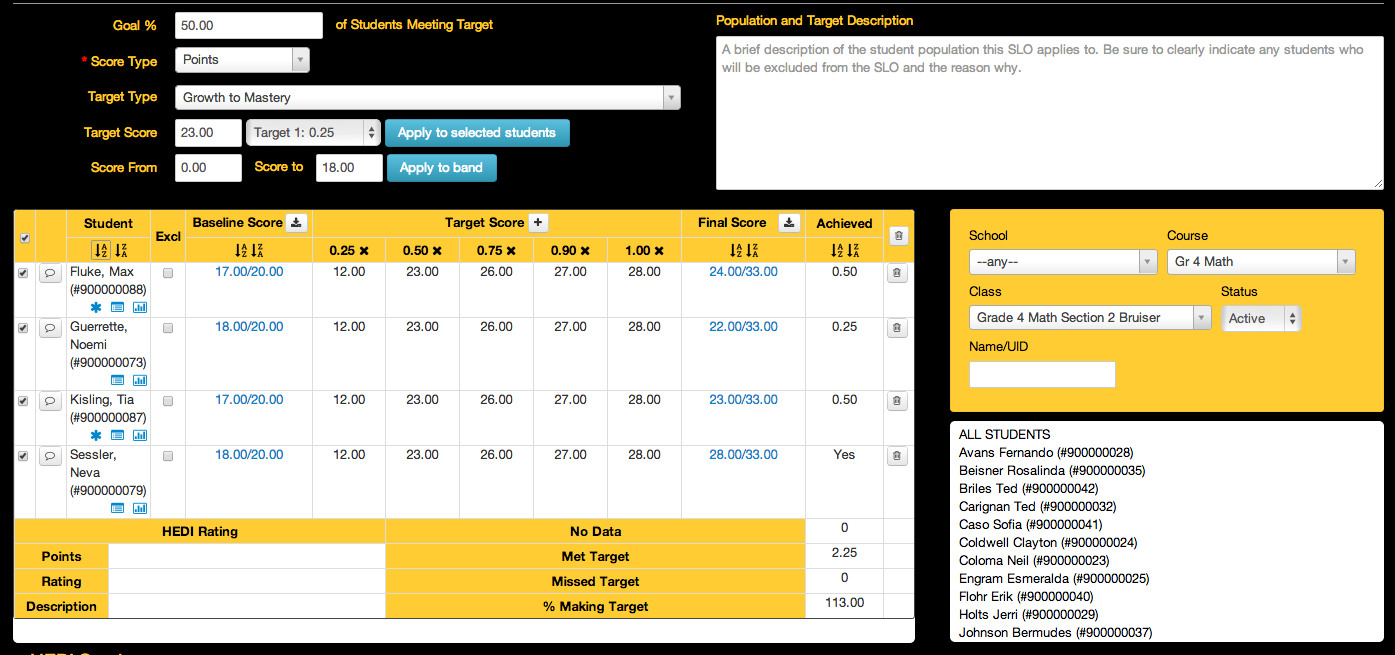
14.C.3. How to Exclude Students and/or Assessment Questions from an SLO
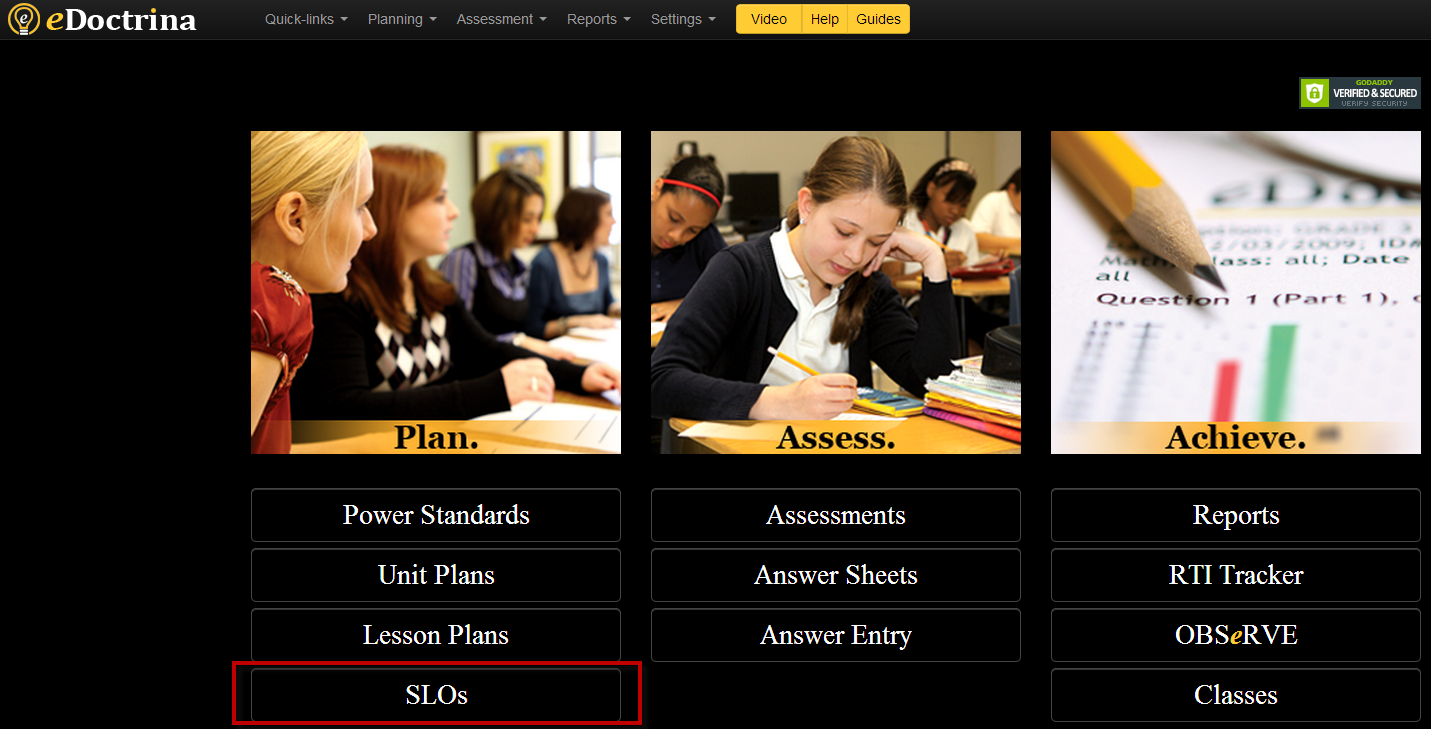
Excluding a Student from an SLO
In some cases, there may be students who have taken the SLO Evidence Assessment and they need to be excluded from the SLO. Please note: If the student does not have data for the Evidence Assessment the student's score will not be included in the SLO calculations- an administrator does not need to exclude the student for this situation.
Locate the SLO using the filter pane and click the edit pencil to modify the SLO.
Navigate to the Population section and check the "Excl" box located to the right of the student's name. Once checked this student's data will not impact the final HEDI rating. To record notes about a particular student click on the talk bubble located to the left of the student's name.

Excluding a Question from an SLO
After a SLO Baseline or Evidence Assessment is given, there may be instances where excluding a question within an assessment is appropriate. Once a question is excluded, the student's answers for this question will no longer impact their score relating to the SLO. All assessment scores will automatically update.
Locate the SLO using the filter pane and click on the edit pencil to modify the SLO.
Navigate to the Baseline Assessment or Evidence Assessment section and click the Checkbox button next to the assessment name in the linked assessments box. A pop-up will open allowing one or more questions to be excluded. When finished, click SAVE. If this assessment is linked to multiple SLOs then this process would need to be done within each SLO.
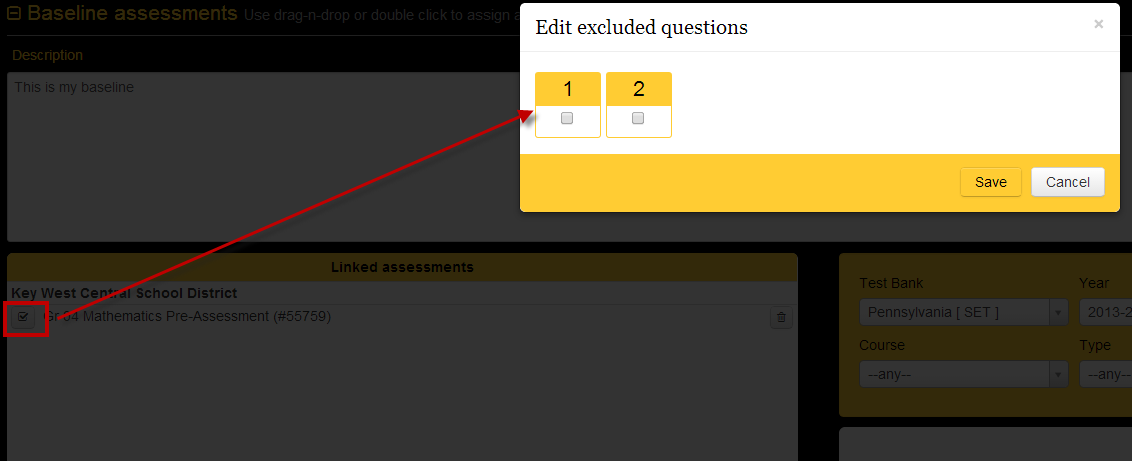
14.C.4. Advanced SLO Tool Features
SLO Score Type Labels
The SLO Score Type Labels allow you to define specific score types to select from. If a district does not set up any Score Type Labels, the default options will be: Percent, Points and Grade Table. Setting up Score Types often make it easier for teachers and allow the district to limit the range of scores that can be entered. It also limits if the score must be a whole number or can have decimals. The following is an example of a set of Score Types that a district might have:
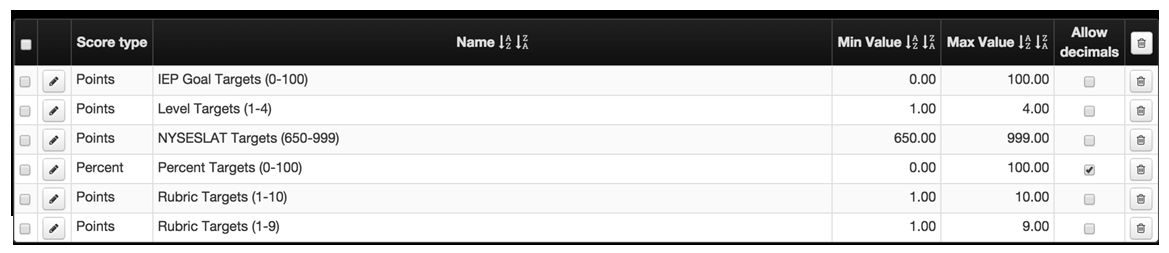 Please note: When you create score types it will apply to all scores in the SLO, Baseline, Target and Final.
SLO Goals Models
The SLO Goals Models tool allows districts to customize the goal setting process within their district and control what SLO Goal setting options are available to their teachers. This tool is quite powerful and can even be used to create formula-based targets that will calculate a target score based on the baseline score and a formula.
For example, if a district was using the following table to determine targets, a formula could be built in the goals models tool to automatically set targets based on this information:
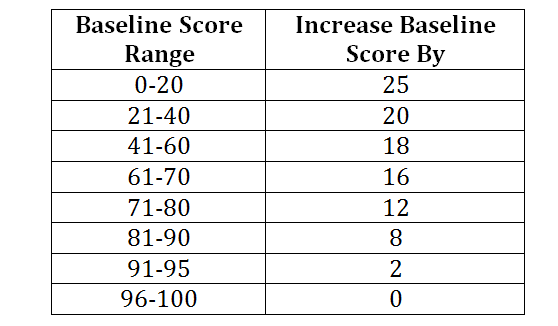 In this case a formula can be written that has IF Statements in it, something like this (Note that formulas are actually written using PHP syntax and may require eDoctrina support to implement):
IF Baseline_Score From 0-20 Then Set Target = Baseline_Score + 25 IF Baseline_Score From 21-40 Then Set Target = Baseline_Score + 20 IF Baseline_Score From 41-60 Then Set Target = Baseline_Score + 18 IF Baseline_Score From 61-70 Then Set Target = Baseline_Score + 16 IF Baseline_Score From 71-80 Then Set Target = Baseline_Score + 12 IF Baseline_Score From 81-90 Then Set Target = Baseline_Score + 8 IF Baseline_Score From 91-95 Then Set Target = Baseline_Score + 2 IF Baseline_Score From 96-100 Then Set Target = Baseline_Score + 0
This tool supports both logic statements (IF / THEN) like shown above, and nearly any mathematical operation you can think of. For example, one district uses a formula that multiplies the baseline score by 65% and then adds 30 points to it to determine the target.
Partial Credit
This tool allows you to create multiple “partial credit” targets. Some districts ask teachers to set multiple target levels for their students and give teachers some credit if the student does not reach the highest target, but does show some growth. For example, a district might have 3 levels of targets. The lowest level gives the teacher ¼ credit, the next level gives the teacher ½ credit and reaching the highest-level target gives the teacher full credit. This partial credit tool can be used with the automated target setting option discussed above so there can be formulas for each of the individual target levels.
Automatic HEDI table assignment
When developing goals models, you can assign a specific HEDI table to a specific goal model. This allows you to ensure the correct HEDI table is selected and applied to teacher’s SLOs.
Detailed Control of Target Editing and other options
If you are using a formula for target setting, you can decide if your teachers are allowed to enter, edit or delete targets. There are also options to hide the % Goal and Decreasing Goal tools in the SLO. A picture of the configuration screen is shown below:
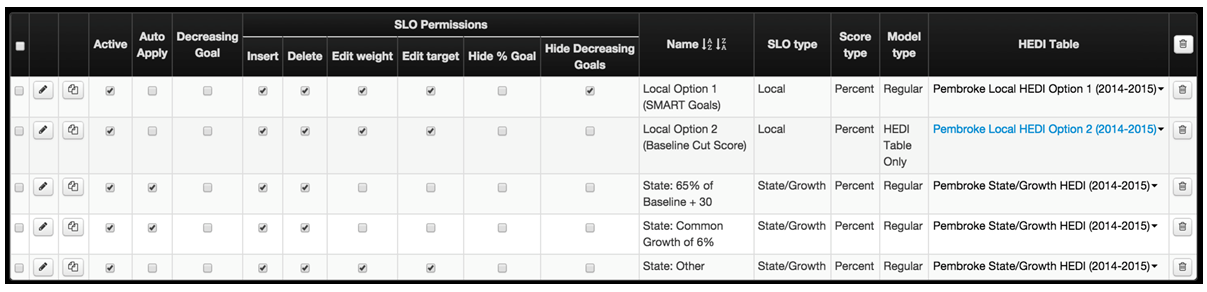
Limiting Target Setting Options
Many districts only have teachers use a few of the target setting tools available in eDoctrina. You can use the goals models tool to limit the target setting tools available to your teachers to simplify the process for them.
SEVEN different methods of calculating the final SLO score
When creating a goal model, each model can have a different option for calculating the final SLO rating. The available options are shown below:
- % Students meeting target: Determines the teachers Final Rating based on the % of students meeting their target.
- Average on final assessments: Determines the teachers Final Rating based on the average of the student scores on the final assessment. In this case, targets are not set.
- Average growth from baseline to final: Determines the teachers Final Rating based on the average increase (or decrease) between the baseline assessment and the final assessment. In this case, targets are not set.
- Average % gap closed: Determines the teachers Final Rating based on the average gap closed by each student. The gap closed is calculated as [(Final – Baseline)/ (Maximum Possible Score – Baseline)] * 100
- Average achieved: Determines the teachers Final Rating based on the average number of points earned for each student. This is typically used when there are multiple target levels with different point values for each target level.
- Difference from Goal: Determines the teachers Final Rating based on subtracting the % Goal that was set from the actual % of students who met their target.
- Average Difference from Target: Determines the teachers Final Rating based on the average of each students difference between their final score and their target score.
For more details, refer to the eDoctrina help guide on SLO Target Setting Options: http://docs.edoctrina.org/document/7551c355cb46c53f2aa2598064a8a4afd9a03729.html
NEED HELP?
eDoctrina has worked very closely with many districts to review their APPR plans and configure the SLO tool to streamline their processes to save time and aggravation. We have also added custom features for districts. For more information on how we can help you with your APPR process, please contact us.
[email protected] (888) 537-3348
14.C.5. SLO Goals Models Configuration
A Goals Model can be configured by a user with a district administrator account. The purpose of a Goals Model is to limit or define the amount and type of target score options teachers will have available to them when creating an SLO.
To create one or more Goals Models, go to Settings>Database Setup>SLO Goals Models.
Permission for what teachers can access within the SLO once the Goals Model has been selected can be decided here:

"Auto Apply" means that when a teacher selects this Goals Model for a Student Learning Objective, the associated target score will automatically populate in the Target Score field of the SLO.
Clicking the Insert button will allow you to create a new Goals Model for your district:

- The name should be something that will be easy for teachers to identify.
- The score type to be associated with this Goals Model must be selected here. Points or percent are most commonly used, but please refer to the "SLO Target Setting Options" document for more information.
- You must select a "Final rating based on..." option. Please refer to the "SLO Target Setting Options" document for more information.
- Clicking Insert will allow you to add a target type with its own weight and score, although a score is not required.
- You can exclude target types from being available to teachers in the SLO editing screen.

A teacher would select a Goals Model from the Target Type drop-down menu in the SLO editing screen:

Once a Goals Model has been selected, only the options associated with that model will be available to teachers:

Using Formulas
This is an example of a formula that can be used to automatically set a target from a baseline score:
if ($b < 30.5) {return 55;} else if ($b<50.5) {return 65;} else if ($b<70.5) {return 80;} else {return 90;}
In the formula, $b references the baseline score. The statement {return 55;} indicates a target of 55 will be set if this condition is met (In this case if the baseline is less than 30.5, then the target will be set at 55.) Contact [email protected] for more assistance if you would like a formula based target but are unable to create one to meet your needs based on this example.
14.A.2. SLO Workflow Options
SLO Workflow options allow a district to customize the approval process for SLO's within their district. These options can only be configured by users with district admin profile permissions.
These options can be found in Accountability => Settings & Config => SLOs => Workflow States

Upon navigation to this module, there are an extensive amount of options to customize eDoctrina to closely match the districts preferences. Below is a summary of the available options.

An important consideration when configuring SLO Workflow States is the differences between how a teacher may interact with an SLO compared to how a Principal or School Admin may interact (as there are configuration options that target the specific group). Please remember that all user groups are linked as a base user group of Teacher, School Admin, or District Admin; and some of these permissions are applicable to such these groups.
Notably, a Teacher user will only be able to move forward in workflow status and never go back while School Admin and District Admin users will be able to change the status of SLOs to any status.
Default
Only one workflow state can be indicated as the default within the district and this controls the initial status of all new and copied SLOs.
Active
Any workflow state can be set as Active or Inactive. Active workflow states will be available in accordance with other configuration options. If any workflow state is not active, then the workflow state will be unavailable for selection and filtering.
Final
The Final option is reserved for any workflow state that could be considered a "Final" score where it can then be added to a teachers set of evaluation data. Scores for SLOs will not transmit to final evaluation reports unless they are in some Final workflow state. Most districts will have one Final workflow state, but there are cases where there may be many.
Locked
When an SLO is in a workflow state that is locked, this means that no updates can be made to the SLO. Please refer to the bottom of this document for the options that allow for specific items in the SLO to be unlocked in accordance with the necessary touch points in each status.
Availability
-
Status available for teachers
If enabled, this status will be available for a teacher level user to select as long as it is moving the status forward. This is an important feature as it allows districts to choose which states a teacher can move their SLO to as long as the minimum requirements are met. By default, SLO workflow states will be available to School Admin and District Admin. -
SLO Visible to all
If enabled, any SLO in this status will be able to be viewed by all users. This option is useful for developing SLO templates and making them available for copy, but should be avoided in cases where SLOs should be private to individual teacher users. By default, School Admin will be able to view all SLOs linked to subordinate users (i.e., Teachers) in their linked school/location and District Admin will have access to all SLOs within their district. -
SLO hidden from teachers
If enabled, any SLO in this status will be hidden from teachers, but more specifically the teacher that created the SLO as well. By default, users should be able to access content they create within eDoctrina, unless there is some status where an SLO must be hidden or quarantined for some reason. This is when this option should be used. -
Learning Content
The Learning Content section of the SLO editor is where learning standards and the general description of what standards covered could be logged. If this option is disabled, this option will be hidden from all users when the SLO is in this workflow state. -
Baseline Data
The Baseline Data section of the SLO editor is where it is possible to link eDoctrina assessments to the SLO to pull in the necessary data for baseline assessments. If eDoctrina assessments are not being used, it can be used to describe the nature of the baseline data being used in this SLO. If this option is disabled, this option will be hidden from all users when the SLO is in this workflow state. -
Evidence Data
The Evidence Data section of the SLO editor is where it is possible to link eDoctrina assessments to the SLO to pull in the necessary data for final/evidence assessments. If eDoctrina assessments are not being used, it can be used to describe the nature of the baseline data being used in this SLO. If this option is disabled, this option will be hidden from all users when the SLO is in this workflow state. -
Discussion Board
The Discussion board is another section that can be used as SLOs move along their lifecycle. The discussion board can be available to School Admin and District Admin users but can also allow teacher comments if configured this way. If this option is disabled, this option will be hidden from all users when the SLO is in this workflow state. -
Attachments
The Attachments section allows for users to upload or attach files from an external link or the local device (as possible supporting documentation). If this option is disabled, this option will be hidden from all users when the SLO is in this workflow state.
Features
-
Auto-Approval
If enabled, the auto-approval feature will automatically select the final score for the SLO in accordance with the selected calculation method and the linked attainment table. This tool helps to expedite the selection of a final score in accordance with the SLO workflow state being a "Final" status as opposed to requiring some admin to select this rating as a step in the workflow. -
Can remove students
If this option is available, it is granted at the district level to be able to remove students from an SLO after they have been added. If this district setting is granted, this option allows for the ability to remove students to be controlled by the status of the SLO. A great use for this option is to lock the student population as soon as the SLO is approved. -
Can exclude students
If this option is available, it is granted at the district level to be able to exclude students from an SLO after they have been added. If this district setting is granted, this option allows for the ability to exclude students to be controlled by the status of the SLO. Excluding a student will eliminate a student from the attainment calculations and allow them to remain within the SLO student population. A typical use case would be to design an SLO status where exclusion is allowed, but otherwise leave the option unavailable. -
Hide approval ratings
In some SLO workflow configurations, there may be an element of quality control where admins must evaluate the quality of the contents entered within an SLO before they can move to the next status. This option, when enabled, will hide these approval ratings. -
Add/Delete attainment table
For an SLO to be able to aggregate all data and provide a single score, it is required to link an SLO attainment table. Some districts (who will leave this option disabled) will set a default attainment table to be linked (as there may exist an approved rubric) and not require manual linkage. When enabled, users will be able to add or delete attainment tables from their SLO. -
Update attainment table
The option to allow users to customize the cut scores, score descriptions, and even points related to their attainment exists when enabled. If disabled, linked attainment tables will not be able to be edited. Please note that it is possible to allow updates but lock specific items of the attainment table. -
Do not allow copy
If enabled, SLOs will not be able to be copied when in this workflow state.
Notify
-
Teacher
If enabled, any teacher linked to the SLO will receive an email message regarding a change of an SLO to this workflow state. Teacher is defined by anyone who is linked in the Teachers section of the SLO editor. -
Evaluator
If enabled, any evaluator linked to the SLO will receive an email message regarding a change of an SLO to this workflow state. The evaluator is defined by direct linkage to the teachers who the SLO is evaluating. This email will only be sent to those who are indicated here (as shown in the image below). The evaluator is an absolute assignment that will carry with the staff member year after year.

-
Observer
If enabled, any observer linked to the SLO will receive an email message regarding a change of an SLO to this workflow state. The observer is defined by any appraiser that has the observe permission granted to the teachers linked to the SLO. Access could be defined at the user type or by observer assignment in the current year, so this email could be delivered to multiple appraisers.
Note: Can add comment
If any of the comment recipients are selected, the option for a specific comment to be included in the email can be added when this option is enabled.Require
-
Baseline Score
If enabled, all non-excluded students linked to the student population will be required to have a baseline score to be able to move to this workflow state. -
Target score
If enabled, all non-excluded students linked to the student population will be required to have a target score to be able to move to this workflow state. -
Final Score
If enabled, all non-excluded students linked to the student population will be required to have a final score to be able to move to this workflow state. It is often configured to include the requirement for both target and final if an achievement model is being used.
Unlock options: only apply if Locked is checked
Unlock Baseline Score: Check this option to allow teachers to edit the baseline score column while the rest of the SLO is locked.
Unlock Target Score: Check this option to allow teachers to edit the target score column while the rest of the SLO is locked.
Unlock Final Score: Check this option to allow teachers to edit the final score column while the rest of the SLO is locked.
Unlock Rationale: Check this option if you want teachers to be able to edit the Rationale field of the SLO while the rest of the SLO is locked
Unlock Attachments: Check this option to allow teachers to upload attachments while the rest of the SLO is locked.
Unlock approval rubric: Check this option to allow users to change the approval rubric for quality assurance purposes while the rest of the SLO is locked.
Unlock student notes: Check this option to allow users to comment on students linked to the SLO.
14.A.1. How to create a HEDI Table
1.Navigate to Settings> Database Setup> HEDI Tables
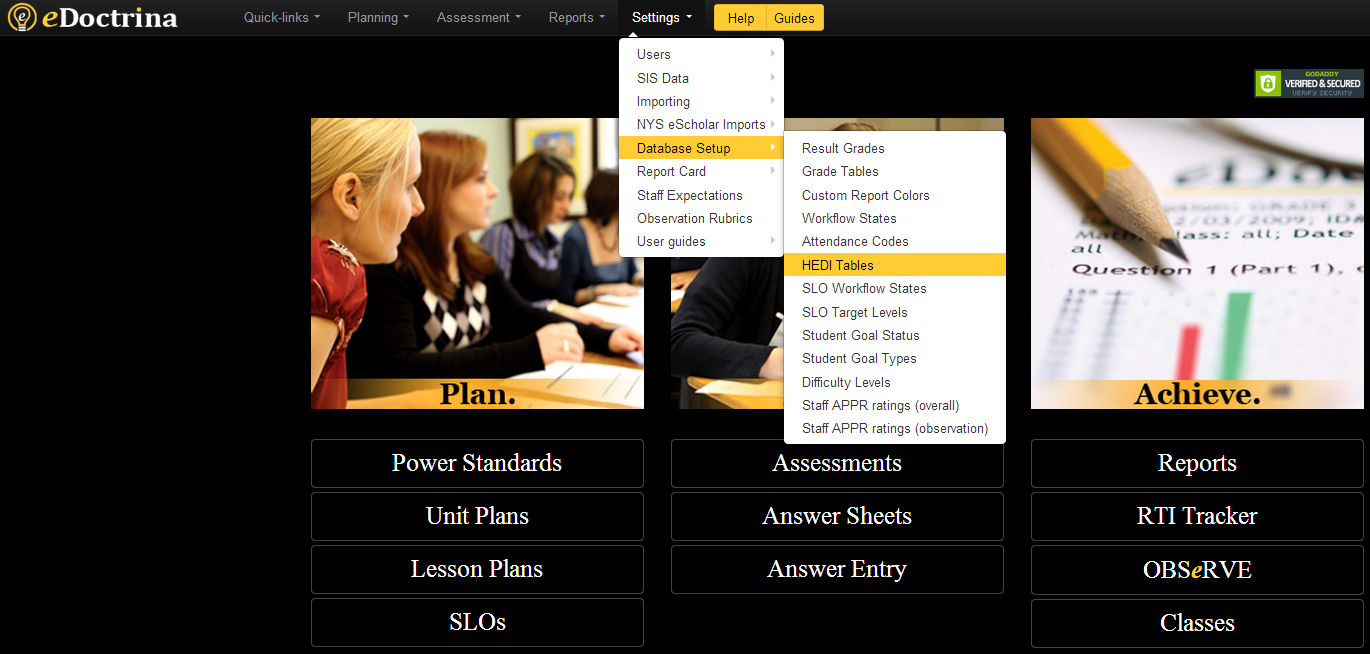
2.Click the Insert button, fill out the name of the HEDI Table and click Save. You are able to set up more than one HEDI Table for your district.
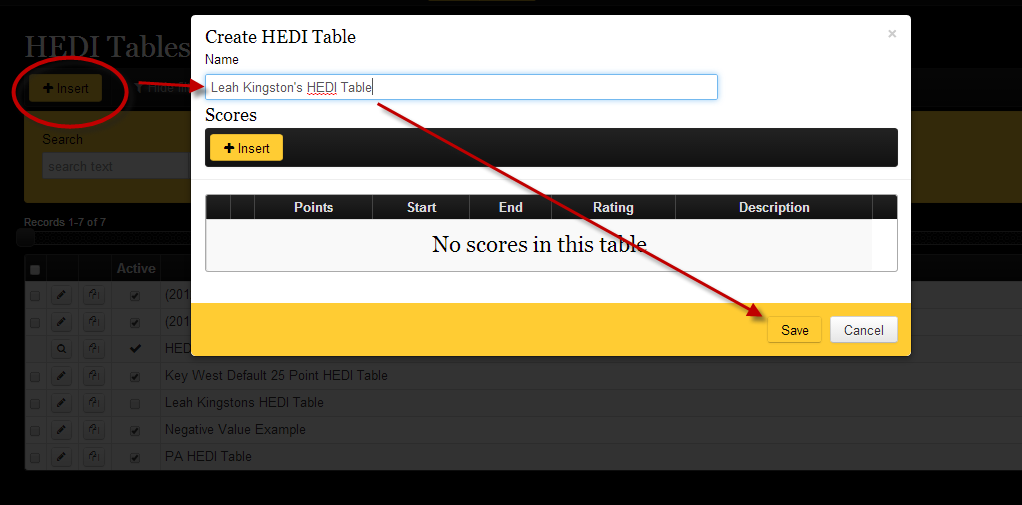
3.Next, begin to insert scores. Click on the Insert button below the "Scores" heading. Start with Points=0 like it is shown below. You will enter the POINTS, SCORE START, SCORE END, RATING and DESCRIPTION FIELD for each point level.
You will insert each level (0-20) separately and save after each level. You can also edit a point level by clicking on the edit pencil and making the necessary adjustments.
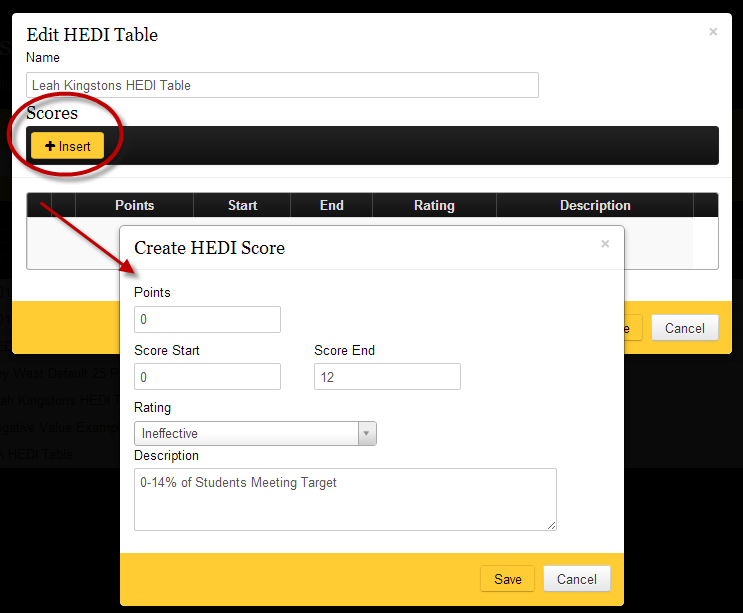
4.When your HEDI Table is finished it will look similar to the one shown below. (We are not recommending the following scoring percentages- this is only an example.)
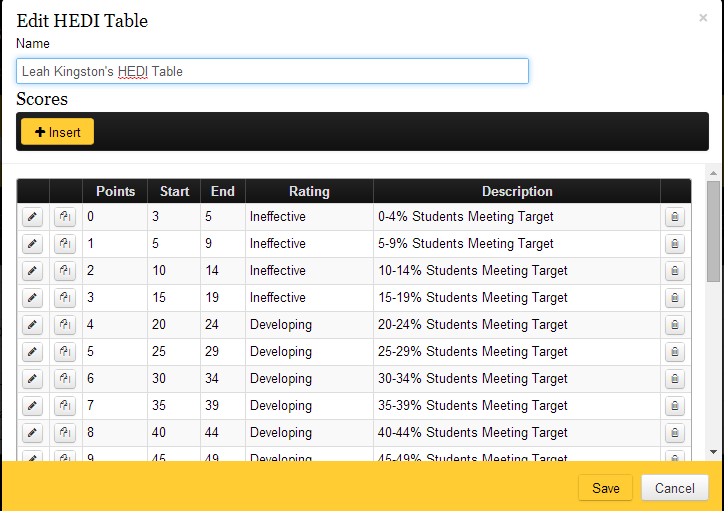
Automated SLO Assignment Tool
https://dev.edoctrina.org/v2/auto-generate-slo.html
Using this tool is a multi-step process.
- Use the Check SLO requirements button to create a temporary table of SLOs that are recommended for creation.
- Change the SCOPE filter to "Require SLO Generation".
- Review the list of users and recommendations and check the box next to all you would like to create SLOs for based on the recommendations.
- Click on the Generate SLOs button to create SLOs for all recommendations you checked.
Note: The buttons on this screen work based on filters so if you have the screen filtered for a certain school, the buttons will only operate for that particular school.

10.A. Enrolling in a PD30 Course
Steps:
To find PD30 courses, click on the "Planning" at the top. "PD30" will appear in the dropdown menu.
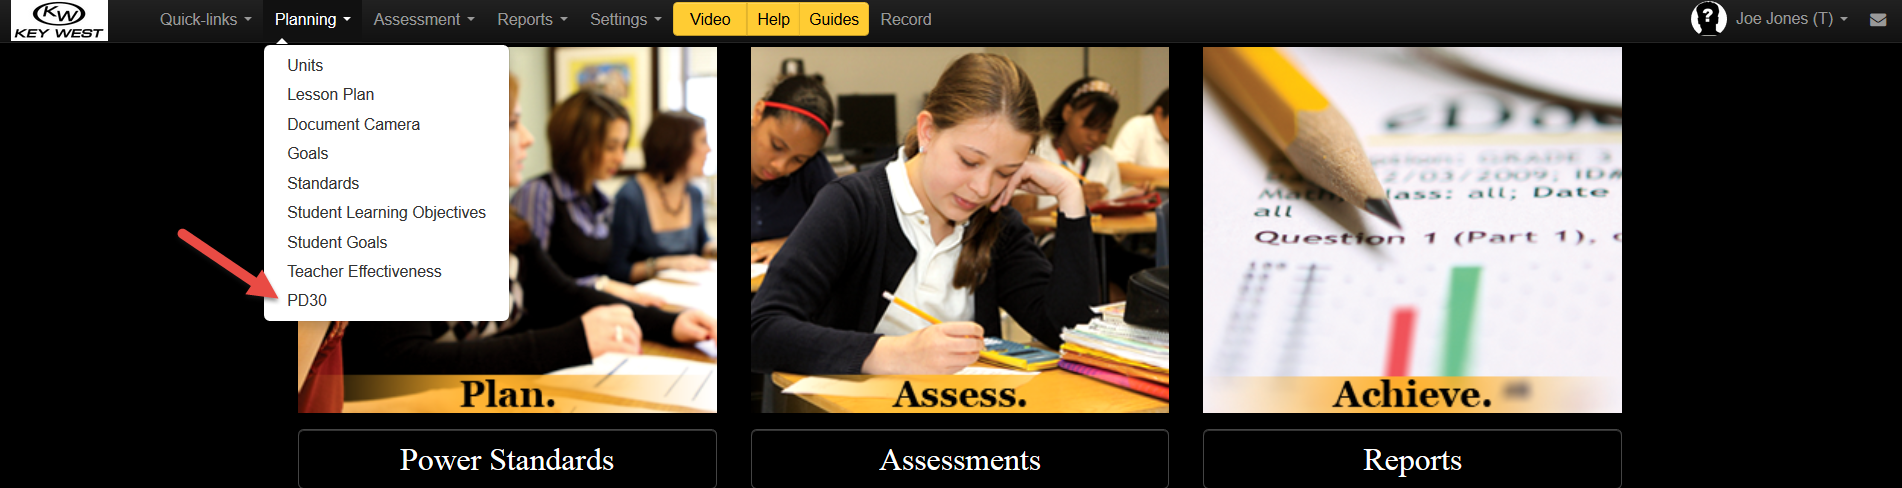
There will be two options in the PD Provider dropdown menu. One will be "eDoctrina PD30", which contains courses offered by eDoctrina. The other will be your district, which offers courses created/offered by your district.

To enroll in a course, select the plus button next to the course name.
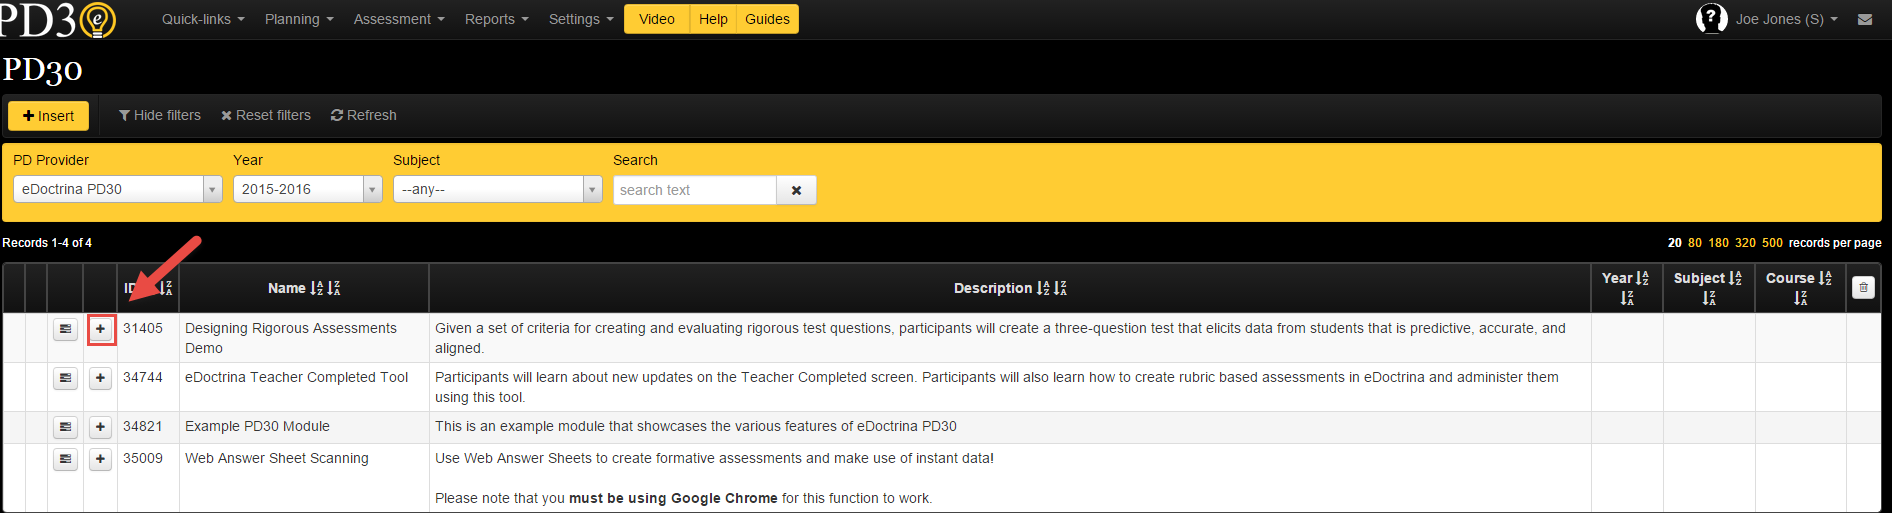
You will then see a "play" button in its place. Click on this button to begin the course.
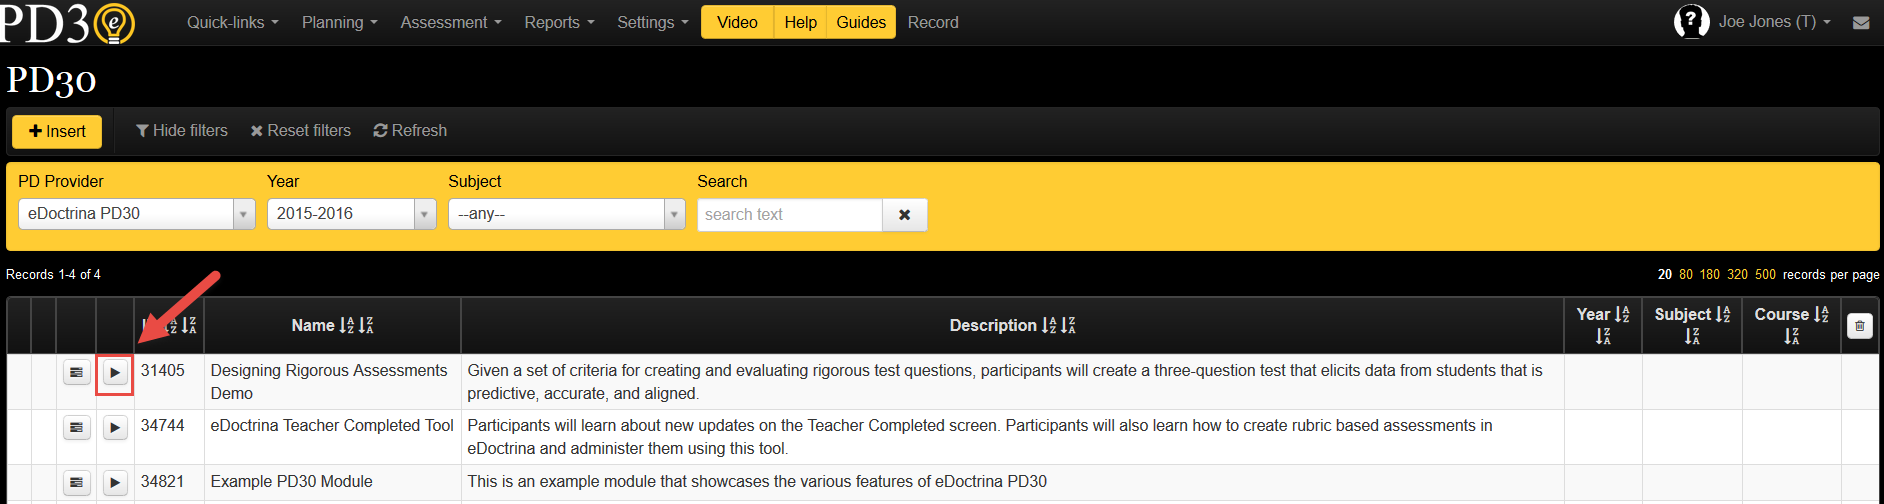
When the course requirements have been completed, a print button will appear in place of the play button. Click here to print the certificate of completion.
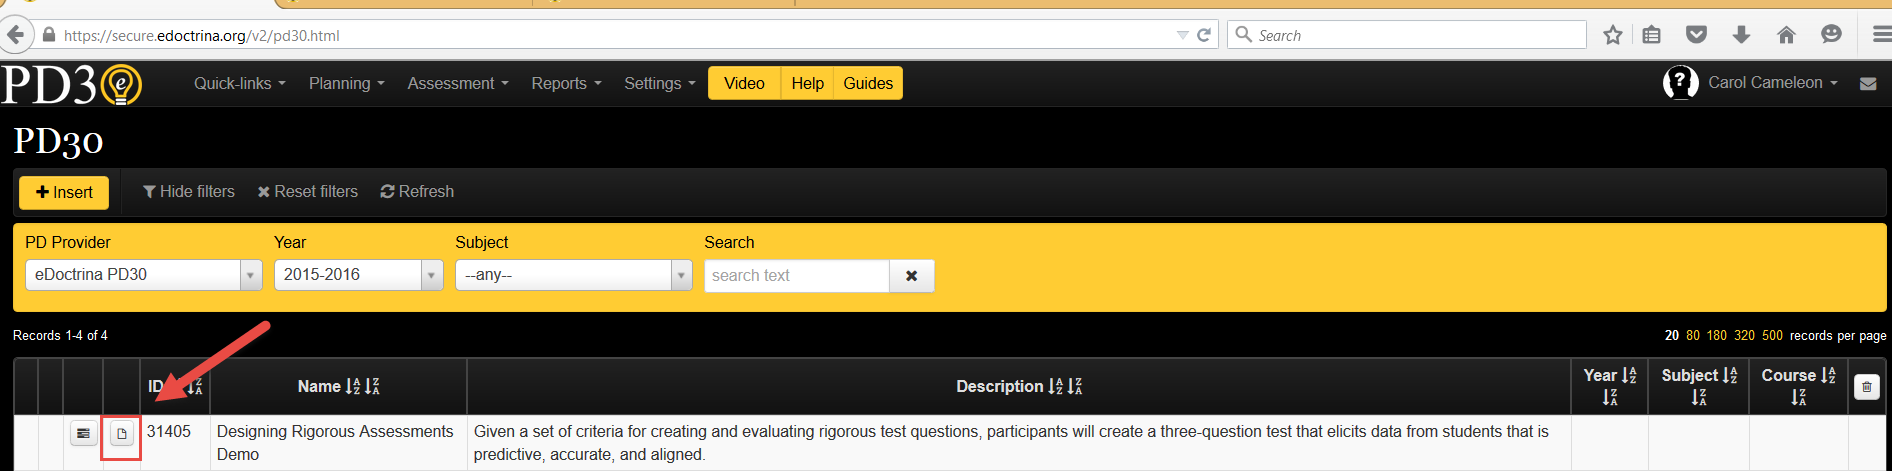
11.B. Using Schooltool Grade Book Sync
The Schooltool Grade Sync is accessed through the "Answer entry/verification" screen from the Teacher Dashboard. Please note that this functionality is meant to send only one class section at a time and it is recommended that you send scores for each class section individually.

- Filter for the appropriate Course, Class, and Students to sync.
- Filter for the correct Test Bank and Assessment to sync.
- Click on the "Check Student Answers" button.
This will take you to the "Answer entry/verification" screen. You will see a list of the students in the class you have selected. Click on "Send scores to Schooltool" to proceed.

You will see the following popup. Review the screen and select "Send Raw Score" or "Send Percent Score" to send the grades to your Schooltool grade book for importing:

Next you must log into your Schooltool account and go to the grade book. There is a feature for you to import assignments and grades. Below are screen shots from the Schooltool help guide. If you have trouble following them, I recommend you access your schooltool help documentation regarding importing assignments and scores.

If you need any additional assistance, or have any questions, please feel free to contact the eDoctrina Help Desk at [email protected]
3.G.1. How to Import Assessment Data -- When the Test Needs to Be Created
eDoctrina's Import tool allows you to import assessment results for a test that has not been created in the system yet. The tool will build the assessment from information in the file you are importing OR will prompt you for information about the test as you are importing it.
1.To begin, navigate to Import Assessments under the Settings -> Importing & Exporting menu located at the top of the screen. Please note this task is one that can only be performed by users with "Admin" access. The "Import Assessments" option will not be available to other user types.

2.Click the "Upload File" button on the top right of the screen (see below) and then browse your files to locate the file you would like to import. Click "Open."
File Formatting: File type will need to be one of the following:xlsx, xls, csv, txt
Column Headers:
Student ID(Required) - Student ID Number in eDoctrina
Score(Required) - Students score on Assessment
Description - Name of the Assessment
Type- Type of Assessment (District, State, any)
Date- Date of import (MM/DD/YY)
Subject - Subject Assessment should be housed under
Grade - Grade level of student
Year - School year
Maximum Points - Max point value on Assessment
Course ID - Course ID listed in eDoctrina
Master Assessment - Any

3.Use the selection boxes to map the information from the file to the assessment. The displayed table should reflect the format of the file that has been uploaded. The STUDENT ID and SCORE are REQUIRED fields because eDoctrina needs to know what score to upload to which student. All other information is optional, but can be helpful to inlcude in the uploaded file to effectively assign descriptive information about the assessment(s) to be created. Once this step is completed, click the "Analyze" button.

NOTE: This tool ONLY allows the user to import a single score, it does not allow importing of student answers for multiple questions. Please see our help guide on How to Import Assessment Data Into an Existing Assessment for more details on this topic.
4.Upon selecting the Analyze File button, the second step of the import process will appear at the bottom of the screen. Here is where the user will assign the descriptive information of the assessment(s) that will be created when these scores are imported. When eDoctrina analyzes the file, it will look at all the included fields and produce a line for any item that seems to be a unique assessment. The user can begin the import when all required fields have been entered for each one of these lines.

NOTE: Fields that are not included in the file will need to be entered or selected.
If eDoctrina finds an assessment that exactly matches the imported fields, the user will have to decide whether to create an new assessment or import the score(s) into the existing assessment that was identified.

NOTE: If an existing assessment is found, the assessment ID # will display in parentheses next to the description.
5.Click the Begin Import button to initiate the data upload.
It is important that the Student ID in the imported file matches the student's UID in eDoctrina. If eDoctrina cannot find a student, the following ERROR message will be produced.
 <
<NOTE: If this error is produced, the student either needs to be created in eDoctrina, or the student ID needs to be updated in the uploaded file.
If eDoctrina identifies existing assessment data for a student, a WARNING message will pop-up to prevent accidental overwrites. In such scenarios, the user will have to decide whether to "Keep Existing" data or "Overwrite" the existing data with the new data included in the file.

NOTE: If a this is a data update, the option to "Check to apply to all warnings" exists so it is not necessary to select an option for all students.
6.Once the import has executed successfully, a summary of the actions performed will display. The created assessments will be listed with their assessment ID# along with other relevant details.

3.G.2. How to Import Assessment Data Into an Existing Assessment
eDoctrina's import tool allows you to import student answers for an assessment that already exists in eDoctrina.
1.To begin, navigate to Assessments under the Assessment menu located at the top of the screen.

2.Locate the assessment you wish to import data for and click on the "Import Answers" icon.

3.You will be prompted to upload the file containing the student answers. Click on the "Upload File" button, located at the top-right part of the screen and then browse your files. When the document to be uploaded is found, click "Open."

4.Use the selection boxes to map the columns to the assessment questions. When completed, click the "Begin Import" button at the screen's top right.

5a.It is important that the Student ID in the imported file matches the student's UID in eDoctrina. If eDoctrina cannot find a student, the following ERROR message will be produced.

NOTE: If this error is produced, the student either needs to be created in eDoctrina, or the student ID needs to be updated in the uploaded file.
5b.If eDoctrina identifies existing assessment data for a student, a WARNING message will pop-up to prevent accidental overwrites. In such scenarios, the user will have to decide whether to "Keep Existing" data or "Overwrite" the existing data with the new data included in the file.

6.Once the import has executed successfully, a summary of the actions performed will display.

Teacher Evaluation Model Configuration
eDoctrina's Teacher Evaluation tool allows districts to determine an overall staff evaluation / effectiveness score based on two or more criteria. A district can have multiple models that are assigned to staff roles that have different criteria or use a single criteria for all staff members. Ultimately, the tool requires two primary scores that determine a staff member's overall evaluation score based on a lookup table.

In order to configure the Teacher Effectiveness Report you must do 4 things: 1. Create an overall model. Often each district has a single model but there could be multiple models if different measures are used to calculate effectiveness for different staff members. Create models by going to Settings -> TE Data -> Models. 2. Create a minimum of 2 categories. One category must be tagged as the Vertical Category and one category must be tagged as the Horizontal Category. Note that each category must be linked to a data source which can be edited from Settings -> TE Data -> Data Sources. 3. Create tables to convert the raw scores for each category into the Teacher Effectiveness Index Score at Settings-> TE Data -> Category Score to Effectiveness. 4. Define the Teacher Effectiveness Index table at Settings -> TE Data -> Effectiveness Index.
08.B. BeHaVE Report
The BeHaVE Report is designed for teachers to see an overview of students' progress in the BeHAVe system.

When all the filters are set, just click on one of the report option buttons and an Excel version of report will be generated.
There are three versions of the report available for print.
Summary by Student: This provides a convenient overview of the behavior codes each student received.

Summary by Behavior Code: This shows how many times each behavior code was assigned.

List: This provides the most detailed overview of the behavior codes assigned to students.

06.B.5. Student Growth Report
The Student Growth report allows you to view a student's growth from one assessment to another.
To print this report, navigate to the "Teacher Dashboard" and filter the "Select Students" and "Select Assessments" filters. Two or more assessments should be selected. Then click the “Student Growth” button (see below).

A pop-up menu will prompt you to select which version of the report you wish to view/print.

The Student Growth Report scores are available in percent, points, percent/points and rubric text format. Also, you can add Growth and Average columns to the report.

The grade from the Grade Conversion Table will be color coded according to the selections in the Grade Conversion Table linked to the assessment.
The Growth column can have a negative value if the student earned a lower score on the most recent assessment.
Note: If there are no corresponding questions in one of the assessments, an "NA" will appear in the Growth column.
09.A. Creating a Student Online Learning Experience (SOLe)
Click HERE to view the help video
A SOLe unit is a teacher-created unit that can be assigned to a student in his/her progress account. It can completed by the student online and on-demand.
SOLe Design
To create a SOLe unit, a user would select to "Create" from the SOLe Units (LMS) screen, and then select "Student Online Unit" in the Type drop-down menu.

Once the unit plans open, the general information will be available at the top of the page and can be edited if need be. There are also additional fields that can be manipulated, such as unit permissions (Team Can Edit, Shared Users Can Edit, etc.), Start/End Dates, Unit Duration, etc.

Standards can be added and unwrapped within each new unit within the "Standards" section of the unit plan, which is below the "General" information. To link a standards, you simply use the filters to find the necessary standard set, subject, grade levels, etc, and drag and drop the standards to the left side of the screen:

Within a SOLe unit plan, each "lesson" within the unit is called a learning experience. Learning experiences can be added in one of two ways:

Once added, there are multiple components to the Learning Experience to ensure users are able to add the content necessary for student success.

- Title: This section is where a title for the learning experience can be added. This will appear at the top of the screen when students log in to complete the LE.
- Description:: Users can add a brief description of the LE, which will appear below the title. They can be as vague or in-depth as they'd like with the description!
- Standards: While Learning Standards can be added to the entire unit, they can also be linked to specific Learning Experiences for more accurate standard data. To link a standard, users can simply drag and drop from the standard set into the LE or double click a standard to link it to multiple LEs.
- Content Editor: This section is where the content of the LE lives.
- Text Links:Text links allow you to define hyper links to content and make them mandatory or optional.
- Attachments: This tab is where you can upload attachments for students to view or download.
- Assessment: This tab is where you can link a new or existing assessment for a student to take within the LE.
- Video: The video tab allows you to either upload a video or record a new video directly in the LE.
- Forum: The forum is where you can choose to include a discussion board.
- Dropbox:The drop box is where you can activate a drop box for students so that they can send you an file. Their uploads can be private for only the teacher's viewing, or public so that classmates can view and comment.
- Instructor Verify: Checking this box means the instructor must verify the LE to designate it as complete and allow students to move on to the next LE.
- Activated: This check box must be selected in order for the LE to be activated for students to see when they login to complete a SOLe unit.
- Min time on page: This is the amount of time students must spend on the LE before they are able to move on to the next one. If they try to move on before the time is up, they will receive an error.
- Min time since last LE: This is the minimum amount of time that must pass since the last LE was completed before the current LE can be accessed. This can be set in minutes, hours, or days.
LE Features: Broken Down
Content Editor
Users can type or copy/paste content in this field using the WYSIWYG editor (pictured below).

The WYSIWYG editor allows users to enter text, special characters, equations, links, images, media. Links can be added within the text and then made mandatory using the Text Links section.

Text Links
Text links can be added to the content area and be made required or optional. By checking "Click required", the hyperlink will appear blue for students, and they will not be able to proceed to the next learning experience until they've clicked on the link (or links).

Attachments
Clicking "Upload Attachment" will allow you to upload a file from your computer or drive. "Activated" will make attachments available to students. Checking "Click required" will prevent students from progressing to the next learning experience unless they've viewed the attachment.
Please note attachments can be removed from a LE using the trash icon

Assessment
In the Assessment tab, you have the choice to link an existing assessment or create a new assessment that will be linked to this learning experience.
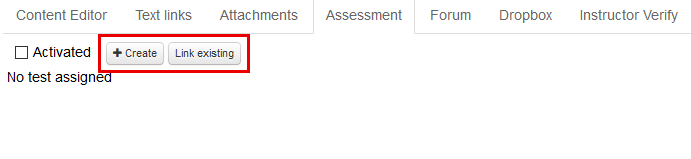
Clicking "Create" will bring the user right into the assessment editing screen where they can create an assessment that will automatically link to the LE. Clicking "Link existing" will produce this pop-up where you can filter to find an assessment. Then clicking "Proceed" will link the assessment.

When an assessment is linked, you will have the option to make the assessment a SOLe assignment ONLY (meaning it cannot be assigned on the Dashboard as a regular assessment), to Make Assessment Required (meaning that students will not be able to proceed to the next LE until they take the assessment), the option to set a minimum required score, to Display the minimum passing score % for students (meaning students will see the minimum passing score displayed when in the LE), and select an action if the student does not meet the minimum required score.

The actions for if a student does not meet the minimum score are:

Video
The video tab provides the LE creator with two options. 1: Upload a pre-existing video by simply clicking on the "Attach a video" button. Once it is uploaded, you have the option to preview the video and you can also click on "Watch Summary" to see a list of students who have viewed the video.

2: The second option is to click on the video camera button to record directly in the LE. A screen will open where you can begin recording instantly.

Forum
Under the Forum tab, users can activate a discussion forum and required a minimum amount of posts and replies from each student (optional). Users can also add Discussion Forum Instructions for the students to provide a bit more information about what the students are expected to do in the forum. The check-boxes allow for teachers to review posts before they are able to go to the next LE, or before they go public for other students to see.

If Needs Moderation is selected, the teacher has the opportunity to review all forum posts by selecting "Review Forum Posts" and either select Approved, or Not Approved.

If Hide Posts Before Submission is selected, posts from other classmates will remain hidden from the student until they them-self have submitted a response. Once they submit a response, they will be able to see their classmates' responses as well.
Allow anonymous posting allows students to post without their name being linked to their posts or replies.
Dropbox
Under the Dropbox tab, you can activate a dropbox for students to send files and also control its settings.

- When activated is checked, the Dropbox becomes activated for that LE.
- When Require student to upload is checked, students will not be able to progress to the next learning experience until they've submitted a file to the dropbox.
- When Require Teacher Approve is checked, this will provide a check-box on the Activity Monitoring screen for teachers to track the student files that have been reviewed.
- When Discussion Board is checked, a discussion board will be provided for students to discuss each other's uploaded files. (Tip: It's recommended that students include their names as part of the file name so others can distinguish who uploaded each file.)
- When Private is checked, the teacher can select whether items in the dropbox will only be viewed privately (by the teacher) or whether they should be viewed publicly and by whom.
- When Allow link is selected, users can upload a link, such as a Google Doc link (it's always good practice to remind students to make sure specific permissions are in order)
- When Min number of documents is checked, the teacher can set a minimum number of documents that are required to be uploaded.
When students have uploaded files, they will appear under the Dropbox tab for teacher viewing.
Instructor Verify
When this option is checked, the teacher must verify the LE as "Completed" before students can continue onward in the SOLe.

Assigning SOLe Units to Students
When viewing a SOLe unit from the Units Dashboard, there are two icons that are important to remember when it comes to assigning and monitoring student progress. The silhouette icon that appears to the left of the unit name can be used to assign the unit to students' progress accounts. The icon that resembles a chart allows you to view the SOLe Activity Monitoring screen to review/verify student progress.

Selecting the assign, or silhouette icon, will prompt the following pop-up:

- These icons allow you to decide if you are assigning the unit for the first time, Re-assigning a unit that has already been started but not finished, or Unassigning a unit. You can customize the assignment by selecting what each student has access to within the Learning Experience:

- Use these filters to find the students you want to assign the unit to. Users can select one or multiple class sections.
- Based on your filters, you will see a list of students that you can select to assign the SOLe unit to.
- Once you have students selected, you can choose to set a specific Assign Window, which will prompt a calendar and allow you to set specific dates/times that the SOLe unit can be accessed (see below), or select "Proceed" to simply assign the unit for students to take until they have completed it.
Assign Window

Student View
Once a student has logged into their Progress page, they can find assigned SOLe units by clicking on "Learning Experience" at the top of his/her Progress screen, or by selecting the "Go to Learning Experiences" link provided in the "Notice" section of the page.

The units, which include one or more individual learning experiences below, will appear. A play button indicates the student can click to begin that learning experience. An exclamation point indicates that the learning experience is not yet available to the student. Either the student did not complete the requirements for the previous learning experience, or the teacher has not yet unlocked that learning experience. The bars to the right indicate the student's progress.

Once within their Learning Experience, students will see the required components set up by their teacher. Each LE is very different, but here is an example of a LE that has required links to click, required attachments to open, private dropbox submission, optional student notes section and the ability to post in the discussion forum.
.png)
If at any point the student tries to move to the next LE without finishing part of the required LE, they will receive a warning which will let them know what needs to be completed before they can move on:

To close the page to finish the LE at a later time, students can simply select the "Close" icon in the top left-hand corner of the page and return to their Progress account.
Activity Monitoring Screen
From the Units page, users can select the chart icon to the left of the Unit name to open the Activity Monitoring screen.

This screen is a dynamic proctoring screen that teachers can use to monitor how their students are doing on a particular SOLe unit. It breaks down each Learning Experience and shows the status of each student as: Not Started, In Progress or Complete.
Clicking on the envelope will allow you to send an email to the student's progress account.

"S" indicates the component has been started, but not completed. A "C" will appear if the component has been completed or if no minimum requirement has been set. Clicking on either of these will produce a pop-up showing how much time has been spent by the student on that component, as well as any part of the LE that has not been completed yet (indicating an "S").

Using Electronic Signatures in OBSeRVe
To include electronic signatures in your observation reports, go to Settings>Staff Expectations and select the rubric you want to modify. You will be able to check a box under "Electronic Signatures Report" next to each stage or component of the observation for which you choose to add this feature. Typically an eDoctrina representative will select this option for you.

After an observation has been completed and saved, a "Sign" button will appear for the administrator on the Observe Dashboard under the Assignments tab for Observations that have been assigned:

If Observations have not been assigned you can also access this button on the "Observations" tab:

When this button is clicked, a pop-up will appear for the administrator to electronically sign. It requires the administrator to fill in his/her eDoctrina User ID and password, then click "Approve":

The same option will be visible when a teacher views his or her observation:

The administator must sign first in order for the teacher to be able to enter his or her signature. A teacher then has the choice to comment, return, and/or sign and approve:

The observation report will include both electronic signatures:

03.H.4. Weighting Individual Questions
eDoctrina provides many tools to enhance how educators can offer assessments. At the simplest level, we make it possible to create multiple choice questions and teacher scored questions that are worth a maximum point value and the student's percent score is based off of the points earned divided by the total points available multiplied by 100. As teachers, we know that this is not the only grading scheme. The Weighting Questions tool exists to accommodate for all the different grading schemes that can be employed on assessments.
Things to know before applying special weighting to an assessment:
- To accomplish some special weighting schemes, there may be a degree of mathematical rigor required.
- There are many variations of assessment formats so it is impossible to cover all scenarios in this help guide.
- Special Weighting does not apply to all data reports.
- The resulting weighted percentages cannot be exported to external gradebook software.
If question weights need to be applied, the first requirement is to complete the format of the assessment; adding all the required questions and point values tied to each question. Doing this builds the answer sheet. When weights are applied to questions, the question formats and related answer sheets will not be affected.
Once this format of the assessment is complete, question weights can be applied by selecting the  button located at the top of the Questions section within the Assessment Editor.
 NOTE: This button exists on all layouts of the Assessment Editor.
Clicking the button will generate a pop-up window where specific weighting schemes can be applied.

There are three possibilities for weighting schemes that can be applied:
-
Based on question point values:
This is the DEFAULT selection as all assessments without specific weighting applied follow this method. In short, this method will defer special weighting to the point values that have been entered for each question. Entering values in the "Questions Weights" will not have an effect on the earned percentage.

-
Multiply questions by % below:
Use this weight scheme when all questions on the assessment are worth the same point value. This weighting scheme will take the earned score for each question and multiply this value by the entered question weight for each question. The sum of these products are then divided by 100 resulting in the points earned. The total points is calculated by taking the total points available for each question and multiplying by their respective question weight, then adding these products together to get a sum that is then divided by 100. The student's earned percentage is equivalent to the quotient of these two values.

NOTE: The entered weight values for the assessment for this option does not need to sum to 100, but all "Question Weights" need to be populated for the calculation to work as intended. -
Weight questions as % of the entire test score based on values below (CLASS SUMMARY REPORT ONLY):
Use this weighting scheme when questions have various point values. This weighting scheme requires that the sum of the entered question weights equals 100. This method calculates the earned points by determining the equivalent earned percentage(out of 100) for each question, then multiplies the sum of these percentages by the total points available. The earned percent score is equivalent to this value divided by the total points available.

NOTE: If the questions weights do not add up to 100, the following error message will be generated.

The buttons on this pop-up should be used to help calculate the values that should be entered:
-
 : This button will delete all the existing entries in the Question weights fields.
-
 : This button will distribute the Question weights by taking 100 and dividing it by the total amount of questions in the Assessment. Choosing this button will override any previously entered weights.
-
 : This button will distribute the unassigned percent value amongst the total number of unassigned questions in the assessment. In other words, this tool will subtract any previously entered weights from 100, then divide the remainder amongst the remaining questions with unassigned weights.
-
 : This button will distribute the Question weights for each question using the percent equivalent to the total points available for each question divided by the total points on the assessment. Using this button will override any previously entered values.
-
 : This button will distribute the unassigned percent value to the unassigned questions according to the total points of the unassigned questions and remaining percentage. In other words, this tool will subtract any previously entered weights from 100, then distribute the remaining percentage to the unassigned questions according to the max points for each question.
Examples: Weighting in Practice
In the two examples below, an assessment with four(4) "teacher-scored" questions worth a maximum of ten(10) points each will be used. The best weighting scheme is the "Multiply questions by the % below" option because all questions have an equivalent point value.
How do I make question #4 worth double?
Logically, you would think that you can obtain this weighting scheme by:
- Making question #4 worth 20 points.
- OR Make question 1 through 3 worth 5 points each.
This first option would make sense, but modifying the point values does not always accomplish what is needed for this assessment. Making question #4 worth 20 points would restrict the test administrator from using any other answer sheet in eDoctrina, besides the 100 point answer sheet. The second option would also make sense, but it would make the grading of questions 1 through 3 less specific or granular.
If one of these solutions is not what is needed, then you must setup special weighting for this assessment.
HELPFUL INSIGHT: If I choose one of the methods explained above, the total points for the assessment will be worth 50 points or 25 points, respectively. In a scenario like this, we are no longer working with an assessment worth 40 total points.
The simplest way to accomplish this weighting scheme is to select the "Multiply questions by the % below" option and enter the question weights as ratios. For this example, the related ratio could be entered as follows:
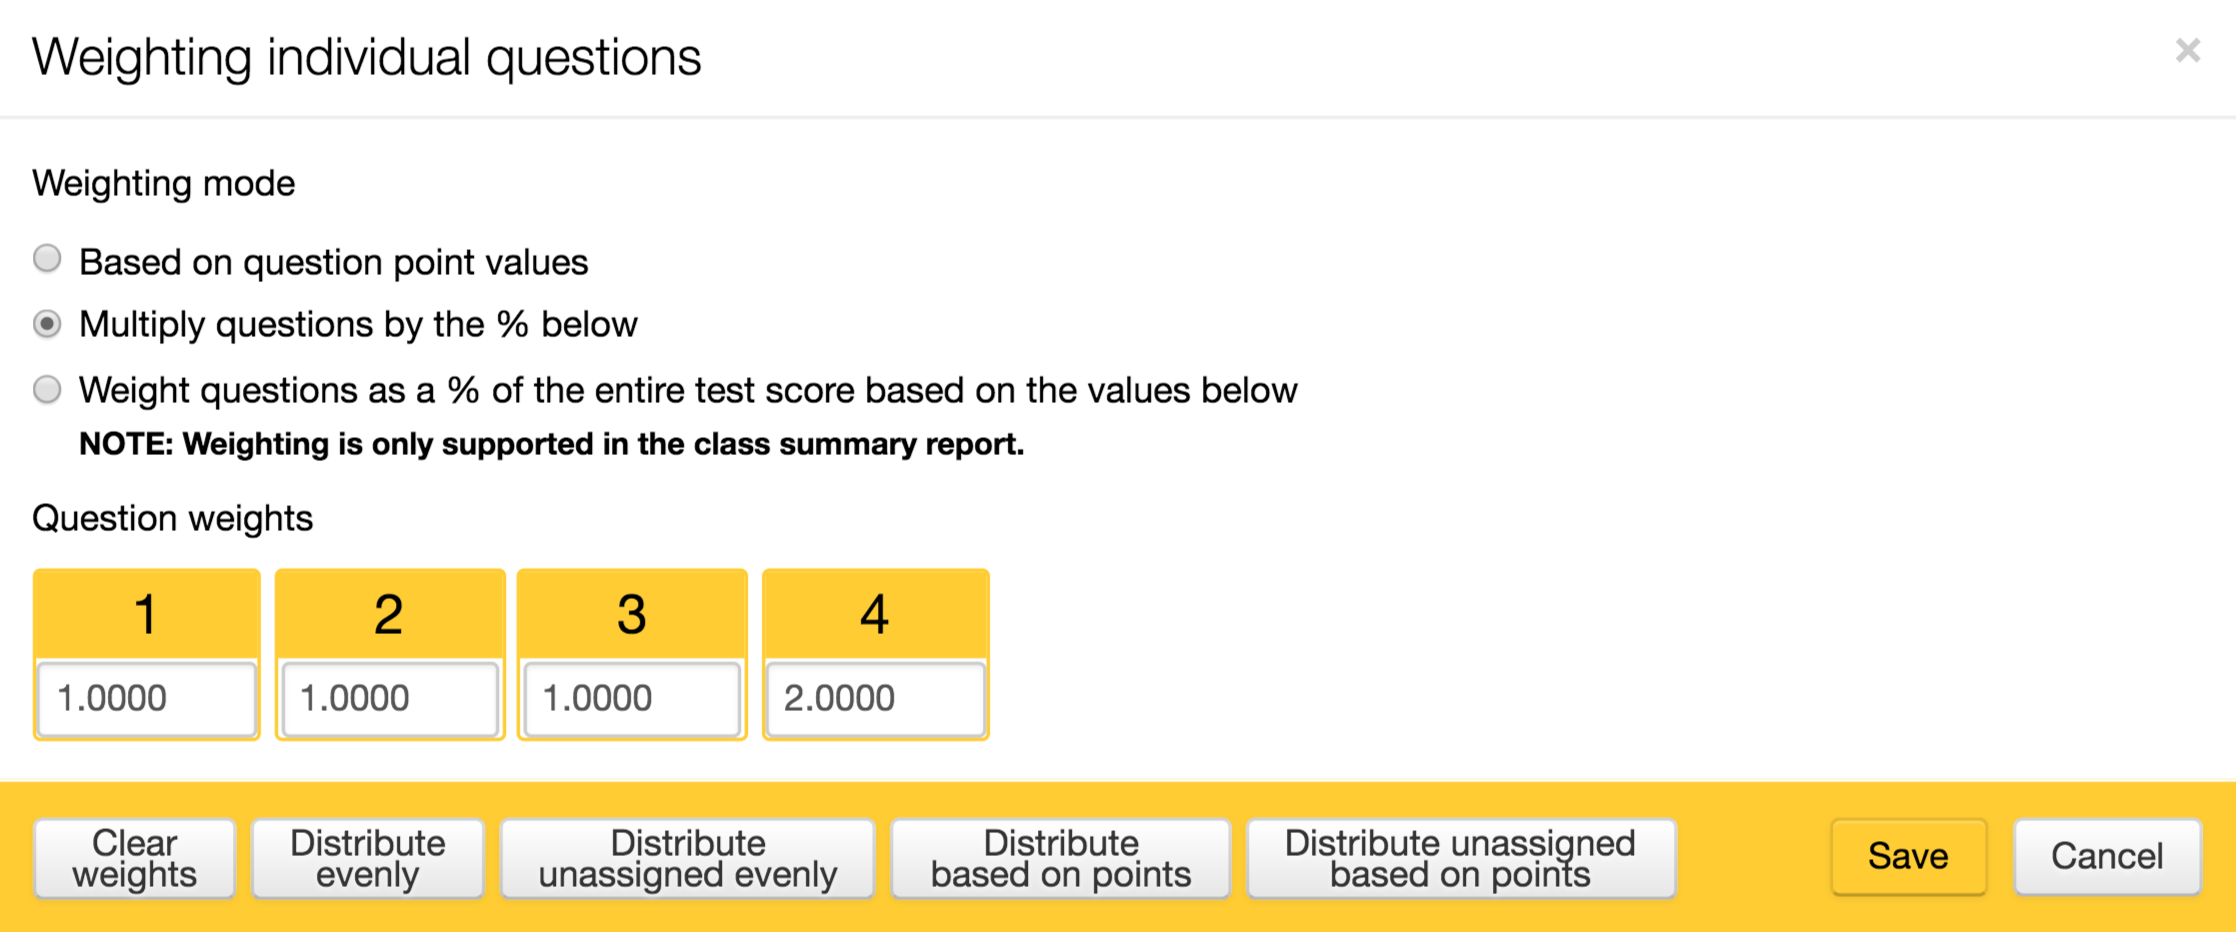
In the screenshot below, you will see a sample student that earned full credit for the first three(3) questions, but earned no credit for question four(4).

Notice how the Score is 0.3 out of 0.5, which converts to a Percent of 60%. Here's how the math would work with this weighting scheme on this student's results.

RECOMMENDED METHOD: It is possible to obtain the same special weighting result using the "Multiply questions by the % below" option using entries that reflect actual percentages. If this is desired, input the equivalent percentage for question #4, which can be calculated as follows:
Once this question weight for all unique questions is calculated, enter them in the "Question weight" field for their corresponding questions, then select the
If the weighting is done this way, the same student's individual student report will look like the following:
Notice how the percent score is the same as before, but the points Score has been modified to 6 out of 10, which appears to be a more relevant score in regards to this assessment because all questions are out of 10 points. Using this approach will always generate an "out of" result that is equivalent to the max point value for all questions.


How do I make the second half of the test worth double the points?
Logically, you would think that you can obtain this weighting scheme by:
- Making questions 3 through 4 worth 20 points.
- OR Make question 1 through 2 worth 5 points each.
For the same reasons as the example above, this may not be the desired solution.
If one of these solutions is not what is needed, then you must setup special weighting for this assessment.
HELPFUL INSIGHT: If I choose one of the methods explained above, the total points for the assessment will be worth 60 points or 30 points, respectively. In a scenario like this, we are no longer working with an assessment worth 40 total points.
The simplest way to accomplish this weighting scheme is to enter the question weights as ratios(shown below):

Just like the prior example, you will see a sample student that earned full credit for the first three(3) questions, but earned no credit for question four(4).

Notice how the Score is 0.4 our of 0.6, which converts to a Percent of 66.67%. Here's how the math would work with this weighting scheme on this student's results.

RECOMMENDED METHOD: If the goal is to use actual percentages for weights (just like the example above), follow the calculation method shown above to determine the question weight percentages, then the "Question weights" should be entered as follows:
Using the same student results shown above, here is how the individual student report would be generated:
Notice how the percentage score is the same, but the earned points are calculated out of 10 points, which may be preferred for some teachers.


When should I use the "Weight questions as % of the entire test score based on values below" option?
In short, this option exists when an assessment contains many questions with various point values.
To explain this, we will look at a three(3) question assessment:
- Question 1 is worth forty(40) points, but is is worth 50% of the assessment.
- Question 2 is worth two(2) points, but is is worth 25% of the assessment.
- Question 3 is worth two(2) points, but is is worth 25% of the assessment.
After looking at the examples above, it could be assumed that the "Multiply questions by the % below" option could satisfy all scenarios. The problem is that not all assessments contain questions with the same point value.
If I use the assumptions outlined in the two examples above, I could attempt to enter the weights shown below using the "Multiply question by % below" option.

If I generate an individual student report for a student that:
- Earned full credit (40 out of 40) for question 1.
- Earned full credit (2 out of 2) for question 2.
- Earned ZERO credit (0 out of 2) for question 3.
We would expect that this student would receive a 75% because the student received no credit for to last 25% of the assessment, but the individual student report does not reflect this(shown below) because the math (using this option) does not account for different point values.

The resulting percentage of 97.62% is not even close to what is expected. It should be noted that the calculation is working exactly as designed as the student earned 20 points on question 1, 0.5 points on question 2, and 0 points on question 3.
When questions in an assessment have unique point values, the formula used in the "Multiply questions by % below" option is flawed because it does not take in consideration the total points that are available on the entire assessment.
Therefore, we can conclude that the best weighting scheme for varied question values is the "Weight questions as a % of the entire test score based on the values below" option because it considers the total available points on the test.
In the above scenario, the optimal way to weight the questions would be as follows:

Using the defined formula, the earned points is calculated as follows:

Using the same student assessment results in this example, I can now pull a class summary report that will display the results that are expected (shown below).

WARNING: If this weighing scheme is applied to an assessment, the individual student report will be generated assuming the default (no weighting applied) as the only report that is currently supported using this weighting scheme is the Class Summary Report.
03.E.3. Creating a Two-Dimensional Proficiency Table
Occasionally the need arises to use a proficiency table that has both a horizontal and vertical axis. This can be achieved by adding a 2D proficiency table to your assessment.
Doing so is easy! You may add the 2D proficiency table from the "Proficiency Table" section in the Assessment Editor in the dropdown menu labeled "Proficiency table type":

Once you have selected this option from the dropdown menu you will see a table labeled "Main Table" appear. Now you may select a Proficiency Table Axis for your questions. By default all questions appear on the Vertical Axis. At least one question must be applied to the Horizontal Axis to get the most out of this feature.
Navigate to the "Question View" if you are not already in this view:

Find the question(s) you wish to apply to the Horizontal Axis and select "Horizontal" under "Proficiency Table axis":

After you have designated the horizontal axis questions click on the "Edit Pencil" to enter the proficiency table and begin creating it:

Editing the Proficiency Table will open the following window:
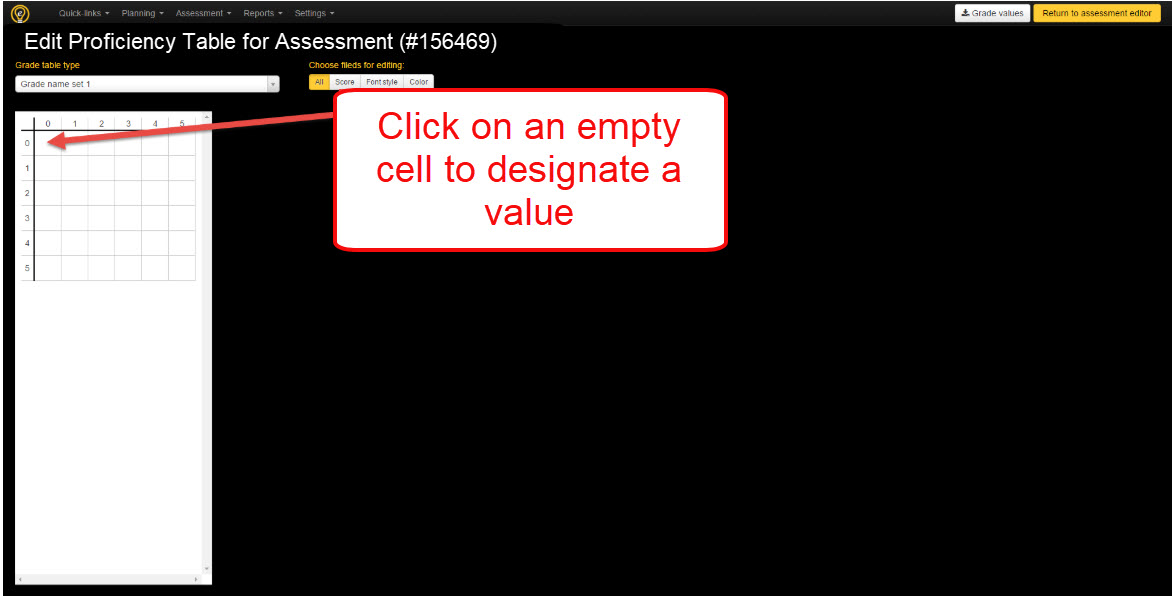

After you have made your selection the following popup will appear:

-
The Set Grade and Formatting option allows you to designate a level to assign to the selected area as well as a report color and font style.
- Please note: The "Grade" dropdown is determined by your district's pre-existing list of levels. If unsure how to designate these levels please see Document "#10.A Creating a Custom Proficiency Table"
The Clear Grade and Formatting will set the selected area back to the blank default of the grade table.
The Proceed button will save the designated settings and bring you back to the main grade table view. The Cancel button discards these changes and brings you back to the main grade table view.
After a few minutes of designating cells you will have your very own 2D grade table!

04.B.1. Types of Answer Sheets
eDoctrina allows educators the option of many different types of Answer Sheets. Each Answer Sheet has its own unique features and benefits and can be used with a variety of assessment types.
Key Components of Answer Sheets
Each answer sheet has some key components that will allows eDoctrina scanners to read and process these sheets.
1. Bar Codes: Each sheet will have a series of Bar Codes that help to identify the student, the Assessment ID #, the type of sheet being used, the District ID#, and number of questions on the sheet.

2. QR Codes: These codes contain all the same information that is within the bar codes and is used if the bar codes cannot be read.

3. Alignment Marks: Depending on the sheet being used these will either be squares, rectangles or pluses but will always be located in the four corners of the sheet:

Traditional Copier Scanning
Please Note: The following sheets are to be used with the scanner option on a copy machine. Prior configuration of this copier will be required before using these answer sheets. Please contact [email protected] for more information.
1. Fastest Small Bubbles: This sheet is our most commonly used Answer Sheet and can be used for Assessments created with multiple choice, true/false, and teacher scored questions (up to 10 points). Students will fill in bubbles to correspond to their answers on the assessment. Questions surrounded by a box are teacher scored and should NOT be filled in by students.
Key Components of this sheet
- Alignment Square
- Bar Code: Used to designate student. Please note the student name on top and the number is the student's UID #.
- Bar Code: Used to designate the assessment. Please note the teacher name on top. The number refers to the Assessment Id #.
- QR Code
- Answer Sheet Type: Shows the type of sheet being used (in this case Small Bubbles).
- Bar Code: Used to designate the type of Answer Sheet being used.
- Bar Code: Used to designate the District #.
- Bar Code: Used to designate the last question on the Answer Sheet.
- Bar Code: Used to designate the first question on the Answer Sheet.

2. Fastest Big Bubbles: This sheet follows the same format as the Fastest Small Bubbles sheet, except the bubbles are larger.

3. 100 Point Answer Sheet: This sheet is formatted slightly different than the Fastest sheets but all of the same information will be contained here. This sheet should be used if you have any Teacher Scored question worth more than 10 points.
Key Components of this sheet
- Alignment Rectangle
- Student Name
- Teacher Name
- Test Name
- QR Code
- Bar Code: Used to designate the Student UID #.
- Bar Code: Used to designate the Assessment Id #.
- Bar Code: Used to designate the District #.
- Bar Code: Used to designate the last question on the answer sheet.
- Bar Code: Used to designate the first question on the answer sheet.
- Bar Code: Used to designate the type of Answer Sheet being used.

NOTE: Notice how the Teacher Scored Questions (#19-20) feature 2 rows of numbers.
When filling in Teacher Scored Questions on the 100 Point Answer sheet, it is important to remember that the top row of numbers represents the "Tens" place and the bottom row represents the "Ones" Place.
For example, if the 4 is bubbled in the first row, and a 2 in the second row the question will be scored for 42 points.
A common mistake many teachers make is forgetting to bubble in the 0 in the first row for questions worth less than 10 points. Bubbling in a 4 in the first row and nothing in the second will yield an invalid response.
Below is a sample 100 point answer sheet with a few questions bubbled in and the corresponding values shown:

4. Fountas & Pinnell Benchmarks: This sheet can be used with the Fountas and Pinnell Assessments that can be found in the eDoctrina FREE Items Test Bank.

5. Flex Rubric Answer Sheet: This sheet can be used once a rubric has been created in eDoctrina. Educators have the option to choose 5 or 6 columns for each category selected. In order to score this sheet you would fill in the bubble in the appropriate box. This sheet can utilize 5 or 6 columns to suit your specific needs.

NOTE: For more information on setting up and utilizing a Flex Rubric, please see the help guides on Flex Rubrics and Teacher Completed Screen.
Web Camera Scanning
Web Answer Sheets are designed to be processed using any compatible web camera connected via a USB, most computers built-in cameras, or the eDoctrina Scanning Application. Unlike the traditional scanning method, results recorded on web answer sheets are instant. These answer sheets are a great option when a traditional scanner it not readily available and have been used by teachers to collect assessment data in many creative ways.
Two Answer Sheets will print on one sheet of paper so please cut the full sheet in half ensuring that the QR code and the area inside the solid black line have not been obstructed.
Key Components of WEB answer sheets:
- QR Code: contains vital information for processing, such as the assessment ID and the student ID.
- Student Response Area: To be successful with Web Scanning, this rectangular area should be unobstructed.
There are three types of web answer sheets that can be generated:
1. Web 11 Choices (Document Camera Only) Answer Sheet:
The Web 11 Choices sheet type separates the questions into two columns. Each column can contain multiple choice questions with a maximum of 10 choices and Teacher-Scored questions with a maximum value of 10 points. Each sheet can accommodate for 30 questions (15 per column).

2. Web 4 Choices (Document Camera Only) Answer Sheet:
The Web 4 Choices sheet type separates the questions into five columns. Each column can contain multiple choice questions with a maximum of 4 choices and Teacher-Scored questions with a maximum value of 3 points. Each sheet can accommodate for 75 questions (15 per column).

3. Generic (Document Camera Only) Answer Sheet:
The Generic sheet type can be used for assessments that have not yet been created in eDoctrina. These sheets can be printed without an assessment assigned, allowing teachers and students to use and reuse them on multiple occasions. For more information about this sheet type, please visit our help guide on Generic Answer Sheets. Generic answer sheets are used for multiple-choice questions ONLY. They can be printed in both the Web 11 and Web 4 format; which will print with 5 choices and 4 choices, respectively.


Printing Answer Sheet Options
After selecting the Answer Sheet Type, there are "More Printing Options" to explore at the bottom of the pop-up window.

Here is a list of these options:

1. Only Print Questions: This option provides the opportunity to print a selected number of questions. For example if an assessment included 50 questions and is being administered over 2 days, it is possible to print one set of sheets to be Questions 1-25 and the second set 26-50. Some teacher will also use this tool to omit the "Teacher Scored" questions from the answer sheet.
2. Number of extra blank sheets to print: This option will allow printing of a Blank Answer Sheet to use as a replacement or for a student that is not in eDoctrina. This sheet will be missing the Student Name, Teacher Name, and Student UID #. It is required to fill in this information prior to scanning to ensure the data will be processed. This option is not available for WEB answer sheets.

NOTE: The assessment data for this student will NOT process until the student appears in eDoctina, so we advise to not scan this sheet until the student has been added to eDoctrina.
3. Do not print cover pages: If printing more than one class set, eDoctrina will separate the classes with a cover page. If you do not want this cover page, check this box.
06.A.8. Student Profile Page
The Student Profile Page allows teachers and administrators the opportunity to open a page that provides a quick snapshot of a student's progress. This page is a great resource for RTI, as it will allow you the opportunity to view and run RTI Progress Monitoring Reports for assessments as well as BeHAVE, Student Goal, and Student Form information tied to a particular student.
In order to access this page a teacher, School or District Admin can navigate to the Student page by following the path: Settings > Student Information Data > Students:

While on the Students page click on the Profile icon:
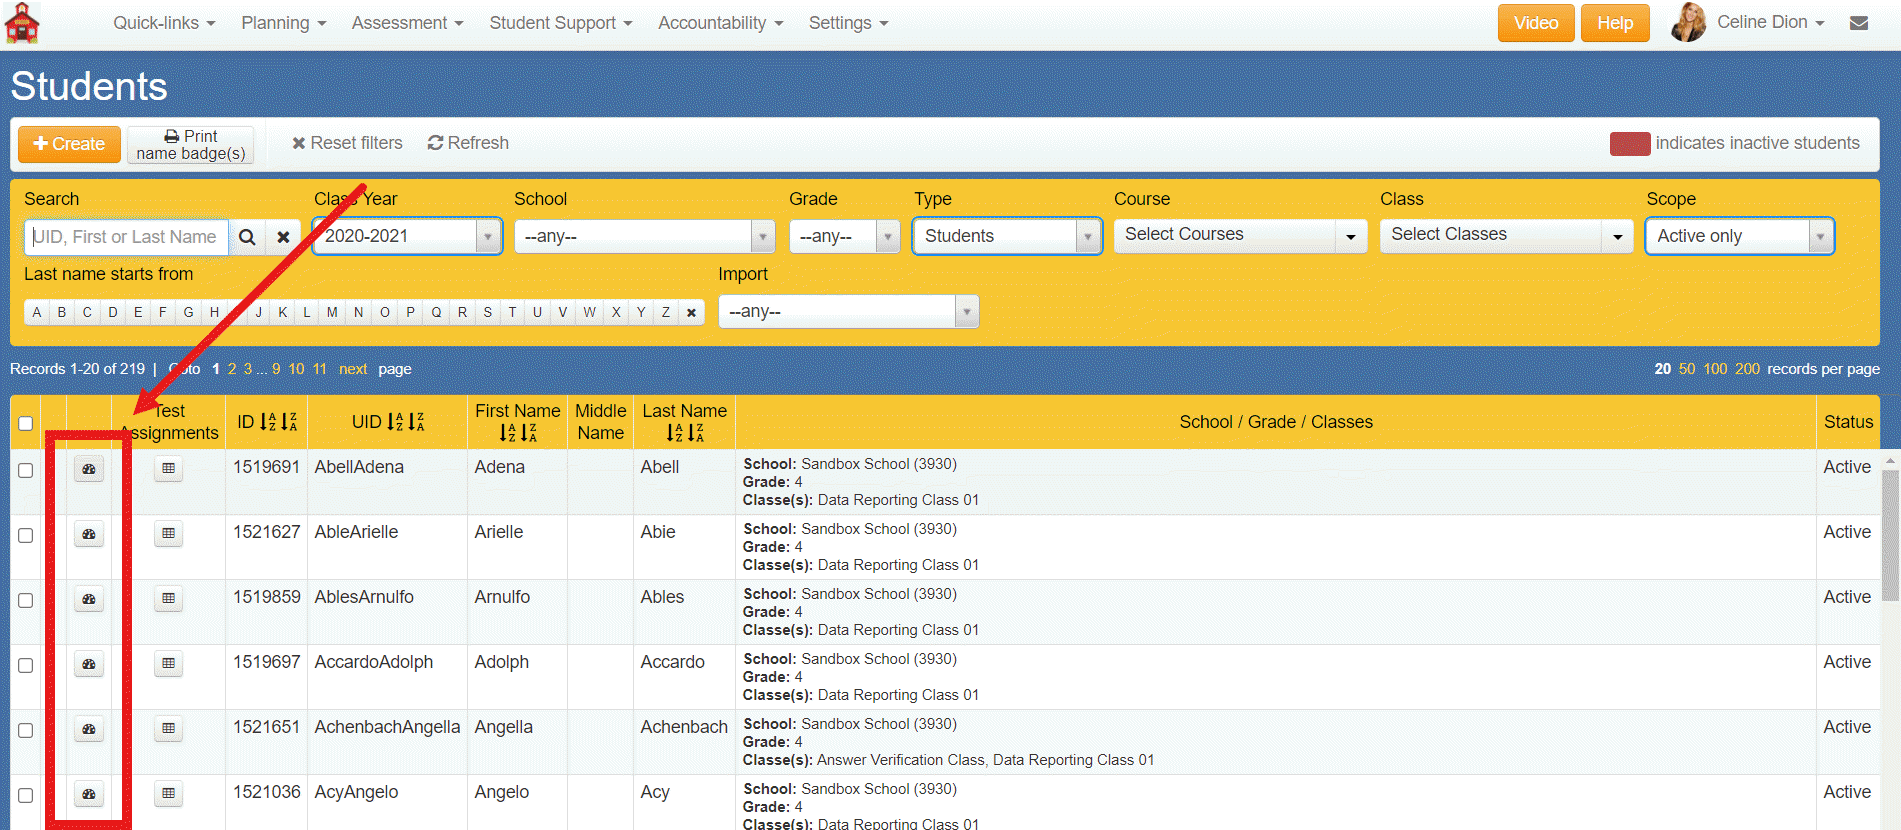
The page will open for the selected student.

- On this screen, you will be able to utilize filters to determine what year you'd like to view data for, as well as specific subjects, assessment types, and start/end dates. *If you are not seeing any results in the current year, change the year filter back to 2020-2021.*
Continue scrolling past the assessment data for a breakdown of all standards that were used on every assessment displayed above:

- The Student Profile Page is broken into 4 Sections; Assessment, Behave, Goals, and Student Forms. You can quickly navigate to any of these sections by clicking on the tabs on the top right of the screen. If the student does not have BeHAVE, Goal, or Form information in the system, these sections will simply appear blank.
Assessment: This section you can run an RTI Progress Monitoring Report utilizing the Subject and Type filters for the data you would like to see. This report can also be exported to PDF, and shows Result Data and also Standards based data as well.
BeHAVE:This section can be used in correlation with the BeHAVE module of eDoctrina. In this section you can view any Behavior Code that a student may have earned, as well as their total number of points that have been earned and their Reward History. Depending on your account, you will see different items for the student. As a teacher you will see Behavior Codes that you yourself entered but a School Admin will see all Behavior Codes that have been entered by other users in the School. A District Admin will see all the Codes that have been entered for the student, regardless of who entered them. Here is how it may look slightly different:
Goals: In this section you can view/edit/print any goals that have been created for this student in the RTI Tracker.
Student Forms: In this section, you can view/open/print any student forms for this student.
03.D.1. Uploading a PDF to use in an Online Assessment
IMPORTANT: Please see Help Guide 03.A. Answer Key Only Assessments if you are unfamilar with creating an Answer Key Only assessment. The following steps assume the Answer Key Only Assessment has already been created.
Click here to view the Help Video
An Answer Key Only assessment is not limited to utilizing a pencil and paper. This guide covers how a teacher or administrator can upload a PDF file to enable students to take any assessment online.
From the Assessment Editor, users can click on the "Online Settings" tab, then click on the Upload File button to select a PDF to attach to the Online Assessment tool:

The PDF to be used should be selected from the user's files:

The name of the file will appear in the Assessment Editor. Additionally, the option to delete the file, whether to display the PDF, and where to display the PDF will be displayed. Users should select the options that best apply to the assessment being built:

Once this is complete, students will now be able to scroll through the uploaded PDF and answer the questions accordingly.
Please see below to preview what the assessment will look like from the student perspective, in online view:

If you need additional assistance with anything found in this help guide please e-mail [email protected]
Student Forms
Creating a student form in eDoctrina allows a teacher or administrator to fill out information on a student based on the particular template (or form) they are working in.
These forms can then be sent home to the students parent/guardian, or kept on file.
To begin, the first step is to create student form templates.
a. Navigate to Settings > Database Setup > Student Form Templates.

b. From this screen, click on the gold '+Insert' button in the top left corner:

c. A window will open which will allow you to enter a name and description for your form. Next, you will use the text editor to create your form/template.

Completing a Student Form
Navigate to Planning > Student Forms:

Using the Master Course Concept for District Wide Reports
Note: For this approach to work the district must have configured Master/State Course Codes and linked their courses to them. They must also have the district setting "Use universal courses concept" checked in the district SLO Settings.

On the Teacher Dashboard begin by selecting the Master Course (State/Universal Course). You can select more than one Master Course.

NOTE: For district-wide reports it is best to leave the School Filter without any schools selected.
Next select the courses you would like to include in your report(s). If you would like all courses linked to the selected Master Course(s) then use the Select All option.

Next you select the classes you would like to include in your report(s). If you would like to include ALL classes, use the Select All option.

Note: Do NOT use the Select Students filter, unless you only want to include certain students in the report. The system assumes you would like to include ALL students in the selected classes unless otherwise specified
Now that you have selected the students you would like included in your reports, select the Assessment(s) you would like to include in your report(s) using the various filters in the Select Assessments section.
Note: The easiest way to select an assessment is to leave all filters

Now simply select from the many report options available below:

12.A. eDoctrina Report Cards
Linking Assessments to Report Card Marking Periods
To link an assessment to a report card marking period, you MUST:
(1) Link the assessment to a Course
(2) Link the assessment to a Marking Period
(3) Link the assessment questions to Report Card Standards
Search for your course in the "Courses" section. Link the course associated with the assessment by dragging and dropping it into the box to the left or double clicking, as seen in the first image below

Then, use the Report Card Settings in the General Settings section to choose the appropriate marking period from the drop down menu labeled "Marking Period", as seen in the second image below

Scroll down to the "Standards" section. Using the filters choose the appropriate District/Set, Subject, Grade, and Standard as seen in the image labeled "1" in red below. Each report card standard will be linked to a state learning standard.
All corresponding Report Card standards will appear underneath in BLUE font, as seen in the image labeled "2" below. Double click OR drag and drop any BLUE Report Card standards to assessments questions (just like you would with regular state standards.

Once your assessment is complete and linked to your COURSE, MARKING PERIOD & REPORT CARD STANDARDS click Save & Close.
Entering Report Card Grades
To enter Report Card grades:
Using the white panel at the top of your screen, navigate to "Student Support" > "Report Card Grade Entry", as seen in the first image below OR click on the Report Card button on your homepage
Once you are on the "Report Card Grade Entry" screen, ALL filters at the top must be filled in with the appropriate information: Year, Course, Grade, Class, and Marking Period.


On the RCL Entry Screen (shown below) you can easily enter grades for one particular student and course but can use the dropdown menus or "Previous/Next" button to navigate to the next student.

Shown below is a snapshot of what a teacher would see when assigning a grade/rating to a report card standard.
1) Teachers see how student have scored on assessments linked to the report card standard. In the MP column, teachers can type in the scoring criteria defined by the district.(ie. "S", "P", etc.) as seen in the image labeled "1" below.
2) Pressing this arrow, labeled "2" below, will pre-fill all of the grades on the Report Card Entry screen according to the following:

3) If there are no grades inputted for a standard listed, and the "MP" column is left blank, this will automatically appear on the student's report card as a dash (-) and will not affect their overall grade, as seen in the image labeled "3" below.

4) On the bottom of the RCL Entry Screen is the "Marking Period Comments" section, as seen in the image labeled "3" below. Teachers can drag and drop any pre-made district comments into the blank box to the right. If a teacher wants to add to his/her own custom standards it can be done by clicking on the + button and will save for the teacher to use in the future.
5) Click Save before navigating away or moving on to enter grades for the next student or next course.

Printing Report Cards
To print report cards:
Navigate to the top of your "Report Card Grade Entry" screen, and click the yellow button labeled "Generate Report Cards for Selected Students" as seen in the image below
This will generate a print preview of report cards for all students based on your Year, Course, Grade, Class, and Marking Period filters
1) You may print report cards from this screen

Below is a snapshot of an example report card:
Please note there are several custom print settings that can be customized for your district. For example: District logo, scoring criteria, print settings (1 column/ 2 column), teachers name/email, comment box, etc.)


A gray background indicates that there has been no data entered or scanned for this question. The correct answer will display within the cell, but has no effect on the percent grade for the assessment.

A white background is for "Teacher Scored" questions. If a scored has been selected by the teacher, the cell will change colors from gray to white.

A green background indicates that the entered or scanned response is correct.

A red background indicates that the entered or scanned response is incorrect.

A yellow background with an "X" indicates that the question has been "excluded" by user selection. This means that this question on the answer sheet has been bubbled in to exclude or the teacher has selected to exclude this question manually.

A yellow background with an " * " indicates that there were multiple answers detected when the answer sheet was scanned. In this scenario, the teacher should revisit the answer sheet to make the best judgement of what response was intended by the student.

A yellow background indicates that the answer choice was not selected for this question. In this scenario, the teacher should revisit the answer sheet to verify that the question does not contain a response.
 A black background indicates that the question has been excluded from the entire assessment. This can only be done from within the Assessment Editor.
00.A.1. Adding District Specific Help Guides
(District Admin Profiles ONLY)
eDoctrina offers an extensive library of help guides that are available to our end users to help them navigate through our software and better understand the features that are available to them to help their students succeed.
These guides are designed to cater to the needs of all the school districts that we serve. eDoctrina knows that each one of our partners are unique and the help guides that are available do not cover all of the district-specific attributes that may exist. To accommodate for this, eDoctrina provides the opportunity for districts to include their own help guides within our help guide menu.
The Help menu is available in the navigation menu. Anything that has been added as a district-specific document will be located within the "00. District Specific" selection right on the top of where all help guides are listed.
Navigation
To add a help guide, navigate to Settings => User quides & help topics => Help Topic.
This will navigate to the "Help menu items" homepage. This is where all help menu items will be managed. The first time any user visits this homepage, they should see the Video and Help options, which are the main categories that are seen on the navigation menu.

The default layout view should be the Tree, which will show the list of help guides in regards to a Parent-Child relationship, which defines how the items will display in the final list. Click on the Expand icon to expand the list to view the children of the indicated parent. Click the  icon to collapse the parent and hide the children underneath the indicated parent.
For example, if a "Parent" is created under the Help category, then two "children" are added under that parent, then two "grandchildren" are added under the first "parent" it would look similar to the image on the left and will present itself similar to the image on the right.


NOTE: It is recommended to NOT create any items beyond "grandchildren" because it is possible that they will be cut off by the end of the viewable area on the screen.

- Click the button to create a new item.
- The "Search" box can be used to easily find an item by name.
- The "layout" option allows the user to toggle between the Tree view and the List. The List view will display all items disregarding the defined parent-child relationships.
- These buttons will ONLY be available for items created for the district admin's district.
- The button allows the district admin to edit the existing item.
- The
- The "Visible" checkbox determines whether or not the item will be displayed. This option is ONLY available for items that have been created within the the district.
- The "URL" is the destination that the user will be navigated to upon selected the option from the menu.
- Select the Trash Can button to delete the entire item.
Adding Help Guides
Click the button to add a new item. A pop-up will appear prompting to enter/select the details of the item that is being added. If no Parent-Child relationship is to be used, select "--none--" as the Parent Item to simply list the item in the help menu. If a Parent-Child relationship has been developed, please organize your help guides accordingly.

Choosing the appropriate parent is essential for keeping all items organized in a manner that is easy to understand for all users. It is highly recommended to keep all first level district-specific items under the "00. District Specific" parent that has already been created. It is up to the district how to organize their material, but it is recommended that only two levels are used to keep all items in the viewable area.
The Name field should be populated with the title of the help guide or video. This will be the Name that is displayed in the menu.
The URL is the web address that users will be directed to upon selecting the item.
It is possible to upload a file and designate it as the destination as well. If the "Upload File" option is used, eDoctrina will create a unique URL for the uploaded file so it will always be accessible. The URL wll look very similar to "https://s3.amazonaws.com/static.edoctrina.org/uploads/helpitems" as eDoctrina utilizes Amazon Web Services to store uploaded files.
It is important to note that an uploaded file cannot be modified, the district admin will have to upload the file again to reflect any changes made.
If the URL is left blank, eDoctrina will create an internal link that serves as a pathway to a page that lists all of the children so they can be accessed from there. In the example below, the "Curriculum & Standards" item was selected.
If the user selects the  button, they will be navigated directly to the URL that has been entered for the selected item.
If the user selects the  button, eDoctrina will copy the URL to the users clipboard so they can paste the URL wherever they please.
The OBSeRVE Dashboard
eDoctrina's OBSeRVE module is designed to be a central location for everything related to staff observations. This page allows School and District Administrators to observe, rate, communicate with staff members, and monitor the status of accountability data throughout the year. After a district has been configured with their observation rubrics/forms and the appropriate assignments have been made, this dashboard will be the central location for observers to visit for anything related to observations.
After the observation rubric(s) in the district have been configured accordingly, it is important to understand how these rubrics can be put into use. If more information is needed on observation rubric(s) set up, please visit the help guide on How to Setup an Observation Rubric.
Assignments Layout
In most cases, there is a required number of each type of observation for each observee in the district. In all cases, it is a good idea to have a way to track the status of and how many observations have been performed for a specific observee. Although the full utility of the Assignments layout view is observed when all rubric assignments have been made so progress can be monitored, there are still some other tools on this view that can help manage observations for staff members.
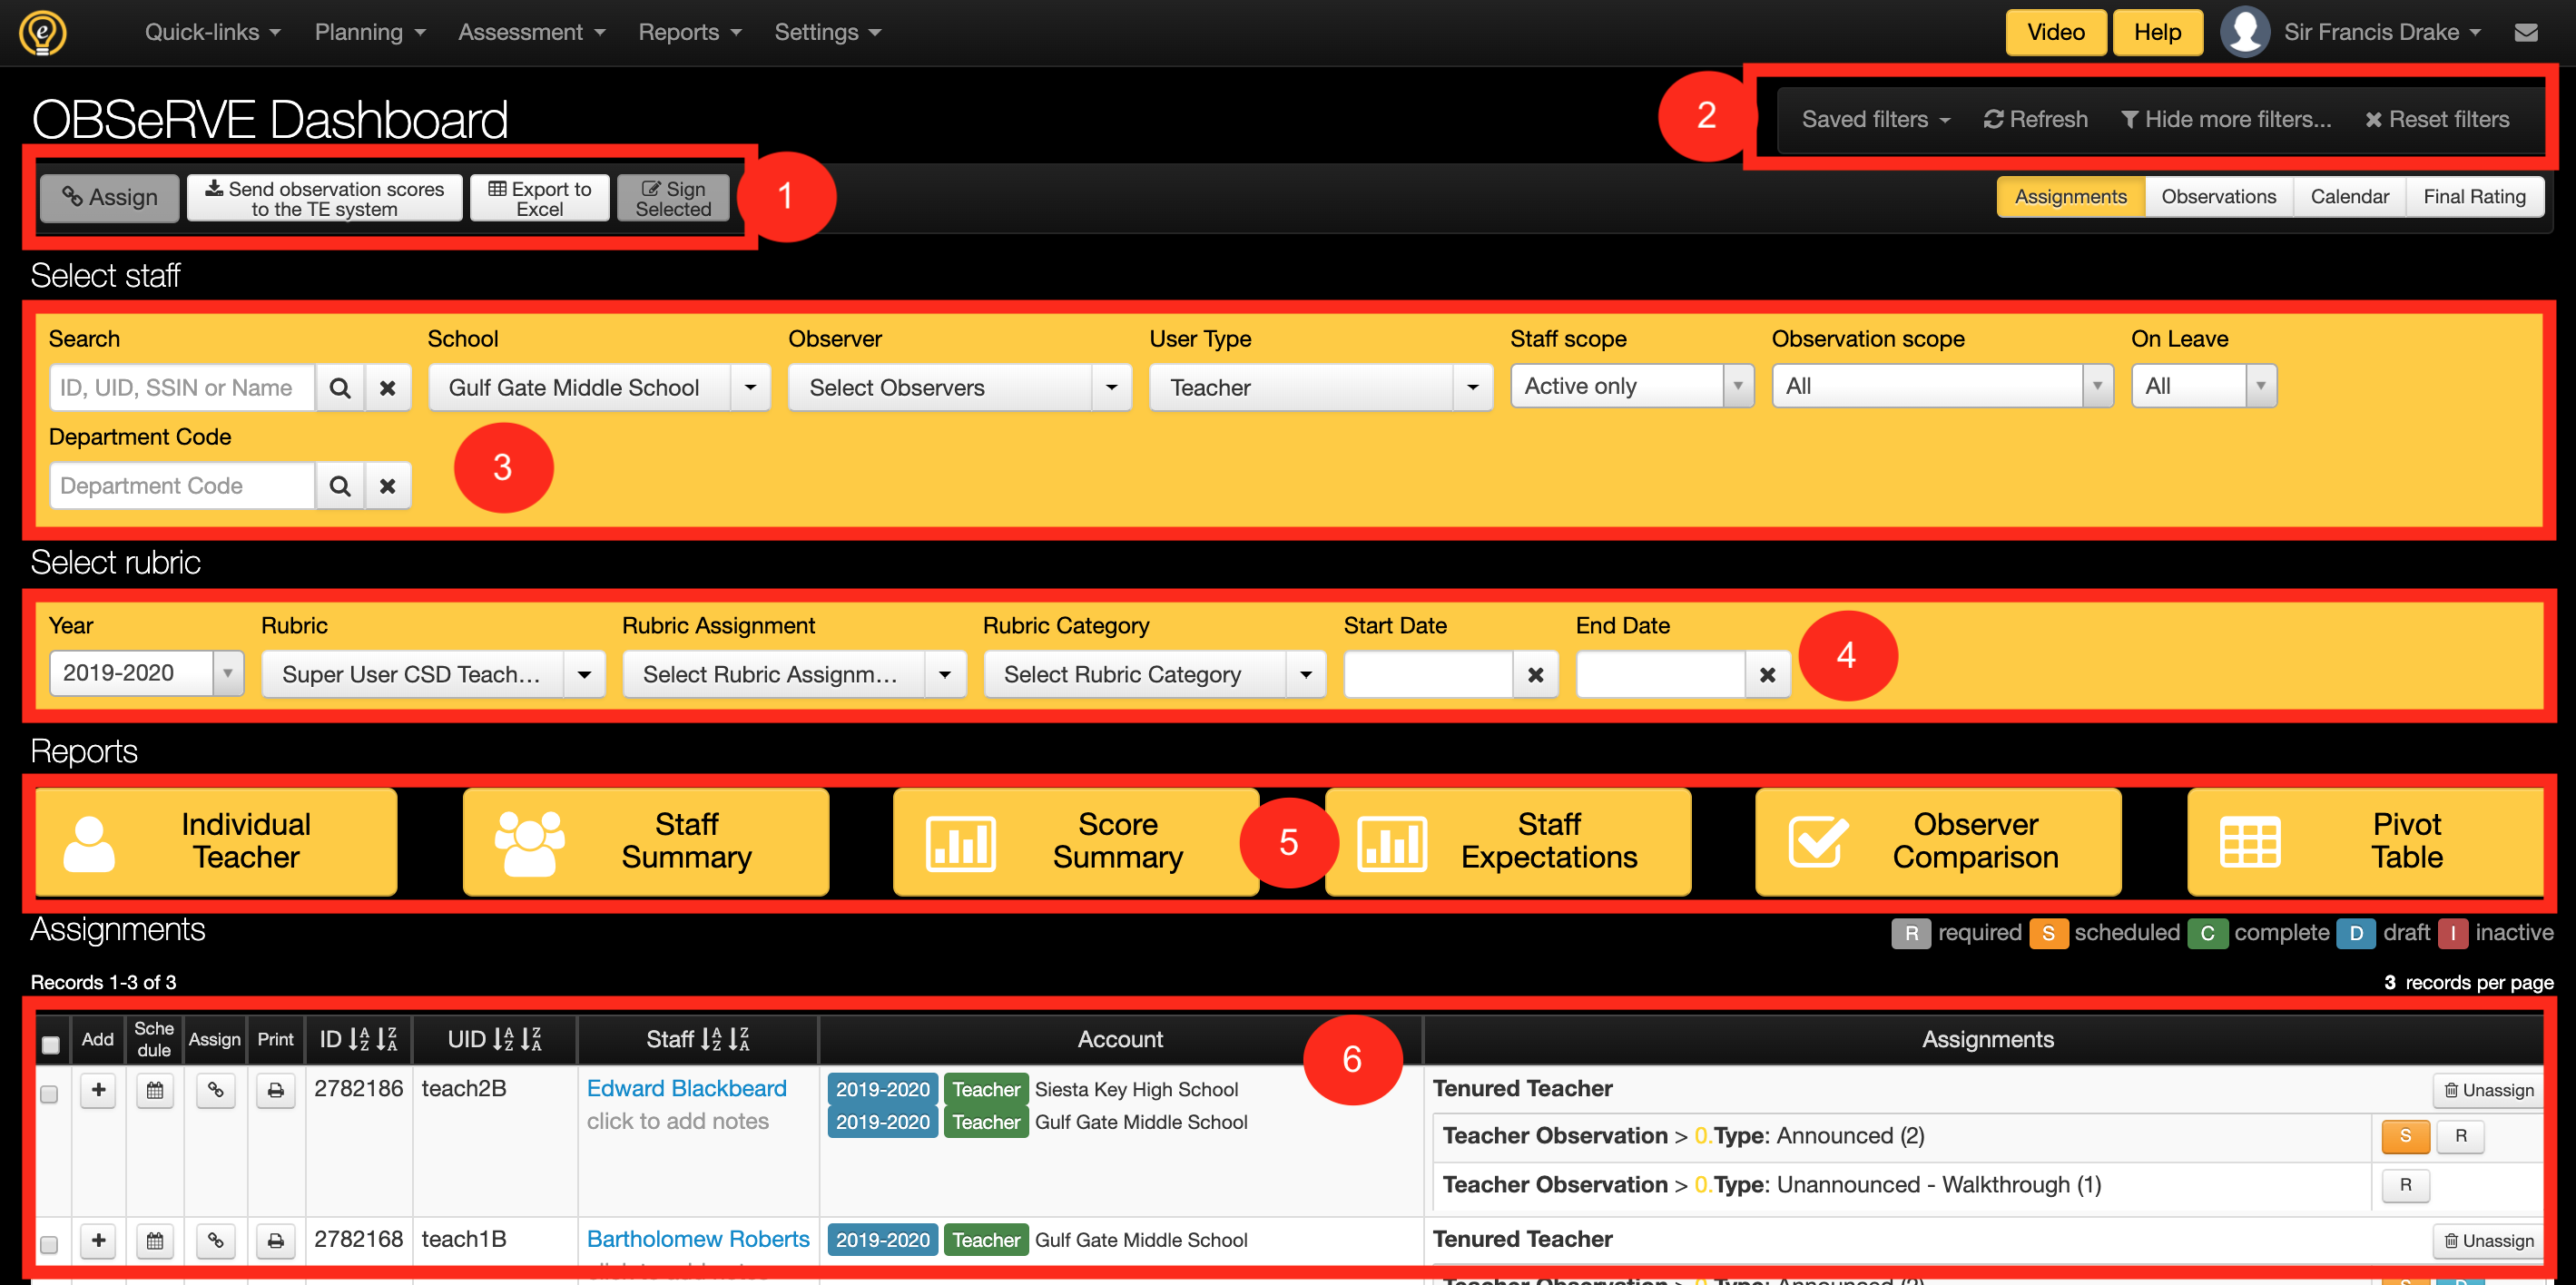
-
Main Buttons: Each page in eDoctrina usually has a number of main buttons that allow for tasks to be completed more quickly. Each of these options can be used either by filtering the list or by selecting the checkboxes for each item that the task should be applied to.
- Mass Assign Button: The assign button allows for one or many users to be assigned a rubric in one action. Select the staff members that need to be assigned the rubric and choose this button to assign one of the current rubrics for the district.
- Send observation scores to the TE System: A vital component of managing observations in eDoctrina is connecting the scores with the TE Sytem (which is used for end-of-year reports and state reporting. This option exists to ensure that scores be sent to the appropriate data sources when scores are ready to be finalized. This button is only available to users with the appropriate permissions.
- Export to Excel: The export to excel option can be used to generate a spreadsheet that is comparable to the displayed list. If no specific staff members are selected, then the resulting export will include all users in the filtered list. If selections are made, these will be the only items that will be included in the export.
- Sign Selected: Unlike the other main buttons, sign selected exists for the observations layout view only as it is designed for signing more than one single observation at a time.
-
Filter controls
- Saved Filters: There are many filters in eDoctrina and selecting the same ones to get the same results as last time this page was visited can often be a difficult task. Even though selected filters are remembered if the same device/browser is used, leveraging the saved filters can help to reduce the amount of time selecting filters if the same subsets of filters are used on a frequent basis.
- Refresh: The refresh option will ensure that the displayed list is updated to the most recent selections without having to refresh the actual browser window.
- Show/Hide More Filters: The default displayed filters are designed to show less to make the selection of filters an easier task, but do not include some other filters, such as the rubric year, that are needed when looking at historical data or for more advanced reports. This option exists to allow the user to toggle between showing more or less filters depending on the task or preference.
- Reset Filters: Yes, you will need to do this a time or two in eDoctrina. It is recommended to all users in the case where they cannot find something in the list to reset theri filters as there is often something selected that is filtering out the desired results. Resetting filters allows the user to start from the beginning with all filters being cleared to their original defaults.
-
Staff Filters
- Search: Searching for a specific staff member can be done by first name or last name (not both), the staff ID#, the staff UID#, or their state identification number (if it exists in the system). Using the search is the quickest and easiest way yo find an individual staff member as no other filters will be necessary to be selected.
- School: It is possible to filter the displayed list by one school or many schools. The school filter will reference both the primary linked school for each user or any other active schools that the user is linked to.
- Observer: The observer filter will return a list of all staff members that have been observed by the selected observer(s) or any staff member that has be assigned to be observed by the selected observer(s).
- Evaluator: The evaluator is an indication that is made on the user accounts screen to assign an administrator to a staff member as an evaluator. While some districts may have this filter hidden, other districts leverage this as an extra filter to help find specific groups of staff members.
- User Type: It is possible to filter the list for one or many user types to exclude unnecessary staff members or staff types from this list.
- Staff Scope: The default for this filter is to search for Active staff members, but it is sometimes necessary to view staff members that are now inactive in the case of pulling historical reports or even if the staff member has recently left the district.
- Observation Scope: The observations scope filter is arguably the most important filter on the Assignments layout view because it allows for filtering upon the assigned observation rubrics. Generally, observers will want to select the Require Not Complete option and try to get this list down to 0 items by the end of the year meaning that there are no more required observations to be done. Other filters include Awaiting Signatures, which is a great filter to ensure that all observations have been signed off electronically.
- On Leave: This filter should only be used in the cases where the district is actively managing this status as it is sometimes important to exclude any teachers that are "On Leave" when pulling data reports.
- Department Code: If imported or entered for staff members, the department code can add another layer of data for filtering. Not only can department code control access rights, but it can also let a department head use the filter to find only staff members that exist in their department.
-
Rubric Filters
- Year: Showing more filters will allow for the year filter to be selected. This filter allows for toggling back to prior years to view historical observation information.
- Rubric: For many tasks, such as printing, the rubric is required to be selected because there are ofter some configuration options linked to the selected rubric. One or many rubrics can be selected to filter down the results and display the desired rubrics in the list below.
- Rubric Assignment: Each rubric can have one or many rubric assignments, such as Tenured or Non-tenured. Each of the rubric assignments may have different minimum requirement and/or settings. Filtering for the assignment can help to narraw down this
- Rubric Category: Some rubric configurations have one or many rubric categories. These categories represent the main categories of the rubric, which depend heavily on the rubric configuration.
- Start/End Date: If it is necessary to only view staff members that have been observed on a specific date or date range, utilize the start/end date filters to update the list to all staff mmebers with an observation within the selected dates.
- Report Options For more information about the report options, please reference the help guide about the OBSeRVE Report Dashboard
-
Staff Assignments List
- Add: Even if an observation rubric assignment does not exist or if the minimum requirements have already been met for a staff member, an observation can always be created by using the Add button.
- Schedule: The only way to schedule an observation for a staff member is to used the Schedule button on the Assignments layout view. Observations can always be scheduled and will remain in this state until the observer enters the observation and makes updates.
- Assign: Although this Assign button may only exist for District Admin users, this button is used to create or update the rubric assignment for an individual staff member.
- Print: This print button will print all observations for the year for the selected staff member (even if no rubric assignment exists).
- ID/UID: The ID is the unique ID number that eDoctrina provides each user in the system, The UID is usually the local ID number for the staff member that is imported from the district's student information system.
- Staff: The staff member will display in this column as a hyperlink that leads directly to the staff members observation folder. There is also a place where notes can be entered about a staff member as another way of communicating to other users some other details. These notes will print on the exported excel spreadsheet.
- Account: The account column will display the details about the staff members user account. Some staff members will display with two schools, other staff mebers will have different user types in different years, and some will even have different user types to control what access rights that they may have.
-
Assignments: To initiate an assigned observation, click on the
 for the desired observation that needs to be conducted. Please visit our help guide on Conducting a Teacher Observation for more details.
Once an observation has been initiated by any school or district admin, they will be the only users that will be able to modify the contents contained within the observation itself. If the observation is in "Draft", no user in eDoctrina will be able to view the contents until it has been marked as "Complete".
If an observation is in Draft, Scheduled, or Completed state; simply hover over the observation from this view to see the date of the observation and the observer who is responsible.
for the desired observation that needs to be conducted. Please visit our help guide on Conducting a Teacher Observation for more details.
Once an observation has been initiated by any school or district admin, they will be the only users that will be able to modify the contents contained within the observation itself. If the observation is in "Draft", no user in eDoctrina will be able to view the contents until it has been marked as "Complete".
If an observation is in Draft, Scheduled, or Completed state; simply hover over the observation from this view to see the date of the observation and the observer who is responsible.

Observations Layout
The observations layout displays a list of all observations that the logged in user has access to in accordance with the selected filters. If an observation has been scheduled, drafted, deleted, or completed; there will be line item on the Observations layout view that exists for it. Similar to many other modules within eDoctrina, the displayed list is dependent on the filters that are selected. Carefully select the filters and use the "Reset Filters" option if an observation is not displaying. It is sometimes best to only use the Search to identify the desired observee.
The observer can access any one of their performed observations from the Observation Layout by selecting the respective ![]() button. They will also be able to delete an existing observation by clicking the
button. They will also be able to delete an existing observation by clicking the  button. Deleting an observation does not permanently remove the observation, it simply makes it inactive. An observation can be reactivated by toggling the Active/Inactive switch back to Active from within the OBSeRVE Editor.
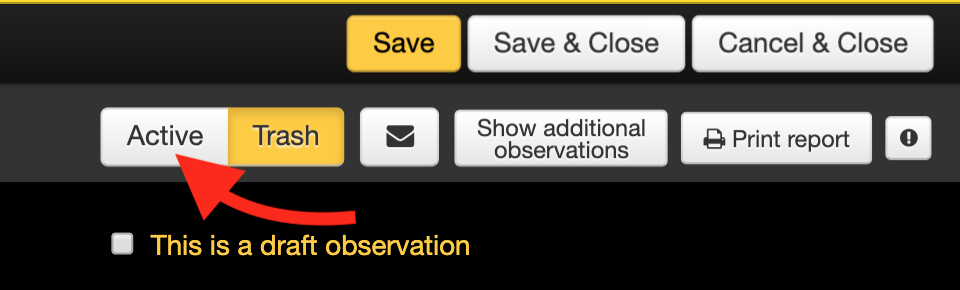
All completed observations can be printed from the observations layout. Please visit the help guide on the OBSeRVE Report Dashboard for more information about printing.
Observation can also be signed electronically (if applicable) from the observations layout view. For more information on Using Electronic Signatures, please visit our help guide.
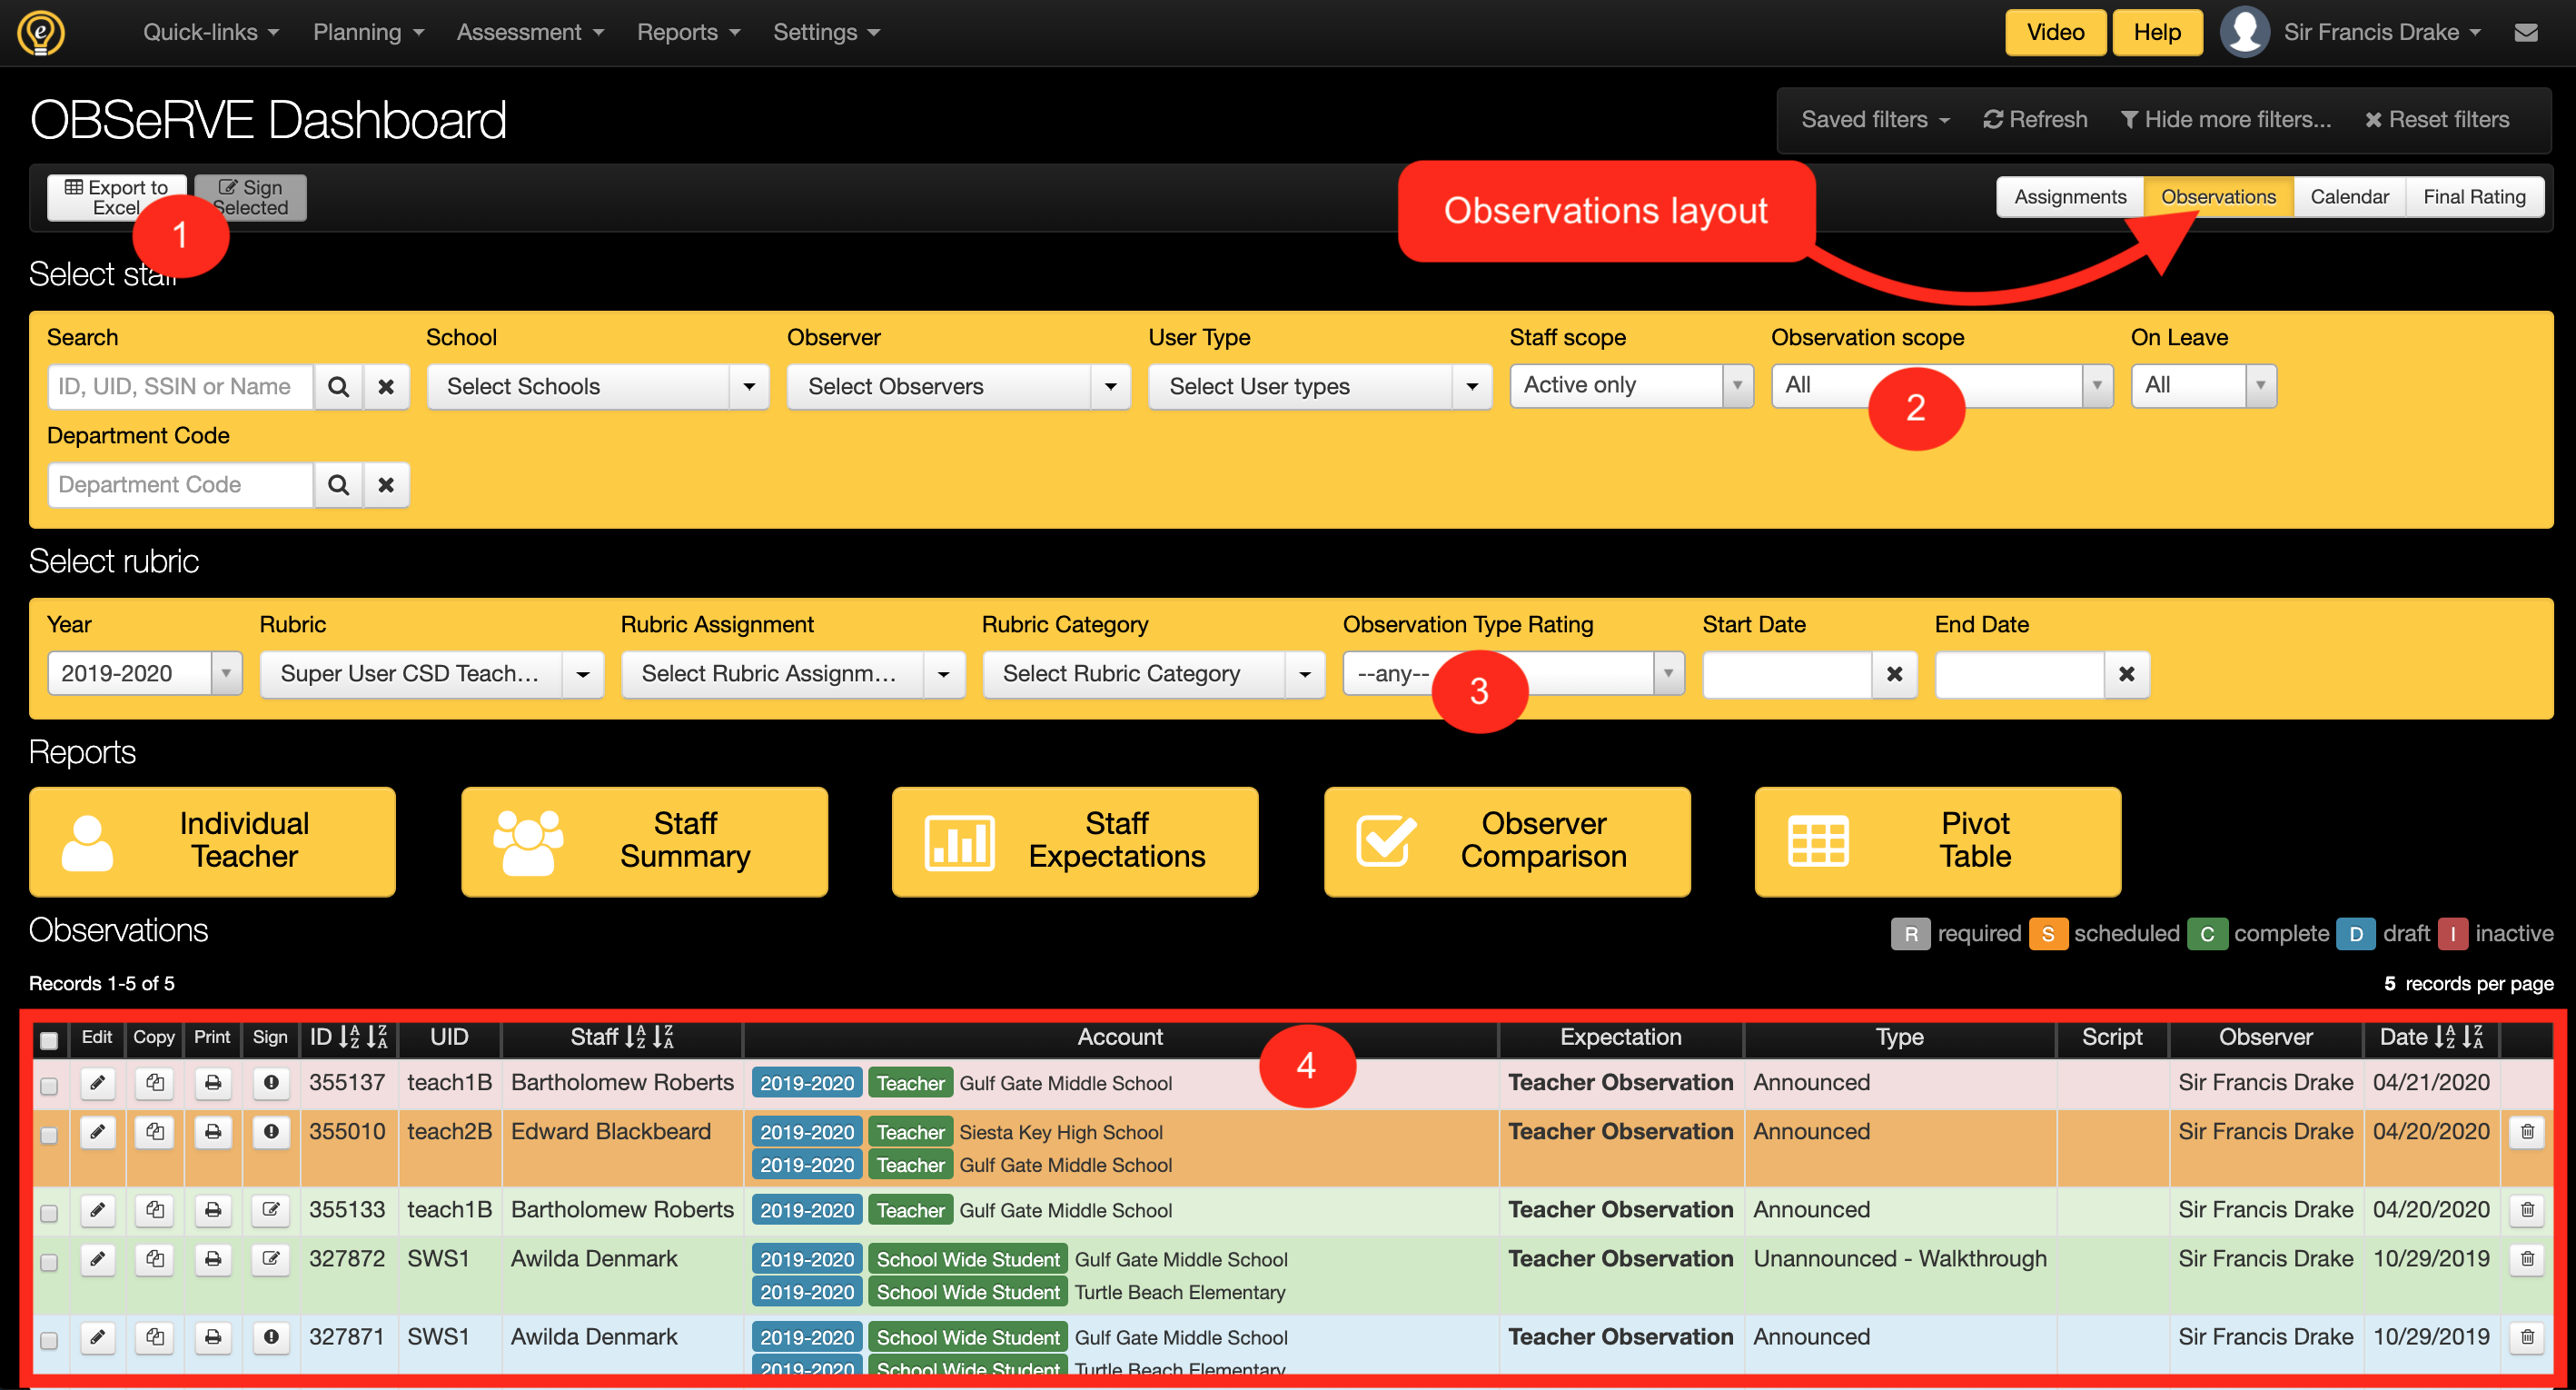
NOTE: Each observation will be highlighted with the color that indicates the status.
To avoid redundancy, we will only point out the differences of the Observation Layout view with reference to the Assignments layout view. If some feature or option is not explained here, please see above where it is likely explain the tool or feature.
-
Export to Excel: There exists two different available format for the Export to Excel tool on the Observations layout view: the Observation List and the Observation Status Report. The Observation List serves as a direct export of how the observations are listed while the Observation Status Report includes important dates regarding the life-cycle of the observation, such as when it was created, made available to the teacher, first and last updated, and all electroinic signature information.

- Observation Scope Filter: The Observation scope fitler on the Observations layout view allow for filtering for statuses of any observation that is accessible by the logged-in user. This is a great filter for monitoring existing observations and finding the ones that need some attention. Filtering for observation status or electronic signature status are both part of the functionality of this filter.
- Observation Type Rating: Unlike the Assignments layout view, the observations layout view offers one more filter to help reduce the list to the desired set of observations. Being that the design of this screen is to list each observation uniquely, it is possible to filter for the observation type.
-
Observation List
- Edit/View: If the logged-in user has access to edit or update the observation the they will see an "Edit Pencil" button here. If the report is locked by signature or if the logged-in user does not have update permissions, then there will be a "Looking glass" button here.
- Copy: The ability to copy an observation is dependent on user access rights, but this option allows for any observation t be copied exactly. once this option is selected, there will be a pop-up prompting to select the target year that new copy should be linked to.
- Print: The print button exists here so each individual observation can be easily printed. Depending on the observation rubric configuration, clicking this option may prompt to select different report options or it will simply generate a PDF of the observation that will be print ready.
- ID/UID: In the observations layout view, the ID is the unique identification number for the observation, while the UID is the staff members local ID that usually comes from an upload from the district's student information system.
- Staff: The staff name will be listed here as it displays throughout eDoctrina. Like many other columns, this column can be sorted but only by staff member last name.
- Account: The account column will display all years, user types, and schools that the staff member is linked to.
- Expectation: The expectation is best described as the category of observation. This expectation will vary by district as it is dependent on rubric configuration.
- Type: This column will display the type of observation, such as "Announced" if this is a selection that is necessary for the observation rubric.
- Script: If the Script is entered made visible, then this column is a quick way to scrool through in the list view to see the entered contents in the scripting area of the observation.
- Observer: This column will display the linked observer or observers if there is the possibility to link a secondary observer in observation form.
- Date: The date column displays the entered date within the observation. This date can be updated by the observer if the observation is not locked. If more dates are needed to explore what has happened with an observation, it is recommended to generate the "Observation Status Report"
Calendar Layout
The calendar layout is designed to help observers manage the observations that they need to complete. To use the calendar layout it is necessary to schedule observations within eDoctrina first.
From the Calendar Layout, the observer will be able to view all observations on a calendar that can be viewed by month, week, or day. Similar to the other layouts in the OBSeRVE Dashboard, the displayed observations are dependent on the filters selected.
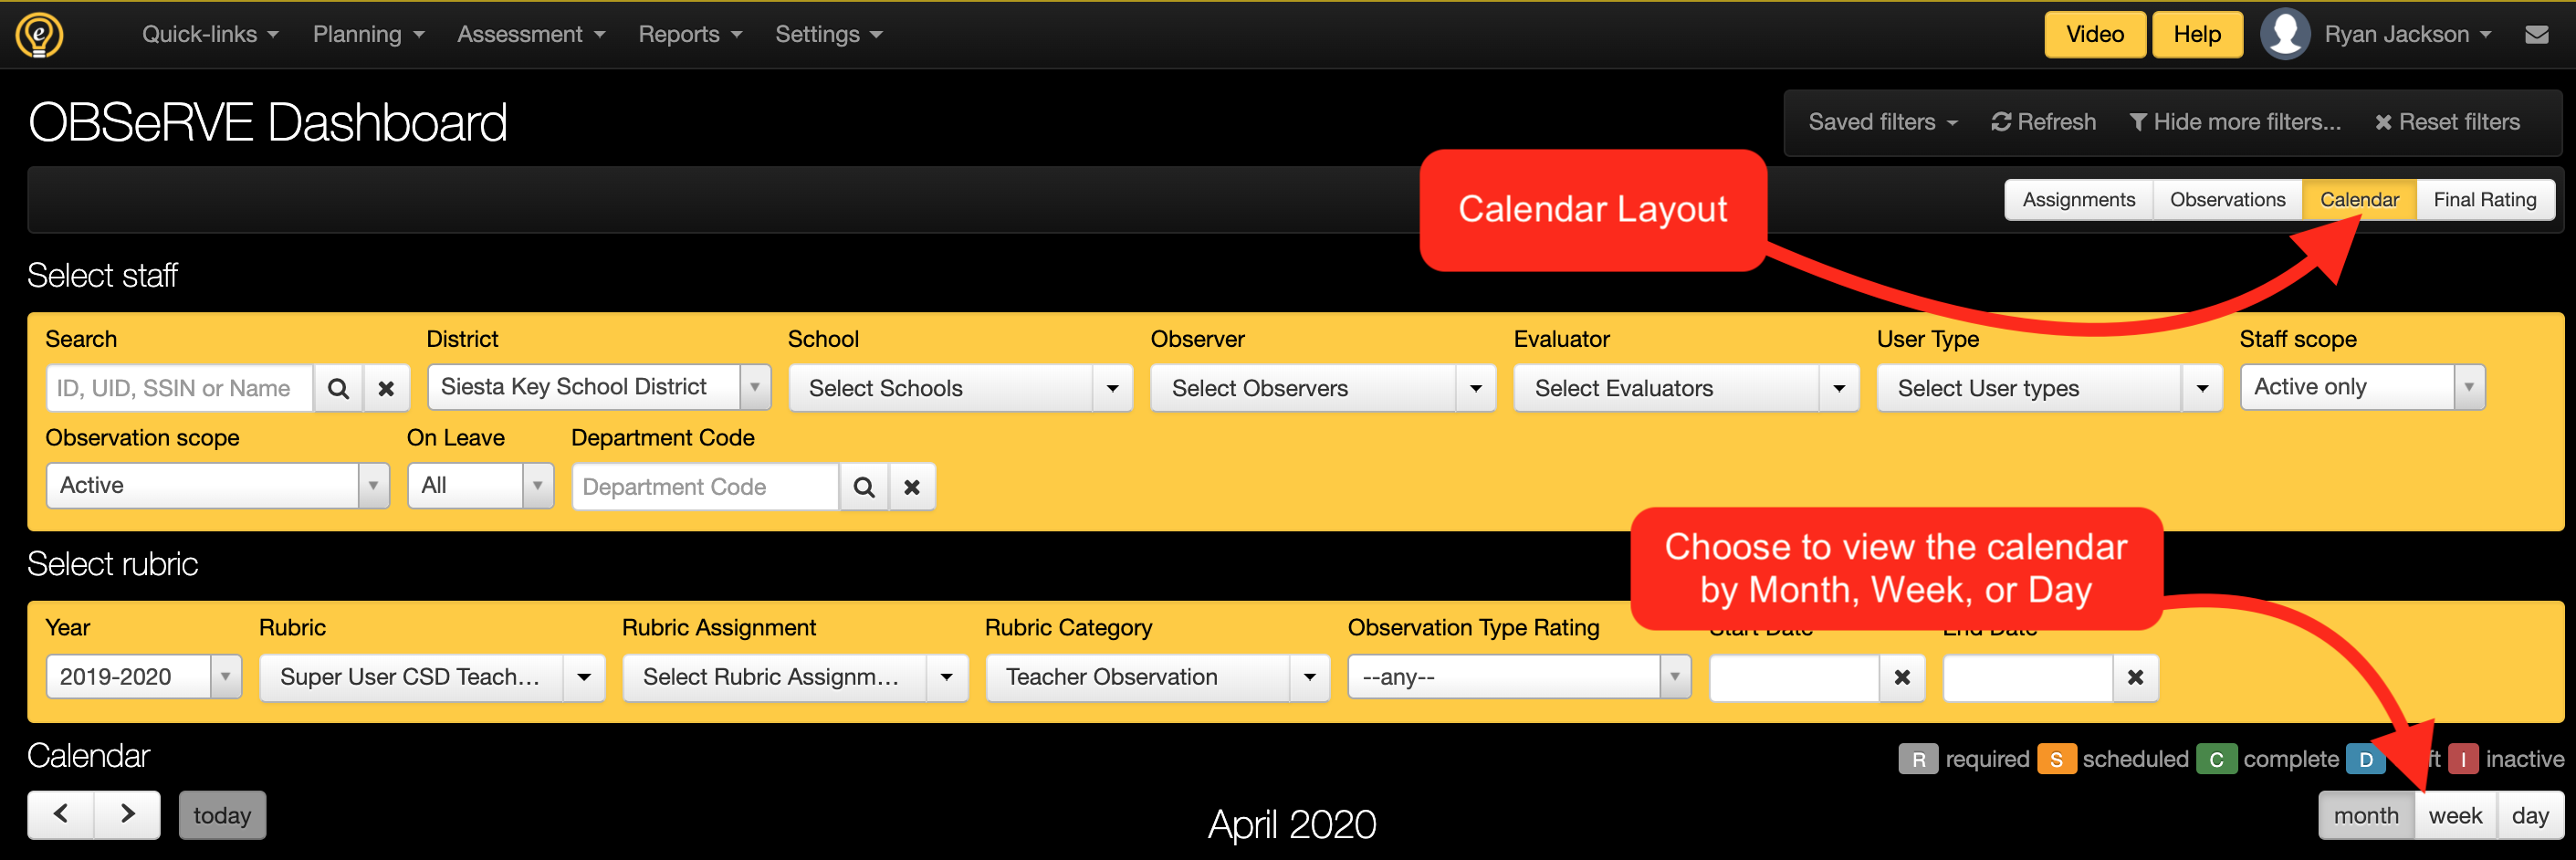
NOTE: Click on the observation to enter directly into the OBSeRVE Editor.


To add/edit a time into an observation without going through the scheduling process, simply enter it within the OBSeRVE Editor. eDoctrina will recognize military time and AM/PM. Therefore, 2:00PM should be entered as 14:00 or 2:00PM. eDoctrina will not recognize 2 or 2p.

NOTE: If the entered time is not recognized when saved, eDoctrina will default to display 7:00PM for the selected day.
Final Rating Layout
The Final Rating Layout can be used to track the workflow status of Observations in the district or school. An Observer can use this feature to see which Observations are complete and which still need some components addressed. Some of the settings in this layout are dependent on the setup of each individual rubric and vary by district.

If any staff member has a rubric assigned to them, there will be a status indicating what status of the observation within the process. If no assignments have been made, the status column will be populated with No Rubric Assigned.
- Here is a list of the potential statuses:
- No Rubric Assigned: This status will show if the person does not have any rubrics assigned.
- Incomplete (Missing Required Observations): This status will show if not all required components of assigned observation for the Staff Member are complete.
- Awaiting Final Rating: This will show if all required components are complete EXCEPT for a Final Rating.
- Awaiting Admin Signature: This will show if Final Rating has been selected, electronic Signatures are required, and the Admin has not signed the final rating yet.
- Awaiting Teacher Signature: This will show if Final Rating has been selected, electronic Signatures are required, and teacher has not signed the final rating yet.
- Complete: This will show if final rating has been applied and if teacher signature is done (if required).
Some districts will be automatically calculating the final ratings for teachers, while other districts will be selecting the final rating from the pull-down menu in the far right column. If the status is "Awaiting Final Rating", select the corresponding pull-down for the desired teacher and select the value that is appropriate for the observee. The options available within this pull-down will vary by district.
03.D.4. Taking an Online Assessment (for students)
Managing Student Accounts
Teachers have the ability to view current usernames and reset student passwords (if needed) from their Classes homepage.

Just click on the  icon to pull open the desired class roster, switch the "Show" filter (see below) to "Enrolled Students Only" and passwords can be created and/or reset. Passwords can be reset individually by clicking on the "Reset" button in the Password column or select multiple students and select the "Mass Reset Password" button at the top of the screen:


Helping Students Navigate PROGReSS
Students will be logging into eDoctrina the same way that teachers log in, but will be navigated towards eDoctrina's student dashboard (PROGReSS) when they enter their login credentials properly.

The two sections relevant to assessments are the "Assignments" and the "Assessment Results". The items that are displayed in these lists are dependent on the Class filter (which allows students to view "All my classes" or select a specific one) and the Year filter (which is defaulted to the current year).
All items listed in these sections will have a  button next to it providing the student the ability to communicate with their teacher using the eDoctrina email option. All users can access their eDoctrina mail by clicking the mail icon in the top right of their screen. Additionally, the option to send the message directly to the teacher's email is selected by default. An error message will display should an invalid email address be associated with that teacher.


In the "Assignments" section of the student dashboard, students will see a list of all "active" assessments assigned to them. The Title will be displayed along with the assessment ID. For ongoing assessments, there will be a Progress bar showing the percentage of the assessment that has been completed so far. The Date will display the Administration Date that has been entered by the teacher in the Assessment Editor.
The last column will display different options depending on the online assessment settings. If a student has never accessed the assessment, they will always have the ability to  . If "Allow Reopen" is selected in the online assessment settings for this assessment, students will have the opportunity to
  or select
  if they have answered all questions to the best of their ability and would like to
submit for grading.
if they have answered all questions to the best of their ability and would like to
submit for grading.
In the "Assessment Results" section, the student will be able to view the score, grade, and/or percentage along with the selected version of the Individual Student Report by selecting the  button.
Taking an Online Assessment
eDoctrina offers many options to educators for creating online assessments. With this said, students may encounter different features depending on the specific assessment settings that have been selected for each assessment. Please visit our help guide for For more information about Online Assessment Settings.
If an assessment has been set up to "Lock students to test", each time they access the assessment they will encounter a pop-up stating "This assessment is locked"

If an assessment has been set up to have an "Online Time Limit", the student will receive a pop-up notification informing them that "This is a timed test" and stating how much of the allotted time is remaining.

If an assessment has been set up to have a "Password", the student will receive a pop-up window prompting them to "Please enter test password".

Below is a basic view of what students will see when they begin their assessment. Some of the features displayed here are optional and are configured in the Assessment Editor. To learn more about configuration, please refer to our help guide on Online Assessment Settings.

- If the assessment has a time limit, it will display here.
- Students should click Finish Test when they have completed the assessment. If selected, they student will not be able to re-open the assessment unless it it is reassigned.
- If the option to "Allow Re-Open" is selected in the online assessment settings, this button will appear allowing the students to close the assessment and complete their responses at a later time (if that time is within the available test window).
- By default, students will be able to toggle between a Scroll and Page views of the assessment. The Scroll view will keep all questions on one page, while the Page view will present each question on it's own page.
- The "Go to next unanswered question" button assists students in navigating through the online assessment. If clicked, eDoctrina will navigate the student to the next question in line that does not have an answer recorded. This invaluable button will change color to blue when all questions have been answered.

- It is possible to navigate directly to a specific question by selecting the the corresponding box in this section. These buttons will also be color coded to provide the student a better test taking experience.
-
 : means the question has a response.
 -
 : means the question has been marked to "Review later".
 -
 : means the question does not have an answer and has not been marked to "Review later".
-
- Available student tools appear here. The Reading ruler and Highlight mode are tools that are available by default.
- The ability to Zoom In/ Zoom Out is available just in case it is needed.
- This area is where the assessment will appear. There are few variations on how assessments are displayed, but displayed below is the view when there is not a PDF uploaded and the questions have been entered.
When answering a multiple choice question, all the student needs to do is click the desired response and a checkmark with appear indicating the answer has been selected.
If the online assessment setting has been selected to allow the students to eliminate answer choices, the student will see an "X" next to each choice. They can simply click it to eliminate that answer choice.
To ensure that students are aware that they have some unanswered questions on their assessment, they will receive this message when they click on "finish Test" if there are any question without a response.

04.A. eDoctrina® Tips & Tricks:
Answer Sheet Scanning
- Please review your answer sheet before you scan them. Be on the look out for extra
marks, faded barcodes, etc.
- Ensure the answer sheet prints clearly. DO NOT USE answer sheets if the copier’s
toner was low and the sheet looks faded; they will not scan properly.
- Make sure the four squares in the corners of each sheet printed fully.
- Students may cross out mistakes. These questions will need to be checked by a teacher. Directions are found at the top of each answer sheet:

- Eliminate stray marks (doodles, student work, etc.) in any area of the answer sheet.
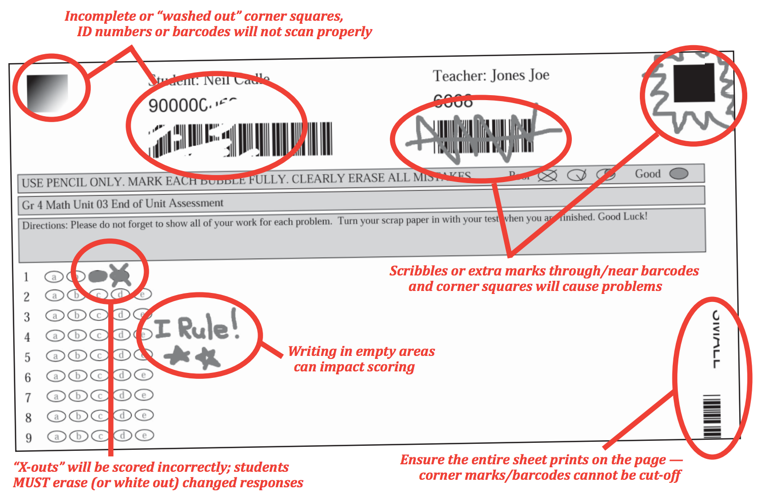
Bubbling / Scanning problems to watch out for!
Below are examples of 3 different scanning settings that could cause 3 different results.
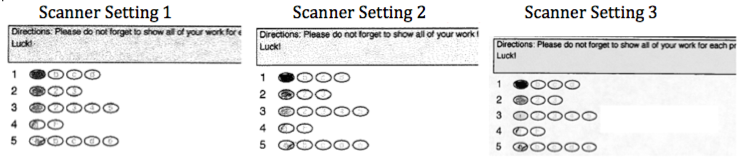
Another source of error is BLANK ANSWERS. When students do not fill in a bubble for an answer, sometimes the system picks up one of the blank bubbles as the darkest bubble and reports this as the answer.
How to prevent these problems:
Have students answer EVERY question by filling in the bubbles DARK. Regardless of scanner or scanner settings, this will always provide the best results.
If you want to know which questions a student does not have any idea how to answer, add an additional answer choice and instruct students to fill in this answer if they are not sure, INSTEAD OF LEAVING THE QUESTION BLANK.
If you notice frequent problems, have your copier technician contact eDoctrina and we will work with them to optimize settings.
Checking Scans with Answer Entry
Open the "Answer Entry" tool to review scanned assessment results. For those users who receive an email when scanning is complete, the link in the email leads here.
Be on the lookout for incomplete data caused by issues with the answer sheets. These may include unanswered questions, stray marks, printing that is too light or too dark, student "x-outs" (erasures are required), etc.
Familiarize yourself with the different icons located on the "Answer Entry" screen.


For more information on using the "Answer Verification" screen, Click Here
4.B.3. How to use Generic Answer Sheets
eDoctrina strives to make the process of collecting assessment data as effortless as possible. Historically, any teacher or administrator would generate answer sheets for a group of students for a specific assessment that has already been created. The Generic Answer Sheets enable teachers and administrators to collect student assessment data using eDoctrina's Web Answer Sheets "on the fly" or before an assessment is created.
Before diving into this feature, it is important to be aware of the constraints that exist when utilizing these Generic Answer Sheets.
- It is only possible to create as many questions that fit on one Web answer sheet.
- ONLY Multiple Choice question type can be used.
- Maximum number of answer choices is 5 (a,b,c,d,e) for the Web 11 format and 4 (a,b,c,d) for the Web 4 format.
- Generic Answer Sheets are currently NOT compatible with the eDoctrina mobile application.
Printing Generic Answer Sheets
To print a set of generic answer sheets, navigate to the Teacher Dashboard by finding it in the Quick Links pull-down in the navigation bar or selecting Answer Sheets on the eDoctrina Homepage.

On the Teacher Dashboard, select the group of students to print answer sheets for by selecting their respective Course and Class.
Do NOT select the assessment. The Generic Answer Sheet option will NOT be available if an assessment is selected.

Upon selecting Print Answer Sheets, a pop-up message will appear asking the user to confirm the action of printing a set of Generic Answer Sheets.

Upon selecting the  button the "Print Answer Sheets" pop-window will appear offering the "Web 11" and "Web 4" sheet types as the "Only suitable sheet type" because this answer sheet type is not supported using the traditional scanning method.
 NOTE: Other sheet types are not currently supported with this feature.
A new tab will open on the browser with the set of printable answer sheets for the selected students. The first answer sheet of the set is designated as the "ANSWER KEY". The creator of the assessment should bubble in the correct answers for the questions that will be administered so eDoctrina knows what to mark as the correct answers when the assessment is created.
 NOTE: Bubble in consecutive responses starting at #1 to ensure the assessment is created with the correct number of questions.
The following answer sheets will look similar to the ANSWER KEY, but will be assigned to all of the selected students. These sheets can be used and reused to record student responses for the current assessment and any other assessment that has only multiple choice questions and matching formats.
 NOTE: Bubble in consecutive responses starting at #1 to ensure the assessment is created with the correct number of questions.
Creating an Assessment by Scanning a Generic Answer Sheet
After the creator of the assessment prints a set of generic answer sheets and bubbles in the correct answers for the set of questions to be included on the assessment, the assessment is now ready to be created.
To create an assessment using generic answer sheets, it is necessary to navigate to the eDoctrina Web Scanning tool located on the Teacher Dashboard. Select the SCAN button to access the eDoctrina scanning tool.

Within the desktop version of eDoctrina's web scanning tool, try to center the "ANSWER KEY" in the area that is displayed on the screen.

After a successful scan has been recognized, a pop-up window will appear asking if a new assessment should be created.

Upon selecting the  button, another pop-up will appear prompting the user to enter the General Information of the assessment that is to be created.

Upon selecting the  button, the creator will be directed back to the Web Scanning tool. THE ASSESSMENT WILL NOT BE CREATED UNTIL THE CORRECT ANSWERS HAVE BEEN VERIFIED. The scanned answers will display on the bottom of the screen and can be modified (if needed) by clicking on the answer.

eDoctrina will not allow an assessment to be created if the ANSWER KEY contains responses for non-consecutive questions. If there are any "breaks", clicking the  button will produce an error pop-up stating which questions need to have an answer provided.

In this scenario, it is the responsibility of the creator to select the correct answer choice or select the [blank] choice to tell eDoctrina that the scanned answer choice was unintended. Once there are consecutive and confirmed answer choices selected, selecting will produce another pop-up prompting the creator to confirm the number of questions that are to be created for this assessment. Click "Yes" to create the assessment.

At this point, the assessment is now available in the creator's district test bank and can be modified and/or enhanced later. It is recommended to link learning standards to the assessment questions once the data has been collected. It should also be noted that this begins the scanning session for the created assessment. If the student bubble sheets are ready to be scanned, they can be processed immediately after the ANSWER KEY has been saved.
The assessment ID will display with the assessment name for the current scanning session. The scanning session will be available as long as the creator stays on the current page.
Please visit our help guide on Web Cam Scanning for more information about scanning student answer sheets.

Scanning Student Responses using Generic Answer Sheet
If student responses have already been recorded on their generic answer sheets, they can be scanned as long as the appropriate assessment is indicated in the current scanning session. If the ANSWER KEY is scanned first and confirmed, the student answer sheets can be scanned immediately after the assessment is created because the scanning session will be current.

When scanning student bubble sheets, eDoctrina requires that the assessment exist before student response sets can be recorded. If a generic answer sheet for a student has been scanned outside of a specific scanning session, eDoctrina will produce a pop-up window prompting the user to select whether the answer sheet belongs to a "new" or "existing" assessment.

If the assessment is "existing", the user will have to locate the assessment in the following pop-up window that allows the user to search using the provided options. When the assessment is found, select the corresponding radio button and click the  button to begin a new scanning session for the selected assessment.

If the assessment is "new", the user will be prompted to scan the ANSWER KEY first because it is required that the assessment exist before associated student responses are recorded.

If the correct assessment is selected for the scanning session, scanning student answer sheets follows the same process when scanning any WEB answer sheet. Notice how the following example shows how eDoctrina does not recognize any bubbles that the student has made beyond the created number of questions.

If an answer sheet is not being recognized by the camera, try selecting the  button to force the camera to look again.
Also, it is important to know that eDoctrina is always striving to make our end user experience better. If there are ever any unexpected or strange errors that are apparent with a specific scan, please let us know by selecting the  button. This will notify our development team of the error and we will do our best to optimize this


13.D. Using Electronic Signatures in OBSeRVe
To include electronic signatures in your observation reports, go to Settings>Staff Expectations and select the rubric you want to modify. You will be able to check a box under "Electronic Signatures Report" next to each stage or component of the observation for which you choose to add this feature.
After an observation has been completed and saved, a "Sign" button will appear for the administrator:

When this button is clicked, a pop-up will appear for the administrator to electronically sign. It requires the administrator to fill in his/her eDoctrina User ID and password, then click "Approve":
The same option will be visible when a teacher views his or her observation:
The administator must sign first in order for the teacher to be able to enter his or her signature. A teacher then has the choice to comment, return, and/or sign and approve:
The observation report will include both electronic signatures:
How to Finalize SLO Scores
In order to provide a final score for an SLO, each SLO must be linked to a HEDI Table as this defines what score should be provided in accordance with the selected calculation method.
To link a HEDI table to an SLO, navigate to the desired SLO and locate the HEDI Scoring section and utilize the  button to view the HEDI tables that are linked to the district.

NOTE: If there exist no options in this pull-down menu, this means that the HEDI tables have not been configured for your district. These HEDI tables must be set up by a district administrator user within your district. HEDI Tables can be configured here .
After the HEDI table has been assigned to the SLO, it should look very similar to the image below.

If there exists a Student Population within the SLO, the suggested rating for the SLO will be highlighted as a "light green" color. This suggested rating is based off the student data that has been recorded and the method of calculation. In the example below, the suggested rating is a 10/Effective. If the suggested rating is agreeable, all that needs to be done is select the checkbox on the left to confirm this final rating. It should be noted that the recommended rating does not have to be selected and the administrator can select a different value as Final. Only one final rating can be selected per Student Learning Objective.

It is also a best practice to update the workflow state(if applicable) of the SLO to indicate that the SLO has been provided a Final score. Although it is not required to do so, this helps organize a prevents duplicate work.

NOTE: The district SLO workflow states can be customized here.
After the score has been selected as Final, the score will be sent over to the Final SLO Score Summary and Signoff screen. This screen's main purpose is to allow for a quick audit to ensure that scores are being calculated properly. This audit process is very straightforward for users whom only have one SLO that is contributing to the final score, but can be more complex if there are a few SLOs that are contributing.

NOTE: To check how scores are calculated (SLO Summary Report), click the print button next to the users name on this screen to get a breakdown of what SLOs have contributed to the calculated rating.
Examples of Final Scores based on Student Assessment Scores in eDoctrina
Here is an example of the SLO Summary Report for a teacher with one SLO that has a final score determined by their associated student population.

Here is another example, but this scenario shows that the teacher has two SLOs that contribute to the Final Score.

Notice how the Final Score is calculated based off the number of students that are included in the SLO. This is designed this way so that a SLO (or specific class) that has more students will be weighted more heavily when determining the final rating. If this is the desired method of calculation, please be sure that the contributing SLOs have the "Calculate SLO weight based on students linked to teacher's SLO" checkbox selected.

Examples of Final Scores NOT based on Student Assessment Scores in eDoctrina
Adding students to SLOs is not a requirement as SLO scores may come from different sources, such as applicable Regents exams results. In these cases, the respective SLOs only need to have a Final Rating selected so this can contribute to the users original or transition scores accordingly.
If the SLO final score is not based on assessment data that has been entered into eDoctrina, be sure to uncheck to the "Calculate SLO weight based on students linked to teacher's SLO" checkbox. If unselected the selected Final Score for the SLO will be considered in accordance with the entered percentage next to the teachers's name.

Here is an example where a teacher has two SLOs that are not weighted based on the students linked to the SLO where each of them is weighted at 50% each.

Selecting the Correct SLO Type
This step is critical to ensure that the SLO values gets reported in the proper category: as part of a user's original scores, transition scores, or both if necessary.

According to 3012d guidelines, there are three SLO scores (the ORIGINAL SLO, the TRANSITION SLO, and the OPTIONAL SLO) that could be reported for any teacher and this indication is controlled in eDoctrina by the selected type for each SLO. All of the mentioned calculation methods explained above will still apply, but the type decides which score the calculated value should be reported to. The best way to explain this is to visualize each of the three reportable SLO scores as three buckets that the calculated scores will be filled with. Most districts will only need to be concerned with the ORIGINAL SLO score and the TRANSITION SLO score as the optional component is only linked to districts who have negotiated this.

The four SLO types relevant to 3012d guidelines are as follows:
-
"Student Performance (REQSP+TREQSP)": The value from an SLO with this type will be counted toward a staff member's original and transition scores, if the value would need to be reported in both categories. If Student Performance is selected as the type, the Final Score will contribute to both the ORGINAL and the TRANSITION scores in accordance with how the SLO is being calculated.

-
"Exclude from Transition (REQSP)": The value from an SLO with this type will be counted only toward a staff member's original score. (This was previously accomplished through a checkbox on the SLO page, but has since been incorporated into the "Type" dropdown menu in the SLO editor.)

-
"Include Only in Transition (TREQSP)": The value from an SLO with this type will be counted only toward a staff member's transition score.

-
** "Optional Student Performance (3012D)": This is only applicable if a district has negotiated the optional student performance sub-component and would not be selected in most cases.

There is much to consider here, so if you need any help in regards to selecting the final scores and which SLO Types to choose, please do not hesitate to reach out to our help desk at 888-537-3348.
How to Finalize Observation Scores
When all observations have been completed for a staff member, a final observation score must be selected that will populate the APPR report and the CSV export.
The simplest way is to finalize all staff observation scores at once from the OBSeRVE Dashboard, Final Ratings view.
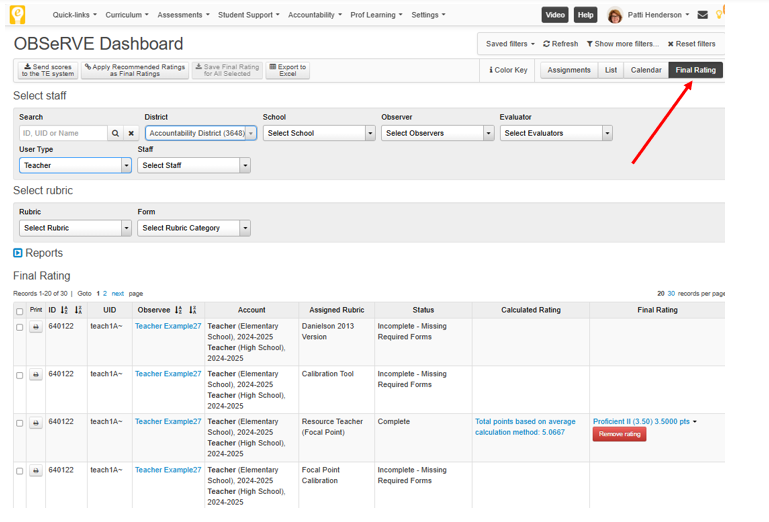
Note: By default, this feature is only available to those with district admin accounts. If your district needs this feature to be available for school admin. as well, please contact the help desk at [email protected].
As shown in the screen shot, the Final Ratings view will display the status of any required observations per staff member (if that information was given to eDoctrina during rubric set up). For example, an administrator can see if any observations still need to be completed or if only a final rating selection is required at that time.
The screen will also display the calculated rating, based on observations conducted so far, so the admin. can select the proper corresponding Final Rating in the column to the right. Click on the drop-down menu in the Final Rating column to select a value:

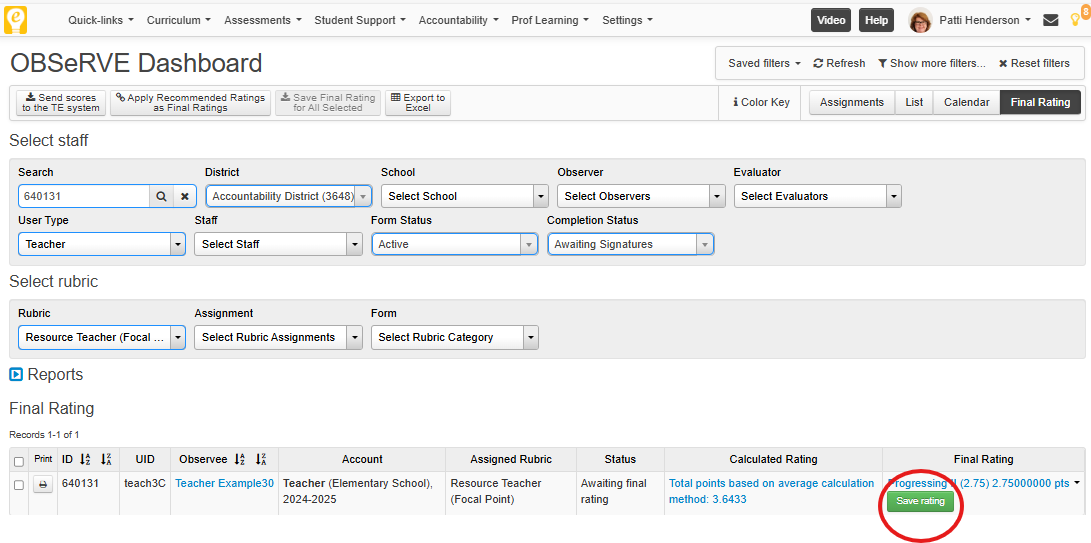
03.H.5. Passages 101: Adding Passages Within an Assessment
In eDoctrina, a passage is defined as contextual information that is used to help students respond to a question, but more often a series of questions. A passage can be a short story, a paragraph, an image, and many other things.
There are many ways to create a passage in eDoctrina. Our recommended way, is to create an assessment first, then add the passage(s) to the created assessment. If unfamiliar with our assessment module, please visit our help guide on Answer Key Only Assessments or Building Questions before trying to build a passage. It is also possible to create a passage without creating an assessment first. Going this route will add the passage directly to a district test bank so the passage can be later pulled into any assessment.
Adding a Passage from the Assessment Editor and Linking Existing Questions
Many times users find it easiest to first build questions within the assessment and then link them to a passage.
Selecting the  icon will prompt users to select which questions they want to link to:

 icon.
icon. Selecting "Proceed" will prompt the passage editor to open, where there are two mandatory steps to follow before the passage can be linked.

- Every passage must be linked to a grade level.
- Once a grade level has been linked, the passage can be entered below. Passages can be created using the WYSIWYG editor or copied and pasted from another document. Passages can also be added as images, but please note that the highlight feature does not work on text copied as an image.
There are also other fields within the passage editor that are not mandatory, but are important to remember.
- Subject: The subject pull-down will usually default to the subject selected for the assessment, but should always be verified. NOTE: This selection will help find the Passage at a later date.
- Type: Although the Type is not a required field, selecting it from this pull-down menu will help to easily find the passage in the Question Bank. The type can categorize a passage as a Chart, Fiction Passage, Graph, Map,Non-Fiction Passage, Persuasive, or Political Cartoon.
- Line Height Multiplier: This tool allows the user to control the spacing of the lines on the passage. If a user enters a "2" in this field, it means the passage will display as double-spaced.
- Tags: Tags show up in many modules within eDoctrina, but their basic function is to allow users to add keywords to any element. Doing so will allow the user to search for these keywords to easily locate the passage at a later date.
- Lexile: Lexile is a scale for measuring both reading ability of an individual and the text complexity of materials he or she encounters. Entering a Lexile level will help identify this passage as eDoctrina can use a range of lexile levels to help idenitfy relative passages.
- The "Show 'Use the information above/below to answer questions x to y' note" checkboxes allow the user to modify the verbiage of the passage to tell the reader to "Use the information above/below to answer the selected range of questions.
Once the passage has been set up, scrolling down the page will show the questions that have been linked.

Selecting "Save & Close" will finish linking the passage and bring users back to the assessment editing page.
Adding a Passage from the Assessment Editor (when questions need to be created)
Once an assessment is created, a passage can be added from within the Assessment Editor by selecting the button located in the main toolbar.
Selecting the
button will open a new browsing window and navigate the user directly to the Passage Editor (shown below).
To add a question, select the
 button in the "Linked Questions" section of the Passage Editor.
This will navigate the user to the Question Editor, in a new browsing tab. The Question Editor has some variations on how to enter questions in comparison to entering questions directly through the assessment editor. For more information on how to use the Question Editor, please visit our help guide.
Once the question has been entered and saved in the Question Editor, it will now become one of the "Linked Questions" to this passage.

To add another question, select the
button and repeat the process until all desired questions have been added to the passage.
Linked Passages Within the Question Editor
When questions have been added to a passage within the Passage Editor, these question will automatically be added as the next questions within the Assessment Editor (shown below).

To edit an existing passage, select the
 button above any one of the linked questions in the Questions View within the Assessment Editor. This will navigate the user back to the Passage Editor where the passage linked questions can be modified with ease.
If a question has been linked to a passage and it needs to be removed, select the  button to remove the question from the passage. This task cannot be done from within the Passage Editor.
FLeX Rubrics with Online Assessments
Once a User understands how to create a FLeX Rubric they may want to use FLeX Rubrics with questions for an online assessment.
In order to do this the User will create a Teacher Scored question to be used, and then create a FLeX Rubric to go with the question. The Teacher Scored question should identify the question or task that students will be asked to accomplish. Please see the Building Assessments with Questions Help Guide for more information on Building your own questions.

Users should make sure that the correct Online Tool is selected for the student so they can answer the question accordingly:

Once the question has been added the User should click on the Rubric Tab to Access the Rubric Option:
Add the 1st Category of the Rubric according to the Rubric description.

Once that is completed, add the remaining rubric components by clicking on the "Add questions" button. Please note that in this case the "questions" are actually the remaining rubric categories.

Make sure to add the remaining "questions" as Teacher Scored questions and again assigning the correct number of point to each question based upon the category point value. For example if the next category in the rubric is worth 5 points, the point value of the "question" being added should be 5 points.

Add the remaining rubric components for each category.
Once all of the rubric information has been entered click on the Questions tab to see the Questions text once again. Once the question text is visible please note that text for question # 1 still shows. Enter text in question 2 that informs students that they will not be entering any student response for this question. This question is used as a place holder for the Teacher to be able to assign the correct value of points for this category. Please also make sure that the "None - for scoring only" option is selected in the Online Tools under the Answer Tools section:

Complete this process for the remaining questions/categories.
When this is all said and done Students will be able to answer question # 1 using the Text Editor tool as shown below, but will not be able to enter anything for the remaining questions as these will be for the User to assess these additional portions of the rubric.

01.F. Using QR Codes for Student Login
QR Code Badges are available for districts to use in order to simplify the process of logging into eDoctrina. Use of the QR code can be enabled for any grade level within the district by contacting [email protected] or by calling the eDoctrina help desk.
Printing is the first step in using the QR Code Badges. Users can print badges for their students by navigating to "Settings > Student Information Data > Students" from the dropdown menu located at the top of the page.

This will route the user to the "students" page. Here, the user will see a list of all the students to whom (s)he is assigned. To prompt the "Print Name Badges" icon to appear, users must first select a grade level.

To print a QR Badge for an individual student, the user can select the  to the left of the student's name. This will result in that student's information being hightlighted.

The user can also mass print QR badges by selecting the  found above the list of student names. This button will allow the user to select ALL of the students listed on a page. All students selected will be highlighted.

Once the student(s) are selected, the user should select the "print name badge" option from the top of the page.

It is also possible to generate name badges by alphabetical order or to group students by class:

PLEASE READ THE WARNING AS EACH STUDENT SHOULD ONLY HAVE ONE ACTIVE BADGE
This means that a new badge for a student should only be printed if they have lost their current badge.
A pdf of QR Badges for the selected students will be generated in a separate tab. (Users should ensure that pop-ups are disabled for this pdf to be accessed successfully).

These QR Badges can then be distributed to students for logging into eDoctrina.
Students will log into eDoctrina using the "Login through QR Code"

Students will be prompted to choose a camera to login.

Once a camera is selected, students will have the ability to scan a QR badge.

Upon successful scanning, the student will be routed to his/her Progress account and can begin working on assignments or access any assigned assessments.

07.F. Customizing the RTI Tracker (Student Goals)
The features outlined in this help guide are available to District Admin profile types ONLY.
Adding Student Goal Type Options
To add more selections to the Status pull-down within the Student Goal Module, navigate to the Student Goal Status by choosing SETTINGS==>DATABASE SETUP==>GENERAL==>STUDENT GOAL STATUS.

A list of the existing options in the Type pull-down will be displayed on the Student goal types screen. To modify existing options, select the  button next to the listed item. The displayed name in this list is exactly how the item will appear in the pull-down menu for service providers to select when they are creating and monitoring student goals.

To add a new option to the Type pull-down, click the  button. A pop-up window will appear where the name of the new option will be defined.

Enter the name as it should be displayed and click the  button to add this option to the existing list.
It is possible to remove an option from the listing by selecting the  button next to the item that needs to be deleted, but eDoctrina will not allow an option to be removed if there is an existing student goal that is utilizing this option.
Adding Student Goal Status Options
To add more selections to the Type pull-down within the Student Goal Module, navigate to the Student Goal Types by choosing SETTINGS==>DATABASE SETUP==>GENERAL==>STUDENT GOAL TYPES.

A list of the existing options in the Status pull-down will be displayed on the Student goal status screen. To modify existing options, select the button next to the listed item. The displayed name in this list is exactly how the item will appear in the pull-down menu for service providers to select when they are creating and monitoring student goals.

To add a new option to the Status pull-down, click the button. A pop-up window will appear where the name of the new option will be defined, as well as some other components.

There can only be one Default option assigned to each district as this option will be what is automatically selected for every goal that is created.
It is also possible to assign a Color to each status as each student goal with the assigned a specific status will display in the Student Goal listing with their respective color. The default color is white.
Enter the the information as it should be displayed and click the button to add this option to the existing list.
It is also possible to modify the order of how these options are displayed by selecting the  arrows. It is a good practice to move the most frequently used options to the top of the list to encourage consistent selection by service providers.
It is possible to remove an option from the listing by selecting the button next to the item that needs to be deleted, but eDoctrina will not allow an option to be removed if there is an existing student goal that is utilizing this option.
Modifying the Student Goal Editor
Each district may use eDoctrina's student goal module in many different ways. With this in mind, we have added the ability to customize four fields within the student goal editor. The system default calls these fields Goal, Target Description, Measurement Methods, and Measurement Frequency. Each of these fields is set up, by default, to be an open text field allowing teachers to type whatever they need to. These text fields can be changed to pull-down menus with custom selections to encourage consistent data entry.

The title of these fields can also be modified according to district preferences, but this excludes the field titled as Goal as this field will be displayed in the listing on the Student Goals Homepage.

To modify the titles of the latter three fields, navigate to Districts, which can be found in SETTINGS==>STUDENT INFORMATION DATA==>DISTRICTS.

Find the district name in this list and select the button to navigate to the District Editor.

Within the District Editor, scroll down to find the Student Goals section of this page.
The will be three fields titled Custom field #1 label, Custom field #2 label, and Custom field #3 label. These fields determine the title of the fields in the Student Goal Editor next to the "Goals" field in order from left to right. Enter in the name that is desired for the Student Goals module at the district.

To change the open text field for each of these to a pull-down menu, select the  button.
A pop-up window will appear prompting to select the field that should become a pull-down. The options will be Goal, Custom Field #1, Custom Field #2, and Custom Field #3; which correspond to the available fields in the Student Goal Editor. There is also the option to modify the Intervention Description to become a pull-down menu instead of a text field as well.
In the example below, the pull-down option of "Twice per day" will be added to the Custom field #3 pull-down.

NOTE: As soon as an option is added, the field will become a pull-down menu.
There is no limitation to the amount of options that can be added to each pull-down menu, but it is a good practice to limit these choices to ensure consistency. As shown in the photo, there are 4 options to select from for the "Frequency" field.

A discussion board can also be enabled for the Student Goal Module. Select the checkbox to Enable Student Goal Discussion to turn the discussion board on. Select the checkbox for Student Goal Comment Draft Option Enabled to allow users to enter draft comments that are designed to be private to the user that adds the comment.
01.D. The Home Page
Description:
After successfully signing into eDoctrina the Home Page is the first screen that will appear. This screen can be customized according to user preferences. On this screen will be a variety of buttons that can be selected to quickly navigate most of the modules. Clicking the icon/logo in the top left of most screens will navigate directly to this page.

- Selecting the icon/logo in the top-left corner will navigate the user back to the eDoctrina Home Page. The displayed image can be customized by any District Admin.
- The Navigation Bar will be present on most modules throughout eDoctrina allowing the user to quickly navigate to any module that they have access to.
- Quick-links will contain some of the most used tools within eDoctrina. For Teacher, this pull-down menu will allow for quick navigation to the Teacher Dashboard. School/District Admins may find a quick-link to navigate to the OBSeRVE Dashboard. Also, if one or many Custom Dashboards have been built, access to these will be available here as well.
- Planning will contain navigation links to all eDoctrina modules related to Planning and Curriculum Development. The option to quickly navigate to the Units Homepage, Lessons Homepage, Standards Homepage, Student Goals Homepage, and many more will be located in this pull-down menu.
- Assessment will contain navigation links to all eDoctrina modules related to assessments. The option to quickly navigate to the Assessments Homepage, Question Bank, and more are available under this pull-down menu.
- Reports are mostly generated from the Teacher Dashboard or OBSeRVE Dashboard. If a report cannot be found on these Dashboards, it will most likely be in this pull-down menu.
- Settings will contain links to view relevant Sutdent Information Data (Classes/Students) and other tools that may be unique to each district.
- The
 option will be available throughout eDoctrina. This menu contains all supported help documentation related to the tools that exist in eDoctrina. Try searching by key word to help identify a specific guide. If a desired help guide is unavailable, the option to email us at [email protected] is always available as we strive to provide rapid responses. We also offer phone support at 1-888-537-3348 from 7:30AM to 5:00PM(EST) Monday through Friday. There is no problem too big or small! We are here to help.
- The User Account Name will be displayed in the top-right corner of most screens. This pull-down menu will contain links to configure Personal Settings and other tools that may be specific to a district.
- The Home page Buttons will vary by district. This setup is usually determined by a District Admin, but can be customized per user. Try re-arranging the homepage buttons to configure a homepage that contains all the modules in eDoctrina that are most frequently used.
- Re-arrange homepage buttons allows each user to customize the look and feel of their homepage. Links to outside webpages can be added as well as links to the modules used most frequently within eDoctrina can be added. See our help guide on Customizing the Home Page for more information.
01.E. Customizing your eDoctrina Home Page
Description:
eDoctrina offers all users the ability to customize their Home Page to give it a look & feel that matches each users preferences. It is possible to add or remove buttons so that the the Home Page offers only buttons that link to the modules that are most frequently used. It is also possible to add custom links to outside webpages, as well as images that can make this home page look as desired.
To customize the Home Page, select the  option in the bottom left of the Home Page screen. The will modify the screen to be the Home Page Editor screen.

- The displayed area for all buttons and images will display as a grid. The width of the grid is 12 units wide. It is possible to modify the width of each button by clicking the button when in edit mode. The following pop-up will appear allowing the user to enter the width of each button.

- Click & Drag any existing button or image to this Trashcan to remove it from the Home Page.
- To add an Empty Space between two buttons, click & drag the Empty Box to the desired location within the grid.
- The Custom Link box is a very powerful tool as it allows users to create a cutom hyperlink to any outside website and insert images to replace buttons. Once the button has been placed in its desired location, click it and the following pop-up window will appear.

If a button is being added, give it a name by entering the Title. If the button is supposed to navigate to a specific website, enter the full URL (website address). If the link should be opened in a new tab on the browser, select the checkbox accordingly. If the button should be displayed as an image, download the desired image and choose the Upload Image option. And, of course, choose the size of the button or image by entering a value between 1 and 12. - eDoctrina offers a standard button that allows each user to include a Local Weather Widget. Once this has been added, the browser will ask to enable the location services so it knows what weather to look up.

- The eDoctrina approved stock photos will always be available as this is the standard images that are preloaded when any district begins using eDoctrina.
- Links to almost every module within eDoctrina can be added to the Home Page. Click & Drag the option from below to the desired location so the selected module will always be available on the Home Page.
- Each district has a Default Home Page that is configured by District Admins for each of the profile types (Teacher, School Admin, District Admin). Click here to reset the home page back to this default setting.
- When the Home Page has been customized accordingly, click here to return back to the Home Page.
eDoctrina Integration with eSchoolData
eSchoolData Side
The first step in sending grades from eDoctrina to eSchoolData is to set up an assignment shell in eSchoolData. To do this, the user must set up both an assessment category and an assignment in eSchoolData.
Creating an Assessment Category in eSchoolData
To create an assessment category in eSchoolData, a user should open his or her gradebook for a specific class and click on the "category" option in the toolbar.

Clicking on the "Category" option within the gradebook will generate a pop-up that will allow the user to enter specific information about the assessment category that is created.

A user can create a number of different assessment categories for each class in his or her gradebook.
Creating an Assignment in eSchoolData
To import assessment data from eDoctrina to eSchoolData, an assignment shell must be created. To create this assignment shell, a user can select the "assignment" option in the toolbar.

Clicking on the "Assignment" option within the gradebook will generate a pop-up that will allow a user to enter specific information about the assignment.

The user will be prompted to enter a category, an assignment name ("assignment"), and a due date. Note that the user is also asked to enter a maximum points value. The points value in eSchoolData must match the points value in eDoctrina in order for grades to sync correctly.
eDoctrina Side
To send assessment data from eDoctrina to eSchoolData, a user must access the Answer Entry/Verification screen. To access this screen, a user must first navigate to the Teacher Dashboard. From the homepage, a user can get to the Teacher Dashboard by clicking on the "Answer Entry" tab or utilizing the "reports" dropdown at the top of the page and selecting "Teacher Dashboard."

This will route the user to the Teacher Dashboard. Here, the user can select the course, class, students, and assessment for which to send data to eSchool. Once these selections are made, the users should choose the "Check Student Answers" option.

This will bring the user to the Answer Entry/Verification Screen. Here, users should ensure that there is data for students and that the data is correct. Once the data is verified, users can select the option to "Send Scores to eSchoolData."

eDoctrina will request the assignments that are available for the selected class from eSchoolData. The user will be asked to select the target assignment to which the data should be sent. This assignment can be selected by clicking on the circle to the left of the desired assignment. Once the assignment is selected, the user can proceed.

Please note that only one target assignment can be selected at a time. Therefore, it is not advisable to attempt to export data for multiple classes with different assignments at the same time.
Once the target assignment is selected, the user will be asked to check the scores before sending them to eSchoolData. The eDoctrina score will populate in the eDoctrina column. If the student already has a grade for the assignment in eSchoolData, the grade will populate the eSchoolData Score column. If not, this column will be empty.

Once the scores are verified, the user can select "Proceed." When completed, the user will get a notification that the scores have been sent.

The user can now log into eSchoolData and verify that the data has been sent successfully.

07.C. Entering Service Data for Students for Progress Monitoring
The purpose of the eDoctrina RTI Tracker is to monitor the progress of a student for a specific goal. An important step in this process is to record any relevant data in the Progress Monitoring section of each student goal.
Adding Data For One Student
Service Data can be entered for each student goal within the Student Goal Editor. Simply find the student goal and scroll down the the Progress Monitoring section of the Student Goal Editor.

If prior service data has been entered for the selected student goal, it will be listed in the Progress Monitoring section. To enter a new item, select the Add Student Goal Data button. The following pop-up window will appear where the information about the service provided can be entered.

Please note that the fields highlighted above are additional fields that can be added and customized per student goal type set up by the district. Please feel free to contact [email protected] if you'd like more information about this field.
Progress Monitoring can be entered using the additional fields provided. Please note that it is not mandatory to enter a student's score, but keep in mind that data will only graph if a score has been added. If no score is added but additional information is, such as attendance codes and/or notes, the data will be included in the Progress Monitoring table only.
Once the appropriate data has been added, users can click the  button to add another line of Service data to the Progress Monitoring section of the student goal.
All entered Service Data will be plotted on a graph to provide a visual representation of the student's progress. The student's score is shown on the vertical axis and the date is shown on the horizontal axis.

Progress Monitoring for Multiple Students
In addition to adding Progress Monitoring data for one student at a time, it is also possible to enter Service Data for multiple students by selecting the  button. This option is very useful if users are monitoring a group of students with a common goal at the same time.
Users should first select either the students or the specific goals they want to add PM data for using the checkboxes on the Student Goals homepage, and then select the icon toward the top of the screen.

When the page opens, users can now enter Progress Monitoring data for multiple students at a time. The data can be entered one student at a time using the fields in-line with their name, or the top row of fields can be used to mass enter common data for all selected students at once.

Once complete, users can select the button to record all of the entered data, which will now appear in each student's individual goals.
07.B. Adding a Student Goal
(for one student)
Before adding a student goal javascript:;for a student, it is a good practice to find the student in the displayed list on the Student Goals Homepage by manipulating the available filters. The displayed list will include all students and goals that match the selected filter options.
From the Student Goals Homepage, find the student in the displayed list by manipulating the available filters. Select the  button next to the students name to navigate directly to the Student Goal Editor.
Once the Student Goal Editor has opened, it is a good practice to enter the general information about the student goals that is being measured. The only required fields are the Goal description and a selection of the correct School Year, but providing as much information here will help when monitoring the progress of each student goal.

- The Subject pull-down will contain all subjects that are offered at the district. Indication of the correct subject will help to find and print goals at a later date.
- The Type and Status are pull-down menus that contain options that are district-specific. These options are managed by a District Admin profile. For more information on how to add/edit the options in these pull-down menus, please visit our help guide on Customizing the Student Goal Module.
- The Service Provider can be selected if there will be an individual other than the person creating the goal. Student Goals can be found by searching for the provider as well as the Creator as this is often two different individuals.
- The Target Value can be measure in points(a raw value) or percent. Setting a target will provide a unit of measurement as well as a visual marker when charting the student goal.
- The Target Date, Start Date, and End Date are important fields for properly tracking student goals as they will be displayed on any printout and define the timeframe when charting the student goal.
- The Reason for Ending pull-down is populated with all the entries that have been entered as reasons for ending an intervention. Typically, if a student goal is concluded, a reason for ending should be provided.
- The Goal will be displayed as the title of the Student Goal on the Student Goal Homepage. This field, as well as the next three to the right can be named alternatively or converted into pull-down selections. For more information on how to do this, please visit our help guide on Customizing the Student Goal Module.
(for multiple students)
In many scenarios, student goals may need to be assigned to a group of students. To accommodate for this need, eDoctrina offers the ability to add a single goal to multiple students, while being able to assign unique target values to each student.
To add a single goal to multiple students, select the checkbox next to each student that is to be included in the student goal. Then select the "Create Goals for Multiple Students" button located at the top of the Student Goals Homepage.
This will navigate to a screen that is comparable to the screen when adding an individual student goal. Populate all of the descriptive information, then enter a unique Target Value for each student (if needed).

Once the desired information has been entered, be sure to select the  button to create the goal for all of the selected students. eDoctrina conveniently navigates the user to a screen where it is possible to enter Service Data for the students immediately after their goal has been created.

This screen will allow the service provider or creator to view multiple students' goals on one screen. It is possible to:
- Enter the Service Duration for all selected students.
- Toggle between all "active" goals for each student by selecting the left and right arrows (if available).
- Enter Service Data for each student.
- View any existing Service/ Progress Monitoring Data for each student.
03.C.3. Copying An Assessment
Click here to view the Help Video
Copying assessments within eDoctrina is a very simple process. Users can copy assessments from previous years and copy pre-made assessments from other test banks, such as eDoctrina FREE Items. Copying assessments can save educators hundreds of hours because the relevant questions already exist in one of the available test banks.
In order to copy an assessment, navigate to the Assessments Homepage by finding "Assessments" in the pull-down menu in the eDoctrina navigation bar.

On the Assessments page, it is possible to search for a specific assessment by the assessment name, assessment ID#, or any tags that are entered for the assessment. If none of this information is known, try manipulating the other available filters to display assessments that are relevant to the selected filters.

In the assessment list, there are a couple important icons to be aware of:
-
The "Edit" pencil will only be available for assessments that are created by the signed in user or for users that have editing permissions to the assessment.
-
The "Copy" button will be available for all assessments unless the assessment has copy restrictions. This option should be selected when copying an assessment.
- To copy an assessment, simply find the desired assessment in the list on the Assessments Homepage.

NOTE: Users cannot edit an assessment created by different user, but copying it will provide access to the content contained in the assessment and the ability to edit accordingly. This action will not change the original. - Once it is determined that an assessment is exactly what is needed, select click the button next to the assessment. This will generate a pop-up window where some options will need to be selected. Set the Assessment Name, School Year, Date, and the Marking Period(if using report cards), and chose the Creator. By default, copying an assessment will also copy the linked learning standards. If the linked learning standards are not applicable to the district, unselect the "Copy Standards" checkbox.
- Once the button is selected, eDoctrina will navigate directly to the Assessment Editor, displaying an exact copy of the assessment, providing a new assessment ID# that now lives in the user's district Test Bank. The only difference will be that the Assessment Name will have the word (COPY) at the end of the title, so be sure to customize the title accordingly.
If the target district does not have a matching subject available, the option to assign an existing subject will also be available on this pop-up, so eDoctrina knows where to map the assessment to.

Users can also copy more than one assessment in one action. Simply select the checkbox next to the assessments that need to be copied, then click the button at the top of the screen.
A similar pop-up will appear as when copying a single assessment. The selected settings will apply to all copies that are created.
This process differs only in the fact the the user will not be navigated directly to the Assessment Editor, but a resulting pop-up will appear indicating the new assessment ID#'s that have been assigned to the copied assessments. To navigate to the Assessment Editor, just click the "Resulting Assessment ID" to navigate to the the Assessment Editor for the desired assessment in a new tab on the browser.
If the "Copy Assessment" box does not automatically open, it is likely being blocked by a pop up blocker. Make sure to check the URL bar on the top of the page to “Allow pop-ups” or check the browser preferences.
01.G. Collaborating with Other Users
eDoctrina offers a variety of ways to collaborate with other users, as well as various levels of sharing and privacy.
Built-In Collaboration Options
1) "Team Can Edit": When this option is selected AND one or more courses has been identified, then teachers who teach the same course as the creator will be able to edit the item.
Available for: Curriculum Maps, Units, Assessments, Lessons

Editing access is available when this button appears next to an item in the list:

A: Yes, it is possible, but it is not advisable because the last person to save can overwrite the other person's changes.
2) Viewing and Copying: Unless privacy settings are enabled, items by default are able to be viewed and copied by other teachers in the school. Find these buttons next to any item that can be viewed and/or copied. Viewing is available via print preview using the printer button, and a copy can be made by selecting the button that looks like two pieces of paper:

Available for: Curriculum Maps, Units, Lessons, Assessments
Adding a Team Member or Co-Teacher
eDoctrina gets information on teacher-course assignments from the district's student information system. But there are times when other teachers may need to be added to the team. Any teacher is able to do this manually. When you add a teacher to your team using this method, the newly added team member will be able to edit items with the "Team Can Edit" checkbox selected.
To link a co-teacher to your class, navigate to Student Information Data > Classes

Then find the class to which you would like to link a co-teacher:

After clicking on the magnifying glass for the class, you’ll see this box appear:

Double-click or drag the name of the teacher you would like to link as a co-teacher and click "OK".
Privacy Settings
1) "Do Not Share- Exclude from List" or "Private": Selecting this option will prevent the item from appearing in the list of items that is visible to other users. Only the creator and admins will be able to locate the item in a search if this is selected.
Available for: Curriculum Maps, Units, Lessons, Assessments


2) "Do Not Allow Copy": Selecting this option prevents anyone from being able to copy the item.
Available for: Curriculum Maps, Units, Assessments

Understanding SLOs and Reporting under 3012D (internal use)
The Two Reports
Districts are typically looking to generate two reports from eDoctrina: an APPR report for each individual staff member (to be signed and filed, either physically or electronically), and a CSV export of this same information, but in the format that NYSED requires. The second will eventually be uploaded directly to NYSED and contains much more detail than the APPR report given to teachers.
First report:

NOTE: This report is specific to model. Two versions of this report may need to be generated, if a user has two models assigned.
Second report:

Understanding the APPR Report Look-Up Matrix
The APPR score is a score that is referenced on a matrix. One axis represents the observation score and the other axis represents the growth score. The values on each axis are only 1, 2, 3, and 4 (I, D, E, and H.) These two scores intersect for one final score.

The observation score typically translates exactly from observation to APPR. For example, if a teacher earns a final score of 4 on the observation, that goes right into the look-up matrix as 4. If a teacher earns a score of 3.4, that would become a 3 on the matrix according to this guidance from the state:

However, the SLO or growth score(s) require conversion from HEDI table scores out of 20 to a score of 1, 2, 3, or 4. The state has provided this guidance which is standard for all districts:

Several SLO/growth scores may need to come together for the teacher's final score of 20 (that is then converted to a score out of 4). For example, a teacher may have several SLOs that, when calculated together, produce a score of 18/20. 18 then becomes 4. If these SLOs are in eDoctrina, you need to be mindful of the weighting method selected by users (either "by student" or by manually entering a value next to the staff name). This is often a major source of inaccuracies.
Original Scores and Transition Scores
Districts have two models available in eDoctrina if the PBCS system was configured correctly for them: an original model and a transition model. The original model is the "bucket" that collects all the original scores that will be put into the matrix to produce the original reports. The transition model is the "bucket" that collects all the scores that will be put into the matrix to produce the transition reports.
We need to be careful when providing assistance to districts that we are not advising them on content (for example, what scores should be reported for whom). It is a fine line because we DO need to advise districts on the technical steps that should be taken to ensure that scores come out correctly in reports for all users.
The state guidance is that an "original" set of scores needs to be reported for all teachers. In addition, for any teachers that are tied to a set of students in grades 3-8 that take the state ELA and Math tests, a "transition" set of scores ALSO needs to be reported. The original set of scores reports all SLO/growth scores for which a teacher might be accountable based on their student rosters. The transition set of scores reports scores that should be considered in lieu of the state ELA and Math test scores. (These scores were determined to be invalid until 2020.)
We should not tell districts who should have an original model assigned and who should have a transition model assigned. Only say that if a user needs an original set of scores reported, the original model should be assigned. If a user needs a transition set of scores reported, the transition model should be assigned.
What growth/SLO scores go into the Transition Model?
Typically, there are two scenarios:
1) An SLO score may need to be reported in both the original and transition score categories. For example, consider a 4th grade teacher, who has a set of original scores and transition scores. Her students take the state ELA test, the state Math test, and the state Science test. The SLO based on the Science test may need to be reported in both categories.
2) The state has required districts to have "Back-Up" SLOs. The scores from these SLOs get reported as part of the transition score category if the transition set would otherwise be null because all relevant SLOs are excluded from the transition set. Consider, for example, a 5th grade teacher. Her students take the ELA and Math state tests, but take no other state exams. Her transition scores, though required, would be null; so for her, a "Back-Up" SLO provides a score.
The Tests
IMPORTANT: Districts will often refer to SLOs in terms of the tests they represent, and/or they will ask you how to use the eDoctrina SLO/APPR tools to capture their various test scenarios, so you need to be familiar with the tests and how they're used. Here is a table of typical scenarios for your reference:

Note that the state provides the "growth" scores (the SLO score) for teachers attached to Math and ELA state tests 3-8. Those scores are not typically released until late August, so that is when the bulk of the APPR wrap-up process will begin for many districts.
The District Growth Score
An SLO score MUST be based on a state test or on a limited group of state-approved local/district tests (for example, the STAR test or AIMS WEB, etc.) Therefore, many districts have negotiated a "District-Wide" growth/SLO score that will be reported for teachers who would not otherwise have a valid SLO score to report (i.e. Art teachers, Music teachers, Health teachers, Kindergarten teachers, etc.) This might also be used as the "Back-Up" SLO score for teachers who have a set of transition scores.
Often, this district-wide growth score is an index of the 5 Regents exams on which students in the district have historically performed the best. The SLO scores from the 5 tests are combined to get one score, which becomes the "district growth score" or SLO score for this group of teachers whose students do not take state tests.
For example:

Here is how this might play out in the district:
The English 11 teacher has an SLO score of 18; this is his original score. The Phys Ed teacher has an SLO (index) score of 17; this is her original score. The 5th grade teacher has a transition score of 17 because the "Index" score is the back-up SLO score.
Districts commonly ask how to use eDoctrina's SLO tools to calculate this index score and assign to teachers. Others prefer to calculate it elsewhere, then directly upload or hand-enter this growth score since it is the same for so many people.
SLO Types
You will need to know how to advise on selecting the correct SLO Type so that the final SLO score ends up in the correct category on the CSV export. They are available in the"Type" dropdown menu.

These are the labels and their corresponding actions:
"Student Performance (3012D)": The value from an SLO with this type will be counted toward a staff member's original and transition scores, if the value would need to be reported in both categories.
"Exclude from Transition (3012D)": The value from an SLO with this type will be counted only toward a staff member's original score. (This was previously accomplished through a checkbox on the SLO page, but has since been replace by this option "Type" in the dropdown menu in the SLO editor.)
"Include Only in Transition (3012D)": The value from an SLO with this type will be counted only toward a staff member's transition score.
"Optional Student Performance (3012D)": This is only applicable if a district has negotiated the optional student performance sub-component and would not be selected in most cases.
The SLO Summary Sheet report reflects SLOs with any "Type" label and can be used to track how SLOs are being weighted and calculated together:

Adding a Custom Page to Students' Online Accounts
A teacher may want to add a customized page to students' online (PROGReSS) accounts to provide resources, links, announcements, etc. relevant to the class. You are able to do this in eDoctrina. This is not available to teachers by default, but rather access has to be requested. If you would like to have this ability, please contact [email protected].
Creating the Page
To create the page, go to Settings>Database Setup>General>Custom Dashboards.
There, you will have the ability to create a new page by selecting "Insert" in the top left corner of the page.

The "Edit custom dashboard" pop-up will appear. You must first give the page a name. Choose one that will help student identify and distinguish this page from other pages in a list. You would then select "Design Dashboard and Access Rights" in the bottom right corner.

Designing the Page
A blank page will open up, and you will be in editing mode. This is where you will create the content of the page. Select a widget from the bottom, and drag it to the right or left of the space where you want it to appear.

When you have finished adding all content, or if you want to leave editing mode to view the page, select Done:
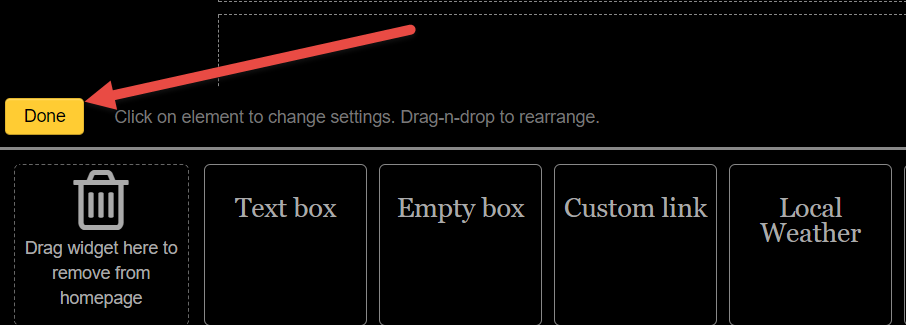
This will allow you to leave editing mode and view the page as a student would see it.
To re-enter editing mode, select "Re-arrange homepage bottons" in the bottom left:

Using Text Boxes
Please note that most of what a teacher would need to present on the page can be accomplished with a "Text box". In a text box, a user can include text, images, streamed media, etc. Here is an example:

When you have placed a Text Box on the page, click on it to get the editing pop-up:

Here you have the menu of editing tools, as well as the ability to resize the box by defining width and/or height.
It is important to note that when you select "Save" and the pop-up closes, the box may still be labeled "Text Box" until you leave editing mode. That is when your content will appear.
Additional Editing and Deleting
You are able to edit the page at any time by locating it on your Custom Dashboard page and selecting the edit pencil next to the page name. To delete a page, select the trash can icon to the right.

Assigning the Page to Students
For the page to appear for students, you must create an assignment. To assign the page, select the edit pencil next to the page name, and select the Insert button under "Assignments":

You are able to assign the page either to a class of students, or to an individual student. You can repeat the process to make as times as needed to make all assignments. To assign the dashboard to a class of students, first select the course, then the class, then Save:

To assign the page to an individual, type part of the student's name in the User filter and select the name when it appears. Then Save:

To verify any assignments you've made, select the edit pencil next to the assignment to view the details. To delete an assignment, select the trash can icon to the right of the assignment:

How do students find the page?
When students log in, any custom pages assigned can be found as "Custom Dashboards" under the Quick Links tab at the top of the screen:

03.E.4. Creating Result Proficiency Levels to use in Proficiency Tables (District Admins ONLY)
eDoctrina offers the flexibility for districts to create levels to be assigned to students. Many schools will not use the traditional A through F or 01 through 04 scales that have been historically popular. In cases where unique levels need to be assigned to students, the level must be created first before it can be assigned on a specific proficiency table. This task can only be done by district admin profile types.
To create custom result levels, a district admin will need to navigate to the Proficiency Levels page located in SETTINGS==>DATABASE SETUP==>ASSESSMENTS==>PROFICIENCY LEVELS

This will navigate to the Proficiency Levels homepage where all of the existing level selections will be listed for the selected district.

To create a new Proficiency level, click the +Create button. A pop-up window will be generated prompting to enter some basic information. It is required to select the District and define the name of the level. NOTE: There are no character limitations on the Name field.. Although it is optional, selecting the Deafult Color and Default Font will enhance the available data reports.

Prioritizing Standards within eDoctrina
Prioritizing Standards is a process that many districts go through in order to identify key standards through a process that would place these standards in a list in order of importance. With the large number of Standards provided to educators it can often times be overwhelming to determine how much time to spend on specific standards. Although educators are still expected to address all of their standards, prioritizing will help in aiding how much time should be devoted to specific standards.
When evaluating standards to determine what to focus on, many educators look to Larry Ainsworth and the work that he completed in regards to identifying Power Standards. According to his research he suggests to consider 3 types of criteria:
Endurance - Ask "Will this standard indicator provide students knowledge and skills that will endure throughout their academic career and professional life?"
Leverage - Ask "Will this standard provide knowledge and skills that will be of value in multiple disciplines?"
Endurance for the next level of learning - Ask "Will this standard provide students with essential knowledge and skills that are necessary for success in the next grade level?"
In addition to these Standards a High Stakes and Power category have been added as well.
High Stakes - These are standards that will be emphasized on a state assessment.
Power - These are standards that indicate the importance to the district. The higher the number the more importance.
Within eDoctrina you can prioritize either your own set of created standards or a specific standard set through a very simple process:
1. Navigate to the Standards Screen by selecting the Standards option under the Planning tab at the top of the screen:

2. When on the Standards screen search for the Standard Set that you would like, in this case we are looking at NY Common Core Learning Standards for Mathematics and Grade 4:

3. In order to set a level simply click below within the column and you will be able to type in a number or perhaps a word. What you use is entirely up to you. Of course all of the columns do not need to be filled out just the areas that would be needed. A color can also be designated to designate the importance as well.
I Prioritized My Standards, Now What?
Once you have prioritized your standards you will see these Standards tagged in the manner that you tagged them which will aide in linking these standards to curriculum pieces as well as assessments. When linking standards the prioritized standards will stand out as shown below:

This will make it very clear to educators what the important standards are and how frequently they should be addressed.
Linking Co-Teachers
Co-teachers can be internally linked to classes to grant supporting teachers (or teacher other than the teacher of record) access to class roster and data information in eDoctrina. This is especially helpful for teacher aides/assistants, intervention specialist, coaches, etc. who likely do not have their own schedules importing into eDoctrina from the district’s student information system.
It is very easy to link co-teachers to classes and can be done when logged in as a teacher (per district request) or administrator.
To link a co-teacher, begin by navigating to the the Settings tab from any page. Then go to Student Information Data > Classes.
*NOTE: Your homepage may look different than the one in the screenshot below because all districts have custom homepages.
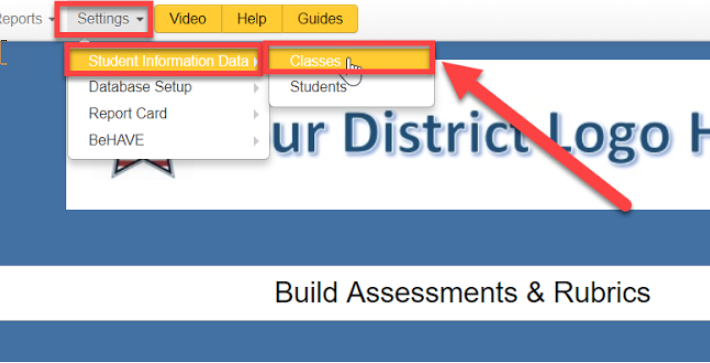
Then use the filters to find the class(es) you would like to link the co-teacher to and click the edit pencil on the left. If you do not have the edit pencil available to you, please click on the magnifying glass icon.

In the popup, click on the Co-Teachers Tab.
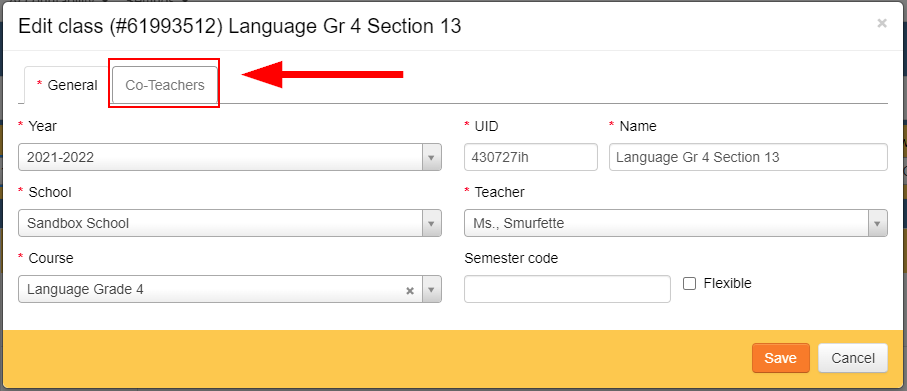
Users will see any current co-teachers listed to the left under the list of "Records", and be able to use the School and Search fields on the left to find and link new co-teachers. Once a teacher has been found, simply double click their name to add them to the list of records.
Note that administrators will have a school filter to select a specific building, should they need to, and teachers will not.

Once the teachers have been selected, click the "Save" icon.
FAQs about Linking Co-Teachers:
Do I have to link co-teachers multiple times through the year?
Linking co-teachers is a “one and done” process. Once it's done at the beginning of the school year and does not have to be repeated until the next school year.
Will my linkage be overwritten each night with our imports?
Linking co-teachers to classes are not overwritten by the nightly import into eDoctrina from your district’s student information system.
Can I only link one teacher at a time?
You can link multiple co-teachers to one class and can link new staff at any point through the school year.
What does linking a co-teacher do for that staff member?
Linking a co-teacher gives the co-teacher editing rights to any items made by the primary teacher and it also gives them full access to run any and all data reports.
Can I link myself as a co-teacher to classes I need/want access to?
No, teachers cannot link themselves as co-teachers to classes they don't have access to. Only the primary teacher of the class and administrators can link co-teachers to classes. Co-teachers cannot link themselves.
03.I. Multiple Correct Answer Questions
When creating a multiple choice question, a user has the option to select more than one correct answer. eDoctrina provides different types of scoring options for selected-response questions that involve multiple correct answers. These types of questions can be administered online or via answer sheets
When creating an assessment, locate the Scoring Type option in either the Answers Key or Questions view:

When clicking on the Scoring Type option, users will be able to select which multiple correct answer combination is needed for the question structure.
Answers Key view:

Question view:


Below are the following options for Multiple Correct Answer questions:
- Single correct answer: This options allows students to select only one answer choice. Students will earn full credit if and only if they select the correct answer.
- Multiple correct answers, all correct required : This option allows students to select multiple answer choices. Students will earn full credit if and only if they select all correct answers.
- Multiple correct answers, any correct required : This option allows students to select multiple answer choices. Students will earn full credit if and only if they select one or many correct answers. Any incorrect answer selections will mark the question as incorrect.
- Multiple correct answers, partial scoring : This option allows students to select multiple answer choices. Students will earn the indicated point value for any correct answer choices and will be penalized the indicated point value for any incorrect answer choices. Maximum points earned will be for all correct choices and minimum points is limited to zero points earned.
- Multiple correct answers, single response : This option allows students to select one answer choice. Students will earn the indicated point value for their answer choice selection.
Once a user selects the type of Multiple Correct Answers format, the next step is for the user to choose which combination of answers are correct/required.
For example, below is a question where all correct answers are required to be selected for the student to receive full credit. To specify which answers are correct the user needs to select the edit pencil and select both correct answers (A and C).

Another screen will pop up so that I can select which answers have to be chosen by the student to receive credit:

Once you select your correct answers and click “save”, you will see both answers will have appeared next to "Correct".

*You can re-open the answer selection screen to edit the correct answer by clicking on the edit pencil at any point.
PARCC Districts: Multiple Correct Answer Questions Answer Sheet
When printing Fastest Small Bubble or Fastest Big Bubble answer sheets for assessments that have multiple correct answers, users have the option to choose a setting which creates a rectangular bubble instead of circular bubble to signal to the student that the question has multiple correct answers.
When printing answer sheets for the assessment, select the “Customize” button under the answer sheet option:

A popup will appear with some options allowing you to customize your answer sheets. At the very bottom of the list, check the Multiple answer as rectangle option and click Apply.

When you print answer sheets, questions with multiple correct answer, such as question #2 and #5 in the example below:

Sending Grades to Tyler Grade Book
Tyler Chrome Extension: Installation Instructions
In order for eDoctrina to send grades into the Tyler Grade Book, there are certain steps that must be taken. This help guide will take you through these steps one-by-one.
- Open a new tab in Google Chrome and navigate to the Extensions Manager. You can do this by typing chrome://extensions/ into the address bar...

or by opening it from the menu:

- Scroll to the bottom of the page to find the Get More Extentions link and select it.
- From the Extension store, type eDoctrina into the search bar. This will prompt two extensions to populate. Find the Tyler extension and select Add to Chrome.

- Activate the extension by making sure the Enable this item link is selected after you have installation is complete.

- Scroll down to the bottom of your list of extensions and select "Keyboard shortcuts"

- Create a shortcut to "Run import to grade book" (for example: Alt + Shift + S) and select OK


You can double check that the extension has been enabled from the Extension screen

Usage Example Usage: Import Data from eDoctrina
Now that the extension has been successfully added to your computer, there are a couple of additional steps to export data from eDoctrina to Tyler.
- Once data has been entered for an assessment, there are two places in eDoctrina where users can export grades to the Grade book. From the Teacher Dashboard, users can select the appropriate course(s), class(s), and assessment that they would like to have data exported for.
Answer Verification Screen
Once these options are selected, the Export to Gradebook option can be found on the Answer Verification screen by selecting the CHECK button...

...or the Class Summary Report

- In both of these options there is a button that says
 . Selecting that button will prompt the following pop-up:

Select the data you would like exported and then "Continue"
Once you have selected Continue, you will receive a message assuring you that your data has been saved.

Export Data to Grade Book
In Tyler, select table cell and run the shortcut that was created in step 9 above (for this example, shortcut is Ctrl + Shift + S).

Click here to see a video example
13.D. Electronic Signature Workflows
Electronic Signatures are a great way to get all parties involved in the observation process. Each district that subscribes to eDoctrina's OBSeRVE module may have a signature workflow that is unique, so this document will not only outline what is possible, but it will explain the logic in eDoctrina as an observation moves through each of these workflows.
To help understand how an observation moves through each phase of it electronic signature workflow, it is best to start this document by explaining the "Scope" filer on the observations layout view of the OBSeRVE Dashboard.

- Ready for Administrator Signature: When this filter is selected, the list will display all observations that need the assigned observer (the creator of the observation) to electronically sign the observation.
- Returned to Administrator: After the first signature is provided to any observation, any person along the electronic signature workflow will have the option to "RETURN" an observation if they find errors or if there are any other concerns that need to be addressed. Returning an observation will reset the the signature workflow to the beginning. When selecting this filter, only observations that have been returned will dipslay in the list.
- Ready for Observee Signature: When this filter is selected, the list will display all observations that need to observee to electronically sign the observation.
- Approved by Observee: When selecting this filter, the list should display all observations that have been Approved by the observee. NOTE: If the observee signs first, this will be the status after the required observers sign the observation.
- Additional Signatures Not Completed: When this option is selected, the list will display all observations that have not been approved by the one or many district selected individuals who are required to sign all observations. These signatures happen after the observer and observee have signed the observation.
Observation Scope Filters
What do the buttons mean?
 When this button displays, it means that the observation is "ready" for a signature. If you are the observer and have already signed this observation, the button will still display this way because the observation may be waiting for the observee's signature. At this point, the observer will still have the ability to "Unlock Data" in any case where they wish to make changes to the observation and restart the signature workflow. It is a best practice to hover over the button to see the status (if the filter is not selected).

 This button means that the observation is not able to be signed. Trying to sign an observation that displays this button will produce an error message that says "This document is not yet ready for signature" or "Additional Signatures Not Yet Complete". This means that this observation is either waiting for the observee to provide their electronic signature or there are some indicated users that have not provided their approval signature.
 When and observation displays this button, it means that the observation has been signed by all required users and has reached the "Approved by Observee" status, which is the final status. The observer will still be able to click this button and "Unlock" the observation, but this will restart the entire signature workflow.
APPROVE, RETURN, UNLOCK, or CANCEL
There are a few options that each user will see when they visit the signature pop-up window.

To provide an electronic signature, one should begin by viewing the observation form to ensure that the entered data is accurate. Scan through the form by clicking the  buttons. The last page will always display any electronic signatures that have already been provided.
If all entered data is correct, provide the electronic signature by typing in your name as how you would like it to appear on the electronic signature record, key in your eDoctrina password, enter any comments that should be delivered with the signature, then select the  button. This will provide the required electronic signature.
After any electronic signature is provided, the data contained within the observation form will be "locked" so no further edits can be made. If the observer wants to make changes to the observation form after an electronic signature is provided, they will only have the option to  . If this button is selected, the observation will become unlocked and changes to the observation form can be made. Unlocking data will restart the entire electronic signature workflow to the beginning and all parties that have previously signed will have to provide their signature again.
After the first person has provided their signature, whether it be the observer or the observee, there is the possibility that the next person can find something incorrect within the observation form. In this case, the user should select the  to return the observation to the observer so they can make the necessary changes.
The  button will simply close the window and perform no action in the database.
Initiating the electronic signature workflow
The obvious first task is that the observer needs to ensure that all relevant or required information has been entered into the observation form. Once the observation has been filled out completely, the observer will need to mark the observation as complete by unchecking the checkbox on the top of the form that indicates that "This is a draft observation"

If email notifications are turned on, making an observation COMPLETE will queue up an email to be sent to the person being observed claiming that the observation has been completed. To ensure this message does not get sent out erroneously, the observer should received a warning message asking them to confirm that they would like to share the observation contents with the person being observed.

Once the observation is marked as COMPLETE, this enables the ability to provide electronic signatures according to the designated workflow at the district.
Default Signature Workflow
The default signature workflow is where the person observing provides their signature before the person being observed does.

- The administrator will be signing the observation first in this workflow so it is important to review all entered information to ensure the data is correct and relevant.
- The administrator will then find the target observation on the OBSeRVE Dashboard on the Assignments laoyout view or the observations layout view. Once identified, the observer will click the
 button that appears next to the observation on the Assignments Layout View or the Observations Layout View:
Assignments Layout View Observations Layout View 

- The observer can provide their electronic signature by selecting the button or exit the screen by selecting the The button. Successfully signing the observation will append the electronic signature information to the end of the observation document for reference.

- The observation will now be able to be signed by the observee. Please visit our help guide on Electronically Signing an Observation as Teacher. The teacher will be able to sing the observation by clicking the button. If the teacher finds that the observation needs to be updated to accurately reflect the observation events, they have the option to return the observation to the observer to make further edits by clicking the button. If they choose to perform this action, the observation scope will be modified to "Returned to Observer". If this happens, the signature process will be reset, the observer can then make any changes and start the signature workflow again.
- Once the electronic signature is provided by both the observer and the observee, the observation scope will be changes to "Approved by Observee. At this point, the observation will be considered as complete and will be locked for future edits.
An observation that has been electronically signed by both the observer and the observee with have a signature stamp at the end of the observation print out that looks like the following.

Please note that any modifications that need to be made to an observation that has already been approved with require the observer to "Unlock" the observation. If this happens, the signature workflow will be reset.
Modified Signature Workflow (Teacher Signs First)
Some districts will choose to modify the default signature workflow by requiring the observee to sign the observation before the observer provides their electronic signature.

- The administrator will review all entered information to ensure the data is correct and relevant.
- The observer will change the status of the observation to COMPLETE. The Observation Scope status will be changed to "Ready for Observee Signature". This will queue an email to be sent to the observer stating that the observation is ready to be viewed.
- The observee will sign into eDoctrina to view and sign the observation. Upon observee signature, the Observation Scope status will be modified to "Ready for Administrator Signature".
- The observer will provide their signature by navigating to the OBSeRVE Dashboard and signing the observation using the aforementioned steps. Successfully signing the observation will change the observation scope status to "Approved by Observee"
An observation that has been electronically signed by both the observer and the observee with have a signature stamp at the end of the observation print out that looks like the following.

Other Considerations (Users who Must Sign ALL Observations)
There are some districts that require one or many users, such as the Superintendent, to provide their electronic signature to all observations that occur within the district.
If this setting has been enabled, any observation will still have to be electronically signed by the observer and the observee. Once both of these individuals have signed the observation form, the observation scope status will change to "Additional Signatures Not Completed".
The observation will remain in this status until all individuals that must sign the observation have provided their electronic signature.
Upon signature of these individuals, they will have the opportunity to provide their signature by clicking the button. If they happen to find any errors or discover that the observation is missing something, they will have the opportunity to reset the electronic signature workflow by selecting the button.
05.B. Answer Sheet Verification Screen
Data verification after scanning student answer sheets if often required, as it is sometimes difficult to predict how students will fill in the bubbles on answer sheets. This tool provides teachers the opportunity to take a second look at any questions where a student left an answer blank, selected more than one answer, and/or provide a score for any "Teacher Scored" questions.
To get to the Answer Verification screen from the homepage, select Assessment --> Student Answer Verification

There are a few filters and columns to pay close attention to on the Answer Verification Screen:

- Unverified Filter: This filter allows the option to choose the types of unverified data you want to see. There are options to see all scans, all unverified scans, or users can select to see unverified scans or online data only.

- This column represents the number of scans that need to be verified for the assessment
- Clicking the edit pencil next to the assessment will bring the user to the Answer Entry/Verification Screen where they can verify any data that needs to be checked:

03.H.6. Passages 201: Adding a Passage to a District Question Bank (without creating an assessment)
If the goal is to simply create passages for later use, it is possible to add a passage to a district test bank without creating an assessment first. To do so, navigate directly to the Passage Editor located in the Assessment pull-down in the navigation bar.

This will navigate to the eDoctrina Passages Homepage. This page allows the user to view all passages that exist under the selected conditions of the available filters. It is also possible to edit any passage that has been created by the signed in user as well as view passages that have been created by other district users.

The  button will navigate the user directly to the passage editor and the process for adding/linking questions is the same as described above.
IMPORTANT: To properly save a Passage, it is required to add questions. If no questions are added, the passage will not save and it will not be able to be recovered.
Adding a Passage to an Assessment from the Question Bank
If an assessment exists and an existing passage needs to be added, select the  button from within the Assessment Editor.

This will navigate the user to the eDoctrina Question Bank. This is where all questions located in the selected Question Bank will be located. This tool is designed to search for questions, but it is possible to locate a question linked to a passage by searching by the Passage #, any keywords in the Passage itself, or by any entered Tags.
For more information on how to add a question to an assessment through this tool, please visit our help guide regarding the eDoctrina Question Bank.

- The large number in this box represents the number of questions selected within the question bank, that will be added to the assessment.
- If the questions linked to a desired Passage still cannot be found, select the
 option as there are a few tools here that will make finding the questions linked to the passage easier.
 - Once the desired passage or question has been located, simply click the
 button. This will add the selected question to the assessment.
It will also produce a pop-up window that will ask if all questions linked to the same passage should be added to the assessment.
button. This will add the selected question to the assessment.
It will also produce a pop-up window that will ask if all questions linked to the same passage should be added to the assessment.

- Click the
 button to add ALL questions linked to the passage.
 - Click the button to ONLY add the selected question(s).
- Click the
 button if the creator does not wish to add any other questions linked to this passage.
Once all of the desired passages or questions have been added to the assessment, use the  button to navigate back to the Assessment Editor.
Adding a Passage (when questions already exist)
If questions already exist and a passage needs to be added to one or many of the questions, eDoctrina makes it simple to link the existing questions to a passage that needs to be created.
Simply select the checkbox for each of the questions that should be linked to the passage, then click the  button to navigate to the Passage Editor.

In the Passage Editor, all selected question will appear in the Linked Questions section. All that is needed from here is to enter some general information and the contents of the passage.

Adding Questions to an Existing Passage (District Admin Only)
If you wish to add additional questions to an existing passage then it must be done within an assessment that has questions linked to the desired passage in addition to the desired unlinked questions.
This process can be carried out in the Assessment Editor by:

- Select a question or questions that are already linked to the desired passage.
- Select the question(s) you wish to add to the desired passage.
- Select "Add passage".
After selecting "Add passage" the following popup will appear:

Select "Link to Passage" for the additonal question(s) you wish to add, and click "Proceed". The additional questions will now be linked to the existing passage.
IMPORTANT :
1. Once the Passage has already been created, the only way to add additional questions is from within the Passage Editor, or by linking them in an assessment, with the desired questions, as a District Administrator.
2. Questions can ONLY be linked to one passage.
3. Passages will not be saved if no questions have been linked to them.
Wicomico ELA Bridge Essay - Creation, Grading, and Student View
Creation of the Bridge assessments is very straight forward, and even may seem repetitive! If you follow these steps to understanding the process, you will find that you yourself can add similar types of assessments with ease and the grading process will be a piece of cake!
Bridge Assessments: Creation
The Bridge Assessment is an essay-based assessment that the students write based off of an assigned prompt. Grading is done using a two category rubric, and the total amount of points a student can receive is seven. Up to three scorers can be assigned to one student response, therefore the assessment must contain duplicate rubric categories to ensure each scorer has a separate place to assign the student a score.
To create the assessment, start with seven questions. The first six questions should be excluded, as they will be simply for scoring purposes only. Questions 1, 3, and 5 should be worth 4 points, as they represent the first rubric category. Questions 2, 4, and 6 should be worth 3 points, as they represent the second rubric category. The 7th question should not be excluded, as this represents the student's overall averaged score, and should be worth the full 7 points.
Answer Key View:

Question View:
Editing the scorer information and adding a question prompt should all be done within the Question View of the assessment editor. Each of the seven questions should be linked to the writing prompt by linking the prompt as a passage.

As you can see in the image above, the question text should be assigned to one of the three scorers (Scorer 1, Scorer 2, and Scorer 3) and should contain the part of the rubric that lives within that question (Ex. Question #1 says "Scorer 1: Comprehension and Written Expression", Question #2 says "Scorer 1: Knowledge of Language and Conventions"). The rest of the questions should be set up as follows:


**Remember, question 7 should be out of 7 points, and should be called "Overall Score"
Rubric View
Now that the question text is set up for the scorers, the Rubric text can be added to each question in the "Rubric View" of the assessment editor. Since there are only two rubric categories, the text will be repeated for each scorer. The rubric view will be set up to look like this:


Grade Conversion Table
Linking a Grade Conversion Table to the Bridge assessment is helpful for reporting. Since the Bridge is a rubric based assessment out of a possible 7 points, the GCT should be set up with grades from 00 - 07. These grades will reflect whether the student needs to re-take the assessment, or if they have passed. Please see the appropriate GCT below:

Now that the prompt, rubric, and GCT have been successfully set up, the assessment can be assigned.
Bridge Assessments: Grading
Once the student has successfully submit their essay response, the best place for users to grade is the Enter Student Response screen from the Teacher Dashboard. The TC View is the most proficient way to grade these types of essay-based assessments.

- Student Response: This section will show the student's essay response to the prompt as they typed it in online. This screen is interactive, and teachers can click inside of the student's response to add feedback.
- Question: This section is where the scorers can add a point grade for each section of the rubric, as well as any comments/feedback that may pertain to that specific rubric topic.
- Embedded Comments/Feedback: If a scorer would like to leave a comment embedded into the essay, this icon will allow them to do so. The scorer must simply highlight the word/sentence(s) that they would like the comment to be linked to and then select this icon. Once a comment is created, a comment icon will appear within the response. Additionally, the highlighted section will bold and italicize so the student can easily see where the embedded comments live.
- Scroll Bars: Two scroll bars now exist within the TC Screen. The first will allow scorers to scroll up and down the student's response without having the rubric categories move as well. The second allows the scorers to scroll up and down the rubric categories without losing their place within the response.
- Reponse Icon: This icon is especially helpful if there was more than one writing prompt in an assessment. If a scorer begins a new rubric category for a second writing prompt, clicking this icon will automatically scroll the left side of the screen to start at the beginning of the second response. This ensures that the scorer is using the correct rubric for the correct essay.
It is important to remember that the Bridge assessment has multiple scorers that are each assigned their own separate rubric categories for grading. The scores added for these categories are excluded within the assessment. Once each scorer has had the opportunity to grade, the average of each scorer's total should be put into the final question. This will be the score reflected on the reports

Individual Student Report
There are a few new features within the Individual Student Report that will allow teachers to not only see the student's score, but also their essay response, as well as any comments that were made.
When selecting the Individual Student Report, choose the following options:

The report will look like this:

The area in red shows the student's response, embedded comments, as well as the rubric text assigned. Please note that the report shows that the point values assigned were excluded for the student.
The area in green shows the student's final score in points, percentage, and the Grade from the GCT.
Student View
Now that you as a teacher/scorer are familiar with the way the Bridge assessment is set up and scored within eDoctrina, you may also wonder what the students will see when they login to take the assessment.
The students will start on their Progress Dashboard, as they normally would when taking an online assessment. Once the test has been assigned to them, they will select the "Start Test" button.

Once the student starts the exam, there are a few things worth noting so that they can be sure to properly submit their work without any trouble or confusion.

- Scroll or Page View: Students have the option to see the assessment in the Scroll View or Page View. The Scroll view is what is pictured above. Question 1 is the only question with content, while the remaining are simply for scoring purposes only. The students will see these questions, but will not be able to manipulate or add information to them. The Page View will only show one question per page, so question 1 for example would take up the entire screen and they would have to arrow right to view the remaining questions.
Page View:
- The "Modified" Bar: As students are typing/formatting their essay response, they must be sure that this modified bar finishes buffering before they select the "Submit" icon. You can tell the newly typed information is finished buffering when the blue bar is completely gone. As they are typing or working within the text field, this bar will fill up and be blue. Once they finish typing, the blue bar will slowly start to get smaller and eventually go away altogether (about 3 seconds). Once it disappears, all work has been saved and it is safe to finish the test.
- The Text Box: This text box is for the students to write or paste their essay. They are given a WYSIWYG editor to help with formatting.
- Additional Questions for Scoring: As explained above, when in the "Scroll" view, the students will see the questions that have been added to the assessment for scoring purposes only. They are unable to add any text or manipulate the questions in any way, but they will see them listed.
Once the student has finished with their work, selecting "Submit" will submit it to be scored.
01.H. User Profile Settings (user editor)
- Read Only: Enabling this security settings will remove editing and copying rights from all modules within eDoctrina. A user with read only access will only be able to view or print existing content.
- Behave coordinator: If a district subscribes to eDoctrina's BeHAVE module, teacher profile types will have access (within the BeHAVE section of the sections menu to view the students list, access the BeHAVE store, and access the Scan Certificate option. Enabling this security setting, it provides the teacher user with the ability to manage purchases and generate BeHAVE Reports. This setting does not apply to School Admin and District Admin profile types as they already have access to manage purchases and generate BeHAVE Reports by default.
- Can Merge Users: Due to the irreversible nature of this feature, we are asking that anyone wishing to merge users receive a few minutes of training in order to ensure proper use of this function. This security setting, if enabled, will allow the indicated user to merge user accounts in the case that there are duplicates. The ability to merge users can be provided to any user specifically, but it is recommended to receive a quick training so the user doing this is well informed of the database implications.
- Observer: Enabling this security setting provides the user access to the OBSeRVE Dashboard to perform staff evaluations. This is a basic setting for School Admin and District Admin base user types. This security settings does not provide teachers with access to the OBSeRVE Dashboard. If there are district specific scenarios where teachers will need access to the OBSeRVE Dashboard, please contact the eDoctrina Help Desk and we can guide you through setting up specific permission sets as an alternative solution.
- Do not update from imports: Enabling this security settings will ensure that all fields within the specified user account will not be updated in the automated import process.
- Data Specialist: This security setting does not apply to School Admin or District Admin base user types. If the specified user is a teacher base profile type, enabling this security setting will provide them access to all courses, classes, and students within the school that they are linked to. This allows them to pull data reports, print answer sheets, and access class rosters for the entire school. If a teacher needs to have access to the entire set of district data, it is recommended to have a linked teacher profile added for them in each of the schools within the district.
- School Curriculum Specialist: This security setting does not apply to School Admin or District Admin base user types. If the specified user is a teacher base user type, enabling this security setting will provide them access to all course and classes within the school that they are linked to within the Unit Plan and Lesson Plan modules. This will provide them access to view and edit all units and lessons that have courses linked to them.
- District Curriculum Specialist: This security setting does not apply to District Admin base user types because, by default, they have access to all courses and classes. For School Admin base user types, enabling this security setting will provide them access to all courses and classes within the district. A School Admin, by default, will only have access to courses and classes within their school and will only be able to edit Units and Lessons within the school they are linked to. For Teacher base user types, this security setting will provide the specified user with access to all courses and classes within the Unit Plan and Lesson Plan modules. This security setting also provides access to the specified user to add, edit, and modify standards within the district standard set as well as add endurance, readiness, leverage, high stakes, and power standard indications for all linked standards sets.
Permission Sets
The Permissions Sets is a list of available user roles that can be customized within any district. These serve as overrides to existing User Group settings. These permissions sets work in combination with each other or as standalone features. It should be noted that each one provides specific access to certain features and certain combinations have overlaps that tend to override one another.
These permission sets can be configured upon request, but eDoctrina already has a few that are already available:
- Help Editor: This permission set does not apply to District Admin base user types because they will already have access to make additions to the Help Menu. By default, School Admin and Teacher base user types do not have access to add/edit/remove content from the eDoctrina Help Menu. By enabling this permission set, it provide the specified user with access to the Help Topics Homepage (located in SETTINGS==>User Guides & Help Topics) so they can make district specific additions to the help menu. To find out more about how to add content to the eDoctrina Help Menu, please visit our help guide on Adding District Specific Help Guides.
- Evaluator: This permission set does not apply to District Admin base user types. By enabling this permission, it will upgrade any School Admin or Teacher base user type to be able to view all Courses and Classes within their school so they can review student learning objectives.
- Observer: This permission set provides the user with access to the OBSeRVE Dashboard so they can provide staff observations. Please note that this permission is only needed if the district is configured to ignore the "Observer" checkbox under the Security Settings.
- Teacher Observer(L): This permission set only applies to Teacher base user types. The essential purpose of this permission is to be used in combination with the "Observer" permission set as the goal would to be able to allow a teacher profile to enter the OBSeRVE Dashboard, but not have access to enter any observation form. Please do not enable this for School Admin and District Admin base user types.
- Observation Scheduler: This permission set is designed for any individual users to be able to change the observer that is linked to any observation upon scheduling. By design, scheduling an observation will link the signed in user to any observation. If the district, user type, or individual user is configured to be able to "Change Observer", they will need this permission enabled to be able to assign a specific user upon scheduling.
- Manager of student test modifications: This permission set does applies only to Teacher base user types. This permission set will provide the specified user with access to the Student Test Modifications screen and allow them to apply default Online Assessment Modifications based on subject to students if necessary.
Notifications
There are many email notifications that are able to be configured for each district. By default, all of the notifications will be sent to the user if an email is designed to be triggered. All users will have the ability to UNSUBSCRIBE from any emails by unchecking any one of these checkboxes.
Advanced Settings
- Flex User: Selecting the flex user checkbox will ensure that the specified user account will remain unchanged from the automated nightly import from the district's student information system. There are many different configuration settings for how the automated imports will be executed and these configuration settings will be ignored for any user who is marked as a Flex User.
- District Result E-mail: This option is only available for District Admin base user types. If this setting is enabled for a user, they will receive an email notification for all completed sets of scanned answer sheets.
- Ask for Password Reset: Enabling this setting will ask the user to choose a different password the next time that they successfully sign into eDoctrina. This is a token setting, which means once the password is reset, the option will go back to an unchecked status. This is a great tool to use when having to reset another users password.
- Must Sign All Observations: This setting is one that applies to the OBSeRVE module only when electronic signatures have been enabled. By enabling this checkbox for any user, it will require this user to review and sign all observations within the district in order to complete the observation.
Do not update on import
Depending on the settings of the automated nightly import, there are some occasions where an individual user would like to maintain a different User Type, Login, email address, or name within eDoctrina. Enabling any of these checkboxes will ensure that the selected field will not be modified in the automated import process.
Additional schools to provide observations
This section of the user profile is designed specifically for user types that are not District Admins. In example, the default for School Admins is that they will be able to provide observations for users that exist within the same school. If the School Admin observer will be providing observations in another school within the district, it will be necessary to add the school here so they can access the teachers in the respective building. If there is a scenario where an observer in one building will only be observing a handful of teachers in another school, it cold be a better idea to assign them as the teachers observer within the Users Homepage.
03.J. Adding Extra Credit Questions
There are times that an assessment should have extra credit questions, in which students will earn addtional points for answering the question correctly, but will not be penalized if they answer incorrectly. Users can add extra credit questions by completing the steps below:
- Create an assessment with questions or as an Answer Key Only. In this example there are 4 multiple Choice questions worth 1 point a piece and 1 Teacher Scored question that is going to be worth 1 point of extra credit. The assessment is set up to be 5 questions with each one being worth the correct value of points (in this case 1 point a piece):

- Select Extra Credit as the Special Scoring type for the question(s) that should be marked as such.

Please note that the scores reflect the Extra Credit given and do not deduct points for being incorrect.
Class Summary:

06.B.6 Standards Proficiency Report
The Standards Proficiency Report is a custom report districts can use to set up grade conversion tables and then see how students performed within those bands on selected standards for specific assessments.
Before this report can be run, Standards Proficiency tables must be set up by any user.
Setting up Proficiency Tables (Admin)
A Proficiency Table is set up just like a district-wide Grade Conversion Table.
From the homepage, nagivate to: Settings --> Database Setup --> Assessment --> Grade Table

This will bring you to the Grade Tables screen, where you can create your own district-wide Grade Conversion Tables. To insert something new, select the yellow Create button:

When creating a new table, it is important that you are selecting the correct type. In this case, the type should be Standard Proficiency. You can title the table and add the appropriate grades on this screen as well.

To learn more about setting up Grade Conversion Tables, Click Here
Running the Report
When it's time to run the report, you must first navigate to the Teacher Dashboard and select the appropriate filters.

- Select the students you want to run the report for by filtering the appropriate Course and Class(es)
- Select the Assessment(s) that you want to view the data for. Remember, you can select more than one assessment to view in this report!
- At the bottom of the reports list, you will find the Standards Proficiency Report button.
Selecting to run this report will prompt an additional screen to pop-up. It is here that you can customize the report to view the data you are looking for.

- General Options - This is where users can select which Proficiency Table they would like to view their data in. Remember, these tables must be previously set up by administrators before they can be added to the drop-down list. Users can also opt to include excluded question data, or exclude the Totals table on the report.
- Data Format - Users can decide what format they would like to see on the report - options are to view the data as a percent only, as a total count only, or both.
- Standards - This report was created for educators to view how students performed on specific standards within previously-determined performance bands based on data from chosen assessments. This section is where users can select the specific standards they want to view data for. The standards selected should be ones that were linked within all of the assessments chosen on the Dashboard.
Analyzing the Report
The data will be presented in a table. The chosen assessments will be displayed in rows with a performance band assigned to each pre-selected standard. The final Total row is the average percent/count of students that fell in that band for that standard. The Total Column is the average of all standards for that assessment, by performance band.

Note: Clicking on the percent/count within a band will show you a list of students that fell within the band for that specific standard
03.D.8. Using the Safe Exam Browser
This Help Guide is for the use of the "Lock students to test Via Safe Exam Browser" option found within the "Online Settings" tab of a previously created assessment. This option is available if students are testing on a Windows computer. If students are using Chromebooks, the Chrome Locker extension is available in the Chrome Web Store and can be enabled in district settings.

The Safe Exam Browser option appears ONLY if your District has requested enabling the Safe Exam Browser. This is a district option as students will be prompted to download the Safe Exam Browser when accessing the assessment. Student downloads are often restricted at a district level, so utilizing this option could require coordination with your district IT department.
When this option is enabled, the student attempting to access the assessment will be prompted to install the Safe Exam Browser utility on their device and download a file to access the assessment. Once the assessment is accessed, the Safe Exam Browser will launch in full-screen mode, and the student will not be able to navigate away from the assessment or utilize any other functions of the workstation they are utilizing, until the browser is closed. The student device should unlock as soon as student submits the assessment however if the device stays locked, teachers can use the "Quit Password to help unlock the device manually. A unique "Quit Password" is generated for each test and is found directly below the "Lock students to test" option.

If the Safe Exam Browser is not Installed on the Student's Workstation
When a student attempts to access an assessment with the "Open in Safe Exam Browser ONLY" option enabled, they will be prompted to download the Safe Exam Browser (this step is optional if the browser is already installed):


The link will direct the user to an external website to download the appropriate version of the Safe Exam Browser.


After Installation of the Safe Exam Browser
After the Safe Exam Browser has been installed the user will need to download the Access File for the assessment and open it. This can be acheived by following the steps below:

- 1.) Click the hyperlink to download the Access File. The file should automatically be opened and start the assessment.
- 2.) If the Access File does not open automatically, locate the Access File and open it.
Taking the Test
- The Safe Exam Browser does not allow access to any other application(s) while it is running. As such, screenshots are not provided for this portion of the guide.
- The Safe Exam Browser allows the user to complete an assessment as usual, however it is of note to avoid using the refresh button or exit buttons found in the lower right-hand corner of the screen unless the user has completed the assessment.
If any issues are encountered while utilizing the Safe Exam Browser you are strongly encouraged to e-mail the eDoctrina Help Desk Team at [email protected].
04.B.4. Cover Page Answer Sheet
The Cover Page Answer Sheet was created so that written student work could be scanned and housed in eDoctrina for teachers to reference. Typically a user is printing this Cover Page answer sheet in addition to an answer sheet where student answers are recorded.
To print the cover page, you go through the same steps from the Teacher Dashboard that you would execute to print bubble sheets. You can find the help guide on how to print answer sheets here.
Step 1: Choose your students.
Step 2: Choose your assessment(s)
Step 3: Click the PRINT button
Once you have selected the students and assessment(s) on the Dashboard that you want to print sheets for and have selected the "PRINT" icon, you will have the option to print multiple different types of answer sheets.

Scroll the options to the right, and you will see the Cover Page Answer Sheet type. Selecting the "Customize" option will allow you to add lines to the cover page, which is very useful if students are using this page to write out short answer questions.

The cover page printed with lines will look like this:
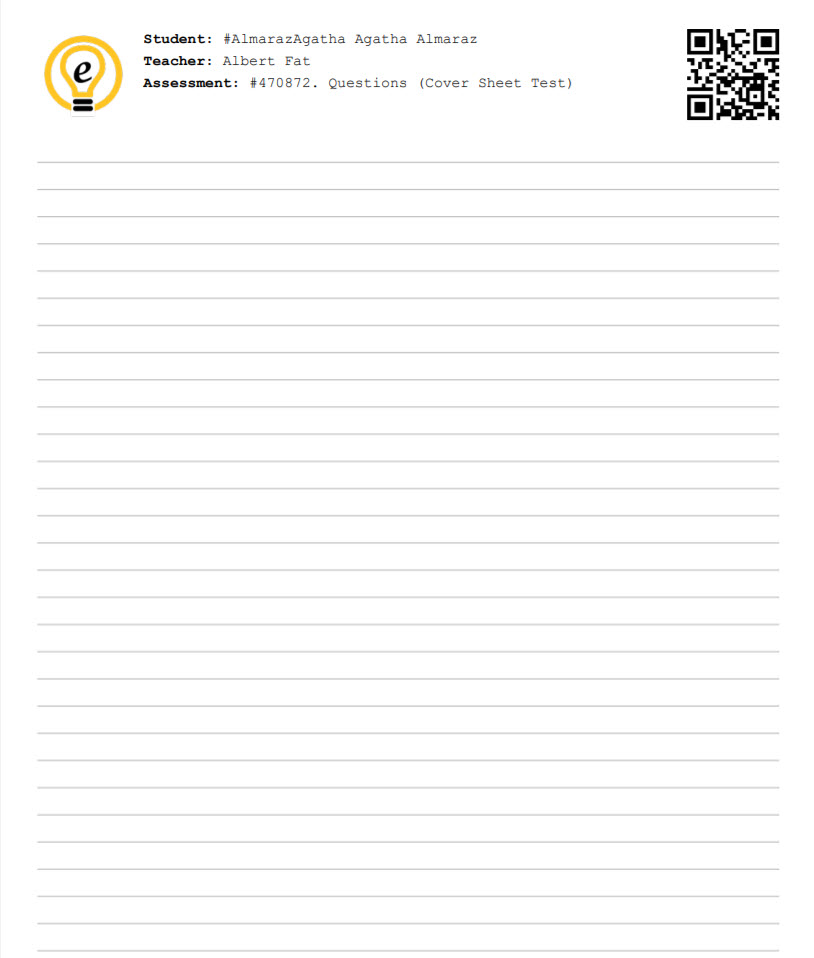
If users decide to print the coverage page without lines for students to use as scrap paper, or to show work, it will look like this:

Students can write/show work on these cover sheets and they get scanned using the same process as scanning traditional answer sheets using the copy machine. Please note that these pages CANNOT be scanned with a smartphone or webcamera.
For more information on traditional copy machine scanning, click here
Where to Find the Cover Sheet
Once the cover sheets are scanned, they can be viewed by users in two places from the Teacher Dashboard - the "ENTER Student Responses" screen and the "CHECK Student Answers" screen.

ENTER Student Responses
When this screen is opened, if any data has been scanned for the student selected, a small camera icon will appear next to the name of the assessment. Clicking that camera icon will open a separate window where the scanned answer sheet can be viewed:

CHECK Student Answers
When the CHECK screen is opened, camera icons will appear next to the name of the students that data was scanned for. Selecting this icon will open up the image of the scanned answer sheet to the right of the student's responses.

Important- Cover sheets do NOT automatically score questions so data will not be loaded into eDoctrina for this type of answer sheet. Scores for student work will still need to be recorded on a traditional answer sheet and/or entered manually be the teacher. Cover pages were created as a way for students to show work for an assessment and have it saved in the system for teachers to reference and utilize while grading.
eDoctrina Copy Machine Scanning Process for Liverpool CSD
Scanning traditional answer sheets to eDoctrina from a copy machine is a simple, two- step process.
- Place your answer sheets in the copy tray and then select Workflow:

2. Then select eDoctrina and scan:

03.D.6 Online Test Assignments Screen
Once an assessment has been assigned to students, either automatically or from the Teacher Dashboard, users can use the "Online Test Assignments" screen to view and edit all of the assignments and assignment details that were made for their students.
From the homepage, select the Assessments drop-down and choose "Online Test Assignments"

This will display the online assignments page. This page exists to show users any assignments that may already exists for an assessment and a set group of students.
The filters on this screen are very similar to those on the Teacher Dashboard. Users will first use the top row of filters to select their course(s) and class(es) in order to find the students they want to review assignments for, and the bottom row to select the assessment.

Once the appropriate filters have been selected, the student names will display below, as well as information pertaining to their test assignment.

For each student, the following information will be displayed:

- Assessment: The name and ID number of the assigned assessment.
- Student: The name of the student.
- Status: The status column will show whether the student has started taking the assessment. If they have, their progress will be displayed. If they have not started yet, the status bar will read 0%.
- Last Active: The Last Active column will show the date and time, along with how many days have passed, since the student last opened this assessment.
- Checkbox: The checkbox option exists to help users when they want to mass-update assignment settings. The students can be selected using these check-boxes (the top check-box will select all students listed), and then the icons at the top of the column in section 8 can be used to mass-update each setting.
-
Edit: Selecting the edit pencil allows the user to choose the testing window dates and whether or not the student can submit the assignment after the testing window closes. Selecting the edit pencil will open the following screen:

The Test Options tab contains additional assignment settings that can be updated for each individual student.
- Questions: If a student has been assigned specific set of questions (example, questions 1-10 out of 20 total questions), the question numbers that they have been assigned will appear in this column. If students were assigned the entire test, the column will read "All", indicating they have been assigned all questions.
- Window(s): The Window column will show the user any testing windows that have already been setup for this student (testing window includes the date, start time, and end time of the assignment window). There can be one window, or multiple windows depending on how many assignments have already been set up for students.
- Preview: The Preview button allows a user to view the test from a student viewpoint.
- Online Settings: These are the top 7 online modifications for students, which is why users have easy access to them, so that updates can be made right from this screen! Blue letters indicate the default setting for the test based on what is set up in the assessment editor, while orange letters indicate a modification that was made for that student upon assigning. In the screenshot above, when Agatha was assigned this assessment, the user switched her default "N" for Text-to-speech, a "Y", allowing this access. These icons can be manipulated from this screen, and the assessment will update for students automatically.
- Type: The Type column shows whether an assessment was assigned traditionally, or manually from the teacher dashboard, or if it was auto-assigned from the assessment editor. If an administrator sets an assessment up to be auto-assigned to specific courses, this column will read "Auto".
- Assigned By: The Assigned By column displays the user who created this Online Test Assignment.
EXAMPLE

- Student, Rowan Acosta, has been assigned assessment #1231686.
- She has started the assessment and completed 98%.
- She last accessed the assessment on April 12, 2022, at 3:50 pm, which was 10 days ago.
- She was assigned questions #1-5 and 15-20.
- This assessment is available to the student from April 19th at 11:10 am until June 30th at 5:00 pm.
- When her teacher assigned these questions, she gave Rowan audio as a modification.
- This assignment was set up traditionally (or manually from the Teacher Dashboard).
03.D.7 How to create Math CBT Assessments in eDoctrina
There are a variety of features in the eDoctrina Assessment Editor that support building online assessments to mirror New York and other state Computer Based Testing (CBT) assessments.
Grade Specific Equation Editors
The newest and most relevant features are the grade-specific equation editors which can be attached to any question through the Online Tools button.

Equation editors for grades 3-4, 5-6, and 7-8 as well as other online assessment tools are available.

Here is an example of the Gr. 5-6 Equation Editor from the student view:

The drawing feature within the grade-specific equation editor includes the option for students to attached "drawings" to their work:
This drawing feature has been designed to allow students to add up to 5 separate drawings. After the 5th drawing has been added, the drawing option will be greyed out so it cannot be selected.

Online Tools
There is also a sketchpad tool located in this drop down menu that users can insert an image into. Students taking an online assessment will be able to draw on the image.
Sketchpad images (and other short student responses) will be saved and accessible to grade on the Teacher Completed test(s) (GRADE button on the Teacher Dashboard) and Answer entry/verification screens (CHECK button on the Teacher Dashboard) in the following locations:
- GRADE - Teacher completed test(s)

- CHECK - Answer entry/verification


Special Question Types
Some CBT questions require multiple text boxes. For example, a question might prompt for a numerical answer combined with a field to show student work. This can be set up using the question type Teacher Scored or Fill in the Blank:

Selecting Fill in the Blank will allow the system to autograde numeric and one or two word responses (if acceptable answers have been recorded). Student explanations should still be graded by a teacher. The user can select Answer Tool from the WYSIWYG editor, in the following location, to create an input box. Place the cursor at the desired location and select Input from the drop down Answer Tool menu.

A Teacher Scored question type can be used if the intention is to manually grade student responses for similar question formats. See below for an example of this style of question:

Either of these options will result in a question that looks like the following for a student taking an online assessment (if the Equation Editor has also been added to the question, using Online Tools):

The following text box short cuts will need to be entered manually into the question text field for multiple choice question types:
- [[choices]] - to be used with multiple choice questions only, places answer choices in a drop down menu
- [[choices_radio]] - to be used with multiple choice questions only, places answer chouices in a horizontal row with radio buttons instead of letter/number
- [[multiple_choices]] - to be used with multiple choice questions with a multiple correct answers scoring type only, place answer choices in a veritcal column with checkboxes


Want more information on building online questions for students? Click on this additional help guide.
Explaining Module Access
(available to eDoctrina team members only)
Module Access for districts can vary from year to year and they control what modules/tools that users in the specified district have access to. The default is the current year. Configuring the module access permissions is essential to providing the district with the tools they need or have paid for. These are the highest levels of user permission controls and no district level or school level user can have access to any of these modules without the district or school being subscribed to them.
District Level module access
-
FASTeST: Not applicable anymore, please refer to Answer Sheet Types in District Settings.
-
PROGReSS: Not applicable anymore. Students have access to PROGReSS solely by having user accounts.
-
SLO: Enables access to SLO related modules (student-learning-objectives, slo-summary-sheet-1v2)
-
OBSeRVE: Enables access to SLO related modules (observe-dashboard, staff-evaluation-rating-report-3012d, observe-final-ratings-import, edoc-teacher-expectations, observation-rubrics).
-
RePORT: Enabling this allows assessments to be configured to be included on eDoctrina’s Report Cards allowing the end-user to link an assessment to a specific marking period with a specific weight. This permission does not turn off the pages related to Report Cards.
-
Examgen: Not applicable anymore, please refer to Linked Set in District Settings.
-
CERTICA/NWEA: Not applicable anymore, please refer to Linked Set in District Settings.
-
WebCam: Not applicable, please refer to Answer Sheet Types in District Settings.
-
PBCS: Enables access to the Teacher Effectiveness System in the Planning menu (pbcs-model-assignments)
-
Automated SLO Assignment Tool: Enabling this provides access to the auto generate SLO module (auto-generate-slo). With this enabled, the district will not be able to create SLO's manually.
-
PBCS Settings: Enables access to the TE Data menu modules. (pbcs-models, pbcs-data-sources, pbcs-category, pbcs-award-amount, pbcs-category-effectiveness, pbcs-category-scores, pbcs-effective-index, pbcs-score-labels, pbcs-questions)
-
SOLe: Enables access to the tools necessary to offer a SOLe unit, such as the unit assignment button, and the progress monitoring button next the the Unit plans marked as “Student Unit”.
-
BeHAVE: Enables access to all BeHAVE related modules. (behavior-codes, behave, behave-store-setup, behave-scan, behave-store-orders, behave-report).
-
PD30: Enables the ability for district users to create their own PD30 modules. The menu option will still exist in the cases where a set or district would like to make their modules visible to other districts.
-
TIP: Enables access to staff improvement and support modules. (staff-improvement-plans, staff-support-plans)
-
Support Chat: Enables access to eDoctrina's support chat option where districts can directly message the eDoctrina Help Desk team (support-chat.html)
-
Readibank: Not applicable anymore, please refer to Linked Set in District Settings.
-
INSPECT: Not applicable anymore, please refer to Linked Set in District Settings.
-
Reasons for Ending: Enables access to the Reasons for Ending tool in general database setup allowing districts to manage these. (reason-for-ending).
-
Self Reported PD: Enables access to the self-reported PD module. (self-reported-pd).
-
TRAVeL: Enables access to all TRAVeL related modules. (travel-locations, travels).
District Level module access
General Settings
(NOTE: Options marked with * are for eDoctrina team members only).
-
Demographic Name 6 through 8: These fields allow districts to rename three of the student demographic fields. These fields can be imported via the students import using columns 14, 15, and 16 of the file, respectively.
-
State Reporting Code: For district that will be reporting their staff evaluation data using eDoctrina, this field should be populated with the district’s state reporting code (NY district would be the BEDS code). This number will display on the Staff Evaluation Rating Report (3012d) csv export.
-
Default Standard Set: Selecting an option from this pull-down will set a Default Standard Set for all users within the District. Select this option if a school is using one standard set predominantly. Users have the ability to modify their Default Standard Set within their Personal Settings.
-
Default Assessment Type*: Selection of the Assessment Type is a required field when creating an assessment. A selection here will automatically populate this field with the respective selection for all new assessments created.
-
Country*: This is a required field that should be selected upon initial setup of district.
State: This is a required field that should be selected upon initial setup of district.
-
Theme*: This determines the general look & feel of eDoctrina. The default selection is the black background.
-
Test Window*: This option exists to restrict teachers to a maximum assigned test window (measured in days). If teachers select a test window that is greater than the indicated selection here, they will produce an error message.
-
Help Desk Email*: Entering an email address here will direct all emails sent through eDoctrina to the entered email address. If this field is left blank, the default will be the destination email address ([email protected]).
-
Accounts Mode*:
- Standard(main account is good for all years where yearly account missing): user permissions are applicable to all years where the presence of a yearly account is missing.
- Standard + Imports
- Yearly (Main account is good for current year only)
Inactive Account Access Mode*:
- Access to the data related to inactive accounts is denied.
- Teacher level accounts can access data related to inactive accounts.
- Inactive accounts can access data.
-
Users linking concept*: This checkbox enables the ability for a District Admin to link users to eachother (enables the button on the Users Homepage - users.html). This is most likely used when there are many users within the district that are assigned to multiple schools. Linking allows users to jump from one account to another by selecting the account in the pull-down on the top-right where their name is displayed.
-
Persons concept*: Selecting this checkbox enables the ability to make multiple user accounts as the same person from the Users Homepage (users.html). Making two users the same person will give both users access to all course, classes, students, and related permissions to both user accounts.
-
Can Upload Lesson Files*:
-
Show All Classes*: Selecting this checkbox will provide access to all Classes within a selected Course. User will have access to perform tasks on the Teacher Dashboard for all classes linked a course that they currently teach when this feature is enabled. They will also have access to all classes relevant to the ones they currently teach on the Classes Homepage as well.
-
Show all students in FLEX class*: Enabling this checkbox will display all students in the district in the Classes page for classes that are marked as FLeX. If unselected, teachers who are running FLeX classes will only have access to students that are enrolled in their current classes. This feature was originally designed for CSAT as they would allow FLeX class teachers to add/drop students from their class as they need to.
-
Is Set*: Make the created district a Standard Set. A "Set" can be assigned to a district so they can utilize the standards that are included within. A standard set needs to be set up as a District because they need to be managed as a District.
-
Is Active*: Most districts and sets will be set to be "Active". An "Active" district or set will be displayed is all pull-down menus where the District/Set is selected. This checkbox will most likely be unselected to make an older standard set inactive to remove the ability for users to select it from the pull-down options. This can also be considered the main switch to make an ex-partner unable to access eDoctrina.
-
Is Visible*: Selecting this checkbox will make the district/set visible in any pull-down menu labeled as District/Set. This includes the log in screen.
-
Use Student UID Prefix*: This is a modification to the import logic for students that was put in place for students with similar UID's in separate schools. Enabling this feature will include the school ID# before the student UID to ensure this has a distinguishable difference in the import logic. So if District Setting for Use Student UID Prefix = Yes And School A has uid_prefix = 01 and School B has uid_prefix = 02 And import file has students School A, 92101 School A, 92102 School B, 92101 School B, 92102 Actual UID in eDoctrina will become: School A, 0192101 School A, 0192102 School B, 0292101 School B, 0292102
-
Multilingual UI*: Selecting this checkbox enables the ability for students to change the language of the main fields of their PROGReSS account.
-
Collaborative editing*: This is not an active tool for use.
-
TE Report Template: This option is applicable to the TE Report that is activated within TE Data Models configuration.
-
Default User*: There are many reasons to set a default user, but the primary reason is for copying content from one district to another as the default user will be assigned as the creator of the copied content.
-
Is secure items visible* (if checked - school admins will see questions with secure visibility status): Select this checkbox to allow School Admins to view "Secure" questions. If unselected, only District Admins will have access to "Secure" questions.
-
Teacher view secure results* (If checked - teacher will be able to select and view results for assessment with secure visibility status): Select this checkbox to allow teachers to have access to the Answer entry/verification screen. Leave this unchecked if "Secure" assessments should be private and viewed only by the Admins.
-
School Admin can create SIS*: Select this checkbox to allow school admins to create users, students, etc... If unselected, School Admins will not have the "INSERT" button for all tools located under SETTINGS==>STUDENT INFORMATION DATA
-
Allow submit*: (If checked, other district/sets will be able to submit a question/passage to this set): Selecting this checkbox will allow users in this District to submit content to a specific set. If unselected the button to "Submit to Set" will be unavailable.
-
PORTAL* (This setting will allow teachers to create PROGReSS users and reset their passwords on the student schedule screen): Select this checkbox to allow Teacher to create and link a user account for any student enrolled in their classes. If a user account is already created for a student, the option will be unavailable. This checkbox is usually selected for districts that allow teachers to reset passwords for students.
-
Default to not share assessments created by school level users*: If this checkbox is selected, all newly created assessments will have the "Do Not Share - Exclude From List" selected by default. For districts who predominantly want to keep individuals content to private to themselves.
Main subject on dashboard*:
- Main Subject Filter Primary: Selecting this option will place the main subject and subject filter on the Teacher Dashboard, but will place the MAIN SUBJECT filter first.
- Subject Filter Primary: Selecting this option will place the main subject and subject filter on the Teacher Dashboard, but will place the SUBJECT filter first.
- Disabled: This option will remove the main subject filter.
-
Allow Test Auto-Assign by Course*: The Test Auto-Assign is a District Admin ONLY tool that will allow District Admins to Auto-Assign Tests for selected test windows for all students that are enrolled in a specific Course. This tool is used for districts with many transient students as they may want to make a district assessment available for students to take without asking the teachers to assign a test window. If unselected, this tool will be unavailable.
-
Limit Assessments Based on Department Code*: Selecting this checkbox will only display assessments that have matching departments codes for a specific user.
-
Show Class Average on Student Dashboard: Enabling this option allows students to see the class average for a specific class if selected on their PROGReSS accounts as a row for “Overall Average” row will be added to their Assessment Results list.
-
Allow Safe Exam Browser*: Safe Exam Browser is a kiosk
mode enabled lockdown browser solution. Enabling this setting provides district users with the option to enable the safe exam browser for a specific assessment. For more information about safe exam browser, please visit their website here (https://www.safeexambrowser.org/news_en.html).
-
Accounts Mode*:
- Standard(main account is good for all years where yearly account missing): user permissions are applicable to all years where the presence of a yearly account is missing.
- Standard + Imports
- Yearly (Main account is good for current year only)
-
Inactive Account Access Mode*:
- Access to the data related to inactive accounts is denied.
- Teacher level accounts can access data related to inactive accounts.
- Inactive accounts can access data.
-
Main subject on dashboard*:
- Main Subject Filter Primary: Selecting this option will place the main subject and subject filter on the Teacher Dashboard, but will place the MAIN SUBJECT filter first.
- Subject Filter Primary: Selecting this option will place the main subject and subject filter on the Teacher Dashboard, but will place the SUBJECT filter first.
- Disabled: This option will remove the main subject filter.
03.D.9 Online Test Assignments: Assign vs. Reassign
After an online assessment has been taken by students, there are student responses and data linked. If you would like students to be able to access their test again, you will need to use the Reassign option from the Online Test Assigments pop-up.

If the testing window expires or students select "Submit Test" you will need to reassign in order to give them access to their online assessment. If you select to Assign again you will overwrite existing student data but you will receive the following warning message:

If you select proceed, data will be overwritten. If you select cancel you will be taken back to the assignments pop-up.
The allow re-open feature will let students re-open their online assessment as long as they have not selected to "Submit Test" and are within the assigned test window. See this help video for more information on how to use "Allow re-open."
This help video explains how to use the Online Test Assignments pop-up to assign online assessments to students and how to customize test assignments.
If students forgot to select "Submit Test," they will not see results online. This help video explains how to use the feature to manually post student results online.
Teacher Dashboard & Assessments Homepage Filters
Always use the following settings: When this checkbox is selected, the below selected filter options will be shown to district users. Options not selected will be available when the user selects "Show more filters". This is a great tool to simplify the filters!
Teacher Dashboard Filters
-
Students filters
-
School: If the logged in user has access to more than one school, they will have a school filter that allows them to choose which school they would like to select students from.
-
School Year: This filter determines the year of enrollment of the students. The default is the current year and will reference the course and classes that exist in the selected year allowing users to select different groups of students in the current year as well as past years.
-
Master Course:
-
Course: Courses in eDoctrina can be best described as the master schedule. Classes are linked to courses, which means that filtering for a course can help narrow down the list of classes or students for the task that needs to be performed.
-
Grade: The grade filter narrows down the student listing by the current grade that the student(s) are in. If reports are needed to be generated for prior years, please note that students will no longer be in the grade that they were in last year.
-
Semester Code:
-
Class: Filtering for class(es) allows users to identify all students that are enrolled in one or many classes. Some reports rely on selection of the class to generte an appropriate report.
-
Students: All of the filters selected apply to the list of students that display here in the Students filter. If a course/class has been selected, the students filter can be left alone as eDoctrina will understand that the action should be applied to all students in accordance with the selected filters. If a smaller subset is desired, double-click or click-and-drag to the right of this filter the desired students.
-
Show Value As:
-
Assessments filters
-
Test Bank: The test bank is in reference to the district or set that assessments are located. Any content creator by district users will be stored in the Test Bank labeled with the district name.
-
Main Subject: If enabled, the main subject is a filter that helps to group subject areas into one broader subject area. For example, Geometry and Algebra may be the subjects, while Math is the main subject.
-
Subject: This filter helps to narrow down the listing of assessments by the subject that they have been linked to.
-
Grade: This filter helps to narrow down the listing of assessments by the grade that they have been linked to.
-
Assessment Scope: This filter helps to identify assessments of different states. The default is to look for Active assessments, but sometimes there exists an Inactive assessment that is needed.
-
School Year: This filter helps to narrow down the listing of assessments by the year that they have been linked to. This is a different filter than the one above in the students filters.
-
Test Type: Test types are specific to each district as they can be customized to unique districts needs. This filter helps to narrow down the list of assessments in accordance with the test type that they are linked to.
-
Start & End Date: The date filters help to identify assessnt(s) according the the administration date that has been entered for the assessments. Just note that the administration date is a manual entry field and may not reflect the actual date of test administration.
-
Creator: The creator filter helps to identify assessments that were created by a specific user. The default is to list the signed in user as the top option, but one or many users can be selected here to narrow down the list.
-
Assessment: All of the filters selected apply to the list of assessments that display here in the Assessments filter. Please note that one or many assessments can be selected in this filter, but there are many actions that allow only one to be selected.
Assessment Page Filters
-
Main Subject: If enabled, the main subject is a filter that helps to group subject areas into one broader subject area. For example, Geometry and Algebra may be the subjects, while Math is the main subject.
-
Subject: This filter helps to narrow down the listing of assessments by the subject that they have been linked to.
-
Grade: : This filter helps to narrow down the listing of assessments by the grade that they have been linked to.
-
Scope: This filter helps to identify assessments of different states. The default is to look for Active assessments, but sometimes there exists an Inactive assessment that is needed.
-
School Year: This filter helps to narrow down the listing of assessments by the year that they have been linked to.
-
Test Type: Test types are specific to each district as they can be customized to unique districts needs. This filter helps to narrow down the list of assessments in accordance with the test type that they are linked to.
-
Start & End Date: : The date filters help to identify assessnt(s) according the the administration date that has been entered for the assessments. Just note that the administration date is a manual entry field and may not reflect the actual date of test administration.
-
Creator: The creator filter helps to identify assessments that were created by a specific user. The default is to list the signed in user as the top option, but one or many users can be selected here to narrow down the list.
- School: If the logged in user has access to more than one school, they will have a school filter that allows them to choose which school they would like to select students from.
- School Year: This filter determines the year of enrollment of the students. The default is the current year and will reference the course and classes that exist in the selected year allowing users to select different groups of students in the current year as well as past years.
- Master Course:
- Course: Courses in eDoctrina can be best described as the master schedule. Classes are linked to courses, which means that filtering for a course can help narrow down the list of classes or students for the task that needs to be performed.
- Grade: The grade filter narrows down the student listing by the current grade that the student(s) are in. If reports are needed to be generated for prior years, please note that students will no longer be in the grade that they were in last year.
- Semester Code:
- Class: Filtering for class(es) allows users to identify all students that are enrolled in one or many classes. Some reports rely on selection of the class to generte an appropriate report.
- Students: All of the filters selected apply to the list of students that display here in the Students filter. If a course/class has been selected, the students filter can be left alone as eDoctrina will understand that the action should be applied to all students in accordance with the selected filters. If a smaller subset is desired, double-click or click-and-drag to the right of this filter the desired students.
- Show Value As:
- Test Bank: The test bank is in reference to the district or set that assessments are located. Any content creator by district users will be stored in the Test Bank labeled with the district name.
- Main Subject: If enabled, the main subject is a filter that helps to group subject areas into one broader subject area. For example, Geometry and Algebra may be the subjects, while Math is the main subject.
- Subject: This filter helps to narrow down the listing of assessments by the subject that they have been linked to.
- Grade: This filter helps to narrow down the listing of assessments by the grade that they have been linked to.
- Assessment Scope: This filter helps to identify assessments of different states. The default is to look for Active assessments, but sometimes there exists an Inactive assessment that is needed.
- School Year: This filter helps to narrow down the listing of assessments by the year that they have been linked to. This is a different filter than the one above in the students filters.
- Test Type: Test types are specific to each district as they can be customized to unique districts needs. This filter helps to narrow down the list of assessments in accordance with the test type that they are linked to.
- Start & End Date: The date filters help to identify assessnt(s) according the the administration date that has been entered for the assessments. Just note that the administration date is a manual entry field and may not reflect the actual date of test administration.
- Creator: The creator filter helps to identify assessments that were created by a specific user. The default is to list the signed in user as the top option, but one or many users can be selected here to narrow down the list.
- Assessment: All of the filters selected apply to the list of assessments that display here in the Assessments filter. Please note that one or many assessments can be selected in this filter, but there are many actions that allow only one to be selected.
Discussion Board Configuration
Unit Discussion Board Comments Access - This configuration option allows a district to decide if and how they will use the discussion board within their Unit Plans.
Options
-
No Discussion Board: Disables discussion board within Unit editor.
-
Only creator and admins can view/edit: Discussion board will be enbaled, but access will be limited to the creator of the unit plan and any admin user within district.
-
All editors can view/edit: Discussion board will be enabled and will be available to all users who have access to the unit plan.
Unit Discussion Board Email Notifications: Enabling this setting will activate email notification that are sent to users when a discussion comment is made.
Lesson Discussion Board Comments Access - This configuration option allows a district to decide if and how they will use the discussion board within their Lesson Plans.
Options
-
No Discussion Board: Disables discussion board within Lesson editor.
-
Only creator and admins can view/edit: Discussion board will be enbaled, but access will be limited to the creator of the lesson plan and any admin user within district.
-
All editors can view/edit: Discussion board will be enabled and will be available to all users who have access to the lesson plan.
Lesson Discussion Board Email Notifications: Enabling this setting will activate email notification that are sent to users when a discussion comment is made.
Teachers can comment observations: If the discussion board is enabled for a specific rubric, teachers will not be able to comment is this configuration is not enabled.
Miscellaneous District Settings
(NOTE: Options marked with * are for eDoctrina team members only).
Unit Settings*
-
Unit Plan Dates Mandatory: Enabling this configuration setting will require the start and end dates of unit plans to be entered. This is a great feature to ensure that dates are entered in curriculum content as the Scope & Sequence and Curriculum Map reports are accurate. If this feature is enabled after Units have been created, the next time the Unit is saved will require a start and end date.
-
Unit Plan & Lesson Plan Templates: Many districts use a standard format for Unit/Lesson Plans that are created using eDoctrina within their district. If a standard format exists, it is a good practice and strongly recommended to create/configure a customized template before creating any Units or Lessons in eDoctrina. This will enforce consistency and allow for proper alignment when viewing a Curriculum Map or Scope & Sequence Report. This task can only be completed by a District Admin profile type.
Import Settings*
-
Do not send to teachers notification about scanned answer sheets: Most districts will choose to keep this checkbox unselected. If selected, teachers will not receive an email letting them know when their assessment data has been successfully processed when answer sheets are scanned using a eDoctrina configured copier/scanner.
Export Settings*
- Generate export dump for districts
- Upload to FTP using account
- Shared DB district id
Shared DB Settings*
- Is from shared DB
- Shared DB
- Shared DB district id
PBCS Settings*
-
Limit to 1 PBCS Model per Person: Enabling this setting restrict users so they can only be assigned a single TE model. If enabled, users will be shown a pop-up message that prompts them to keep or replace the existing model. This is a great setting to ensure users can only be assigned only a single teacher effectiveness report.
Media Kit
-
Logo for reports: Uploading an image, likely the district logo, here will modify the printable reports by placing the image in the top left of the printable. This applies to Unit Plans, Learning Plans, Lesson Plans, Curriculum Map PDF, Scope & Sequence Report, & Student Goals(only standard print out).
BeHAVE
-
Custom field label #1 through #6: Entering in a custom field in the BeHAVE section will add an extra text entry field for users to enter other information when creating a BeHAVE event. Entered data in these field will be available in the overall BeHAVE reports and can be searched upon to filter the report before exporting to a spreadsheet.
Sets Visibility*
If any of the following modules are selected below, all of the respective content linked to this district will be available for other districts to select as long as this district is linked to that district. For example, this setting is used for our eDoctrina FREE Items set. This set is linked to all districts and we offer both assessments and questions to our partnering districts. If this set is linked to a district, the set will become an option in the district/set pull-down menu in the selected module homepages (and related screens). This option also present opportunities from schools to share content and work towards a more global professional learning community.
- Units
- Lessons
- Assessments
- Questions
- Standards
- PD30 Modules
Linked Sets, Districts, Subjects, & Grades*
-
Sets/Districts: A set is usually a how eDoctrina will link a third party test banks, question banks, or learning standard sets so district users can have access to this content within eDoctrina. If the conten is available in eDoctrina format, it can be linked and made available to this district. Some examples of question banks that eDoctrina offers is INSPECT and Certica. The only difference between a set and a district is that districts have an active user-base while sets only need to be monitored. It is also possible to link a set, but restrict specific grade levels or subject areas from utilizing the linked set by clicking the edit pencil next to the set and indicating which constraints to place on the set.
-
Subjects/Grades: Linking subjects and grades is essential for categorization of content created in eDoctrina as Units, Lessons, Assessments, Goals, etc... are all linked to both subjects and grades. These can certainly be customized, but one should hold data categorization and end-user utility when adding or removing grade levels or subjects from the eDoctrina interface. While linked, users will be able to filter for subject/grade and it is important to stay consistent and group your content with intent. Student Login Badges can be enabled per grade by selecting the checkbox to the right. Login badges are QR code ID badges that can be printed for students so they can login at studentlogin.edoctrina.org.
Notes
A place where log notes can be input by eDoctrina and District users to log any configuration changes.
Student Learning Objective Settings
The configuration options found here are district-wide permissions that all users will follow in regards to the SLO module. There exist many other configuration options that are related to specific types of SLOs, the general lifecycle of a standard SLO(workflow states), and different goal setting models that can be designed to adapt to district needs.
SLO Settings
-
Teacher Can Exclude Questions from SLO's: If an assessment is linked to an SLO, this gives teacher the option to exclude certain questions when calculating student scores. If enabled, teachers will be provided a button that, when clicked, will give them a pop-up where they can indicate which questions should be excluded.
-
Teacher Can Exclude Students from SLO's: By default, admin base user types will have the option to exclude specific students from the SLO student population. Enabling this option will allow teacher user types to exclude students from an SLO population as well.
-
Teacher Can Delete Students from SLO: By default admin base user types will be able to delete/remove any student from an SLO student population. If enabled, this option will also provide teachers the option to delete/remove students from an SLO population.
-
Round up SLO Evidence Result: This will round up an evidence score with a tenth place value of .5 or higher to the next whole number. For example, if the target was 65%, and the student scored 64.6%, the student would have met the target.
-
Show Goal Button: Enabling this option will provide the option to examine any students goals or create new student goals by providing a button next to each student in the SLO population.
-
Show RTI Report Button: Enabling this option will provide district users with the ability to quickly generate a subject specific RTI Progress Monitoring report for a specific student from within the SLO.
-
% Making Goal Based on Target %: Enabling this option changes the logic of how overall attainment scores are calculated. This option will use the entered % Goal (default is 100%) setting in the SLO for the HEDI table look up. For example, if % Goal was set at 50%, and 20% of students met their target, then 40% would be used in the HEDI table lookup (20/50 = 40%).
- Use non-rounded rating
-
Local SLO: Weight scores before final rating: If these options are not selected, eDoctrina's default approach is to first refer to the HEDI score in each SLO, then weight it by the number of students attached to the SLO. If either of these options are selected, eDoctrina will first count the number of students meeting the target across SLOs, then refer to the HEDI table once for conversion.
-
State SLO: Weight scores before final rating: Same logic as above.
-
Mixed Weighting: Works in correlation with Group SLOs. Enabling this option allows group SLO to comprise a certain weight of the SLOs to which its linked.
-
Skip inactive students when calculating SLO: If a student becomes inactive after s/he has been added to an SLO, this will exclude such a student's data from calculation. Note that unenrolled and inactivated students will display as a different color within the SLO student section
-
Allow Copy Scores: Enabling this feature provides the end user with the ability to copy baseline, target, or final scores from another existing SLO within the same course. There will be a copy button in the header of the columns to execute this action prompting a pop-up box that asks to filter which course to find the appropriate SLOs. If there exists more than one, the end-user can select the corresponding radio button for the SLO scores that they wish to copy.
-
Auto save SLO: Enabling this option will enable the auto-save feature within the SLO editor so changes are saved automatically. If unselected, the save action will only take place if the end-user selects Save or Save and Close.
-
Skip unenrolled students when calculating SLO: If a student becomes unenrolled from a class after s/he has been added to an SLO, this will exclude such a student's data from calculation. Note that unenrolled and inactivated students will display as a different color within the SLO student section
-
Allow teachers to discuss SLO: Enabling this option will add a discussion board to the bottom of the SLO editor for Teachers base user types.
-
Send new discussion posts per mail: If this option is enabled, email notifications will be sent to the teacher and the administrator when a comment is posted.
-
Include Start/End in printed SLO: If this option selected, the printed SLO will include the ranges for each value on the HEDI table.
-
Hide Baseline Score Column in SLO Report: If this option is selected, the baseline scores will not print with the SLO.
-
Show whole discussion thread in SLO report: I this option is selected, the discussion board contents will print with the SLO.
-
Show % DEM: This setting will show the percentage of students in the SLO with a demographic designation or flag. This works together with the "Show DEM button in SLO" setting described below.
-
Show bonus points: This provides administrators with a place in the SLO to award bonus points if desired. Bonus points will be added to the attainment table score. For example, the calculated attainment score may be 15. If bonus points of 2 is entered, the score will be updated to 17.
-
Use universal courses concept: Enabling this option changes the SLO editor to reference the Master Course instead of Courses. This is a good option for large districts with many different course variations.
-
Teacher can change score combine method: This allows teachers to decide how multiple baseline or evidence assessments will be calculated to produce one score. They can select from percent average, points average, highest score, or lowest score.
-
Auto-assign TE model on SLO Signature: Enabling this option will make the TE System more manageable if and only if electronic signatures are enabled for SLOs within the district. If enabled, the selected model in this section will be linked to the teacher as soon as they apply their electronic signature.
-
Show DEM button in SLO: Selecting this will show demographic information next to students' names in the SLO screen. In the "Categories to include" section below, districts can determine which demographic information to show.
-
Combine tests score for multiple tests in SLO: This is where the default score combine method can be selected in the case where two or more assessments are linked as a Baseline or Evidence assessment. If teachers cannot change the score combine method, this is an important distinction as it is possible to choose Points Average, Percent Average, Highest Score, or Lowest Score.
-
APPR Report Number of Decimals: This indication determines the number of decimal placed that the weighted average will be rounded to before the weights are added to arrive at the final score. Modifying this value can result in modifications of calculated SLO scores because of rounding logic. If this is modified, the district should verify calculated scores before reporting to state.
-
APPR Report Sum Method: This indication determines how the percentage calculation for the SLO Summary Report will be determined. There exists options to "Carry rounded values through", "Truncate rounded values", and to "Round Display Only". This is also an important distinction in how multiple SLOs for a single teacher will be combined as each option has a different effect on a teacher's overall SLO score.
-
Auto Assign Model: If the "Auto Assign TE model on SLO signature" option is enabled, the selected TE model here will be linked to each district useer that applies their electronic signature.
SLO Settings / Categories to include in DEM Button
In combination with configuration option above to "Show DEM button in SLO", selection of the demographic fields here will determine when the DEM button will display next to a student's name in the SLO population. It is important to configure these in accordance with the demographic fields that are used or focused on within your district. For example, if you only want to highlight students with IEP's, then you would only select the IEP checkbox here.
SLO Instructions
It is possible to configure SLO Instructions in the key fields of the district SLO. Choosing
Instructions in the pull-down will load an SLO with pre-populated "ghost" text. This option is mostly used to provide instructions to the end-user before they begin typing because the bature of the "ghost" text is that it will disappear after the first edit is made. "Ghost" text does not print. The other option that can be selected in configuration is Default Values, which is actual text that will load into each SLO when created. This is used mostly to standardize some of the fields within the SLO to encourage consistency.
Assessment Editor
eDoctrina's Assessment Editor provides the assessment creator with many useful tools to help educators configure their assessments for the optimal test taking experience. This guide includes a basic description of the tools. If you want to learn more, click on the links to get more information.
Navigation
-
Print:
The Print Test button will generate a preview of the assessment, which can then be converted to a PDF and printed.
-
Preview Online:
The Preview online button allows the user to generate a basic view of how the assessment will look from a student's point of view in their PROGReSS accounts. It is a good practice to preview the assessment before assigning it to students online so any formatting mistakes can be addressed before the date of test administration.
-
Share/Embed:
This tool provides a hyperlink for easy sharing and a way to embed a button in a third party software so students can easily access an assessment. This is a great resource for sending so student an assessment link to direct them to a currently assigned assessment or embedding assessment access within another electronic resource.
-
Save:
Click Save to update the assessment with the most recent changes and stay on the same webpage.
-
Save & Close:
Click Save & Close to update the assessment with the most recent changes and close the current browsing window.
-
Cancel & Close:
Click Cancel & Close to ignore the most recent changes and close the current browsing window. Please note that some features of the assessment editor save automatically and this button applies to features that are directly related to the assessment. Changes within questions, proficiency tables, and attachments are saved separately.
-
Questions Bank:
The Question Bank is a great tool for users to add existing questions to an assessment. Many districts subscribe to other third party question banks and this is where it is possible to grab those questions and include them in any assessment. For more information on how to use this tool, please view our Question Bank help guide.
-
Assessment Editor formats:

-
Answer Key:
The answer key view provides the most basic information about the questions within the assessment and presents the questions in a very manageable tile format. If the goal is to solely create printable answer sheets for an assessment, this view is optimal. If assessment data does not exist for the assessment, this is probably the best way to rearrange the question order.
-
Questions:
The questions view is the most frequently used view of the assessment editor because it offers all of the availble tools and configuration options. This view is used to create your own questions and design an amazing assessment.
-
Rubric
Assessments can be configured as a rubric within eDoctrina. In most cases in rubric design, a description needs to be entered for each possible point value that can be earned for each question. Rubric categories must be created as unique teacher scored questions and the Rubric view is the best way to configure the best rubric possible.
-
List:
The list view displays a few more attributes about each of the questions in an organized list format. This view is great for making quick changes and for seeing the details of the question metadata so it is possible to put more thought into the assessment design.
The Print Test button will generate a preview of the assessment, which can then be converted to a PDF and printed.
The Preview online button allows the user to generate a basic view of how the assessment will look from a student's point of view in their PROGReSS accounts. It is a good practice to preview the assessment before assigning it to students online so any formatting mistakes can be addressed before the date of test administration.
This tool provides a hyperlink for easy sharing and a way to embed a button in a third party software so students can easily access an assessment. This is a great resource for sending so student an assessment link to direct them to a currently assigned assessment or embedding assessment access within another electronic resource.
Click Save to update the assessment with the most recent changes and stay on the same webpage.
Click Save & Close to update the assessment with the most recent changes and close the current browsing window.
The Question Bank is a great tool for users to add existing questions to an assessment. Many districts subscribe to other third party question banks and this is where it is possible to grab those questions and include them in any assessment. For more information on how to use this tool, please view our Question Bank help guide.
Assessment Editor formats:
-
Answer Key:
The answer key view provides the most basic information about the questions within the assessment and presents the questions in a very manageable tile format. If the goal is to solely create printable answer sheets for an assessment, this view is optimal. If assessment data does not exist for the assessment, this is probably the best way to rearrange the question order. -
Questions:
The questions view is the most frequently used view of the assessment editor because it offers all of the availble tools and configuration options. This view is used to create your own questions and design an amazing assessment. -
Rubric
Assessments can be configured as a rubric within eDoctrina. In most cases in rubric design, a description needs to be entered for each possible point value that can be earned for each question. Rubric categories must be created as unique teacher scored questions and the Rubric view is the best way to configure the best rubric possible. -
List:
The list view displays a few more attributes about each of the questions in an organized list format. This view is great for making quick changes and for seeing the details of the question metadata so it is possible to put more thought into the assessment design.
General
-
Name:
The Name of the assessment will appear as the description of the assessment and can help to find the assessment at a future date. The Name will also display on the students' answer sheets, their PROGReSS accounts, and many other modules in eDoctrina.
-
School:
The school pull-down will be available to any user who has access to more than one school within the district. The school selection is important because only users linked to the same school will have access to the assessment. District Admin profiles will have the option to choose "--any--" school if they would like to make an assessment available across the entire district.
-
Administration Date:
The Administration Date should be populated with the date the test will be administered as there are many reports that can be generated with a date filter. If there exists more than one Administration Date, select the most appropriate date.
-
Year:
Selection of the appropriate year within an assessment is important so that the assessment can be easily found in the assessment database. If assessments are being offered year-after-year, it is recommended to copy the assessment so the assessment data is reported in the correct time period/year.
-
Grade:
Selection of the grade for an assessment is important to properly categorize assessments in regards to assessment data and being able to locate the assessment at a later date. One or many grades can be selected for an assessment.
-
Subject:
Selection of the subject for an assessment is important to properly categorize assessments in regards to assessment data and being able to locate the assessment at a later date. Only one subject can be selected for an assessment.
-
Type:
Selection of the type for an assessment is important to properly categorize assessments in regards to assessment data and being able to locate the assessment at a later date. one or many assessment types can be selected for an assessment. Assessment Types are customized to district preferences and can be very helpful for cateogorizing assessment data.
-
Visibility State:
The visibility state is the main access control for assessment visibility in eDoctrina. There exists three different visibility states: Secure, Invisible, and Visible. If the assessment is Visible, all users will be able to see the assessment throughout eDoctrina. If the assessment is Invisible, the assessment will be hidden from all teacher users on screens such as the assessments homepage and the teacher dashboard. If an assessment is secure, it usually mean that the assessment is invisible, but there are some conditions that are dependent on district preferences that define the scope of what secure actually means.
-
Teacher Verification:
This option only shows to the user is the assessment is selected as a Secure assessment. If the assessment is secure, it is possible to control what teachers can do in regards to grading the assessment as you can open up the entire assessment for teacher grading or only questions on the assessment with Teacher Scored question type.
-
Workflow State:
Workflow states are custom for the district and can modify the visibility state as an assessment moves through the district-defined workflow states.
-
Active:
An assessment can be made inactive within eDoctrina, which is equivalent to "deleting" the assessment. If an assessment is made inactive, it will only be viewable if filtering to see inactive assessments. Inactive assessments will be hidden and any assessment data linked to it will also be hidden throughout eDoctrina.
-
Department Code(s):
-
Tags:
Enter Tags as an extra identifier for the assessment. Tags can be used when searching for an assessment. If you have a consistent naming convention that you use that is not the assessment title, this is a great place to add an extra identifier that can be searched upon to find the assessment.
-
Report Card Settings:
- Marking Period:
- Weight:
- Exclude from Report Card Average:
-
Linking Courses to Assessments:
Linking a course to an assessment is an essential component for categorizing assessments. The first advantage of linking courses is that it helps to find the assessment after it has been created. There are many screens where this is important, one of the most important being the student view because the an assessment will not show up for a specific class without a course linked to it. The course also defines some access rights as the eDoctrina collaborative environment uses the course indication to define a team. In example, if another teacher instructs the same course that is linked to an assessment and the "Team Can Edit" option is enabled, that user will have access to edit the assessment. There are also some other features directly linked to the course. In other words, although a course is not required to be linked to an assessment, it is a best practice to do so.
-
Linking Units to Assessments:
Linking a unit is a great option if and only if the time has been taken to create unit plans. Assessments can also be found by filtering for specific Unit Plans, but the real value is added when ensuring that standards are being consistently selected because linking a Unit will then modify the standards selector to only show the standards for linked unit plans (this includes any unwrapped/unpacked language).
The Name of the assessment will appear as the description of the assessment and can help to find the assessment at a future date. The Name will also display on the students' answer sheets, their PROGReSS accounts, and many other modules in eDoctrina.
The school pull-down will be available to any user who has access to more than one school within the district. The school selection is important because only users linked to the same school will have access to the assessment. District Admin profiles will have the option to choose "--any--" school if they would like to make an assessment available across the entire district.
The Administration Date should be populated with the date the test will be administered as there are many reports that can be generated with a date filter. If there exists more than one Administration Date, select the most appropriate date.
Selection of the appropriate year within an assessment is important so that the assessment can be easily found in the assessment database. If assessments are being offered year-after-year, it is recommended to copy the assessment so the assessment data is reported in the correct time period/year.
Selection of the grade for an assessment is important to properly categorize assessments in regards to assessment data and being able to locate the assessment at a later date. One or many grades can be selected for an assessment.
Selection of the subject for an assessment is important to properly categorize assessments in regards to assessment data and being able to locate the assessment at a later date. Only one subject can be selected for an assessment.
The visibility state is the main access control for assessment visibility in eDoctrina. There exists three different visibility states: Secure, Invisible, and Visible. If the assessment is Visible, all users will be able to see the assessment throughout eDoctrina. If the assessment is Invisible, the assessment will be hidden from all teacher users on screens such as the assessments homepage and the teacher dashboard. If an assessment is secure, it usually mean that the assessment is invisible, but there are some conditions that are dependent on district preferences that define the scope of what secure actually means.
This option only shows to the user is the assessment is selected as a Secure assessment. If the assessment is secure, it is possible to control what teachers can do in regards to grading the assessment as you can open up the entire assessment for teacher grading or only questions on the assessment with Teacher Scored question type.
Workflow states are custom for the district and can modify the visibility state as an assessment moves through the district-defined workflow states.
An assessment can be made inactive within eDoctrina, which is equivalent to "deleting" the assessment. If an assessment is made inactive, it will only be viewable if filtering to see inactive assessments. Inactive assessments will be hidden and any assessment data linked to it will also be hidden throughout eDoctrina.
Enter Tags as an extra identifier for the assessment. Tags can be used when searching for an assessment. If you have a consistent naming convention that you use that is not the assessment title, this is a great place to add an extra identifier that can be searched upon to find the assessment.
- Marking Period:
- Weight:
- Exclude from Report Card Average:
Linking a course to an assessment is an essential component for categorizing assessments. The first advantage of linking courses is that it helps to find the assessment after it has been created. There are many screens where this is important, one of the most important being the student view because the an assessment will not show up for a specific class without a course linked to it. The course also defines some access rights as the eDoctrina collaborative environment uses the course indication to define a team. In example, if another teacher instructs the same course that is linked to an assessment and the "Team Can Edit" option is enabled, that user will have access to edit the assessment. There are also some other features directly linked to the course. In other words, although a course is not required to be linked to an assessment, it is a best practice to do so.
Linking a unit is a great option if and only if the time has been taken to create unit plans. Assessments can also be found by filtering for specific Unit Plans, but the real value is added when ensuring that standards are being consistently selected because linking a Unit will then modify the standards selector to only show the standards for linked unit plans (this includes any unwrapped/unpacked language).
Questions
-
Side buttons:
-
Add Questions
It is always possible to add more questions to an assessment by clicking this button. Please note that if questions are added after an assessment has been administered that the overall percentage scores for students will change.
-
Questions Bank
The Question Bank is a great tool for users to add existing questions to an assessment. Many districts subscribe to other third party question banks and this is where it is possible to grab those questions and include them in any assessment. For more information on how to use this tool, please view our Question Bank help guide.
-
Add Passage
The Add Passage button will navigate the user to the Passage Editor. It is important to select the questions that need to be attached to the passage before clicking this button. Otherwise, questions can only be added to the passage from within the Passage Editor. For more information about Passages, please view our Passages help guide.
-
Copy Question(s)
If a question or questions within an assessment need to be copied, simply select checkbox for the question(s) to be copied then select this button.
-
Select All
The Select all button will select all questions in the assessment. This button should be used if an action should be performed on more than one question in the assessment, such as adding a Passage.
-
Unselect
This button will Unselect the checkbox for all questions in the assessment.
-
Delete Selected
This button allows the user to mass Delete selected questions.
-
Change Special Scoring
This button allows the user to mass update the Special Scoring for all selected questions.
-
Setup Weighting
There are many occasions where an assessment needs to have special weighting applied to questions in an assessment. For example, there can be two "Teacher Scored" questions on an assessment worth the same amount of points, but one question is worth 75% of the assessment. Special Weighting can be used to accomplish this grading scheme.
-
Setup Numbering
There are many occasions where an assessment needs to have special weighting applied to questions in an assessment. For example, there can be two "Teacher Scored" questions on an assessment worth the same amount of points, but one question is worth 75% of the assessment. Special Weighting can be used to accomplish this grading scheme.
-
Import questions from DOC/PDF
This tool is the quickest way to take an existing assessment that is either in a .DOC or .PDF format and get all of the questions added to an eDoctrina assessment. All that needs to be done is copy the assessment from the existing resource, paste it into this tool, and let eDoctrina do all of the work. It should be noted that this tool is highly dependent on formatting and relies on some built-in logic to determine question formats. Although the tool is very useful for some assessments, there does exist some assessments/questions that will not convert properly and should be manually created.
-
Show/Hide Standards
This option allows the user to hide the standards selection tool and increase the viewable region for question building. If standards are to be linked to questions, the user will have to show the standards selection tool.
-
Question Tools:
-
Print Question
The Print button for an individual question is available on the questions view of the assessment editor allowing users to view/print how a question would be presented with a one- or two-column layout.
-
Print Settings
The Manage Print Settings button allows users to add lines or spaces to the end of a question providing an area for students to enter responses.
-
General Information
The Manage metadata button allows the user to add extra descriptive details to a question, such as Difficulty Level, Bloom's Taxonomy, Webb's Depth of Knowledge, questions tags, error codes, and/or extra grade levels. Adding extra information to questions can only help with organization and to develop more informative data reports.
-
Online Tools
The Online Tools is where a user will add features to an individual question that will enhance how the question is offered through student PROGReSS accounts. Tools like a calculator, a graphing tool, protractor, and ruler can be enabled for any question. This is also where you can modify the answer tooland choose for a text editor, equation editor, a sketchpad tool (that can include a background image), and a simple upload to question tool. It is also possible to configure a question to include a work area or change the nature of the question to be for scoring only.
-
Parse Answers
The Parse Answer Choices option is available for multiple choice questions allowing users to distribute answer choices existing in the question body to the answer choice entry fields below. Although a great tool, there are some formatting limitations.
-
Record Audio
The Record Audio button allows users to record an audio note, using your own voice of the Text-to-Speech options, that can be made available to students through the PROGReSS accounts. For this audio option, it is important to assign the online assessment with audio allowed within the online assessment settings or upon assignment so the student has access to these recorded audio clips.
-
Upload Attachments
The Upload Attachments button allows the user to include an attached file to a question so it can be accessed through student PROGReSS accounts while taking the assessment online.
-
Edit Question
The Edit Question button navigates users to a separate window where all details of an individual question can be viewed and customized. As there are many options available for question design right on the assessment editor, there exists a few more options within the question editor that can help do design a great question.
-
Special Instructions
The Special Instructions button allows users to add directions that will appear above the question. These instructions appear in both electronic and hard copy formats above the question to help describe the nature of the question. Online test environments will offer the student the opportunity to show or hide these instructions.
-
Scoring Guide
The Scoring Guide allows users to attach any information relative to scoring and/or enter Teacher Instructions about the question. The scoring guide (if entered) will appear for teachers when entering answers manually within eDoctrina and there is also the option to print these with a hard copy of the assessment. Teacher Instructions can be included to show above each question they are entered for if this option is chosen upon printing.
-
Delete Question
The Delete Question button allows the user to remove the question from the assessment. Please that that it is not possible to delete a question that already has student assessment data recorded for it.
-
Question Design/Configuration:
-
Type:
-
Multiple Choice (letters or numbers):
Questions of this type need to be configured with possible answer choices and can be set for single correct answer, multiple correct answer, and partial scoring.
-
True/False:
This type of question offers the student with the option to choose whether the entered statement is true or false.
-
Fill-in-the-Blank:
Questions of this type are best used in the online test taking environment and can be used in many different ways. When choosing this question type, it is important that the appropriate scoring type is selected as it is possible to have one entry field or many. For single correct answer, simply type all of the acceptable responses with each acceptable response on its own line. For multiple entry fields, you will need to explore or embedded response input tools.
-
Teacher Scored:
Questions that are Teacher-Scored are much more flexible that the other question types because the nature of them is that the teacher will have to visit the student response after it has been provided and score it accordingly. For example, developing a rubric assessment entails that all of the questions should be of this scoring type.
-
Special Scoring:
This is where scoring methodology can be modified for any question as the special scoring can be changed to make the question excluded, count as full credit, or be considered as extra credit. Excluded questions will not be considered into the students overall score, full credit will give the student credit without considering their answer choice.
-
Standards:
Linking standards to questions is an extremely valuable to assessment configuration because mostly all of the assessment data reports in eDoctrina show statistics related to the linked standards within the assessment. Use the standards selection tool to find the learning standards that are applicable to the question and link them by clicking-and-dragging to the question or double-click to link them to more than one question. It is also possible to link Report Card standards and/or skills/proficiencies, but these require a some setup. Please contact the eDoctrina team about standard sets or skillsets as we have an extensive library of standards, but only link them to a district by request.
-
Print Settings:
-
Put page break after this question when printing assessment:
This option applies to printed assessments only and will force any following questions to be printed on the next page if this option is selected for any question.
-
Put line after question:
This option applies to printed assessments only. Some assessments are designed to separate each question with a solid line as a formatting option. Selecting this option will add a solid black line after each question it is selected for.
-
Add Questions
It is always possible to add more questions to an assessment by clicking this button. Please note that if questions are added after an assessment has been administered that the overall percentage scores for students will change. -
Questions Bank
The Question Bank is a great tool for users to add existing questions to an assessment. Many districts subscribe to other third party question banks and this is where it is possible to grab those questions and include them in any assessment. For more information on how to use this tool, please view our Question Bank help guide. -
Add Passage
The Add Passage button will navigate the user to the Passage Editor. It is important to select the questions that need to be attached to the passage before clicking this button. Otherwise, questions can only be added to the passage from within the Passage Editor. For more information about Passages, please view our Passages help guide. -
Copy Question(s)
If a question or questions within an assessment need to be copied, simply select checkbox for the question(s) to be copied then select this button. -
Select All
The Select all button will select all questions in the assessment. This button should be used if an action should be performed on more than one question in the assessment, such as adding a Passage. -
Unselect
This button will Unselect the checkbox for all questions in the assessment. -
Delete Selected
This button allows the user to mass Delete selected questions. -
Change Special Scoring
This button allows the user to mass update the Special Scoring for all selected questions. -
Setup Weighting
There are many occasions where an assessment needs to have special weighting applied to questions in an assessment. For example, there can be two "Teacher Scored" questions on an assessment worth the same amount of points, but one question is worth 75% of the assessment. Special Weighting can be used to accomplish this grading scheme. -
Setup Numbering
There are many occasions where an assessment needs to have special weighting applied to questions in an assessment. For example, there can be two "Teacher Scored" questions on an assessment worth the same amount of points, but one question is worth 75% of the assessment. Special Weighting can be used to accomplish this grading scheme. -
Import questions from DOC/PDF
This tool is the quickest way to take an existing assessment that is either in a .DOC or .PDF format and get all of the questions added to an eDoctrina assessment. All that needs to be done is copy the assessment from the existing resource, paste it into this tool, and let eDoctrina do all of the work. It should be noted that this tool is highly dependent on formatting and relies on some built-in logic to determine question formats. Although the tool is very useful for some assessments, there does exist some assessments/questions that will not convert properly and should be manually created. -
Show/Hide Standards
This option allows the user to hide the standards selection tool and increase the viewable region for question building. If standards are to be linked to questions, the user will have to show the standards selection tool.
-
Print Question
The Print button for an individual question is available on the questions view of the assessment editor allowing users to view/print how a question would be presented with a one- or two-column layout.
-
Print Settings
The Manage Print Settings button allows users to add lines or spaces to the end of a question providing an area for students to enter responses.
-
General Information
The Manage metadata button allows the user to add extra descriptive details to a question, such as Difficulty Level, Bloom's Taxonomy, Webb's Depth of Knowledge, questions tags, error codes, and/or extra grade levels. Adding extra information to questions can only help with organization and to develop more informative data reports.
-
Online Tools
The Online Tools is where a user will add features to an individual question that will enhance how the question is offered through student PROGReSS accounts. Tools like a calculator, a graphing tool, protractor, and ruler can be enabled for any question. This is also where you can modify the answer tooland choose for a text editor, equation editor, a sketchpad tool (that can include a background image), and a simple upload to question tool. It is also possible to configure a question to include a work area or change the nature of the question to be for scoring only.
-
Parse Answers
The Parse Answer Choices option is available for multiple choice questions allowing users to distribute answer choices existing in the question body to the answer choice entry fields below. Although a great tool, there are some formatting limitations.
-
Record Audio
The Record Audio button allows users to record an audio note, using your own voice of the Text-to-Speech options, that can be made available to students through the PROGReSS accounts. For this audio option, it is important to assign the online assessment with audio allowed within the online assessment settings or upon assignment so the student has access to these recorded audio clips.
-
Upload Attachments
The Upload Attachments button allows the user to include an attached file to a question so it can be accessed through student PROGReSS accounts while taking the assessment online.
-
Edit Question
The Edit Question button navigates users to a separate window where all details of an individual question can be viewed and customized. As there are many options available for question design right on the assessment editor, there exists a few more options within the question editor that can help do design a great question.
-
Special Instructions
The Special Instructions button allows users to add directions that will appear above the question. These instructions appear in both electronic and hard copy formats above the question to help describe the nature of the question. Online test environments will offer the student the opportunity to show or hide these instructions.
-
Scoring Guide
The Scoring Guide allows users to attach any information relative to scoring and/or enter Teacher Instructions about the question. The scoring guide (if entered) will appear for teachers when entering answers manually within eDoctrina and there is also the option to print these with a hard copy of the assessment. Teacher Instructions can be included to show above each question they are entered for if this option is chosen upon printing.
-
Delete Question
The Delete Question button allows the user to remove the question from the assessment. Please that that it is not possible to delete a question that already has student assessment data recorded for it.
-
Type:
-
Multiple Choice (letters or numbers):
Questions of this type need to be configured with possible answer choices and can be set for single correct answer, multiple correct answer, and partial scoring. -
True/False:
This type of question offers the student with the option to choose whether the entered statement is true or false. -
Fill-in-the-Blank:
Questions of this type are best used in the online test taking environment and can be used in many different ways. When choosing this question type, it is important that the appropriate scoring type is selected as it is possible to have one entry field or many. For single correct answer, simply type all of the acceptable responses with each acceptable response on its own line. For multiple entry fields, you will need to explore or embedded response input tools. -
Teacher Scored:
Questions that are Teacher-Scored are much more flexible that the other question types because the nature of them is that the teacher will have to visit the student response after it has been provided and score it accordingly. For example, developing a rubric assessment entails that all of the questions should be of this scoring type.
-
-
Special Scoring:
This is where scoring methodology can be modified for any question as the special scoring can be changed to make the question excluded, count as full credit, or be considered as extra credit. Excluded questions will not be considered into the students overall score, full credit will give the student credit without considering their answer choice. -
Standards:
Linking standards to questions is an extremely valuable to assessment configuration because mostly all of the assessment data reports in eDoctrina show statistics related to the linked standards within the assessment. Use the standards selection tool to find the learning standards that are applicable to the question and link them by clicking-and-dragging to the question or double-click to link them to more than one question. It is also possible to link Report Card standards and/or skills/proficiencies, but these require a some setup. Please contact the eDoctrina team about standard sets or skillsets as we have an extensive library of standards, but only link them to a district by request. -
Print Settings:
-
Put page break after this question when printing assessment:
This option applies to printed assessments only and will force any following questions to be printed on the next page if this option is selected for any question. -
Put line after question:
This option applies to printed assessments only. Some assessments are designed to separate each question with a solid line as a formatting option. Selecting this option will add a solid black line after each question it is selected for.
-
Put page break after this question when printing assessment:
Online Settings
-
Layout/View:
-
Default View:
There are numerous online test taking views that can be used for eDoctrina and the selection of the default view determines how an assessment will be presented to students when the assessment is being administered. Selecting if questions should be one the same or different pages is just one option that can be explored. It is important that the assessment creator checks the online assessment preview before administering the assessment to ensure that the view provides the optimal test taking experience.
-
Scramble Questions:
Scramble Questions allows an assessment to be offered to many students with a random question order. It is also possible to only scramble a small subset of question by selecting the "Customize" button.
-
Scramble Answer Choices:
Scramble Answer Choices allows an assessment with multiple choice questions to be offered to many students with the answer choices offered in a randomized order. For example, one student may see an answer choice as option A and another as option D.
-
Online Assessment PDF:
The online assessment PDF is a great tool if the goal is to simply upload a resource and have it available throughout the entire assessment. Many users will attach a PDF copy of an assessment if they choose to create an Answer Key ONLY assessment. Others may use this a reference sheet. Once the PDF is uploaded, the options to place the PDF on the right or left of the online test taking window will become available, as well as a checkbox toe determine whether a student should be able to see this uploaded PDF when reviewing their online assessment results.
-
Controls:
-
Online Time Limit:
The online time limit is measured in minutes and can be applied to any online assessment within eDoctrina. The timer will begin counting down as soon as the student starts the assessment and will automatically finish the assessment as soon as the entered time elapses. The time will still continue to run even if the student exists the assessment. This field should be left blank for assessments that are not timed.
-
Password
A password can be entered for each assessment created in eDoctrina. If entered, all students will be required to enter this password to gain access to the online assessment. The password is not restricted by special characters, but it is case senstive. It can be changed as needed, but the most recent or current password will be the ONLY password that will provide student access to the assessment.
-
Enable Answer Masking:
This online assessment tool will initially present multiple choice questions as covered options. Any answer choice can be revealed by the student if they actively click to reveal the choice.
-
Disable paste:
The security option will ensure that students cannot paste any text into the assessment.
-
Disable copy passage text to clipboard:
This security option will disable the student's ability to copy text from any passages withing the assessment.
-
Allow notes:
Enabling the utility option will proivde the student with a place to within each question to keep notes.
-
Change Background/Foreground Color:
This option will allow for modification of the online test taking color scheme that students see when taking online assessments.
-
Allow reopen:
Allow reopen will allow students to return to an incomplete assessment within the assigned testing window by selecting "Save and finish later" within the assessment. If this option is left unchecked, a student will only be able to access the assessment once within each assigned testing window.
-
Lock student to test:
Lock Student to test can be enabled hand-in-hand with either the Google Chrome Extension "eDoctrina Locker" or the Safe Exam Browser.
eDoctrina Locker is an extension districts can download and push to student devices that will not allow students to open new tabs in Chrome, or maneuver to other websites they may have already had open. PLEASE NOTE that this extension only works with Chrome and does not prevent students from opening additional tabs in other browsers.
Safe Exam Browser is a browser that can be downloaded onto student devices and when in use, students will be locked into the browser while testing. They will be unable to maneuver out of the browser until the exam is finished, and attempting to do so will lock them out of the test.
-
Results visible online:
If the results visible online checkbox is selected, students will have access to an individual student report. The traditional way that results can be published requires that the student click the "Submit" button upon completion of their assessment and there must be no unverified answer selections. In essence, the student has to indicate they are finished and the teacher must provide all a scores for Teacher Scored questions or question that were unanswered altogether. The results will be displayed as an individual student report and will follow the selected format in the customized report below. It is also possible to choose what values display to the student, such as the points earned, the percent score and their proficiency level. Choosing the RTI Summary will allow this assessment to be included in the RTI Summary report so the student can compare their results to district averages.
-
Allow manually post results online:
In many cases, assessment results should not be posted online until all students are complete with the assessment to protect the integrity of the assessment and the results. If this is the desired option, allowing for manual post of assessment results is likely preferred.
-
Use customized options for individual student report:
When results are visible online, students will have access to their individual student report about the assessment results. This report is highly customizable and can be catered to specific preferences. It is important to configure the report with options that help the student receive the most valuable feedback.
-
eMail Teachers when done:
If this option is enabled, any student that finishes an assigned assessment will prompt an email notification about this action and all teachers who are teach a class in the linked course for the assessment will be notified.
-
Enable Raise Hand:
The raise hand feature is an online assessment add on that can be used in a true test proctoring scenario. By enabling this feature, students will have the ability to click a "Raise Hand" button. The test proctor should have the Answer entry/verification screen loaded as they are proctoring and will see an icon appear next to the student that has clicked the raise hand button so assistance can be provided to that student without causing distracting to other test takers in the same room.
-
Student Tools:
-
Show Calculator:
Both of the scientific and basic calculator can be made available to students for each question or the entire assessment. If the selection is "Default" the assessment will look to the specific questions to determine which calculator to use. If either "Basic" or "Scientific" is selected, then this calculator will be assigned to the online assessment as selected for the entire assessment.
-
Show graphing tool:
The graphing tool is a simple coordinate plane plugin tool that allows students to plot points and line as well as graph basic linear functions.
-
Show protractor:
The protractor is an accessory that can help for questions that are designed to have students measure specific angles on the screen.
-
Show ruler:
The ruler is an accessory that can help for questions that are designed to have students measure specific lines segments or other attributes.
-
Disable "Handwritten Mode" in WIRIS (Equation) Editor:
By default, the equation editor that is provided to students has the option to access what is called the "handwritten" mode, which allows students to write their equations on a touchscreen or trackpad. Selecting this option will disable this alternative.
-
Dictionary:
It is possible to offer Mirriam-Webster's Elementary level or Intermediate level dictionary on the side tool bar for students when they are taking an online assessment. Simply select which dictionary that should be available and this will be applied to the online assignment.
-
Enable spell checking:
Enable spell checking allows students to utilize the spell check feature within any questions that use the Text Editor as an answer tool.
-
Allow Audio
The allow audio checkbox is the main control in regards to whether or not audio can be enabled for an assessment if it exists. This setting designates the default setting when assigning an online assessment, but this can be modified for specific students.
-
Google Translate
Enabling Google Translate provides the student the opportunity to change the language of the entered text of an assessment. The option will display on their online test taking window and will use the Google translate engine to best translate the text within the assessment.
-
Allow text-to-speech
Enabling this option will provide students with the text-to-speech engine throughout the assessment so they can have on-screen text read to them. When enabled, it is possible for students to modify the play speed of the TTS voice to have the words read faster of slower.
-
TTS Voice
When the text-to-speech engine is enabled, there are a variety of different voices that can be used to read the on-screen text. It is best to use the online preview to sample the voices to ensure that the best possible voice is selected for the assessment.
-
X out option on online assessments
Enabling the X out option on online assessments gives the student the opportunity to eliminate answer choices as a test taking skill.
Layout/View:
-
Default View:
There are numerous online test taking views that can be used for eDoctrina and the selection of the default view determines how an assessment will be presented to students when the assessment is being administered. Selecting if questions should be one the same or different pages is just one option that can be explored. It is important that the assessment creator checks the online assessment preview before administering the assessment to ensure that the view provides the optimal test taking experience. -
Scramble Questions:
Scramble Questions allows an assessment to be offered to many students with a random question order. It is also possible to only scramble a small subset of question by selecting the "Customize" button. -
Scramble Answer Choices:
Scramble Answer Choices allows an assessment with multiple choice questions to be offered to many students with the answer choices offered in a randomized order. For example, one student may see an answer choice as option A and another as option D. -
Online Assessment PDF:
The online assessment PDF is a great tool if the goal is to simply upload a resource and have it available throughout the entire assessment. Many users will attach a PDF copy of an assessment if they choose to create an Answer Key ONLY assessment. Others may use this a reference sheet. Once the PDF is uploaded, the options to place the PDF on the right or left of the online test taking window will become available, as well as a checkbox toe determine whether a student should be able to see this uploaded PDF when reviewing their online assessment results.
Controls:
-
Online Time Limit:
The online time limit is measured in minutes and can be applied to any online assessment within eDoctrina. The timer will begin counting down as soon as the student starts the assessment and will automatically finish the assessment as soon as the entered time elapses. The time will still continue to run even if the student exists the assessment. This field should be left blank for assessments that are not timed. -
Password
A password can be entered for each assessment created in eDoctrina. If entered, all students will be required to enter this password to gain access to the online assessment. The password is not restricted by special characters, but it is case senstive. It can be changed as needed, but the most recent or current password will be the ONLY password that will provide student access to the assessment. -
Enable Answer Masking:
This online assessment tool will initially present multiple choice questions as covered options. Any answer choice can be revealed by the student if they actively click to reveal the choice. -
Disable paste:
The security option will ensure that students cannot paste any text into the assessment. -
Disable copy passage text to clipboard:
This security option will disable the student's ability to copy text from any passages withing the assessment. -
Allow notes:
Enabling the utility option will proivde the student with a place to within each question to keep notes. -
Change Background/Foreground Color:
This option will allow for modification of the online test taking color scheme that students see when taking online assessments. -
Allow reopen:
Allow reopen will allow students to return to an incomplete assessment within the assigned testing window by selecting "Save and finish later" within the assessment. If this option is left unchecked, a student will only be able to access the assessment once within each assigned testing window. -
Lock student to test:
Lock Student to test can be enabled hand-in-hand with either the Google Chrome Extension "eDoctrina Locker" or the Safe Exam Browser. eDoctrina Locker is an extension districts can download and push to student devices that will not allow students to open new tabs in Chrome, or maneuver to other websites they may have already had open. PLEASE NOTE that this extension only works with Chrome and does not prevent students from opening additional tabs in other browsers. Safe Exam Browser is a browser that can be downloaded onto student devices and when in use, students will be locked into the browser while testing. They will be unable to maneuver out of the browser until the exam is finished, and attempting to do so will lock them out of the test. -
Results visible online:
If the results visible online checkbox is selected, students will have access to an individual student report. The traditional way that results can be published requires that the student click the "Submit" button upon completion of their assessment and there must be no unverified answer selections. In essence, the student has to indicate they are finished and the teacher must provide all a scores for Teacher Scored questions or question that were unanswered altogether. The results will be displayed as an individual student report and will follow the selected format in the customized report below. It is also possible to choose what values display to the student, such as the points earned, the percent score and their proficiency level. Choosing the RTI Summary will allow this assessment to be included in the RTI Summary report so the student can compare their results to district averages. -
Allow manually post results online:
In many cases, assessment results should not be posted online until all students are complete with the assessment to protect the integrity of the assessment and the results. If this is the desired option, allowing for manual post of assessment results is likely preferred. -
Use customized options for individual student report:
When results are visible online, students will have access to their individual student report about the assessment results. This report is highly customizable and can be catered to specific preferences. It is important to configure the report with options that help the student receive the most valuable feedback. -
eMail Teachers when done:
If this option is enabled, any student that finishes an assigned assessment will prompt an email notification about this action and all teachers who are teach a class in the linked course for the assessment will be notified. -
Enable Raise Hand:
The raise hand feature is an online assessment add on that can be used in a true test proctoring scenario. By enabling this feature, students will have the ability to click a "Raise Hand" button. The test proctor should have the Answer entry/verification screen loaded as they are proctoring and will see an icon appear next to the student that has clicked the raise hand button so assistance can be provided to that student without causing distracting to other test takers in the same room.
Student Tools:
-
Show Calculator:
Both of the scientific and basic calculator can be made available to students for each question or the entire assessment. If the selection is "Default" the assessment will look to the specific questions to determine which calculator to use. If either "Basic" or "Scientific" is selected, then this calculator will be assigned to the online assessment as selected for the entire assessment.
-
Show graphing tool:
The graphing tool is a simple coordinate plane plugin tool that allows students to plot points and line as well as graph basic linear functions.
-
Show protractor:
The protractor is an accessory that can help for questions that are designed to have students measure specific angles on the screen.
-
Show ruler:
The ruler is an accessory that can help for questions that are designed to have students measure specific lines segments or other attributes. -
Disable "Handwritten Mode" in WIRIS (Equation) Editor:
By default, the equation editor that is provided to students has the option to access what is called the "handwritten" mode, which allows students to write their equations on a touchscreen or trackpad. Selecting this option will disable this alternative. -
Dictionary:
It is possible to offer Mirriam-Webster's Elementary level or Intermediate level dictionary on the side tool bar for students when they are taking an online assessment. Simply select which dictionary that should be available and this will be applied to the online assignment.
-
Enable spell checking:
Enable spell checking allows students to utilize the spell check feature within any questions that use the Text Editor as an answer tool. -
Allow Audio
The allow audio checkbox is the main control in regards to whether or not audio can be enabled for an assessment if it exists. This setting designates the default setting when assigning an online assessment, but this can be modified for specific students. -
Google Translate
Enabling Google Translate provides the student the opportunity to change the language of the entered text of an assessment. The option will display on their online test taking window and will use the Google translate engine to best translate the text within the assessment. -
Allow text-to-speech
Enabling this option will provide students with the text-to-speech engine throughout the assessment so they can have on-screen text read to them. When enabled, it is possible for students to modify the play speed of the TTS voice to have the words read faster of slower. -
TTS Voice
When the text-to-speech engine is enabled, there are a variety of different voices that can be used to read the on-screen text. It is best to use the online preview to sample the voices to ensure that the best possible voice is selected for the assessment. -
X out option on online assessments
Enabling the X out option on online assessments gives the student the opportunity to eliminate answer choices as a test taking skill.
Access Controls
-
Team Can Edit:
The Team Can Edit option allows other users with the district to edit the assessment. The team is defined as any user who teaches the same Course that has been linked to the assessment. If there is no Course linked to the assessment in the General section of the assessment, this option will not apply.
-
Do Not Share - Exclude From List:
The Do Not Share - Exclude From List option allows users to create an assessment in eDoctrina without sharing it with any other teachers within the district. By selecting this option, the assessment will only appear in the assessment listing for the creator of the assessment. NOTE: District and School Admin profile types will still be able to see the assessment when viewing from their profiles.
-
Do Not Allow Copy:
Enabling this checkbox will prevent any users from copying this assessment. This is a great option to ensure there is only one version of the test in the database.
-
Hide from teachers not teaching linked courses:
For this permission to function properly, there must be a course linked to the assessment. If a course is not linked, this option will hide the assessment from all users. This is a great option to keep an assessment private to teachers that are on the same team and instruct the same courses.
Team Can Edit:
The Team Can Edit option allows other users with the district to edit the assessment. The team is defined as any user who teaches the same Course that has been linked to the assessment. If there is no Course linked to the assessment in the General section of the assessment, this option will not apply.Do Not Share - Exclude From List:
The Do Not Share - Exclude From List option allows users to create an assessment in eDoctrina without sharing it with any other teachers within the district. By selecting this option, the assessment will only appear in the assessment listing for the creator of the assessment. NOTE: District and School Admin profile types will still be able to see the assessment when viewing from their profiles.Do Not Allow Copy:
Enabling this checkbox will prevent any users from copying this assessment. This is a great option to ensure there is only one version of the test in the database.Hide from teachers not teaching linked courses:
For this permission to function properly, there must be a course linked to the assessment. If a course is not linked, this option will hide the assessment from all users. This is a great option to keep an assessment private to teachers that are on the same team and instruct the same courses.Shared with:
The option to share an assessment with specific users in eDoctrina is available by adding the user's name in the "Shared With" option. This is a great option to open up an assessment to be edited by a specific subset of users. Simply add their name to the list.
Print Settings
-
Do Not Print Bubble Sheets:
Enabling this feature will ensure that answer sheets cannot be printed for this assessment. Users will receive an error message when trying to print answer sheets.
-
Always use following print settings:
Some assessments have require specific formatting to ensure that the assessment prints a certain way. If this option is enabled, the set print settings will always apply when printing the assessment as users will not be presented with printing options upon printing the assessment.
-
Output Format:
- PDF
- HTML
- DOC
-
Columns:
Choosing the number of columns that an assessment should be printed on depends on the questions included on the assessment. Many assessments that are printed in portait orientation may be formatted to print in two columns, while the landscape orientation may offer the opportunity to print an assessment with four columns to condense the number of questions that fit on one page.
-
Orientation:
The two options for printing orientation are portrait and landscape.
-
Mark-up Settings:
-
Do not keep responses in same column/page with question:
By default, eDoctrina will print assessments by keeping each of the questions on the same page so any question is not placed on two different pages. If this is not the preference, enable this option and the assessment will print in a fashion that fills the entire page without considering that each question should be on the same page..
-
Answers appear in 2 columns:
By default, eDoctrina will print answer choices for multiple choice questions in one column. If this option is enabled, the assessment will print multiple choice answer options in two evenly distributed columns.
-
Do not print blank questions:
Depnding on the configuration of the assessment, there may be some questions that are used as placeholders for one of many different reasons. These questions may not have any question text entered and probably have no reason to be printed. If this is the case, enable this option and eDoctrina will not print questions of thi type.
-
Sections to Include (at least one selection must be made when printing):
-
Assessment Questions:
This is the default selection when printing an assessment as this determines whether or not questions should be printed.
-
Answer Key with Standards:
This section lists the number of each of the question on the assessment accompanied by the correct answer(if applicable), the maximum points, and any linked standards for each question, respectively. The special instructions and scoring guide are part of the answer key.
-
Answer Key Only:
This section lists the number of each of the question on the assessment accompanied by the correct answer(if applicable) and the maximum points. The special instructions and scoring guide are part of the answer key.
-
Standards Only:
This section lists all of the linked standards only on the assessment.
-
Grade Table:
This section will display the proficiency table (if applicable) as it has been entered on the assessment to explain how the student grade has been determined.
-
Teacher instructions:
-
Sketchpad Images/Attachments
If there are images attached or attachments linked using the sketchpad tool, this option will include these items below the question.
-
Always print row-wide:
-
Teacher Scored Questions:
This print option will ensure that Teacher Scored questions will print with the full-width of the page disregarding other formatting options.
-
Passages:
This print option will ensure that linked passages will print with the full-width of the page disregarding other formatting options.
Do Not Print Bubble Sheets:
Enabling this feature will ensure that answer sheets cannot be printed for this assessment. Users will receive an error message when trying to print answer sheets.Always use following print settings:
Some assessments have require specific formatting to ensure that the assessment prints a certain way. If this option is enabled, the set print settings will always apply when printing the assessment as users will not be presented with printing options upon printing the assessment.Output Format:
- HTML
- DOC
Columns:
Choosing the number of columns that an assessment should be printed on depends on the questions included on the assessment. Many assessments that are printed in portait orientation may be formatted to print in two columns, while the landscape orientation may offer the opportunity to print an assessment with four columns to condense the number of questions that fit on one page.Orientation:
The two options for printing orientation are portrait and landscape.Mark-up Settings:
-
Do not keep responses in same column/page with question:
By default, eDoctrina will print assessments by keeping each of the questions on the same page so any question is not placed on two different pages. If this is not the preference, enable this option and the assessment will print in a fashion that fills the entire page without considering that each question should be on the same page.. -
Answers appear in 2 columns:
By default, eDoctrina will print answer choices for multiple choice questions in one column. If this option is enabled, the assessment will print multiple choice answer options in two evenly distributed columns. -
Do not print blank questions:
Depnding on the configuration of the assessment, there may be some questions that are used as placeholders for one of many different reasons. These questions may not have any question text entered and probably have no reason to be printed. If this is the case, enable this option and eDoctrina will not print questions of thi type.
Sections to Include (at least one selection must be made when printing):
-
Assessment Questions:
This is the default selection when printing an assessment as this determines whether or not questions should be printed. -
Answer Key with Standards:
This section lists the number of each of the question on the assessment accompanied by the correct answer(if applicable), the maximum points, and any linked standards for each question, respectively. The special instructions and scoring guide are part of the answer key. -
Answer Key Only:
This section lists the number of each of the question on the assessment accompanied by the correct answer(if applicable) and the maximum points. The special instructions and scoring guide are part of the answer key. -
Standards Only:
This section lists all of the linked standards only on the assessment. -
Grade Table:
This section will display the proficiency table (if applicable) as it has been entered on the assessment to explain how the student grade has been determined. -
Teacher instructions:
-
Sketchpad Images/Attachments
If there are images attached or attachments linked using the sketchpad tool, this option will include these items below the question.
Always print row-wide:
-
Teacher Scored Questions:
This print option will ensure that Teacher Scored questions will print with the full-width of the page disregarding other formatting options. -
Passages:
This print option will ensure that linked passages will print with the full-width of the page disregarding other formatting options.
General Instructions & Notes (Special Instructions)
-
General Instructions:
This section is best utlized to present general instructions to the entire assessment. When printing the assessment hard copy, these instruction will display at the top of the assessment print out. If this assessment is offered online, the general instructions will display at the top of the assessment and the students will have the option to show or hide them throughout their test taking experience.
-
Notes:
This section is best used to provide any special notes that may need to be included when administering this assessment. Many district also use this as a place to log lessons learned about the administration of this assessment. Take note of the checkbox to "Print on answer sheet cover page" as these notes can be included when printing out answer sheets for different classes if this checkbox is selected..
This section is best utlized to present general instructions to the entire assessment. When printing the assessment hard copy, these instruction will display at the top of the assessment print out. If this assessment is offered online, the general instructions will display at the top of the assessment and the students will have the option to show or hide them throughout their test taking experience.
This section is best used to provide any special notes that may need to be included when administering this assessment. Many district also use this as a place to log lessons learned about the administration of this assessment. Take note of the checkbox to "Print on answer sheet cover page" as these notes can be included when printing out answer sheets for different classes if this checkbox is selected..
Proficiency Table
-
Proficiency Table Type
-
Standard, percent based
The traditional style of proficiency table in eDoctrina in based off of the percentage score earned by the individual student. The standard option will map each students earned percentage with a corresponding proficiency level.
-
2-dimensional, points based
The 2-dimensional proficiency table is a points-based table that allows users to define questions in a vertical and horizontal category. The proficiency level earned by any student is determined by the values within the table that correspond to the points earned for horizontal questions and vertical questions, respectively.
-
Add Row
When building proficiency tables manually, the add row option allows users to create individual rows of the proficiency table.
-
Copy Proficiency Table from
There are many ways that proficiency tables can be linked to assessments. Some districts will choose to build standardized proficiency tables using the Proficiency Tables option in the Assessments section of Database Setup in the Settings menu. If they are already built using this tool, users will be able to quickly link those tables to assessments by using this option.
-
Generate Proficiency Table
This option allows for end users to quickly generate a proficiency table by entering the number of possible levels. This tool will automatically add the entered number of proficiency levels and evenly distribute the cut scores in accordance with the number of levels entered.
Proficiency Table Type
-
Standard, percent based
The traditional style of proficiency table in eDoctrina in based off of the percentage score earned by the individual student. The standard option will map each students earned percentage with a corresponding proficiency level. -
2-dimensional, points based
The 2-dimensional proficiency table is a points-based table that allows users to define questions in a vertical and horizontal category. The proficiency level earned by any student is determined by the values within the table that correspond to the points earned for horizontal questions and vertical questions, respectively.
Add Row
When building proficiency tables manually, the add row option allows users to create individual rows of the proficiency table.Copy Proficiency Table from
There are many ways that proficiency tables can be linked to assessments. Some districts will choose to build standardized proficiency tables using the Proficiency Tables option in the Assessments section of Database Setup in the Settings menu. If they are already built using this tool, users will be able to quickly link those tables to assessments by using this option.Generate Proficiency Table
This option allows for end users to quickly generate a proficiency table by entering the number of possible levels. This tool will automatically add the entered number of proficiency levels and evenly distribute the cut scores in accordance with the number of levels entered.Attachments
It is possible to link supporting documentation to an assessment by uploading a file or entering an external link in this section of the assessment editor. These resources will display for quick access within the assessment listing on the assessments homepage. Many times, test creators will upload or link the original assessment here and solely build an answer key to collect student data. Sometimes, relevant test procting information or historical data reports are placed here. There are very few file type limitations, so use this as a tool to best support the administration of this assessment. These attachments are not student facing and should be used as a repository for relevant documentation for this specific assessment.
Mass Course Assign
The Mass Course Assign tool works in concert with the Master Course concept. Each course in eDoctrina can be linked to a master course to group or categorize a subset of courses that are similar by nature. This is a great feature for quickly linking groups of courses to an assessment. Courses must be linked to Master courses by district users and this must be done to make this feature have full functionality.
Additional Settings
-
Master Assessment
The Master Assessment tool is a way to group key assessments that can be used as baseline evidence for student learning objectives in the district. Many times, baseline scores are determined from a series of assessments offered throughout the district for individual students and this tool is designed to make this process easier. These Master Assessments must be configured before this tool is used. Once a master assessment is created, it will display as an option in this pull-down menu. Master Assessments can also be linked using the Assessments Import tool so this grouping can happen automatically.
-
Average question scores for final score
This is a unique assessment tool that changes the way that the final score of an assessment is calculated. If enabled, eDoctrina will take the total points earned for each student and divide this by the total number of questions. This option is best used when questions are valued equally, but can be used in other ways as long as the assessment is designed with intent.
-
Assessment Dates
As a stand alone feature, assigning assessment dates and/or times here will restrict any users from assigning this assessment outside of these date ranges. If used in concert with the "Auto Assign to Linked Courses" feature, the date indication here will automatically make the assessment available online to all students that are enrolled within the linked courses for the date/time(s) indicated here.
-
Auto Assign to Linked Courses
This feature is turned on within the district settings and allows district admin user types to configure an assessment to be automatically assigned to students if they enrolled in a course that is linked to this assessment. Assessment Dates will need to be configured for so eDoctrina knows when to make this assessment available to students online.
-
Include in Nightly Export
Assessment data can be sent to a secure site if this option is enabled. This feature is designed to match a specific export format, so if modifications are needed, please contact the eDoctrina team for any customizations that may be needed.
-
Quiz
The quiz feature could be the answer to offering multiple choice assessments without having to make an online assignment. If enabled, students will be able to sign into their eDoctrina accounts to take a multiple choice assessment. A password must be entered for this tool to work as designed as students will need the assessment ID# and the password to get access to enter their student responses.
-
Allow Revision Snapshot
This feature allows a user to capture multiple revisions of student work for a constructed response in an online assessment. These responses can be pulled into the Individual Student report and will be automatically date and time stamped.
Master Assessment
The Master Assessment tool is a way to group key assessments that can be used as baseline evidence for student learning objectives in the district. Many times, baseline scores are determined from a series of assessments offered throughout the district for individual students and this tool is designed to make this process easier. These Master Assessments must be configured before this tool is used. Once a master assessment is created, it will display as an option in this pull-down menu. Master Assessments can also be linked using the Assessments Import tool so this grouping can happen automatically.
Average question scores for final score
This is a unique assessment tool that changes the way that the final score of an assessment is calculated. If enabled, eDoctrina will take the total points earned for each student and divide this by the total number of questions. This option is best used when questions are valued equally, but can be used in other ways as long as the assessment is designed with intent.
Assessment Dates
As a stand alone feature, assigning assessment dates and/or times here will restrict any users from assigning this assessment outside of these date ranges. If used in concert with the "Auto Assign to Linked Courses" feature, the date indication here will automatically make the assessment available online to all students that are enrolled within the linked courses for the date/time(s) indicated here.Auto Assign to Linked Courses
This feature is turned on within the district settings and allows district admin user types to configure an assessment to be automatically assigned to students if they enrolled in a course that is linked to this assessment. Assessment Dates will need to be configured for so eDoctrina knows when to make this assessment available to students online.Include in Nightly Export
Assessment data can be sent to a secure site if this option is enabled. This feature is designed to match a specific export format, so if modifications are needed, please contact the eDoctrina team for any customizations that may be needed.
Quiz
The quiz feature could be the answer to offering multiple choice assessments without having to make an online assignment. If enabled, students will be able to sign into their eDoctrina accounts to take a multiple choice assessment. A password must be entered for this tool to work as designed as students will need the assessment ID# and the password to get access to enter their student responses.
Allow Revision Snapshot
This feature allows a user to capture multiple revisions of student work for a constructed response in an online assessment. These responses can be pulled into the Individual Student report and will be automatically date and time stamped.
Student Goals Settings
The eDoctrina student goals module, better known as the RTI Tracker, is customizable to meet the unique needs of each of our partnering districts. The district settings for this module a to develop a district wide standard for supporting student goals and interventions. Here you can define fields, set discussion board preferences control the level of access rights to your district users.
Student Goals
-
Custom Field Label #1 through #3: The standard options for text entry fields for a student goal are Goal, Method, Target, and Frequency. While Goal is a hard-coded mandatory field, the other three are not and the titles of these text fields can be modified according to district preferences. These three fields can also be made mandatory by selecting the checkbox below each field. If a field is mandatory, users will not be able to successfully save a student goal until the indicated fields are populated. The option to have these fields displayed as pull-down menus is available to drive consistent selection. If a pull-down menu is desired, the options in the pull-down menu are defined in the templates section below. As soon as you add an option linked to one of these fields, the text field will update to be a pull-down menu.
-
Enable Student Goal Discussion: Selecting this checkbox will enable a discussion board for each student goal. This can be used if multiple users will be providing service to a student. The entered comments can be included on the print out if selected.
-
Student Goal Comment Draft Option Enabled: Selecting this checkbox allows users to enter a "draft" comment, which will be private to the user that has entered the comment. Draft comments are great tools for personal note taking that does not necessarily need to be shared.
-
Enable Learning Standards: Selecting this checkbox will add a section to the Student Goal Editor that will allow users to link learning standards to student goals.
-
Service Provider Can Edit: By default, the service provider cannot edit a student goal. Selecting this checkbox will allow users edit student goals for students who they have been designated as the service provider within each student goal.
-
Linked Teacher Can Edit: Selecting this checkbox will all users who are designated co-teachers edit a student goal for students enrolled in these classes.
-
Participant/Service Provider Notifications: When a participant is added to a student goal or student form, they will receive an email notification
-
Templates:
Templates are a way to change student goal text entry fields into pull-down menus. Once an element is added to a specific field, the corresponding field in the student goal editor will display as a pull-down menu to allowing user to discretely select a choice from a standardized menu. To utilize the student goal templates it is important to understand which fields are being referenced before building the pull-down menu.
-
Field: The field designation maps the Text option to the respective field within the student goal editor.
-
Goal: This refers to the main mandatory goal field within the student goal editor.
-
Custom field #1 through #3These fields refer to the three custom fields that can be defined/titled above.
-
Intervention Description: This refers to the description field when entering intervention data within the student goal editor.
-
Custom field name #1 through #10: This refers to the metadata that can be linked to a specific data point when entering progress monitoring data within the student goal editor. These fields are custom in accordance with district preferences and many districts will not use all ten custom fields. The names of the custom fields are determined in the Student Goal Types option in the Database Setup options in the settings menu. Custom field names are unique to each student goal type.
-
Text: The entered text will be how the option in the pull-down menu for selection of users in the student goal editor.
Templates are a way to change student goal text entry fields into pull-down menus. Once an element is added to a specific field, the corresponding field in the student goal editor will display as a pull-down menu to allowing user to discretely select a choice from a standardized menu. To utilize the student goal templates it is important to understand which fields are being referenced before building the pull-down menu.
-
Field: The field designation maps the Text option to the respective field within the student goal editor.
- Goal: This refers to the main mandatory goal field within the student goal editor.
- Custom field #1 through #3These fields refer to the three custom fields that can be defined/titled above.
- Intervention Description: This refers to the description field when entering intervention data within the student goal editor.
- Custom field name #1 through #10: This refers to the metadata that can be linked to a specific data point when entering progress monitoring data within the student goal editor. These fields are custom in accordance with district preferences and many districts will not use all ten custom fields. The names of the custom fields are determined in the Student Goal Types option in the Database Setup options in the settings menu. Custom field names are unique to each student goal type.
- Text: The entered text will be how the option in the pull-down menu for selection of users in the student goal editor.
Permissions Explained
Base User Types
The base user types below are the most broad levels of profile types that have been developed by the eDoctrina team. This allows our design & development team to apply common rules on the most general level. For each base user type, it is most important to understand that all school-based users within the district are linked to a specific school, which means their access throughout the system may be limited within the school they are linked to. The only base user type that is not linked to a school is the District Admin, which is defined for users that should have access to the entire district and explains why they choose "-any-" for the school upon login. All users in eDoctrina must be assigned to a specific base user type, so it only makes sense in the non-existence of any other profile permissions that the district user should follow the configured permissions for their assigned base user type.
Currently, eDoctrina offers the following base user types:
- District Admin: This base user type has the highest access of any users within the district. They will be able to access all assessment data, all district-created content, and all staff members. They will also have access to many district configuration options. Normally, there is only a few users within district with this level of access.
- School Admin: This base user type will have access to all assessment data, all content created within the school that they are linked to, and all staff members that are linked to their school. By default, they can perform all the required actions for their respective school.
- Teacher: This base user type is one of the more limited as they will only have access to assessment data for students that are currently enrolled in classes that they teach. In regards to content, they will have access to everything that they have created and are linked to in configuration.
- Progress: This base user type is assigned to student accounts that directs the students to the PROGReSS screen. The standard name of this user type is student. These users will only have access to online assessments, their published assessment results, posted lesson plan information, the BeHAVE store, and SOLe.
- Guardian: This base user type is a read only profile duplicate to a PROGReSS account so parents and guardians can have an account to view the assessment results and lesson plan information for the students that they are directly linked to.
Base User Type vs. User Type
Districts also have the opportunity to create their own custom user types, but it is important to understand that there is a difference between a user type and a base user type in eDoctrina as a base user type may contain one or many user types. For example, a user type of "Teacher Aide", "Paraprofessional", or "Teacher" may exist, but they all can be a "Teacher" base user type. When permissions are assigned to a user type, it will define access rights of a specific user type. An example of this would be two School Admin base use types: an Assitant Principal who has building wide access and a Department Chair who may have only acess to all users in the same building with the same department code. When permissions are assigned to a base user type, this will define access rights to all user types that are within that subset. But as soon as a permission is added for any specific user type, these will be the permissions that apply for that corresponding security scope. In the image below you can see an example of three User Types in a district that all follow the basic rules of a School Admin Base User Type.

NOTE: District do not have to use any customized user types as many choose to use the four main base user types of District Admin, School Admin, Teacher, and Student.
User Permissions can be applied at three different levels
While the base user type permissions are not editable as they are a standard configuration determined by eDoctrina, permissions for specific user types or users can be customized within each district in case where districts decide to be more or less flexible in a specific module. If district permissions exist for any security scope at the user type level, users with this user type will no longer follow the rules set by the base user type, but by the rules defined within the district user type permissions. It is also possible to apply permissions to specific users to define access rights for their user profile specifically. Just remember that the signed in user will follow the the most specific set of permissions for a given module or tool. So if there exists permissions for any security scope in the purple circles below, these will be the ones that apply.

NOTE: If no permissions can be defined, the system will assume the action will be denied.
Where are District level User Type permissions managed?
Although it is best to ask an eDoctrina team member about these permissions or any district settings, they can be managed by District Admin users within the district settings. They are lcoated at the bottom of the district edictor and offer a search feature to find a specific security score and the ability to filter by the user types that exist within the district. If there are permissions that are applied to the selected user type, it is easiest to find these permissions by using the scope filter to quickly find the security scopes that have permissions.

NOTE: Do not be alarmed by the non-existence of security actions at this level. If no permissions exist, it just means that this user type will follow the rules of the associated base user type.
Where are User specific permissions managed?
When user level permissions are applied, it usually means that there exists a single user that has special privileges in the district and it is not beneficial to create a user type. Sometimes there is a specific tool that may be needed for a system administrator, such as access to import files, that will only be used by a single user. These permissions can be applied in the same nature that they applied at the District level user type permissions, but these are located within the user editor. The only difference is that the user type filter is not present in the user editor. The most important thing to remember is that permissions applied at this level are the ones that the user will follow for the corresponding security scope.
What are Security Scopes?
Security Scopes are usually linked to a specific page or module within eDoctrina. For example, there exists a "Users" security action, which refers to the User Accounts homepage. In most cases, if security actions are defined under this security scope, it refers to something on this page.
What are Security Actions?
User permissions are directly related to security actions and each security scope has its own set of security actions. Although to most common security actions are:
- Access: this defines whether or not a user can use the defined security scope.
- Insert: this defines whether or not a user can create an item withinthe defined security scope
- Update: this defines whether or not a user can make changes for the security scope.
- Copy: this defines whether or not an item in the list can be copied within the defined security scope.
- Remove: this defines whether or not an item can be deleted from the list within the defined security scope
It is possible the there exist very specific security actions that only apply to a specific security scope. One example of this would be the "Observe" security action that is within the "Users" security scope. This action determines whether or not the signed in user will be able to conduct observations on district users. This is relevant as there may be some users that need access to specific users, but should not be involved in anything regarding staff observations.
Applying User Permissions
Before applying any district specific user type or user specific permissions, it is important to understand where each of the security scopes apply within eDoctrina and what each security action does. If the desired result is known, district admin users will have the ability to apply permissions within the district editor and/or the user editor. To add a new permission, simply click on the  button next to the desired security scope. To edit an existing security action, click on the
  button. The following pop-up will appear where the security action can be defined.

The top two pull-down selections, Action and Permissions, define the permission that is being applied. The options in the Action pull-down will be all actions that are applicable to the selected security scope. The Permissions pull-down will have only two options: Granted and Denied.
The bottom two pull-down menus will exist for only some security scopes or actions, but can be used to indicate which target user types or base user types the security action will be directed towards. This is where very granular access rights can be defined. These are not required fields and can be selected as "--any--". In these cases, the security action will target all users that the base user type has access to. For example, there may exist some instances where a user group will need to observe only "Guidance Counselors", but not "Teachers". In this case, we can set the Observe security action to "Granted" for the Guidance Counselor user type, but also set the Observe security action to "Denied" for Teachers. In the cases where a permission should be applied to only one base user type, keep the user type selection as "--any--" and select the desired base user type in this Base user type pull-down.
It is also possible to apply security actions to specific department codes if these has been imported with the staff member user profiles. If department codes exist, we can check the checkbox within the security action and the permissions will then only be applicable to users within the same department. This is a great tool if Department Chairs need to provide observations for teachers in their department, but should not have access to any other teachers within the district.
Ask about permission sets?
eDoctrina also offers the opportunity to group permissions sets and apply these groups of permissions to specific users in the district. Assigning a user a permissions set is equivalent to selecting all permissions in the set on the specific user. If there exists a specific user type modification that is applicable to many users, this may be great tool to explore.

District Specific Accommodations
Please note that there are some hard-coded permissions throughout eDoctrina's interface that are determined to provide the optimal experience for all of our partners. Although it is not our preferred way of meeting customer requirements, sometimes the general framework does not align with district preferences so a modification needs to be made. This design allows for flexibilty and allowing us to modify certain access rights to the various levels. Get in a conversation with the eDoctrina team if you would like to get this conversation going.
03.D.10 Text-To-Speech Highlighting Tool
eDoctrina now allows the option to have assessment questions, passages, or an entire test read to students while highlighting each word WITHOUT having to link audio to every question and passage! This new tool can be used with an entire class, or assigned to specific students!
VIDEO: To see a short video on how to enable this feature within the assessment editor, please click HERE
- This tool will read text that has been typed or entered using copy/paste.
- Images pasted into the program cannot be read.
- Text-to-Speech can read questions built through our equation editors.
- If the user would like to personalize audio for any questions read aloud to students, the user can add a recording of their own voice through our Record Audio tool. (This tool is detailed at the end of this Help Document.)
To enable the Text-to-Speech highlighting tool, the user must first venture to the "Online Settings" section of the assessment editor. Under the "Student Tools: Language Tools" menu, find the option "Allow Text-To-Speech".
When enabling Text-To-Speech, the user is able to select from three options: (1) To read all passages and questions (2) To read questions only (3) To read passages only.

The user can even select a certain type of voice reader using the filter to the right of this option!
Student View
When students login to take an assessment with the Text-To-Speech Highlighter enabled, each question will have a small audio icon available ![]() . When this icon is clicked, the feature will enable and begin to read.
. When this icon is clicked, the feature will enable and begin to read.

Once the feature starts to read, the text will highlight word-by-word as it is read aloud. Additional icons will appear allowing the student to pause the feature, or start reading from the beginning.
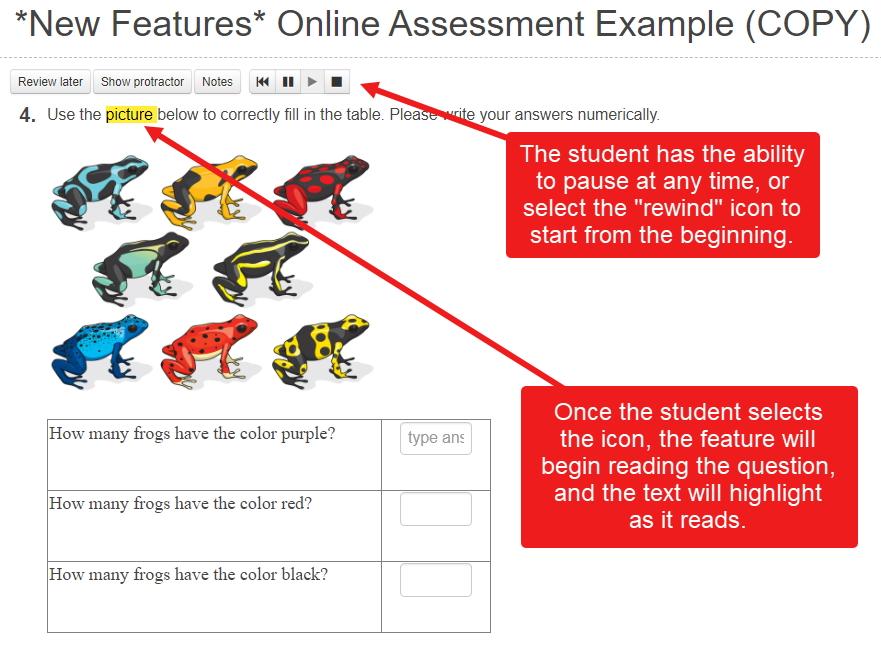

In the event that a student would like to choose where they would like the TTS engine to begin reading in a passage, question, or answer choice, they can simply right click where they would like to begin and select Play from here.

The tool will begin reading wherever the user selected to begin as opposed to starting at the beginning. In the even that they want the entire passage, question, or answer choice selected, they can also right click and select Play Passage.
Formatting Text-To-Speech for Questions Made in Equation Editor
If for any reason the user would like to change the words being read aloud for the equation, follow these steps:
o Right click on the equation
o Select “Image Properties”

o Edit the words in the “Alternative Text” box to reflect EXACTLY what the user wants read aloud by the Text-to-Speech tool when the equation is read to students.
o Click “OK.”

Assigning TTS Highlighter to Specific Students
VIDEO: To see a short video on how to assign this feature to specific student, please click HERE
If the TTS Highlighter is not something the user would like assigned to all students, but rather to a select group of students with testing modifications, this feature can be enabled for those kiddos while assigning the assessment.
From the Teacher Dashboard, assign the assessment as one would normally assign any test to students. To learn more about assigning online, please click here.
Once the Start and End time have been selected, and the additional modification options are enabled, the 4th column will represent the TTS feature.

For students that need this feature turned ON, the user can simply click the blue "N" next to their name. There are three options for enabling the TTS. An orange "A" will enable TTS for questions and passages, an orange "Q" will enable TTS for questions only, or an orange "P" will enable TTS for passages only. Any students that needs this modification will need to have it manually turned on by making the blue "N" an orange "A" , "Q" or "P" in the TTS column.
Permissions Explained
User Accounts
User Accounts
- Access: This is the main control for access to the user accounts screen.
- Insert: This settings applies to the ability to create a new user within the district. District-Based users will be able to create users for the entire district, while school-based users will only be able to create users within their assigned school.
- Update: This setting applies to the ability to change user profile settings for any user that is accessible to the signed-in user.
- Remove: This setting applies to the ability to delete or remove users from the database. It should be noted that delete actions are usually prohibited for any user that is linked to existing data. In these cases, making the user inactive is likely the best solution.
- Copy: This setting is not applicable to this page.
- Impersonate: This setting is related to the ability to log in as a specific user group within eDoctrina. It is possible to allow a specific user type or user group to log in as other specified user types or user groups. This is a great control for any user or user group that would like to act as another user for training or troubleshooting scenarios. Although this action can serve as a great tool, user impersonation should not be considered as a way to reduce personal liability.
- Observe: This action is related to the ability to conduct observations on specified user types or user groups. On the users screen, this controls the "eyeball" button. It should be noted that if the "eyeball" exists for a user on this screen for the signed in user, the signed-in user will also have this user in their listing on the Assignments layout view of the OBSeRVE Dashboard. This permission can be set to allow specific users or user groups the access rights to provide observations for other specified user groups, but can only be applied on the user type or user group level. If someone needs to observe a single user, they should be assigned as an observer for the user that they will be observing, which also requires the observer indication for the observing user within the Security Settings of their user profile.
- Observe myself: This action is applicable if and only if there exists observation rubrics configured to allow self-observations. If access is granted, the signed-in user will be able to conduct a self-observation on themselves.
- Access data about me: This action is related to the signed in user's access to all user related data about themselves.
- Access data about other people: This action is related to the signed in user's access to all user related data about other users.
- Assign Observer: This action is related to the ability to assign an observer to a specific user. The observer assignment overrides any existing observation rights and is often useful for assigning outside observers to users. Many districts also use the observer assignment to organize the yearly workflow for all observers within their district.
- Assign evaluator: This action is related to the ability to assign an evaluator to a specific user. The evaluator assignment is predominantly linked to receiving email notifications for student learning objectives. There is also some filters and reports that utilize the evaluator. This evaluator is not linked to any access rights.
- Assign Model: This action is related to the ability to assign a TE Model to a specific user. Assigning a model to a user provides them with the configured TE report, such as the Effectiveness Index report or other reports that have been customized to district specification. TE reports call up yearly data in data sources and provide opportunities for various data centric reports.
- Export to Excel: This action is related to the exportable Users List Report which includes all of the information in the filtered users list, as well as some other user-based information such as state ID number and school code.
- Merge: This action is applied to the ability to merge users accounts that are deemed to be the same user. This permissions is usually provided to users who have been trained on the benefits and shortfalls of merging users in eDOctrina.
- Assign CLF: This action applies to the student learning objective module as an assigned CLF user can access a user's SLO with view only permissions and contribute to the SLO discussion board (if applicable).
- Mass Un-assign CLF: This action applies to the ability to remove a CLF assignment.
- Un-assign Observer: This action applies to the ability to remove an Observer assignment.
- Usage Report: This action applies to the user-based usage report where eDoctrina activity regarding creation of units, lessons, and assessments can be viewed, as well as login activity, assessment administration, and accountabilty information.
- Link users: This action applies to the ability to link existing users in eDoctrina. Linking users allows the linked user accounts to quickly toggle between one account to the other.
- Un-link users: This action is related to the ability to unlink users that have previously been linked.
- Make same person: This action applies to the ability to make two user accounts the same person so each account can perform the same actions as the others without having to log in to the other accounts. This is a great feature for teachers who are linked to more than one school.
- Make separate persons: This action applies to the ability to separate user accounts that have previously been marked as the same person.
- Reset passwords: This action applies to the ability to single reset or mass reset passwords for users from the user accounts homepage. This is different from reseting a password within the user account editor.
- Create Yearly Accounts: This action applies to the ability to merge accounts that will be dependent on the year so unique user accounts and permission sets can be applied to the same user for different years.
eDoctrina Integration with ProgressBook
ProgressBook Side
The first step in sending grades from eDoctrina to ProgressBook is to set up an assignment in ProgressBook. To do this, the user must create a new assignment in their ProgressBook account.
Creating an Assignment in ProgressBook
To import assessment data from eDoctrina to ProgressBook, an assignment shell must be created. To create this assignment shell, a user will need to navigate to the class section they wish to create the assignment for. Then click on "Add Assignment":

Clicking on "Add an Assignment" will take the user to a new page to populate the Assignment with the necessary details.

The user will be prompted to enter a description, an assignment type ("assignment"), and a due date. Note that the user is also asked to enter a maximum points value. The points value in ProgressBook must match the points value in eDoctrina in order for grades to sync correctly. For example, if your eDoctrina assessment has 17 questions worth one point each, then your ProgressBook assignment should also be a total of 17 points.
eDoctrina Side
To send assessment data from eDoctrina to ProgressBook, a user must access the Answer Entry/Verification screen. To access this screen, a user must first navigate to the Teacher Dashboard. From the homepage, a user can get to the Teacher Dashboard by clicking on the "Answer Entry" tab or utilizing the "reports" dropdown at the top of the page and selecting "Teacher Dashboard."
This will route the user to the Teacher Dashboard. Here, the user can select the course, class, students, and assessment for which to send data to ProgressBook. Once these selections are made, the users should choose the "Check Student Answers" option.
This will bring the user to the Answer Entry/Verification Screen. Here, users should ensure that there is data for students and that the data is correct. Once the data is verified, users can select the option to "Send Scores to Grade Book."

eDoctrina will request the assignments that are available for the selected class from ProgressBook. The user will be asked to select the target assignment to which the data should be sent. This assignment can be selected by clicking on the circle to the left of the desired assignment. Once the assignment is selected, the user can proceed.

Please note that only one target assignment can be selected at a time. Therefore, it is not advisable to attempt to export data for multiple class sections at once.
Once the target assignment is selected, the user will be asked to check the scores before sending them to ProgressBook. The eDoctrina score will populate in the eDoctrina column. If the student already has a grade for the assignment in ProgressBook, the grade will populate the VendorLink Score column. If not, this column will be empty.

Once the scores are verified, the user can select "Proceed." When completed, the user will get a notification that the scores have been sent.
The user can now log into ProgressBook and verify that the data has been sent successfully.

Go back to Assessment Editor: Main
Print Test
Helpful Hints:
- Clicking the print button is a great way to check the format of your assessment. You will be able to preview before you send the test to be printed on your printer.
- You should also print some answer sheets if you are offering a physical assessment.
Frequently Asked Questions:
Q: Can I change the font of my assessment when I print it?
A: The font size can be modified in the print options before the assessment is printed. The font size will change for all entered text, but does not apply to images or equations entered with the built-in equation editor.
Q: What is the default font size and style?
A: Although the font size and style can be modified, the default font size within the assessment editor is Arial 14pt. There does exist the option to modify this upon printing and many cases the default is set to Arial 9pt when printing an assessment. If you choose "As Designed", the assessment will print with the select font size and style for each individual question.
Lessons Learned Log
- Printing an assessment and offering an assessment online can behave differently in regards to format. Sometimes a copy of the assessment needs to be made to accommodate for the format differences.
Go back to Assessment Editor: Main
Preview Online
Go back to Assessment Editor: Main
Share/Embed
Go back to Assessment Editor: Main
Save, Save & Close, Cancel & Close
Go back to Assessment Editor: Main
Assessment Editor Formats
Go back to Assessment Editor: Main
Assessment Name
Helpful Hints:
- Name you assessment so you can easily search for it using a keyword search.
- The name of the assessment displays on answer sheets, printed assessments, online assessments, and basically all assessment reports.
Frequently Asked Questions:
Q: Can I change the name of the assessment after it has been named?
A: As long as the signed-in user has permissions to edit the assessment, they will be able to update the name of the assessment at any time.
Lessons Learned Log
- Determining a district-wide naming convention has helped districts to organize their assessment bank so it is easier to find the correct assessment.
Go back to Assessment Editor: Main
School Pull-Down
Go back to Assessment Editor: Main
Administration Date
03.D.11 Setting up NYS CBT Math Questions
Create a Question with a Show Your Work Field Preceding Answers Field
The NYS CBT's format many math questions with a "Show your work" field preceding an answer field. The image below is from one of the released practice assessments NYS has made available:

To set up a question with the same format in eDoctrina, it must be either a Teacher Scored or Fill-in-the-Blank question type. This can be selected in the following location:

If the user selects Teacher Scored as the question type, student work will have to be graded on either the Teacher Completed Test(s) screen (ENTER button) or on the Answer Verification screen (CHECK button). Fill-in-the-Blank questions will automatically grade student work based on the acceptable answers provided.
To set up a question to match the NYS CBT example above the user will need to use Answer Tools available in the WYSIWYG editor. To add an equation editor as a the work field, do the following:


Then add an input box as an answer tool by following the same steps as above and selecting Input from the Answer Tool pop-up. The user can adjust the width of the input box by defining it in the pop-up:

The question will look like the following for a student taking an online assessment:

If the user utilizes a Fill-in-the-Blank question type, the acceptable responses need to be recorded for eDoctrina to auto-grade. Additionally, we recommend using the Scoring type "Multiple correct answers, partial scoring" so that the show work field is not graded. In the image below, the first answer tool (the equation editor) is worth 0 points, so students work will not be graded for points. The second answer (the input box) is worth two points and a student will receive both points if they enter 7, seven, SEVEN, or 7.0 as their answer.

If the user chooses to use the Fill-in-the-Blank question type and would like to assign points for the show work field, then enter a point value and grade student work like a Teacher Scored question on either the Teacher Complete Test(s) (ENTER button) or Answer Verification (CHECK button) screens. We recommend this because it would be improbable to account for how all student's would show their work, so it would be best to grade this manually.
If you have any questions about this, don't hesitate to email the help desk at [email protected].
To set up a question to match the NYS CBT example above the user will need to use Answer Tools available in the WYSIWYG editor. To add an equation editor as a the work field, do the following:
Go back to Assessment Editor: Main
Info/Edit Metadata Button for Individual Questions
Helpful Hints:
- Entering metadata is essential for building question banks that are easily searchable to provide more value to assessment creators.
- Any new questions that are created within an assessment will automatically be linked to the grade that is selected for the assessment.
- Question Tags can be searched for when using the keyword search in the question bank and are very useful when there is a need to categorize a question beyond the available options. Enter them as comma separated values to enter more than one.
- Error codes are a great tool to identify the common mistakes that students make on a given question
Frequently Asked Questions:
Q: Are there any questions that have error codes already loaded for them?
A: By nature, error codes may be unique to the teacher and students involved, so eDoctrina does not add them to our free items bank. If entered for questions within your district, these error codes will follow the question if the assessment is copied or if the question is added using the question bank tool.
Q: Im am not sure what grade the question belongs to, what should I select?
A: To allow the question to show up when filtering for grade levels in the question bank tool, it is best to select many grades so the question will show up when someone searches for any of the selected grades. In this case, linking the question to more grades is most appropriate.
Go back to Assessment Editor: Main
Uploading Attachments to Individual Questions
Helpful Hints:
- Attachments to individual questions can help to provide students with the necessary resources to answer an online question without having to enter the information in the question text.
- Attachments will display to the student in their online test taking experience and they will have the option to show/hide the attached file(s)
- Attachments will be available for each question within the Grid and List view of the Teacher Completed screen
Frequently Asked Questions:
Q: Are there any file type restrictions for this upload tool?
A: All of the typical file types are supported with this tool. If there is a file type that is not acceptable, please contact the eDoctrina Help Desk at [email protected] so we can investigate to see if files of this type can be added to the acceptable file list.
Go back to Assessment Editor: Main
Special Instructions for Individual Questions
Helpful Hints:
- Special Instructions, when entered, will always display above the question in both online and printed assessments
- It is possible to add images, reference to specific resources, hyperlinks, and a lot more. If directions or instructions are needed to guide students in how to answer a question, this is a great place to add these.
Frequently Asked Questions:
Q: Can I add a hyperlink to another website?
A: Yes, just access the special instructions pop-up and click the button in the text editor tools that looks like a chain link. You can enter the link to the other website here.
Q: Can I embed or upload a video for special instructions?
A: Yes, we have the ability to upload videos as special instruction, but there is a file size limitation that restricts from uploading extremely long videos. It is suggested to utilize an external link in this case. If the video exists on a website, such as Youtube, that provides an embeddable link, you can easily include this by clicking the "Embed Media" button. Of course, this is only available for online assessments.
Go back to Assessment Editor: Main
Scoring Guides & Teacher Instructions
for Individual Questions
Helpful Hints:
- Teacher Instructions can be printed by choice and are usually printed as a master copy for the teacher to hold as a resource.
- Scoring Guides will only print if the "Answer Key" option is selected in the print settings.
- Scoring Guides are available electronically through the Answer Entry/Verification screen to help enter grade in a paperless manner.
Frequently Asked Questions:
Q: What is the difference being a scoring guide and rubric text?
A: Rubric text is supposed to be entered for each possible point that can be earned on a Teacher Scored question and can only be entered as text. The Scoring Guide is more flexible and allows for images, attachments, and much more. Rubric text is great for rubric-based questions and scoring guides are a great tool to provide grading instructions for individual questions.
Q: Can students see techer instructions when taking a test online?
A: No, teacher instructions only display to the teacher when they are signed into eDoctrina and will only display on the printed version of the test if the option is selected in the print setttings.
Go back to Assessment Editor: Main
Select All, Unselect, Delete Selected
(and a couple related tools)
Helpful Hints:
- When creating a passage, it is a good idea to select all of the questions before clicking the "Add Passage" button so the selected questions will automatically be linked to the passage upon creation.
- To copy a question within an assessment, you will need to select the questions first, then click the "Copy Questions" button to make an exact copy of the selected questions. They will be added to the end of the assessment and given the next available question number(s).
- Scoring Guides are available electronically through the Answer Entry/Verification screen to help enter grade in a paperless manner.
Frequently Asked Questions:
Q: Why can I not delete a question?
A: Questions can be manipulated as long as there does not exist student data. In these cases, the best option is to exclude the question by changing the special scoring. If the question needs to be removed for future test administrations, it is best to create a copy of the assessment, then delete the question.
Assessments Homepage
eDoctrina's Assessment Homepage is where all assessments that the logged-in user will have access to. From here, assessments can be created and managed.
Filters
The filters on any page in eDoctrina determine what items display in the listing as each element in the list is linked to specific attributes, such as the year, subject, and grade. Remember when filters are selected that the items in the list will reflect exactly what is selected in the filters. If you are having trouble locating a specific item, try resetting the filters and selecting only one filter at a time. In short, less filters will return more items. When filters are not selected, the assessment listing will show all assessments without considering that specific filter.
-
Search
The best way to identify an assessment is by searching using the keyword or by the assessment ID#. This field also will search the "Tags" field within the assessment editor. -
Test Bank
Any assessment that has been created by a district user will be stored in the test bank named with the district name. Depending on access rights and current subscriptions, users may also find other test banks in this filter, such as the eDoctrina FREE Items Bank or a unique paid items bank. Some districts also are part of a collaborative test bank that can be managed and they will find this test bank as an option here ass well. -
School Year
Although it is a best practice to keep all assessments updated to the current year, there is the option to find assessments that are linked to past and future years as well. -
School
THis filter is hidden for users that only have access to a single school, but if users scaffold across more than one school, they will have the option to filter for assessments that have been created within a specific school. -
Course
If the course is selected in the filters, only assessments that have been linked to this specific course will display in the assessment listing. -
Main Subject
This filter is only applicable if the district subjects have been linked to a main subject. -
Subject
If the subject is selected, the assessment listing will be reduced to display only assessments that have been linked to the selected subject(s). -
Grade
If the grade is selected, the assessment listing will be reduced to display only assessments that have been linked to the selected grade(s). -
Unit
The Unit filter is a dynamic single select option that will show all units that fit the preceding filter selections. For example, only units linked to the selected course will be available in this filter if selected. -
Type
Assessment type is a required selection for assessment creation so this is always a reliable filter. Assessment types are custom by district. -
Creator
Arguably the most valuable filter on any homepage anywhere in eDoctrina. It is possible to filter for the creator of assessments to only display assessments that we built by a specific user in the district. It is also possible to set user defaults in "My Account" to always have your name set as the creator so you will only see assessments that you have built. -
Scope
Assessments can either be active or inactive in the assessment list. The default in this filter is "active Only", so if an inactive assessment needs to be found, this filter can be changed to "All" or "Inactive Only"/ -
Visibility State
This selection allows for end-users to quickly identify assessments that have been marked with a specific visibility state. -
Workflow State
This selection allows for end-users to quickly identify assessments that have been marked with a specific workflow state. -
Start Date/End Date
Filter by assessment date to reduce the assessment listing to show only assessments that have been marked with a date within the entered range. It is possible to use only the start date or only the end date.
Page Buttons & Controls

-
Create +
The create button is where any user will go to begin the creation of a brand new assessment within eDoctrina. Once this button is clicked, there will be a series of pop-ups that will make the first steps of creating an assessment easier for any user. -
Copy
The copy button is the easiest way to copy more than one assessment at a time. Simple select the checkboxes next to the assessments that need to be copied, then click this button to copy assessments en masse. -
Submit to BANK
When school disticts work to collaborate on a common test bank, this option will submit the selected assessments to a selected test bank. There are many different utilizations of shared test banks, so please contact the eDoctrina team if you want to learn more. -
Mass Update
This button allows for mass updating many assessments at one time. This is possible to do for various cateogrical information as well as privacy controls. -
Mass Assign
This button allows users to assign multiple online assessments to students in one action. -
Export to Excel
This option is a quick way to export the displayed list of assessments to a Microsoft Excel spreadsheet. The information that is exported is limited to the information displaying in the list. -
Print Assessment(s)
This option allows for mass printing more than one assessment at a time. Once the assessments are selected and this button is clicked, the end-user will be presented with the stabdard assessment printing options that will be applied to all printed assessments.
-
Print Answer Sheets
There are some occasions where it is necessary to print answer sheets for more than one assessment. If this is the case, find the assesmnets i the list, select the corresponding checkbox, click this button, and the standard answer sheet printing options will be available for selection. -
Hide filters
the filters can take up a considerable amount of space on your screen depending on the device you are using. Select this option to hide/collapse the filters and view more of the assessment listing. -
Reset filters
Reseting the selected filters is sometimes imperative to finding a desired assessment. If you are experiencing trouble finding a specific assessment, try resetting filters and try again. -
Refresh
The refresh option will reload the browser in the same manner as the control in your browser options and by keying CTRL + R.
Common Action Buttons
-
Edit
The edit pencil will only be available for assessments that the signed-in user has permissions to update. Clicking this button will direct the user to the assessment editor for the selected assessment. If you would like to edit a specific assessment, it is best to contact the person that is listed as the creator.
-
Copy
The copy button will be available for all assessments that allow copying. The most simple way to remove the copy feature is to select the access control option within the assessment editor.
-
Preview Online
This button is essential to use if you are ofering an online assessment to students as you can preview what the selected assessment will look like when the assessment is being administered to students.
-
Assign Online
This button will actually take you straight to the Teacher Dashboard where it is possible to Assign an online assessment. Using this feature helps because it will automatically select this assessment over in the Teacher Dashboard to you do not have to go hunting through the list again.
-
Print Assessment/Answer Sheets
It is possible to Print Assessments and their respective Answer Sheets by selecting this option right on the Assessments homepage.
-
Import Assessment Data
If an assessment is already built within eDoctrina, it is possible to import assessment data as long as the imported file has the student UID and unique data for each question for each respective student.
-
Delete/Make Inactive
Deleting an assessment is actually just making it inactive within the system. Inactive assessments can always be retrieved by filtering for them.
03.D.12 Revision Snapshot
Revision snapshot is a great feature that allows multiple drafts of a student response to be stored, commented on by teachers, and pulled into a report for students. This option must be turned on in your district's database settings. If this feature is not available for your district, please have an administrator contact us to enable it.
The first step in using this feature is to set up an assessment with a Teacher Scored question that will be used to capture students' writing online. Then make sure the following setting is selected in the Additional Settings section of the Assessment Editor:

From there, a user must assign that assessment to students from the Teacher Dashboard. A student will login and take the assessment as they normally would, and select Submit when they are done with that version of the draft. Now, a teacher can grade the student work and leave comments on the Teacher completed test(s) screen.
In order to add a teacher comment, highlight the text within the student work, then click the Comment bubble to add the teacher feedback.

Once grading and/or comments have been entered, a user must ASSIGN the assessment to students again in order for them to work on the next revision. When a student logs in to their PROGReSS account and begins the new draft they will hoveror click on the teacher comment icon as shown below:

When all revisions are complete the user can run the Individual Student Report with the "Show Revision Snapshot" option like so:

The report will show the following:

Go back to Assessment Editor: Main
Assessment Visibility, Workflow & Teacher Verification Settings
Helpful Hints:
- A visible assessment can be accessed by any user on the Assessments Homepage and the Teacher Dashboard for printing answer sheets, assigning online, and grading.
- An Invisible assessment will only be availble to admin accounts. Teachers will not be able to view an invisible assessment on the Assessments homepage or the Teacher Dashboard.
- Secure assessments will be available for teachers to print answer sheets, assign online, or pull data reports. The secure setting protects that assessment from be printed and shared by teacher users.
- The Teacher Verification setting only applies to Secure assessments providing flexibility to allow teachers to grade specifc types of questions.
Frequently Asked Questions:
Q: Why am I not able to access the Answer Entry screen or Teacher Completed screen to enter my student responses?
A: It is likely that this is a Secure assessment. Please reach out to the creator of the assessment if this setting needs to be changed.
Q: Can teachers print answer sheets for or assign online a Secure assessment?
A: Yes, the design of Secure assessments is to prevent teachers from accessing the content within the assessment. Secure assessments allow teachers to gather assessment data, but they prevent them from distributing the content within the assessment itself.
Q: What is the difference between a Visibility State and a Workflow State?
A: Visibility states are hard-coded to behave a specific way to control viewing rights of a specific assessment. Workflow states a customizable according to district processes and can control a multitude of access rights. Ultimately, the main purpose of workflow states is to update the visibility status of the assessment in accordance with district processes, but there are some other access rights that are also linked to the selected workflow state.
Creating & Managing Custom Dashboards (for Reports)
Each assessment has an Access Controls section that can be set up by the test creator.

I have summarized the functionality of these options below:
Team Can Edit will allow only the teacher linked via the course (in the general settings section) to edit the assessment.

Shared Users Can Edit will allow only users linked via the Shared with filter to edit the assessment. The Shared with box right of the filter will allow you to search and link any other user in the district, granting them access to the assessment. They will only be able to edit the assessment if the Shared Users Can Edit checkbox is selected.

Do not share - Exclude From List will hide the test from the list of assessments on the Assessments page. Only the creator of the test, shared with users, and admins will be able to see or edit the test.

Do Not Allow Copy prevents users who can not edit the test from making their own copy of the test.

Hide from teachers not teaching linked courses hides the assessment on the Assessments page from any teacher expect those linked via the course in the general settings section.

03.D.2a. Online Assessment Settings (Per Question)
Online Tools
There are several tools that can be added to an online assessment for the student to use when answering questions: calculator, protractor, ruler, and sketch pad. Most of these can be accessed by clicking on the 'Online Tools' button on an assessment question.
If the question type is multiple choice, true/false, or fill in the blank; the option to include the calculator, graphing calculator, protractor, ruler and a work area is available.
If the question type is Teacher Scored, there will be more options available. With these options, the teacher will still need to review the student responses. For more information, please visit our help guide on Grading Online Assessments.
These options are:
-
Text editor: The Text editor option will provide students with the WYSIWYG text editor that is common throughout eDoctrina. This will allow students to enter basically any text or images in the same manner as they would with any other word processor. If this option is selected, it is possible to restrict student responses to a maximum number of characters.

-
Equation Editors: eDoctrina has released three equation editors to be linked to questions that directly mock the equation editors seen on the NYS CBTs. The three editors are "Gr. 3-4", "Gr. 5-6", and "Gr. 7-8". Each editor contains the necessary mathematical tools students of the corresponding grade level would see on the NYS CBTs.

For more information on these tools, click HERE for the Equation Editor Functionality sheet -
Sketchpad: The Sketchpad is eDoctrina's tool that allows students to draw on a previously uploaded image. Upon selecting the Sketchpad option, upload the image that will be displayed in the background. Once the image has been uploaded, it can be re-sized and manipulated to fit in the space.
NOTE: Images can be deleted and new images can be uploaded, but eDoctrina will ONLY allow one image to go in the background (of each sketchpad). This image should not be modified if there are any student responses recorded.
Users also have the ability to upload multiple sketchpads, with different images, to the same question. To achieve this result, first click on the question box to have the WYSIWYG editor appear:
Next, select the option for Sketchpad from the dropdown menu (users are able to move the image and re-size):
Repeat this process to add another sketchpad to the question. Here is an example of how this question looks to the student:.png "TITLE")
If no image is uploaded into the background of the tool, the Sketchpad Tool will provide a blank space for students to draw in (see the image below).
-
Upload to question: The Upload to Question option allows students to upload any file to eDoctrina from within the online assessment. If this option is selected, students will see a
 button.
If they click this button, they can upload any file(s) from their computer. More than one file can be uploaded here and can be accessed by the teacher when they decide to score this assessment.
button.
If they click this button, they can upload any file(s) from their computer. More than one file can be uploaded here and can be accessed by the teacher when they decide to score this assessment.
To activate this option, the question first needs to be marked as a Teacher Scored question. Next, select the Online Tools button on the question header -> click on the Answer Tool dropdown menu -> and choose Upload to Question:

Additonally, a checkbox labeled "Enable Camera Tool" can be selected, which will allow students to use the button. This button allows the student to take a picture using their default camera device and attach it to the question:

NOTE: For more information on how to retrieve student responses, please visit the help guide on Grading Online Assessments. -
Audio Recorder: The audio recorder tool gives students the ability to record their response.

NOTE: For more information on the functionality of this feature, please click HERE to see the help video - None - for scoring only: This option exists if a question needs to be scored for grading purposes, but does not require a response from the student through eDoctrina. Students will not see this question in online assessment view.
Recording Audio
Adding audio to questions in an online assessment can often increase the value of an assessment.
To record audio within an assessment, simply find the desired question to link audio to and locate the  button in the question tools:

A pop-up window will appear, prompting the user to start recording. The question is shown to read from when recording.

When users start recording, they will see an image indicating a recording is in progress. When the user is finished recording audio, simply wait 2-3 seconds in silence and click "Stop recording" to end the audio clip.

After recording, the user can preview their audio choosing to either save, or discard their work and record again. Once the user is satisfied with their audio recording, click "Save" to save this audio to the question.

After clicking on the "Save" button, the audio note will automatically be saved in the question shell. Once it appears, it is a good practice to playback the audio recording at least once to ensure quality.
Audio recording tips:
- Always ensure that the recording area is as quiet as possible.
- Allow approximately 2-3 seconds before talking into the microphone.
- Speak slowly and clearly.
- Allow approximately 2-3 seconds after the recording before clicking on the "Stop & Save" button.
Text-to-Speech
eDoctrina is proud to have updated the Text-To-Speech feature. This tool no longer needs to be customized per question. Checking a single box when creating an assessment enables the Text-To-Speech feature and automatically applies this option for all questions on the given assessment.

To learn more about the Text-To-Speech feature, visit this link Text-To-Speech Highlighting Tool.
Including Attachments
Some questions offered online can be enhanced by including supplementary information. It is possible to include an attached file with every question, if necessary. There is no current restriction on the file types that can be uploaded, which allows for ultimate flexibility in how questions are offered and the content that can be viewed.
To upload an attachment to a question, simply click on the  button in the question tools.
After the file has been uploaded, all students who have been assigned to this online assessment will be able to access the included attachment(s) for each question.


To enable the hint, the user will need to check the box in the 'Online Settings' section of the assessment editor:

03.D.15. Student Answer Recorder
Please click HERE to see our help video on using the Answer Recorder tool.
With the new Audio Recorder, students are able to record their responses to Teacher Scored and Fill in the Blank questions. Teachers can then listen to a student's recorded response and grade it on the Teacher Completed or Answer Verification screen.
Accessing the Recorder
This new feature can be enabled by selecting the "Online Tools" icon within the question editor.

The feature can be selected from the "Answer Tool" drop-down menu.

Once the feature has been enabled and the test assigned to the student, they will see a small microphone icon within the body of the question.
Afer clicking the icon, a pop-up will appear. Selecting "Start recording" will enable the student's microphone and allow them to begin recording their response.

Once they have recorded their response, they will be giving the following three options:

- Save: Selecting Save will save the audio file and link it to the question.
- Discard: Selecting Discard will delete the audio file and allow the student to start over
- Cancel: Selecting Cancel will close the pop-up and not save the recorded audio.
Once an audio file is saved, students will see it linked to their question. They can play the audio back using the play icon or delete it using the trash can.

Grading Student Audio
Once a student has completed their assessment and linked a recorded response to a question, the teacher is able to listen to the student's response using the Teacher Completed Screen and/or the Answer Verification Screen. These pages can be accessed using the ENTER (Teacher Completed) and CHECK (Answer Entry/Verification) icons on the Teacher Dashboard.

Within the Teacher Completed screen, teachers are able to use either the TCs view or the Page view to listen to a student's recorded response. On both screens the audio is available, as is a section to add any comments and a score.
TCs View:

Page View:

Within the Answer Entry/Verification screen, questions that were set up to include a student's recorded response will have the black flag in the corner like other additional teacher scored questions.

When clicking on the flag, a pop-up will appear showing the question and student's response, as well as a place for users to add a comment and point score for the question.

For more information on grading online assessments, please click HERE to view our help guide.
How Do Students Login
eDoctrina allows students the ability to login and take assessments online. Of course keeping track of all of these student usernames can be an arduous task, at times, but eDoctrina allows Teachers and Admins the ability to view current student usernames. Just follow the steps detailed below:
From any screen select the path Settings > Student Information Data > Classes. Many Home pages are customized and appear differently, than the one shown below. Some will have a Classes button that can be selected instead of using the path detailed above.
 Please Note that you may see more options in this dropdown dependant upon your access rights.
Whether the path is followed or the "Classes" button is selected, it will navigate to the Classes page, which will allow the User the ability to see their available Classes. Teacher Users will be limited to only seeing their classes where as Administrators will be able to see ALL Classes in the school or district. That being said Administrators may want to utilize the filters, within the gold pane, to narrow down the list of Classes. Once the Class is found, select the student icon to access the students, linked to the Class:

- When on the Student Schedule screen please make sure that the "Show" filter is set for "Enrolled Students Only." Users will see a series of columns including the UID and Username columns. In some instances the Student UID is being set as the password so in these cases all of the information for student login credentials (username and password) is right there. If a different password is being used it will not be visible on this screen, for security purposes. Please keep in mind that if a student resets their own password there is nowhere for this password to be seen, so it is recommended to always use the district provided password. Please contact [email protected] for any additional questions about student passwords.

Of course this page can be printed (selecting Print screen option on the Users computer) but our recommendation would be to access it electronically.
Resetting A Student's Password (OPTIONAL)
Resetting a student password is not permitted with some districts but for those that approve it, there are 3 ways that a student's password can be reset:
1. Resetting a Student Password as a Teacher
Some districts have an option enabled that will allow Users the ability to reset the student's password. Please keep in mind that changing a student's password will impact that student in every class, not just the one listed, so this should be used as a last resort. If the reset passwords option is selected you will see an additional column while within the Student Schedule screen:
-
Click the “Reset” button next to the student that requires a new password:

-
Type in the new password, then retype it, and click "Execute":

-
The student's password is now reset!

Please note that not ALL districts have this option enabled due to the fear that it may cause additional confusion.
2. Resetting a student Password as an Admin User
First navigate to Settings > Users > Users:

Change your filters to match the school and the User type of student to access the students needed:

After the filters have been set follow the steps below:

- Click the User(s) that should need to be reset or if looking to reset ALL student passwords select the topmost check box to select all users.
- Click on the "Reset Passwords" button.
- Repeat for all pages of users if necessary.
Type in the new password and it will set it for all selected users. Select the "Ask user to change his password on first login" to prompt the User to to select a new one when they log in:

Now your passwords are reset!
3. Resetting a student password as a Student User:
If there is a need to have a student reset their password to something of their choosing, have them follow the "Trouble logging in" link on the Home page.
Please keep in mind that if a student changes their password that there is no way to view what this password is if they forget it.
In order for students to be able to complete this process an email MUST be linked to their account within the SMS. In order to rest their password students can follow the steps below:
- Select the “Trouble logging in” button on the login page:

From there, fill in the students e-mail and click on “Reset password”:

This will generate an e-mail that will be sent for each eDoctrina account linked to the e-mail address provided:
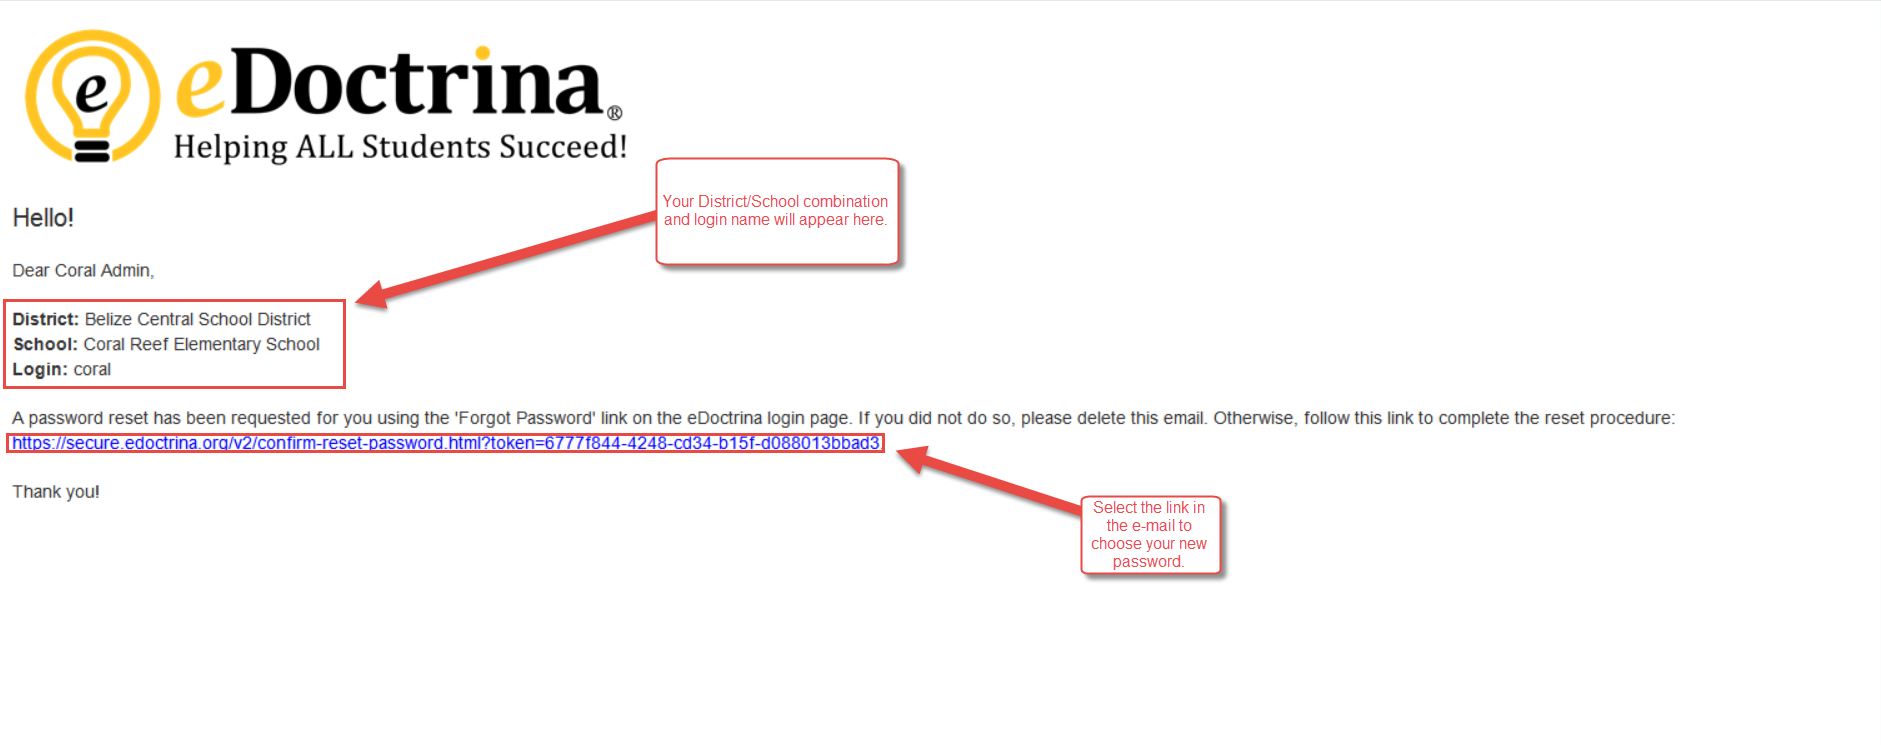
Selecting the link in the e-mail takes the User to the login screen:

That's all there is to it! The password has now been reset!
Please be advised that if encountering the following screen, when attempting to reset a password, it indicates that this email is not linked to the account or that eDoctrina does not have an active account for this User:

For additional assistance or questions please feel free to contact your in district support or [email protected]
To start, please copy the section below starting at "BASIC DESCRIPTION" and ending two lines below "ADDITIONAL INFORMATION", fill out information using rules described underneath and send as e-mail to [email protected].
BASIC DESCRIPTION
DETAILED DESCRIPTION
ADDITIONAL INFORMATION
Best Practices for writing Development Tasks / Glitch Submissions
Writing the BASIC DESCRIPTION?
The Basic Description of any software development task is to state the general summary or purpose of the development work that is to be done in one or a few sentences/statements. A good Basic Description should allow any team member to quickly read it and understand the work that needs to be done to complete the development task. This doesn't necessarily have to be in-depth as the goal is to best summarize the work to be done so there is a better chance that no further questions will need to asked to proceed with the development work.
SOME HELPFUL HINTS
- Do not include any screenshots, hyperlinks, and other "extra" information in this section. Save this for the detailed description and the additional information sections
- If the task is a glitch submission, then try to use conditional statements (i.e. IF THIS...THEN THIS...). This will help the developer understand what the expectation of the ensuing work would be
- Be concise, but do not exclude any of most vital information about the work that needs to be done. A developer will welcome a lengthy basic description, but remember the goal of the basic description
- Try writing the Detailed Description first and then coming back to the Basic Description . Sometimes working backwards gives you a clearer picture of how the task can be best summarized.
- There is no best way to write a Basic Description, so use your best judgment!
Writing the DETAILED DESCRIPTION?
The Detail Description for any software development task is where all of the required information about the development task should be located. It should be expected that the Detailed Description includes all the vital information about the work to be done.
- Put as much info as possible about the user if it is a glitch that needs to be reproduced:
- District
- School
- User Type
- User name or UID
- Make sure screenshots are not cut so developer can see
- User name in top right corner (if you forget to report user info)
- Filter conditions if it’s some listing screen or teacher dashboard page or report
- Settings section if it was importing issue
- Put as many URLs as you can into your submission
- URL to screen, even if it’s some obvious screen - clicking on URL in email will be much faster than logging in and picking screens from menu
- URLs to all screens which involved into issue explanation
- Attach all files you have or think may be useful
- For issues related to imports, please attach the import file
- If it's cut and paste issue please attach file you were cutting text from
- For changes in calculations, please explain the algorithm and attach examples. As many as you can, for as many cases as you can imagine.
- For changes in layout please attach a template or graphic explaining changes.
- For changes in texts/messages/labels please put them into request AS TEXT not as only as TEXT OVER A SCREEN SHOT - this will require retyping it and may cause typos.
If the task is a glitch submission, please include the following:
- Steps to Reproduction (STR): This is the logical sequence of actions required to reproduce the issue that is being described. It should be assumed that the person checking this error should be able to reproduce it with no prior knowledge on how the system works. If possible, avoid using screen shots here unless the only way to explain the issue is to provide a visual resource for the explained error.
- EXPECTED RESULT: The expected result is a short statement about what the expectation should be when the end-user performs the above described action. This should be listed right under and logically follow the Steps to Reproduction(STR) and should paint a clear picture for the developer of what the expected output should be.
- ACTUAL RESULT: The actual result is a direct statement or depiction of the error that is being experienced by the end-user.
If the task is an enhancement or change, please include the following(as appropriate):
- SCOPE
- END-USER STORY / USE CASE: Details about the challenge or issue that is being addressed by adding or modifying a new or existing tool, respectively. This can include, but is not limited to, an issue description or an end-user story and is an opportunity to best explain why this task is important and why it should be implemented. This is the very valuable for a developer to know because task requirements are often missed or they evolve as the development work progresses. If the developer has this information, they will have a better chance on making design and database decisions without having to ask.
SOME HELPFUL HINTS
- All screen shots should be accompanied by the URL where the image was taken from in a logical location so it can be easily accessed.
- User name in top right corner (if you forget to report user info)
- Filter conditions if it’s some listing screen or teacher dashboard page or report
- Settings section if it was importing issue
- Put as many URLs as you can into your submission
- URL to screen, even if it’s some obvious screen - clicking on URL in email will be much faster than logging in and picking screens from menu
- URLs to all screens which involved into issue explanation Attach all files you have or think may be useful
- For issues related to imports, please attach the import file If it's cut and paste issue please attach file you were cutting text from
- For changes in calculations, please explain the algorithm and attach examples. As many as you can, for as many cases as you can imagine.
- For changes in layout please attach a template or graphic explaining changes.
- For changes in texts/messages/labels please put them into request AS TEXT not as only as TEXT OVER A SCREEN SHOT - this will require retyping it and may cause typos.
- Do not put several unrelated changes into single task if you do not specifically need them to be done at once. One change could be small another could be big. We can’t install them separately if needed. Re-opening one of the issues may hold other, already fixed, problem.
- Embedded screen shots are much better than URLs to the screenshot - problem can be examined faster without opening external URLs.
03.J. Teaching with Writing Process with eDoctrina
Click HERE to view the help video.
Writing Prompt: Creation
Essay-based assessments can be created in eDoctrina with ease. These assessments can then be assigned to students so that they can login to their Progress accounts and write their essays directly into the system for electronic grading.
Creating a writing prompt in eDoctrina is the same as creating an assessment! Users can simply venture to the Assessments homepage, select the icon and fill in the necessary general information.

Once the assessment has been created, users have one of two options to create a writing prompt. If the prompt does not contain a rubric, then one Teacher Scored question can be added to the assessment with the writing prompt typed into the Question text field. The total number of points that the writing prompt is worth can be added to the Points section of the Question Editor.

If the prompt does contain a rubric, the question should still be created to house the prompt, but additional questions should also be created to represent each rubric category being tested. In the example below, the writing prompt contains a 3 category rubric. The first question is linked to the first category, and questions 2 and 3 are linked to the second two categories. Rubric categories and point value criteria can be added by selecting the
 icon in the Question Tool Menu.


Once the rubric category descriptions and point value criteria have been added to each question, the questions that do NOT contain question text and simply exists to house rubric criteria should be set to be invisible to students while testing. This can be done by selecting the Online Tools icon in the Question Tool Menu by setting the Answer Tool to None - for scoring only.

Student View
Once the writing prompt has been assigned to students (click HERE to learn more about how to assign assessments online), the assessment will appear to them on their Progress Dashboard after the START time of the assignment. Students will have access to the WYSIWYG editor to write their response in the text box. Note that any rubric category questions that were set up will not appear for students as long as the answer tool was set to None - for scoring only.

Once the student has finished with their work, selecting "Submit" will submit it to be scored.
Writing Prompt: Grading
When the student has successfully submit their essay response, the best place for users to grade is the Grade Student Responses screen from the Teacher Dashboard.

The Teacher Completed View is the most proficient way to grade these types of essay-based assessments.

- Student Response: This section will show the student's response to the prompt as they typed it in their online assessment.
- Answer/Score: This section is where the teacher can add a point grade for each section of the rubric
- Embedded Comments/Feedback: If a scorer would like to leave a comment embedded into the essay, this icon will allow them to do so. The scorer must simply highlight the word/sentence(s) that they would like the comment to be linked to and then select this icon.

Once a comment is created, a comment icon will appear within the response. Additionally, the highlighted section will bold and italicize so the student can easily see where the embedded comments live. - Questions/Rubric Categories: These sections represent the question prompts and/or rubric categories. In this case, question 1 contains the writing prompt as well as the first rubric category, and questions 2 and 3 represent the other two rubric categories and are for scoring only. Users can use the SG icon to review the rubric components for that question/category and then use the Pts box or drop-down menus to add points for that question/rubric category. A comment can also be added in the Teacher Comment section.
Re-Assigning
In the event that a teacher wants to send the students' written work back to them with embedded comments so the students can make revisions, the assessment can be re-assigned. Once re-assigned, students can log back into their accounts and see their current responses, as well as any embedded comments left by teachers.

This allows students to see feedback from teachers and make adjustments to their work. Once they are finished revising, they can select Submit to send their revised written responses back to teachers for grading.
Easily Share Online Content for Students Using eDoctrina Lesson Planning
Click here to view the Help Video
eDoctrina Lesson plans can be quickly published to student accounts using the "Show on Progress" checkbox in the lesson plan editor. This feature will allow you to make hyperlinks and videos available for students online.

Sharing Content
To use this feature, you can create a new lesson plan or edit an existing lesson plan's description to include the desired content. For example, you can paste in hyperlinks to online learning activities:

Or, embed a video that student should watch:

Attachments
Attachments linked in the lesson plan editor will be available to students in their lesson plan view. Attach items in the following location in the lesson plan editor. The "Published" checkbox determines whether these attachments are available to students:

A lesson broadcast summary is available for any lesson that is recorded and saved. In the attachments section of the lesson plan, select the 'Broadcast Summary' button under the Status column:

The summary shows session details; such as the moderator, lesson name, start/end time, duration, and more. You are also ale to track when students entered and exited the session.

The summary also includes data for any students that viewed the broadcast at a later time.
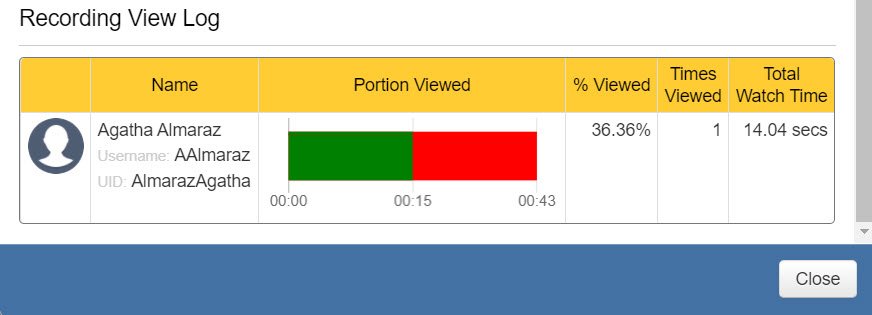
Student Discussion Board You can manage the student discussion board in the Student discussions section of the lesson plan editor:

- Student posts to the discussion board will appear here.
- Users will be able to respond to student comments here. Select Post to post a reply with user name, or select Post Anonymous to post anonymously.
- Users will have the option to Reply to, Edit, or Delete a student's comment. To view student replies to a user comment, select X comment(s) to expand a thread.
Streaming Video from Lesson View
Users will also be able to stream video to students who are viewing the lesson plan. To stream live video to students, select the View icon from the following location on the Lessons page:

On the Lesson View page, select Start Streaming Session to stream a live video to students. Note that users also have the ability to reply to student comments on this page as well:

Users will have to select the Go Live button to begin video:
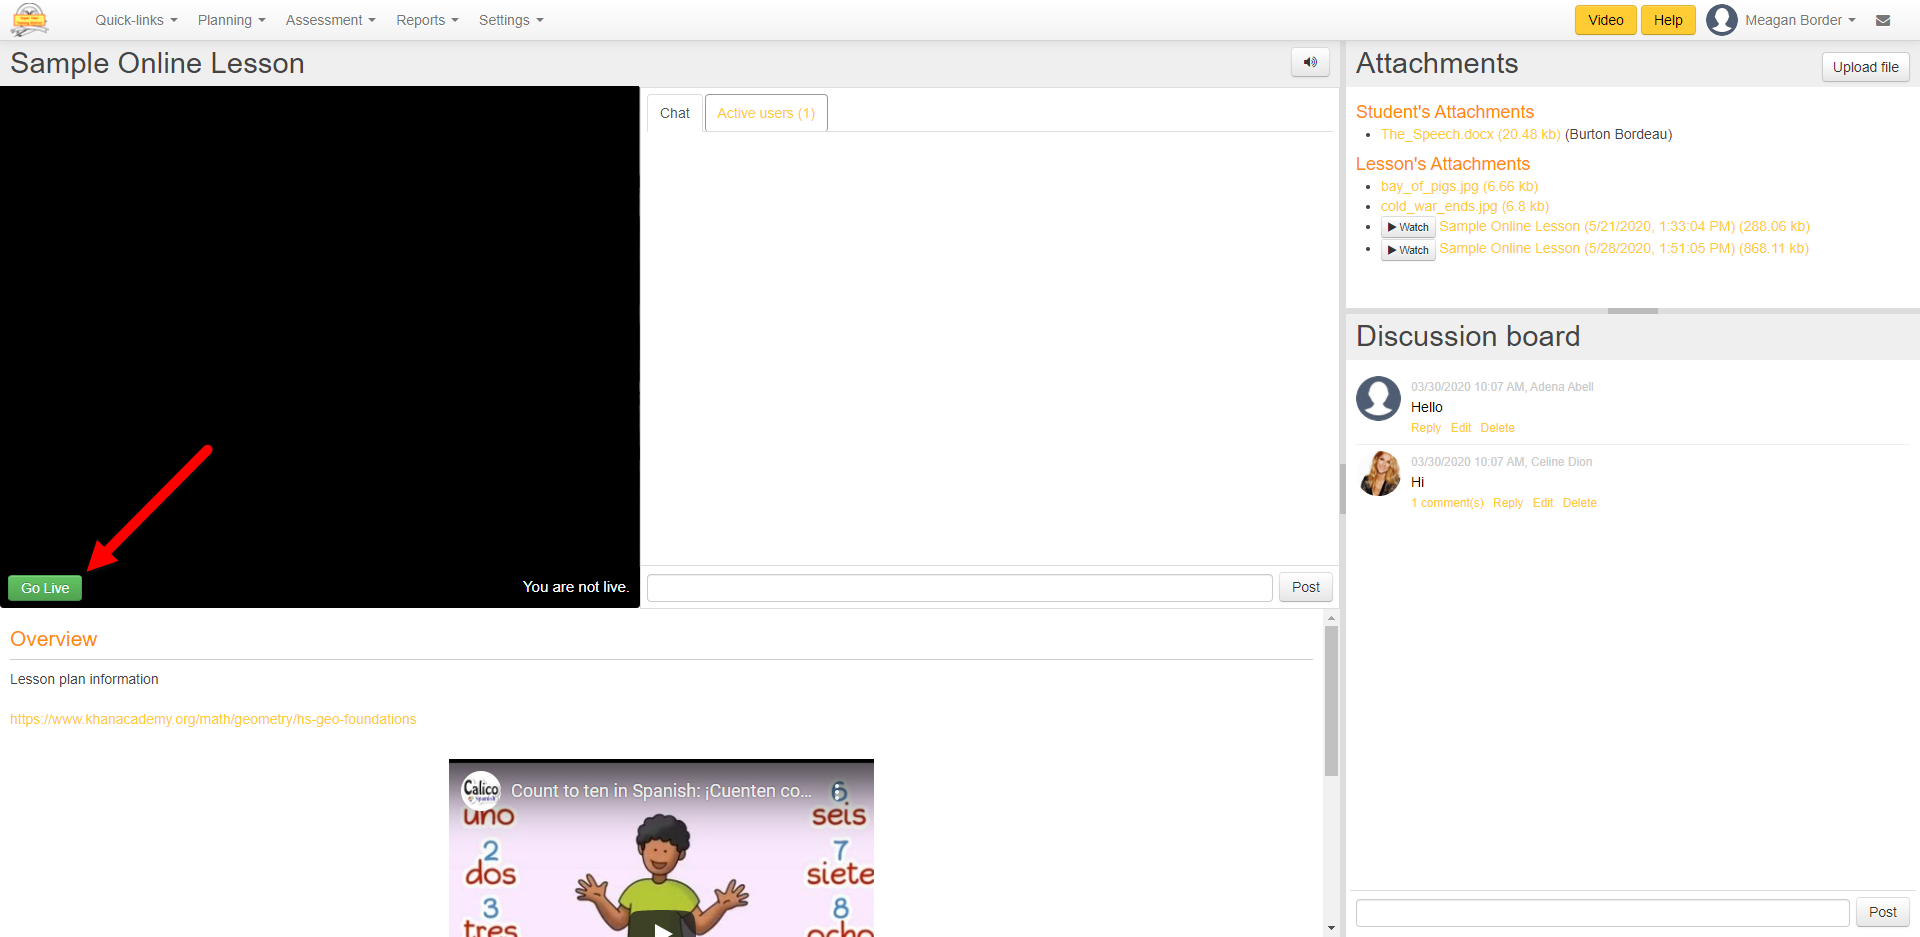
Each live stream session will include the following features:

- Users video live stream.
- Selecting Pause will pause video, selecting Mute will mute audio, and Stop Streaming will end the live stream.
- The Chat tab will show when students start and stop the live stream, as well as student comments and reply threads. The Active users tab will show all active participants of a live streaming session.
- You can send a message to all live stream participants here.
Upon ending the live stream a popup will appear prompting whether the user wishes to save a recording of the live stream:

- Save and publish: This option will save the live stream recording and immediately "Publish" it to students.
- Save without publishing: This option will save the live stream and allow the user to review the recording in the lesson editor prior to "Publishing" to students.
- Delete: This option will discard the recording entirely.
Student View
The student will see the following when logged into their eDoctrina PROGReSS account (For assistance obtaining your student’s online account credentials, please email us directly at [email protected]).
They can access the lesson plan description and all entered content by clicking the lesson plan here:


If a teacher is not streaming video, a student will see the following:

- Overview will show any text, links, or videos entered into the Lesson Plan Description.
- Attachments will be available for download here.
- The Discussion board will allow students to post comments to their teacher, as well as view and reply to threads.
- Upload file allows the student to upload a file to the Attachements section in order for the teacher to be able to see what they have posted.
If a student is viewing a lesson with an active video live stream they will still have access to the three sections shown above, as well as the live stream and chat:

Use online assessments to gauge student learning and get the most out of eDoctrina’s online capabilities. Here are links to the eDoctrina help guides on creating and assigning online assessments.
SLO Management Directly from Observation Dashboard
The SLO Summary can now be included on the OBSeRVE Dashboard to have all of a users accountabilty data in one place:

Information about the SLOs can be viewed by hovering over the shaded box below the SLO title:

The ability too view SLOs on the Observe Dashboard is a district setting that must be enabled manually:

The color settings for each SLO type can be set in the SLO Workflow States by selecting to edit individual workflow states:

Within this pop-up you can add the desired color and code to appear on the Observe Dashboard:

11.E. Sending Grades to Infinite Campus (Campus Learning Districts Only)
The Infinite Campus Grade Sync is accessed through the "Answer entry/verification" screen from the Teacher Dashboard. For more information on this screen please see our help guide: 05.A. How to Use Answer Entry/Verification from Teacher Dashboard
The option to send scores to Infinite Campus will be visible if your district is a current Campus Learning subscriber, and this option has been enabled at the request of your district. If you do not see the option to do so, please contact your District Representative to contact the eDoctrina Help Desk ([email protected]) for assistance.
Please note that this feature is meant to only send ONE class section at a time.

After clicking on the
 button you will see the following pop-up appear:

You will need to select which students you wish to send scores for (by default all are selected) and then choose whether you wish to send the Default Assignment and Due date or if you wish to choose a custom Assignment and Due date:

The Default Assignment/Due Dates are the Assessment's "Administration Date" and the Date the scores were sent respectively.
If you choose to select a Custom Date you will be prompted with an additional pop-up after you choose the score format allowing you to choose what Assignment and Due date you wish to apply:

After selecting the students and whether you wish to send the default or customized due date, you will need to select the preferred format for your scores:

1.) Send Proficiency Score:
This option is available when a proficiency table is set with a score designated for each level. When scores are sent in this format they will be out of the highest valued score. For example, if the highest valued score in a proficiency table is 5 and the student received a 4 then the score will be sent as 4 out of 5
2.) Send Percent Score:
This option will send the students score as an expression out of 100 to match the percent score as closely as possible. For example, if a student received an 85% then their score will be sent as 85 out of 100.
3.) Send Raw Score:
This option uses the default number of points earned and points possible as designated in the assessment. For example, if a student received 20 points out of a possible 34 points then their score will be sent to the gradebook as 20 out of 34 points.
After sending your scores you will receive the following message:

After you receive this message you will need to navigate to your Infinite Campus gradebook. A video on how to utilize your newly sent scores can be found here.
If you need any additional assistance or have any questions please feel free to contact the eDoctrina Help Desk at [email protected]
Student Online Access Checklist
Are your students familiar with the login process? If not please share this document!
Are your students familiar with taking assessments online through eDoctrina? If not please share this document!
Do you know your student’s login credentials? Yes? then you can stop here, you’re all set! No? See the next two items below!
If you are unsure of your student’s login name: Please refer to this document to find your student’s login name.
If you are unsure of your student’s login password or need student accounts set up: Please refer to this document for options in configuring student online accounts. Then contact an eDoctrina Representative ([email protected]) for additional assistance. Please note that these changes will affect students district-wide so permission to apply these settings will need to come from a district representative.
Checklist for Internal eDoctrina Use
Does the District have a regular nightly import? If so, is it an API or a Traditional CSV Import? If API, then is it set to create student accounts? If traditional, then are they preparing a Progress File? If they are not preparing a progress file, then is Student file set to create student accounts? If there is no Progress file and the Student File is NOT being used to create student accounts, then this is the fastest avenue to gaining students access. Please refer to this document with a representative from the district and go over their options. Get confirmation from them via email so there is a ticket to reference in the future.
Do Student Accounts Exist? If not, then naming convention and default password must be determined. Along with method of import (one-time, from API, nightly, etc.) See the document linked above.
Are student accounts regularly used? If not, then a recommended student username/password must be determined and best to run the import ASAP and override what is necessary to get all student logins on the same conventions as quickly as possible.
Are student email addresses present? If not, recommend they be present just in case a student needs to reset their own password.
Do teachers have the ability to reset passwords for students? If not, then inform that this is possible to enable district-wide with permission. If a district representative expresses interest in this option, please have them contact the Help Desk so a ticket may be created for future reference.
Has this district ever administered online assessments? If no, then suggest setting up a webinar with someone from HD team and refer them to the appropriate help guides.
03.D.3. Assigning Online Assessments
Use the steps below to assign online assessments to students as well as setting testing modifications as well.
-
Users can assign an assessment online by either using one of the following options:
-
Selecting the Assign online button while on the Assessments screen:

-
Or Navigating directly to the Teacher Dashboard by following the path: Quick Links > Teacher Dashboard

-
-
Once on the Teacher Dashboard select the students and assessment that need to be assigned online by following the steps below.

- Select the Class that the students are in.
- Select the Test Bank that the assessment is linked to. This will usually be the District that the User is linked to.
- Select your assessment(s): You can assign more than one assessment at once to the same group of students
- Click the ASSIGN Online Assessments button
-
After clicking on the ASSIGN button a pop up will open and provide 3 options: Assign, Reassign (Default) and Un-assign.
- ASSIGN: If the student already started the test and has any answers, clicking Assign will CLEAR all previous data and the student will have a blank assessment.
- REASSIGN: If a student already started the test, clicking Reassign will KEEP all previous data and the student can pick up where he/she left off. If the test is being assigned for the first time, it will assign the new assessment to the student.
- UNASSIGN: Will remove the assignment from a student. Completing this action will make the assessment unavailable to students.
NOTE: The default option will be to REASSIGN the students the assessment to guarantee that no assessment results are overwritten. It is recommended to leave this as the default when assigning assessments online. If a mistake is made and need to start over, simply select the students, click the Un-Assign button and click PROCEED.
-
Once the correct assignment option is selected follow the proceeding steps to assign to the necessary students.

- Choose the assignment option (default is REASSIGN)
- Select the student(s) that should be assigned the assessment, by checking or unchecking the box to the left of the student names. All students will be selected by default but can be checked or unchecked accordingly.
-
Choose the testing window (date & time) by entering in the required Start and End times:

Select Proceed to apply the test assignment(s).
-
Once the testing window is assigned, the default options that were set up in the test will appear in columns to the right of the student’s name. NOTE: Y = Yes (Available based on what was set up in test)N = No Calculator Options = U (DEFAULT- Uses question settings), B (Basic TI 108), C (Computational), S (Scientific TI 34)

To change a testing accommodation for a student, click on the button below the option. Clicking the button to select a Y or N will ensure the modification does not change even if the default value is changed in the assessment afterward. If the option is a blue (Y,N,...) it indicates the student will have the same option that is set in the assessment, so if the option is changed in the assessment, after the assignment is made, the new option from the assessment will be given to the student when they take the assessment.
-
Once settings have been customized, click the Close button to close the window.

-
If you have additional testing modifications for particular students, they can be customized by clicking on the edit pencil:

-
Selecting this option will open the pop-up window with additional testing modification options. Remember, this will only update the settings for this specific student.

Mass Assigning/ Advanced Features (Advanced User):
Use the steps below to assign additional online accommodations for testing modifications to a large amount of students.
-
If assigning additional custom settings found under the “Show Assignment Settings” option to a large group of students, it is recommended that you choose these additional settings BEFORE you assign the testing window.

-
These options can be customized and assigned to multiple students. You can select which students to mass assign the options to by checking or unchecking the box to the left of the student names.
*Tip: If unable to see the full pop-up window the screen is either zoomed in or zoomed out. To adjust the zoom, hold down the CONTROL + or - keys on your keyboard (while using a PC) or COMMAND + or - buttons to zoom in or zoom out (while using a MAC).
-
When all of your settings have been customized, choose your assignment window (date & time) and click PROCEED.

Linking eDoctrina Assessments to Other Programs
Once an eDoctrina Assessment is created Users can post the assessment into another program through the use of the Share/Embed button. Utilizing this option will allow the User the ability to provide a sharable link that can be posted within another program. This link will allow students the ability to take an eDoctrina assessment online, without the Teacher or Admin, having to assign the assessment first.
In order to use this option either complete the action while creating a new assessment or access, an already created assessment by navigating to the Assessments screen and then selecting the Edit pencil.

NOTE if the Edit pencil is not being shown the User in question does not have access to Edit the assessment. In order to gain access the assessment should be Shared with them, through the use of the "Shared with" option within the "Edit Assessment" screen
When on the Edit Assessment screen please click on the Share/Embed button at the top of the screen:

Once selecting this button a popup will show a warning informing you that a Course and Time Frame must be linked to the assessment:

Both the linkage of a Course as well as the Time Frame are required for the student to be able to access the shared link. Each of these items is discussed in more detail below:
-
Course Linkage: Linking a Course will provide any student that is enrolled in the Course, access to the shared assessment link. If a student is not linked to the Course, attempts to access the link, they will not be allowed to access it. In order to link a Course, simply find the Course required and double click to add to the Courses box:


-
Time Frame Linkage: This will set a time and date, in which students can access the link. If a student attempts to access this link outside of the Time Frame they will not be able to access it. To set the Time Frame scroll to the bottom of the page to access the "Other Settings," section within the "Additional Settings" tab:

Clicking on the "Customize" option will open up a calendar to set the time frame accordingly.
Once the time frame is set it will appear on the calendar as well as being listed in the top right portion of the "Edit Assessment Dates" box.
If additional Time Frames and dates are necessary simply click and hold to drag to additional dates as seen here:
After linking a Course and a Time Frame the User will then be able to share the link by copying the link and then pasting in a different program, such as Google Classroom. After the link is shared a student can click on the link, in order to take the assessment online, by doing the following:
-
Paste the link into the program accordingly. Shown here through the use of Google Classroom, but please keep in mind that the shared link can be used in any other program or application:

Once the link is selected the student will be directed to the eDoctrina login page, where they will enter their eDoctrina login credentials.
Upon logging in, the student will be taken to an online version of the assessment. They can then take it accordingly.
NOTE: The online settings shown, to the student during the testing window, will match the settings set within the Edit Assessment screen.
Quick Start Guide: Assigning NYS Exams
eDoctrina houses both the most current and historical Regents exams in the FREE items bank. There is a fast and easy way to assign these assessments for students to take online right from the Teacher Dashboard! To see the help video on this topic, please click HERE
Please note that this document does not include ways for teachers to copy exams into their district for editing or how to find questions using the Question Bank. This is a quick guide to assign the assessments already created in our FREE bank
Once users have successfully logged into eDoctrina, they can navigate to the Teacher Dashboard.

Teacher Dashboard

- Once users have successfully navigated to the Teacher Dashboard, it is important to note that some filters might contain information from previous sessions. To clear the filters, users can select the "Reset filters" icon in the top right-hand corner of the page.
- The Course and Class filter will list all of the courses and classes users have access to via their Student Information System, where the Students filter will list the students from selected courses/classes. To make it simple, if users are choosing to assign an assessment to all of their students in their courses and classes, these filters do not need to be utilized, as all students will automatically be selected for assignment. If teachers do want to select specific courses and classes to assign to, they can use these filters to do so.
- Users can easily find the assessment they would like to assign their class(es) using the Assessment drop-down. For grades 3-8 assessments, users can simply type in the word phrase "ELA Grade 4 Engage" (or whatever grade they are hoping to see), or "Math Grade 4 Engage". For Regents exams, users can reference the table below to know what search term to use to find the assessment desired.

Once the desired assessment has been selected, users can assign the test to their students by clicking on the gold  icon on the dashboard. This will prompt the assignment popup to appear.
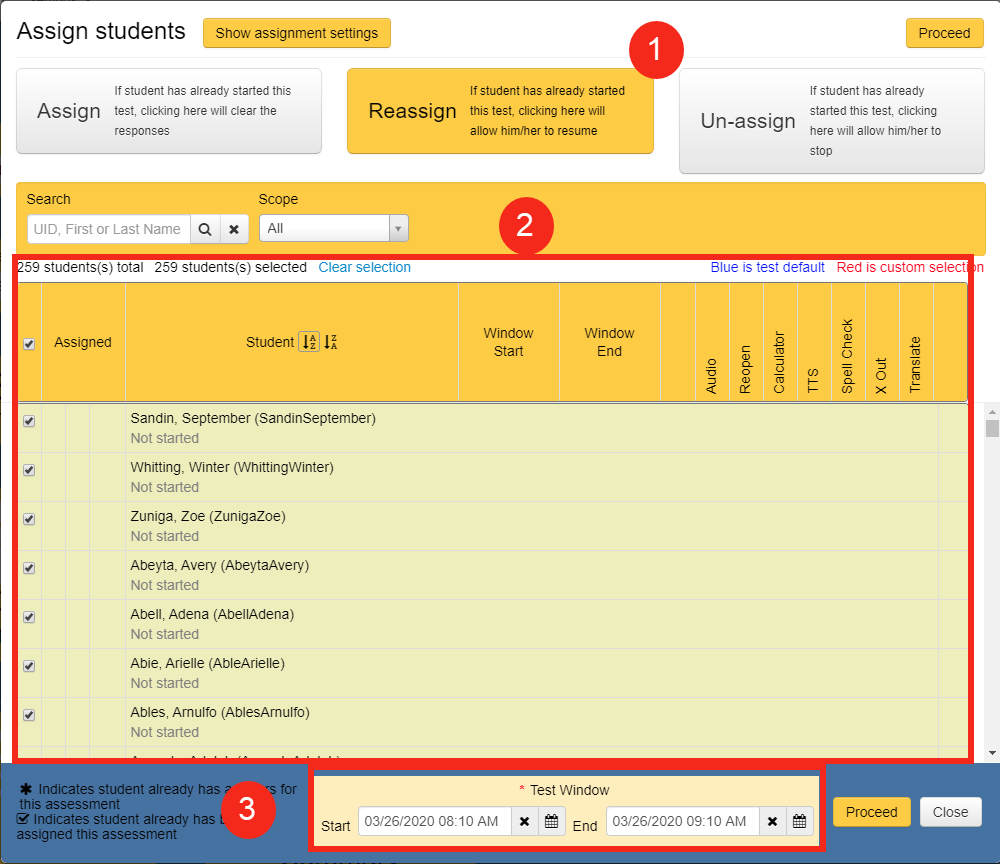
- The REASSIGN option will be selected by default and will allow users to assign the assessment to the selected students. This option should remain selected.
- Users will see a list of students being assigned. In this case, a course and class were not selected, so all 259 students are being assigned this assessment. If courses and classes are selected, the user will see only the students enrolled in them.
- A testing window with a specific Start and End time can be assigned using the START and END options. This determines when the test is available in the student's Progress accounts to be taken online.
Once the correct students have been selected and an appropriate test window set, the user can select the Proceed icon to successfully assign the test to their students.
Student Dashboard
Once the test has been assigned, students can login during the designated testing window to take the assessment. The assignment will show up under the "Assignments" section of the page and students can select the green "Start Test" icon to begin.

Allow students to submit (Upload) work that can be graded on rubrics
The assessment building tools allows for many different question types and answer tools. This document will focus on a creating Teacher Scored questions and leveraging the Upload to Question answer tool to allows students to submit their work that was done using outside resources. You will also find some basic information on creating a rubric grading scheme to ensure expectations are set and student work is graded consistently.
Configuring the online assessment to support student upload
The first step is to create an assessment that contains a question that utilizes the Upload to Question answer tool. Although there is other help documentation related to assessment and question creation, here are a few quick steps to be successful in assessment configuration.
- Navigate to the assessments homepage.

- Create a new assessment to build or find an existing assessment that you would like to add to. In this example we will create new assessment.

- Add at least one "Teacher Scored" question to the assessment and set the max points that is allowed on this question. These point values will later be provided a rubric description.

- Once the question has been added to the assessment, it is a good practice to enter the question text to describe the nature of the question that the students will be responding to or that they will be uploading content to. Remember that mostly all file types are accepted, therefore students can upload Powerpoint, Word, Excel, or any other type of file.

NOTE: The description box can be used for many different media types! Try embedding a video. - Choose the Online Tools button for the question that you would like the update. The ensuing pop-up should allow you to select the Answer Tool. There are many other useful options, but in this example we want to selec tthe Upload to question answer tool to allow students to attach some file that they have worked on elsewhere. Make sure you Save the changes!!!

NOTE: It may also be a good idea to add some of the other tools to help the student or add one of the answer tools as the work area. The work area displays on the screens that are used for grading student work.
If you would like to preview how a student will view the question or the entire assessment, the Preview Online option exists for all assessments so you can update to optimize the student online testing experience.
- Of course, it is important to provide a framework or rubric to students to communicate the expectations of the online assignments. In eDoctrina, this is done by creating a grading rubric. At the moment, it is possible to enter rubric text for you question by clicking the RB button on the questions layout or navigate over to the rubric layout view of the assessment editor to be able to enter more details. If you would like to find out more information about how to create rubrics for an eDoctrina question, please check out this help guide HERE.

The Rubric view of the assessment editor allows for easy entry to define the rubric column headings, the category description, and the rubric rating descriptions (up to 280 characters). The column headings will replace the numeric values for the column headings (if entered), the category description will be the row label, and the rubric rating descriptions fill in the grid.
NOTE: The rubric option is limited to enter only text and is limited because these rubrics can also be printed on one of eDoctrina's scannable rubric answer sheets.
-
The next step is to assign the assessment online to the student so they have access to upload their body of work in electronic format. Please review the following help guide (Click Here!) to find out how to assign an eDoctrina assessment to students. The traditional way allows you to pick certain online settings and access dates. If you are looking for a more rigid feature to assign online assessments, it is suggested to use the Auto Assign Assessment feature.
If the student is assigned the assessment properly, then they will be able to log into eDoctrina and find their online assignments on their PROGReSS Homepage. If they have yet to start the assessment, they will see the Start Test button, but if they already have data entered for the assessment, then they will see a Continue Test button. Either way, the student will be navigated into the online test taking window where they will be able to find the question that was created for uploading their body of work.

Students will be able to navigate to each question in the testing window. In this case, they will find the question that allows for upload and they will be able to reference their computer or some external source to upload their body of work.

NOTE: The student has the ability to upload one or many files and they will also have the ability to remove them if they need to. - After students have submitted their responses or the test window has expired, it is important to provide a student grade for this uploaded file. The best two screens to go to provide students with their scores is to CHECK or ENTER student responses. But remember, these filters are dependent on the selected student filters and assessment filters. The CHECK screen supports one assessment and the possible ability to send the assessment scores to your gradebook in your student information system (NOTE: the gradebook integration option is only available to some districts), while the ENTER screen allows for up to 4 assessments and provides many different views for easy answer entry.

OPTION #1 for grading student work -ENTER Student Responses
The ENTER Student Responses (Teacher Completed) screen allows for you to quickly view student responses for many students, provide the assessment mark, and even leave a teacher comment. There are a number of different views, but the "Page" or the "TCs" view are the best for getting the most data on a single screen for ease of use.
OPTION #2 for grading student work - CHECK Student Asnwers

03.B.2 Creating Questions Using the Import DOC/PDF Tool
Click here to view the Help Video
Users have the ability to import questions from a document or PDF when creating questions in the Assessment Editor. To use this, select the  button in the following location:

Once selected, a pop-up will appear where the creator can paste in questions from a document or PDF:

The next pop-up will display the questions to be created as well as some options for editing and adding questions:

- Example multiple choice question pasted in from a PDF.
- Example short answer question, just type in a question without any answer choices.
- Selecting "Append" will keep all existing questions in the assessment and add newly created ones after them (for example, if there are 3 questions in the assessment, the first newly created questions will be question #4). Selecting "Replace" will remove any existing questions and replace them with those in the pop-up.
- Back will allow users to go back and edit questions.
- Approve will add questions to the assessment using the method chosen in Step 3.
Not all items paste without formatting issues, contact the Help Desk at [email protected] if you have any questions!
Once questions have been added to the assessment, users will need to add correct answer choices by setting up the answer key, link standards, paste in any images or add online tools. Check out this comprehensive Assessment Editor How-To-Guide for information on how to do these steps and more!
Using the Import Questions from DOC/PDF Tool
Embed an Online Assessment into an Online Lesson
New functionality added to the eDoctrina Lessons Module provides Users the ability to embed an eDoctrina Online Assessment directly into Lesson Plan for students. In doing this the online testing window will be placed in one easy to find place. In order to do so Teachers or Administrator Users should follow the steps detailed below:
- Access the Assesments page and click on the Edit pencil for the Assessment that you wish to embed:

- Once on the Edit Assessment Screen select the Share/Embed button at the top of the screen.

-
Copy the Embed Link url:

-
Access the Lessons page and click to create a new Lesson or the Edit pencil to Edit an existing Lesson.

- Once on the Edit Lesson screen scroll to the area that you would like to embed the assessment and access the "Source" button within the text editor.

- Paste the Assessment embed link url into the Source box and select "Ok" when complete.

- An "IFRAME" should show in the box indicating that the assessment has been embedded accordingly.

- Once the Lesson editing is complete please make sure that a Course is linked as well as "Show on PROGReSS" option is checked. This will insure that all students that are linked to the Course(s) linked to the Lesson will be able to access the Lesson on their Progress Dashboard page.


- Then once a Student logs in to their account they will see the Lesson and will have the ability to access it directly through this account.


For additional questions or guidance please feel free to contact [email protected]
eDoctrina Lesson Planning for Online Learning
Accountability Suite How-To Guide
eDoctrina's Accountability Suite is a combination of modules that are related to staff improvement, accountability, and related state reporting. This includes, but is not limited to, staff observations, student learning objectives, staff improvement plans, staff support plans, staff forms, and end-of-year staff effectiveness reporting.
In this resource, you will find resources for each of the related modules in each one of the sections below. Use the Jump To... tool to quick navigate to the section to learn more about it. Each section will list the main topics. A general description of what the module entails with some key insights, simply click on the topic and the description will appear. If there is any supplementary materials that are related to the module that is being explored, click the Learn More link to the right to open up these supplemental resources.
There is also a Frequently Asked Questions section at the bottom that is consistently maintained so that the most common questions can be answered without waiting for an eDoctrina team member to respond to your inquiry.
It is recommended to bookmark this page if you are someone who will be creating and managing observations in eDoctrna. If you cannot find the answers your are looking for within this document, please do not hesitate to reach out to the eDoctrina team so we can quickly respond and let you get your important tasks done!

For Observers
There are many ways to create a new observation within eDoctrina as an observer. The OBSeRVE Dashboard offers a great solution for viewing and creating new observations, but there are other ways to create a new observation as well. Depending on the observation rubric configuration, there may also be some forms that the staff member will need to create, which is done from their own view (which is accessible by the observer as well). Before creating an observation, it is also important to know the general workflow within your district as the process may vary.
Electronic signatures is a great way to monitor the workflow of any observation and add another layer of accountability. When enabled, signing an observation ensures that no future changes can be made within the system. Electronic signature workflows vary by district, so it is important to know this before proceeding with signing observations electronically.
If it is necessary to print an observation, eDoctrina offers many different ways to do so. There are also many different report printing options that can change the look and feel of the printed report while also providing the option to customize what contents are included, such as a calculations page or discussion board.
There are some instances where an observation will need to be scheduled before it actually occurs. Each district or individual user may utilize the observation scheduling tool in a different manner, but the primary purpose is to create the observation within the system through scheduling with the option to notify the staff member about the scheduled event.
One of the most important steps that must be done by some district user to ensure each staff member is observed using tohe approriate rubric.framework is to assign them at the beginning of the year. Within assignment, monitoring the completion of the minimum requirements for each year becomes more difficult, which means it is a best practice to create these assignments so district observers can begin to work towards fulfilling the minimum observation requirements for the year.
Frequently Asked Questions (FAQs)
The nature of the OBSeRVE Dashboard is to provide only users that have permissions to perform observations access to this tool as there is sensitive staff data that can be accessed. If you are supposed to be performing an observation on another user in the system and do not see this tool, please contact a district administrator to provide you "observer" access.
If you have successfully created an observation for a user in the system, it will always be in the observations layout view of the OBSeRVE Dashboard where all observations will be listed that you have access to. If you do not see the observation item in this view, please reset your filters and search using only the staff members name. The filters determine what displays in the list and will return observation items that fit the selected filter parameters. If this still doesn't work, please check other years as sometimes an observation was linked to the incorrect year. It is also a good idea to go the the staff members folder (by clicking the eyeball on the user accounts screen or the hyperlink on the Assignments layout view) to see if you can find it there. Still no luck? Please reach out to [email protected] to see if we can find it for you.
Observations that have an electronic signature will be locked for further update. But, if a signature has been applied and there are further changes required, then there is the possibility to "Unlock" the observation. Unlocking the observation will remove any previously applied electronic signatures and re-open the observation for edit. This can be done for any observation and the tool exists in the same place where you sign the observation, simply click Return or Unlock instead.
Generally speaking, each user should have access to the teachers or staff members that they are linked to only. If you are a School Admin or Building Principal, the default is to provide you with access to all staff that are linked to your school. If this does not satisfy your requirements for observations that need to be performed, then there are some modifications to your access rights that can be made. Any observer can be linked individually as the observer for any staff member in the district to provide direct access or a user account can be modified to be linked to more than one building. If your district is using department codes for access rights, then it will be necessary to add the individual that you are trying to observe to the same department.
For Observees (Teachers and other non-administrative staff)
If an observation has been made available to the staff member, they can view it in eDoctrina by navigating to their staff folder. Usually, observations are only available to staff members if the observer has updated the status to Complete, but there are some other specific district configurations that may allow staff members to view Scheduled observations so they can contribute to a discussion board or upload lesson plan documents.
Depending on the observation rubric and the type of observation, there may be a requirement to provide an electronic signature. This can be done from the staff folder where the status of the electronic signature will be displayed. Electronic signature workflows vary by district, so it is important to know when a signature is to be applied. Signing an observation provides the extra layer of accountability and ensure that no further changes to the observation can be made. Upon signing, the option to provide a signature to approve exists as well as the option to return the observation in the rare occasion where there may be some errors or rebuttal.
If it is necessary to print an observation, eDoctrina offers many different ways to do so. If the observation is available for the staff member to view, then they can also print it in a .pdf or .xls format.
Frequently Asked Questions (FAQs)
The most common reason why an observation is not listed to view is because the observer has likely not removed the observation from Draft status. By design, any user can create an observation and it will remain private to them until they update the status to complete. Once completed, the observation item should show. If it is expected to to available, then please send a message to your observer to inquire.
Each observation rubric may have a unique signature workflow. First, for electronic signatures to be possible, the observation must be in complete state. Once complete, there is a general signature workflow that needs to be followed. Some districts will have the teacher sign first, while most will have the observer sign first. If it is not your turn to sign, you will be provided with an error message that states the current step in in the signature workflow. If you are required to provide you signature and are not allowed to in the system, it is recommended to reach out to your observer. Please note, signatures for self-observations are not required.
To be able to access any end-of-year effectiveness reports the district must be managing their accountability data within the application. If your district does, then finding your report is as easy as navigating to the Teacher Effectiveness System module located in the Planning menu in the top navigation bar.
Self-observations are possible if and only if you have been assigned the appropriate rubric framework that allows this. If it is necessary to fill out some pre-observation form or self-reflection, please reach out to a district administrator and ask them to assign you the appropriate framework.
Observations
The OBSeRVE Dashboard is the module where observations can be created and managed. There are many tools within the dashboard that allow observers to create new observations, update existing observations, and generate important observation reports for individual staff members or groups of teachers. Like many other modules in eDoctrina, the OBSeRVE Dashboard offers many filters and many views, so get familiar with the tools and get those observations done!
The observation form in eDoctrina is a highly customizable form that is usually set up by an administrator in your district or an eDoctrina team member. Some forms have a sole purpose of gathering pertinent staff information and others are official staff evaluation forms that are configured to calculate a teachers overall effectiveness rating in accordance with the guidelines outlined in the district's approved documents. Form the most part, the top section of the form is consistent across district with minor variations, but the form itself is something that needs to be configured and before it can be used within eDoctrina. By default, observation forms are designed for an observer or evaluator to fill out for specified teachers, but there are many modifications that can be made to change the form to be a self-observation or reflection form or some shared form where the observer and observee can both contribute to the observation event.
There are many reports that are available through eDoctrina in regards to observations that can be created. Anywhere from an Individual Staff Report for a single observation to a cumulative report that allows any administrator to aggregate data enabling them to make data-driven decisions based on the actual data that has been collected for any observation form. Some reports solely exist for printing to provide to the targeted staff member, but other reports offer data that will help to monitor observations throughout the year to ensure that all staff members are observed in a timely manner.
Any observation form (besides self-observations) can be configured to require electronic signatures once they are marked as complete. Enabling e-signatures allows for observers to apply their signature to lock the form from further update as well as providing another tool for monitoring the completion of observations. Although the default is to have the administrator sign the report first (then the observee), eDoctrina offers a number of different signature workflows that include, but are not limited to: having the teacher sign first, adding a second observer signature, or even having a final signature be applied by some person within district. There are also many reports and filters available to help monitor electronic signatures to ensure that all forms are signed in a timely manner.
It only makes sense to send an observer or observee an email when something important occurs within eDoctrina. These email messages can be configured by district and there are many options for single users to configure their profiles to receive or not receive such notifications.
There exists many settings to configure at the district level that can modify the behavior of the observation form or the entire observations module. Settings, such as Auto-save observation, can be configured within the district settings. It is important to know which settings are active so the expectations on the behavior of the observation tool behaves as expected.
One of the most important aspects in eDoctrina is the beginning of year setup. Each new year requires that some district administrator complete a few tasks to set the table for all observations that will take place within the district throughout the year.Of course, the first step would be to ensure that all required evaluation/observation forms are created and linked to the new year. This will then allows for tasks like assigning staff members the correct rubric or framework so the minimum required events are clearly defined to all observers/evaluators so they can begin to fulfill these set requirements. Going further, there is some consideration to be had about which rubrics and assignments will be used; so this should be planned prior to the date when observations will begin. It is also important to make sure that all users have the appropriate access that is needed so district observers can complete the tasks that are required of them in the school year. There is also the possibility to assign staff members a specific observer or evaluator. This is most important for building level observers who may observe staff members in other building because their default access is limited to staff members within their building only.
By the time the end of the school year, the expectation should be that district observers/evaluators have completed or nearly completed the minimum require observations throughout the year. If so, it is time to begin the process for closing out the observation module for the year. One of the first tasks that should be done to be successful in closing out the observation year is to clean up the data that has been entered as there is often some mistakes that can be made (i.e. creating a blank observation). To do this, some district administrator should use the tools on the OBSeRVE Dashboard identify anything that still needs to be completed or needs to be cleaned up. If signatures are enabled, it is important that all forms have both the observer and observee sign so you can feel comfortable reporting the data. After the observations have been cleaned up, it is now time to send the calculated final scores to the TE System for individual and state reports. This is usually done by a single administrator from the Final layout view of the OBSeRVE Dashboard, but some districts are starting to create End-of-Year forms that allow observers to send scores to the TE System on their own.
The task of configuring an observation form in eDoctrina is usually one that is assigned to some district-lead staff member that has a vast understanding of the staff evaluation process and overall effectiveness rating calculation methodology within the district. In many cases, the assistance of an eDoctrina team member is required as some calculations methods can be pretty advanced and the staff expectations tool can be rather daunting because of all of the configuration options. Of course, this is usually the first step to begin using the observation tool. To learn more about observation rubric configuration beyond what is in the help documentation, please reach out to an eDoctrina team member.
Student Learning Objectives
The SLO Homepage is where all Student Learning Objectives that have been created within the district will be located. This page offers a number of different filters, views, and tools to help administrative and instructional staff create and monitor SLOs within their district.
The Student Learning Objective Form is one of the most robust forms within eDoctrina. Within this form, one will find general information about the SLO, the teachers who are linked to it, a number of different fields to be filled out, a discussion board and attachments tool, the ability to link eDoctrina assessments to be used as Baseline or Evidence assessments, and a student population section where student targets can be set. Much of this form is controlled by SLO Workflow States and District SLO Settings that modify the behavior of the form. There is not many other tools out in the market that can compare!
Although the general workflow of any SLO that exists is generally the same, there are many districts that like to place their own twist on how the SLO Editor behaves. The eDoctrina solution to this is to configure SLO Workflow States so that the SLO editor behaves in accordance with the status that it is in. Certain fields can be locked, email notifications can be sent, and one or many states can be marked as a Final state.
The SLO Summary sheet is where all SLOs come together for each user. In most cases, a single staff member may have more than one SLO for any given year and their overall score is based off of all of these. This page will place each user in a list and show their aggregate scores for each SLO Type and provide a status for each teacher for the year. Use this tool to keep track of what is going on in the district in regards to SLOs and make sure that all staff members get to the point of completion!
For the most part, the Student Learning Objectives (SLOs) module is an out of the box product and can be used as long as the district has access to it. But there are many different configuration options that need to be considered before SLOs should be created for the year. It is important for some district admin that is familiar with the guidelines for SLOs to visit the SLO District settings, to configure SLO Workfow States, and to ensure that the correct SLO Types (and other linked data) is available for selection. The SLO Type is required for every SLO and this is how the SLO module is linked to the TE System so that final scores can be sent to the appropriate data sources. It is also important to ensure that the appropriate Attainment (HEDI) Tables are available and the cut scores for the final value are also defined in the TE System.
As the end of the school year approaches, most of the data for student target and final scores should be logged in eDoctrina and each SLO should have moved along to one of the final workflow states. It is usually a good practice to start with individual SLOs to ensure that data has been gathered appropriately, final scores have been selected, and the proper approvals for each one have been provided. Once the SLOs look clean, the logical next step would be to review their final calculated score, which can be done from the SLO Summary Sheet. A quick data review here can help identify and errors in how SLO scores are calculated. Once everything looks satisfactory, the last step would be to send the scores to the TE System, which there are ways to do this manually or trigger with each SLO score update.
Some Student Learning Objective settings are configured at the district level or the School level. For example, a minimum or maximum count of SLOs can be set at the school level. More of these settings will exist at the district level as simple rules can be applied here that will apply to all SLOs created within the district.
Teacher Effectiveness System (End-of-Year and State Reporting)
If a TE model has been assigned to a user in eDoctrina, then their report(s) for these models will be located in the list on the Teacher Effectiveness homepage. In many cases, this is where a staff member's end-of-year effectiveness report will be located. These reports are custom, therefore the format, conditions, and style of the report depends on how it has been configured. The primary purpose of this module is to aggregate data from all other modules, such as Observations and SLOs, and produce a formatted report that is in compliance with district requirements. But this module can also be used to gather data from other data sources as well.
The Staff Evaluation Rating Report is a configurable module that is formatted to allow for easy review of staff evaluation data. Being that eDoctrina has the highest number of customers in New York state, the report is currently configured to the parameters set forth by the New York State Education Department (NYSED). It is here where all of the staff evaluation data comes together and aligns with state reporting codes to allow for easy generation of the .csv file that Level 0 looks to receive from each district at the end of the year. If in other U.S. states, please do not hesitate to ask about this module to see if it can be reconfigured to be aligned with your own state's reporting guidelines.
The TE System is usually configured at the beginning of the school year and usually does not change drastically from year-to-year as the configuration is usually dependent on district documentation regarding cut scores and reportable data. This means that the configuration in the background will likely not be needed to be revisited unless there is some change to district specific or state reporting guidelines. Most of the work that needs to be done at th beginning of the year is the task that involves assigning the appropriate model (report) to each staff member that is supposed to receive one or anyone that is required to report effectiveness data. This task is managed from the user accounts screen where models can be assigned. If this is done at the start of the year, there are some ways that you can limit access to the report based on required data or keep inactive until the scores are ready to be released.
This is the most important task of the end-of-year closeout if you are providing teachers with their end-of-year effectiveness reports or if you are planning to use eDoctrina to generate your file to be submitted to the state. The TE System has two components: one for providing teacher their reports and another for generating a file for state reporting. Individual reports can be managed and electronically signed from the Teacher Effectiveness System module or within the Assignments layout view of the OBSeRVE Dashboard. At the end-of-the-year, it is important to monitor this screen so all reports are complete and/or signed so these can be printed and distributed to all evaluated staff members. The state reporting part is done from the Staff Evaluation Rating Report, but this should be an easy task at the end-of-the-year if all data has been approved and sent to eh TE system from the other modules or from some data import.
The Data Sources are a very important piece of the Teacher Effectiveness System because they are the placeholders for each staff members data for each school year. In other words, there exists a data sources that will eventually contain a staff members total observation score for each year, as well as other data. Data Sources can be created for many reasons, but their primary purpose is to carry the yearly data for each user so the Observation module (or some other module) can send scores to them and the TE System can call upon that data for final reports. Data can get into the data source from pretty much every module within eDoctrina or it can be imported if there is a .csv file available for upload. Each data source is associated with some code to help with this process. It is recommended that before any model is configured within eDoctrina, that all of the data sources have been identified and configured.
The TE Model can be best described as the report that a staff member will receive at the end of the year. Each model is configured to align with district requirements, so it is important to assign the correct model to each staff member on the user accounts screen before reports are sent out or made available. The model is where all of the TE categories and data sources come together to make a nice formatted report that can be printed or signed electronically. There are many rules and configuration options available for each TE Model that can be defined in the other TE configuration modules, such as Category Scores to Effectiveness, where cut scores can be defined for each data sources.
The Categories module is a configuration subset of the TE System and it is best described as the way that the data sources are glued together and organized. One model can have one or many categories and these categories can have a parent-child relationship that can help to average or add other categories to produce some other value. Categories are either directly linked to some data source or are configured to consider many data sources. For example, if there was a category set up for an observation score (from the 'OBS' data source) with a value of 3 in it and another category set up for an SLO score (from the 'SLO' data source) with a value of 4 in it, we can create a parent category that can produce a value of 3.5 (the average) or 7 (the sum).
If a TE Model has been assign to a staff member and the TE Model has been configured with the appropriate TE Categories, then the Category Scores screen will display this user and all of the categories that have been assigned to the model. If scores have been sent to the associated data sources, then these values will display on this screen. This is the place where all of the accountability data for each user in each year will be and the values that are seen here are what the individual effectivenss reports and state reporting values are based upon. Most often if there is some issue with a score or a report, this is the best place to begin troubleshooting because this is the source data for any TE Reports. Values can be updated here if and only if the data is not linked to a report that has been electronically signed.
After each of the TE Categories have been configured, it is now time to head over to the Category Scores to Effectiveness page to define the cut scores for each of the categories within each model. The logic of this screen works in a very similar fashion as a typical grade conversion table for assessments in eDoctrina, but also some other tools that help with accountability. Here is where you can name each level (i.e. Highly Effective), provide an index score for further reference that will be defined in the Effectiveness Index, and enter the state reporting codes for each performance level. Items on this screen can only be created if there already exists a TE Model that has TE Categories already configured.
Staff Forms (TIPs, Support Plans, Forms)
In may districts, Staff Improvement Plans are assigned to a staff member who has either earned a below satisfactory in one or many effectiveness data metrics in the prior year. These forms are usually customized for each district, so it is necessary to reach out to the eDoctrina team to get your forms added to the system. These forms can be associated with different workflow states as the improvement plan progresses and also provide the opportunity to configure to require electronic signatures.
Staff Support Plans are usually created for any staff member who needs extra support for one or many reasons. Like all the other forms, these Staff Support Plans are customized and usually need to be configured at the beginning of each school year. These forms can also be configured to follow a set workflow states to controlled functionality and levels of permissions.
Staff Forms is the simplest of the three available form modules. In short, this is where a form would be created to be filled out for some staff member in the district. These forms are flexible, but they need to be customized for each district request. If there is some form that you would like to store electronically, please reach out to the eDoctrina team t to find out what is possible.
Setting up forms is a very simple task. The obvious first step is to make sure the form is built to your district's specifications and it is available for use in the system. The next step would be to configure your TIP Workflow States to fit the needs of your district (we are always building new tools for varied processes). Then it is always a good idea to go through the process in the system as if it were a real scenario. If something seems off revisit any of these steps until it meets all of your requirements.
Staff Forms are designed to be a yearly tool. Each staff member can have one or many forms. While some forms do not offer as much urgency to complete or close out, it is always a good idea to have a plan to define some complete state so there are no open issues in conclusion of the school year. Sometimes this means ensuring that all forms are signed electronically or maybe simply moving the form into some completed state. One advantage of using eDoctrina's form application is everything is stored in the cloud and workflow states allow for monitoring forms across Improvement Plans, Support Plans, and standard Forms.
Currently, templates to use in eDoctrina's Staff Forms module have to be submitted to the eDoctrina team so they can be built. Depending on the nature of the form, this could entail some custom development fees. This should not deter you because we are always willing to work with staff and administration and usually find a good way to get you what you need fast! There is some planning that has occurred about enhancing the general Forms module to allow creating some template that can pull values from anywhere in eDoctrina!
03.K. Student Test Modifications Screen
The Student Test Modifications Screen is where a user, with the appropriate permissions, can create or edit the features a student requires access to by subject.
If a user has the appropriate permissions they will see the "Student Test Modifications" option under the "Assessment" tab of the quick-access menu:

Creating a New Modification
VIDEO: To see a short video on how to enable this feature within the assessment editor, please click HERE
The button will allow the user to create a new student test modification.

When the is utilized a pop-up will appear to allow the user to select a subject area, as well as the student(s) to link the modifications to:

After the subject, student(s), and modifications have been selected, clicking the CREATE icon will create the modifications for those students and subject area. A pop-up will appear to confirm the modifications.

Updating an Existing Modification
Students with existing modifications can be searched for on the main Student Test Modifications Screen. The top row of filters is used to search and filter for the students. The "Main Subject" filter can be used to further refine the results:

When viewing the modification landing page, any existing modifications will appear in the list of records. The top modifications will appear to the right of each student's name. The
 icon indicates the student utilizes the default setting for the assessment. The
  icon indicates an override to the default settings enabling the selected setting. The
  icon indicates an override to the default settings disabling the selected setting. The top modifications are as follows:
- Audio: This option is related to student access to teacher recorded Audio Notes.
- Reopen: This option is related to the student's ability to reopen an assessment.
- Calc: This option is related to student use of a calculator tool within the assessment.
- The
 icon indicates the student is allowed to use a Basic Calculator.
 - The
 icon indicates the student is allowed to use a Computational Calculator.
 - The
 icon indicates the student is allowed to use a Scientific Calculator.
- The
 icon indicates the student will use the default values for each question in regards to calculator access.
- The
- TTS: This option is related to the student's ability to utilize the Text-to-Speech functionality within the assessment.
- Spell: This option is related to the student's ability to use Spell Check functionality within the assessment.
- X Out: This option is related to the student's ability to "Cross out" answer choices within the assessment.
- Trans: This option is related to the student's ability to utilize Google Translate within the assessment.
-
 icon: Allows the user to remove the modification if it was made in error or no longer necessary for this student.
 -
 icon: Opens up the "Advanced" pop-up for modifications:
Advanced Modifications
If the user selects the icon then a popup will appear outlining all other available modification options to add/edit:

- Lock student to test: The student will not be allowed to navigate away from the online test screen without saving.
- X out option: Allows students to eliminate answer choices with strike through.
- Default View: Allows the default view for the assessment to be overridden if required.
- Scramble questions: Questions will have a different order in the online assessment screen for students with this option selected.
- Scramble Answer Choices: Answer choices will have a different order in the online assessment screen for students with this option selected.
- Online time limit: Allows the user to select a maximum amount of time for a student to complete an assessments.
- Time limit multiplier: Allows the user to allow to extend the time allowed for a timed assessment.
- Font family: Allows the default font for the assessment to be overridden if required.
- Font size: Allows the default font size for the assessment to be overridden if required.
- TTS Voice: Allows the default voice for the TTS tool to be changed if required.
- Enable spell checking: Allows the default setting for Spell Check, or to override and show or hide this tool.
- Google translate: Allows the default setting for Google translate, or to override and show or hide this tool.
- Disable "Handwritten mode" in equation editor: Allows the default setting for handwritten mode, or to override and show or hide this tool.
- Disable copying of text to clipboard: Allows the default setting for copying text to clipboard, or to override and show or hide this access.
- Disable paste: Allows the default setting for pasting text into an assessment, or to override and show or hide this access.
- Background/Foreground Contrast Setting: Allows for override of the default Background/Foreground of the assessment if required.
- Enable magnifier: Allows the default setting for use of a magnifier on the assessment, or to override and show or hide this tool.
- Enable answer masking: Allows the student to use the default setting for the Answer Masking Tool, or to enable/disable this tool.
- Enable highlighting: Allows the student to use the default setting for the Highlighting Tool, or to enable/disable this tool.
- Enable reading ruler: Allows the student to use the default setting for the Reading Ruler Tool, or to enable/disable this tool.
- Show ruler: Allows the student to use the default setting for the Ruler Tool, or to override and show or hide this tool.
- Show calculator: Allows the student to use the default setting for the Calculator tool, or to override and show or hide this tool.
- Show protractor: Allows the student to use the default setting for the Protractor Tool, or to override and to show or hide this tool.
- Graphing Tool: Allows the student to use the default setting for the Graphing Tool, or to override and to show or hide this tool.
- Enable hint: Allows the default setting for the Hint option to be overridden if required.
- Passage Annotations: Allows the default setting for the Annotation tool to be overridden if required.
- Dictionary: Allows the default setting for the Dictionary tool to be overridden if required.
- Raise hand: Allows the default setting for the Raise Hand tool to be overridden if required.
- Can open in Safe Exam Browser only: Allows the default setting for the Safe Exam Browser option to be overridden if required.
11.F. Sending Grades to SIMS for ESU3 Districts
Setup in SIMS
In order for a successful sending of scores from eDoctrina to SIMS the user will need to create an Assignment that matches the name of the eDoctrina Assessment. This can be accessed under Setup > Assignments in the SIMS Gradebook:

Once the Assignment is set up in SIMS the user is able to send scores from the eDoctrina Assessment to the SIMS Assignment.
Sending Scores to SIMS from eDoctrina
The SIMS Grade Sync is accessed through the "Answer entry/verification" screen from the Teacher Dashboard provided proper SIMS credentials are provided to eDoctrina. If the  button does not appear on the Teacher Dashboard, please have a district representative reach out to the eDoctrina Help Desk ([email protected]) for assistance.
For more information on the Teacher Dashboard please see our help guide: 05.A. How to Use Answer Entry/Verification from Teacher Dashboard.
From the Teacher Dashboard click on the If the button:

After selecting the button the following popup will appear:

After selecting the desired assignment and clicking on the  button the user will be prompted to select the desired student(s) to send grades for:

By default all students in the class section will be selected. If there are any students that do not need their scores sent, then they may be "unchecked" to be excluded from the sent data.
After reviewing the students scores, use the  button to send the scores to SIMS.
Upon a successful sending of scores the following popup will appear:

The scores have now been successfully sent and will now appear in the SIMS Gradebook under the Earned Points column for each student for the corresponding Gradebook Assignment:

Beginning of Year Setup for Observations
To be successful in in district utilization of the observations module in eDoctrina, there are a number of configuration steps that should be performed at the beginning of the year that must be done by a district administrator or some district lead. Although much of the rubric configuration should be done prior to setting up the details, tasks like assigning the appropriate rubric or framework for a staff member to be evaluated on or providing observers with the appropriate access is something that needs to be revisited every school year. This document will contain all of these steps and how to perform them successfully. If there is a need for any extra observation rubrics or forms that do not already exist in eDoctrina, then consider building one with the assistance of this guide or an eDoctrina team member.
Access to the OBSeRVE Dashboard
The first step to managing OBSeRVE is to ensure that all users in the district that will be performing observations have access to the OBSeRVE Dashboard. If a user cannot see the OBSeRVE Dashboard under Quick Links, then they will need to be marked as an Observer in their user profile.

To provide access for a certain user to the OBSeRVE Dashboard, find their profile in the "User accounts" page.

Find the Security Settings section of the user profile and check the "Observer" checkbox.

Assigning Observation Rubrics to Staff Members
In most districts there is a minimum required number of observations that need to be performed for each teacher in each school year. Although assigning a rubric to a staff member in eDoctrina is not a required task, doing so has great utility as assigning each staff member something provides a visual of how minimum requirements are being met throughout the year. Not to mention, there are some great filters that are available to help monitor the completion of yearly observations that are only useful if staff members have been provided a rubric assignment or framework. This is a pretty simple task that has very high impact, which means this task is considered one of the most import best practices for beginning of year setup.
Observation rubric assignments are done from the Assignments layout view of the OBSeRVE Dashboard.

To make a single user rubric assignment, find the observee in the list by utilizing the available filters. The best way to identify a user in the list is by searching by last name in the Search field, but other filters may also be used. Just remember that if there is difficulty finding some user, then it is always a good practice to Reset Filters. Once the desired user is located in the list, find the  button next to the observee's name amongst the other common action buttons.

Once the button is clicked, a pop-up window will appear prompting to select the rubric that needs to be assigned. One or many can be selected as long as they are not part of the same rubric.

Once selected, click the  button to complete the rubric assignment. If successful and the correct filters are selected, the assigned rubric should display and show a number of "R" buttons that represent the minimum required items for each observation type.

To make a rubric assign for multiple users in one action, eDoctrina offers a Mass Assign tool that can be used to expedite this task. In many cases, observation rubrics will need to be assigned to a group of observees, such as all "Non-tenured" teachers. To do so, simply select the respective checkboxes next to the desired staff members' names from on the Assignments Layout and click the  button on the top of the screen. After the mass "Assign" button has been selected, the process is completed the same way as outlined for singular assignment. So use the filters advantageously and remember that once a checkbox is selected in this layout view, it will remain selected even if the filters have been changed. The selections will only be erased if the page is refreshed.

Assigning Observers to Staff Members
Before taking the initiative to assign specific observers to specific staff members, it is important to understand the default access for the different user types that exist in eDoctrina. If someone is a district admin user type, then they will automatically be granted access to create and manage observations for all staff members in the entire district. On the contrary, school admins will ONLY be able to see(observe) and manage staff members that exist in their school own school. Going further, there is the possibility for a teacher user type to have access to the OBSeRVE Dashboard, but they will be limited on access that might depend on a department code or some other access rights. In some cases, these default access rights need to be modified as, for example, some school admins will need to observe teachers that are in other schools within the school district as an independent observer. The ability to "Assign an Observer" is included to accommodate for this need.
The primary utility of this tool is that if an observer or evaluator has been assigned to any staff member, then they will be able to find this person on the OBSeRVE Dashboard to start and complete the required observation(s). Although there are some districts that want to assign observers in the beginning of the year so their observers can use the observer filter on the OBSeRVE Dashboard to limit the list of staff members that they will see.
Assigning an observer is done from the User accounts screen. Instead of entering the the profile, the onservation rubric assignment can be made right from the listing of users.

To assign an observer to one teacher select the  button next to the users name in the user listing. A pop-up will appear prompting to select the desired school admin, the observation rubric they will be using, as well as a prompt asking to what to do with already existing assignments.

To complete the observer assignment to a staff member, select the observer that will be performing the observation for the selected teacher and the the rubric that will be used. It is not required to select any of the radio buttons where the rubric assignments are listed as it is possible to simply assign the observer without indicating which rubric or observation type that they will be completing for this teacher. Just note that if a specific observation type is selected, then the observer may only see that option on the Assignments layout view of the OBSeRVE Dashboard. The option to remove all existing observers is available, but keeping them assigned is the default. Click the  button to complete the assignment. All assigned observers and the selected observation rubric will be listed next to the user once they have been made and can be removed at any time by selecting the trashcan next to the assignment. Notice that observer assignments are linked to specific years, so this task must be revisited each year in the beginning of year setup if it is being used.

To assign an observer to multiple teachers simultaneously, simply select the checkbox in the left most column for the desired teachers and click the "Assign Observer" button at the top of the screen.

Other considerations for Beginning of Year Setup
Providing a School Admin access to another School within the District
This tool should only be used for users who are linked to one building, but will also need full access to another building within the district. This feature will does not work with District Admin user types because they already have full access to district staff members. As opposed to assigning this school admin user to each staff member through the observer assignment as described above, it is sometimes easier to provide them with the permissions to observe any teacher in a building other than their own. To give a school admin access to view/observe teachers in a different building, click the button next to their name from the users homepage and add the school to their profile as shown in the image below.

As this above described setting to provide "Additional schools to provide observations" is only applicable to the OBSeRVE Dashboard, there may be some scenarios when a user will need access to everything in the linked schools, which can include assessments, unit plans, or even student goals. If this is the case, then it is possible to have a secondary school linked to any users account to extend their default access. In the example below, this School admin user will have access to all content within both of these listed buildings.

There are two ways that this can be configured: through manual/automated staff imports OR manual assignment. If the import method is the decided method, it is important the the line items on the imported file include linkage to all schools that are required for this observer. This is the recommended way because the lack of the required manual maintenance that is needed as the other method will require making the admin a Flex User to prevent changes from being revert through the nightly file transmission between the student information system and eDoctrina.
If it is decided to add this extra school manually, simply click the on the user accounts screen for the desired user, then find the User Account History section of the user editor. Here is where one can add or delete any other linked settings and toggle them to be active or inactive. Just remember that if the staff list is loaded through automation, it is also important to update their profile to be a Flex User or set their profile to Do not update from imports

Making an existing rubric available for the upcoming school year
If an observation rubric or form has been created by an eDoctrina team member, this is probably a good thing because they will move the district rubric assignment to the upcoming year as long as the district is in good standing. But if an observation form is managed internally, then each year will require that new assignments, however many there are, to be made by a district admin or some district lead user.
District Settings for Observations
Although much of the behavior of the observation rubric or form is determined through the unique configuration of the included elements, there does exist some configuration options that are applied at the district level. These settings will be applicable to all observation rubrics or forms if they are used. Only district admin user types will be able to access these settings and as they should usually be set at the beginning of each year so any behavior in eDoctrina is as expected.
To find the district settings for observation, navigation to the District option located in the Student Information Data sub-menu within the Settings menu on the top navigation bar.
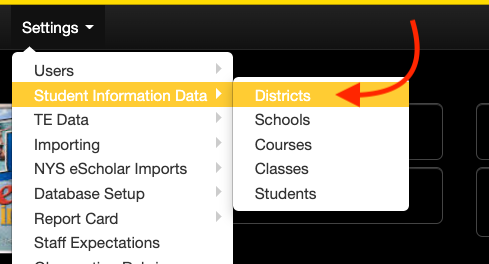
This will navigate to the District/Sets page where all available districts and standard sets will be listed. It is normal to only see one button as access to edit is restricted for all other districts and sets besides the one that the logged in user is linked to.
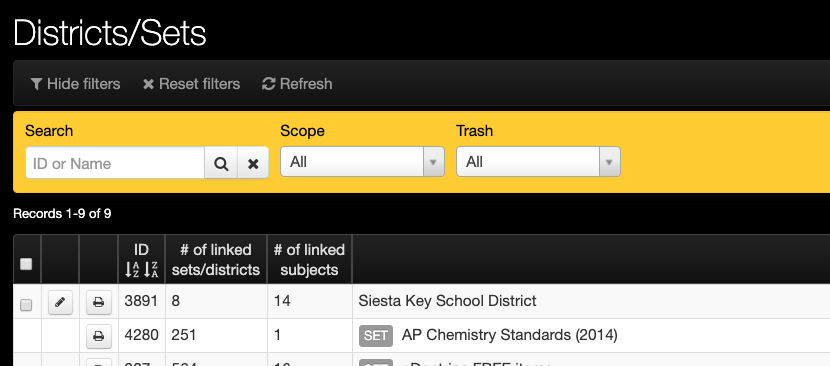
Click the to enter the district editor where the district settings for observations is located.
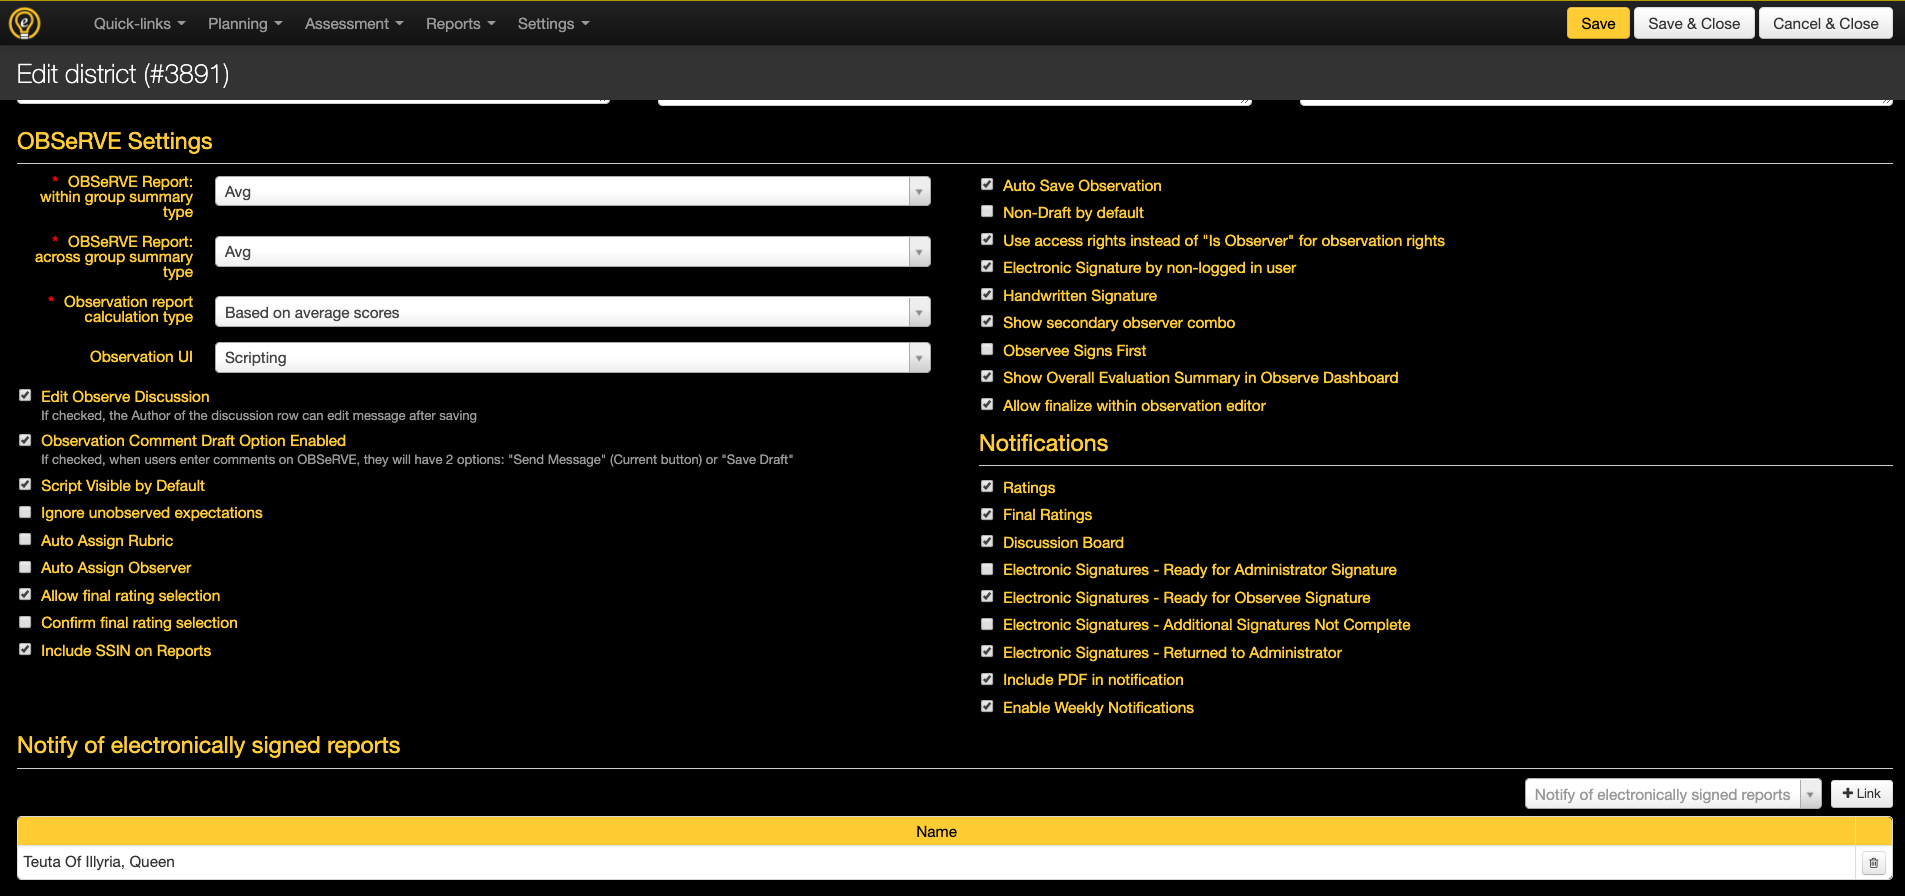
OBSeRVE Settings
All general district observation settings for the OBSeRVE Dashboard, Observation forms, Final Rating selection, and Report options can be found here. Please note that there exists many configuration options within a specific observation rubric. These settings are district-wide options, which means these are the rules that all user in the district will follow in regards to their use of OBSeRVE.
- OBSeRVE Report: within group summary type: This selection only is considered with the none existence of a calculation method within the rubric assignment. Most of the time, this setting does not apply because it is overridden in the observation rubric setup.
- OBSeRVE Report: across group summary type: to be defined in other help guide regarding observation rubric configuration. Most of the time, this setting does not apply because it is overridden in the observation rubric setup.
- Observation report calculation type: to be defined in other help guide regarding observation rubric configuration. Most of the time, this setting does not apply because it is overridden in the observation rubric setup.
- Observation UI: the Observation UI determines which view staff members will be led when accessing the screen where an individual staff members will all be listed. The Scripting user interface option is the most commonly used as it simply lists all available observations, but some districts prefer the Tradtional user interface that aligns all accessible observations in a side-by-side format. This is mostly applicable to how teachers will experience the eDoctrina observations module as most admins have since migrated to use the OBSeRVE Dashboard for managing observations.
- Edit Observe Discussion: If selected, comments made on the main OBSeRVE discussion board can be edited. If unselected, posted comments will be final.
- Observation Comment Draft Option Enabled: If selected, the ability to post a private/draft message will be enabled. A draft comment will only be viewable by the user who made the comment.
- Script Visible by Default: This setting controls the default setting for the Script Visible to Teacher option within every observation form. If this district setting is selected, then all created observations will default to have the scripting area visible. This is only the default setting, so each observation can be updated depending on observer preference.
- Ignore unobserved expectations: Select this checkbox if the default selection for observation rubrics assigned to the district should be to ignore unrated staff expectations. There is also a selection that can be made within the observation rubric assignment and should be verified before finalizing the rubric. Most of the time, this setting does not apply because it is overridden in the observation rubric setup.
- Auto Assign Rubric: If the rubric code has been included on the staff import file, it is possible to auto-assign rubrics if the rubric code has been entered in the observation rubric setup. To make this work, the rubric codes must be entered first, then the staff import file must be run after this feature has been enabled. This will create the rubric assignment on the OBSeRVE Dashboard automatically upon staff import.
- Auto Assign Observer: This feature is also closely linked to the staff import file. With the presence of department codes, this feature will assign observers to teachers if and only if this configuration option is checked. All users who are observers will be assigned as the observer for all users who match their department code. This action will NOT be removed existing observer assignments.
- Allow final rating selection: Selecting this checkbox will allow admins to choose the Final Rating for an observation assignment from a pull-down menu or enter a score on the Final Rating Layout view of the OBSeRVE Dashboard. This can work independently as the option to remove the final rating is an option in the pull-down. Enabling this option will allow admins to create a Final Rating without entering the OBSeRVE Editor.
- Confirm final rating selection: Selecting this checkbox will force the admin to select the "Save Rating" button on the Final Ratings view of the OBSeRVE Dashboard. This button will be modified to a "Remove Final" button as soon as the Final Rating is saved. This option will be completely unavailable if the "Allow final rating selection" is unchecked.
- Include SSIN on Reports: Selecting this checkbox will add the staff members state identification number (if it exists in eDoctrina) to most of the reports that are generated for an individual user through the OBSeRVE Dashboard
- Auto Save Observation: Selecting this checkbox will enable the Auto-save feature which will save all entered information at a 3 second delay. This selection should be confirmed by the district as there are advantages and disadvantages to this feature. Unless admins are thoroughly trained to ensure internet connection and click save frequently, it is highly recommended to use this option.
- Non-Draft by default: Selecting this checkbox will make all conducted observation non-draft (complete) by default. This should be enabled if your district would like to share observations as soon as they have been initiated. This selection should be confirmed by the district as most will want the draft option to be the default.
- Use access rights instead of "Is Observer" for observation rights: The permission "Is Observer" is a simple toggle switch that provides users with access to the OBSeRVE Dashboard to conduct and manage observations. This option does not depend user permissions, which means it is not flexible. Enabling this option will allow a more granular configuration by using Observe access rights defined for specific users or user groups as primary allowing districts to define user access rights in for the OBSeRVE Dashboard. This is usually used in districts that have a large variety of user types or districts that would like to use department codes as the determining factor of which observer sees which staff members on the OBSeRVE Dashboard.
- Electronic Signature by non-logged in user: Selecting this checkbox will allow someone to electronically sign an observation through a different user's account. This will allow an administrator to sign an observation then have the teacher sign it immediately after without having to change who is logged in. The password will determine who is the person providing the signature.
- Show secondary observer combo: Enabling this option will add another field to indicate another observer to have access to an observation. The secondary observer will display on printed observations and will have similar access rights as the observer.
- Observee Signs First: Enabling this configuration setting will change the electronic signature workflow for the entire district to have the observee provide their electronic signature first. The observer will sign the observation after this signature has been provided.
- Show Overall Evaluation Summary in Observe Dashboard: Enabling this feature will place the Teacher Effectiveness or End of Year Summary Report on the assignments layout view of the OBSeRVE dashboard.
- Allow finalize within observation editor: Enabling this feature will allows final rating selection to be made within and observation form. This feature is usually used when there exists a closeout observation or evaluation event at the conclusion of an observation period where the observer can select the final rating and send the value to the TE system in one action.
Scheduling an Observation
Scheduling an observation for a staff member in eDoctrina is basically creating an observation event without entering any data just yet. The scheduling tool allows observers to pick a date and time when an observation is planned. Upon scheduling, staff members can be notified with an email notification. The primary utilty in scheduling an observation is to mark an observer to a specific type of observation, but there is some other utility that is specific to district configuration as scheduling an observation could mean that the staff member will also have access to the observation form while it is still in scheduled state. Generally, if the person conducting the observation makes a change to the scheduled observation event, it will be updated to a more private Draft status where only the observer will have access until it is complete.
Scheduling observations occurs from the Assignments Layout. To schedule an observation, select the  button next to the desired teacher's name.

A pop-up will appear prompting the user to select information about the scheduled observation.

- The Calendar tool allows the observer to see other observations that may also be on the calendar and provides a tool to quickly select the date and/or time of the observation that is being scheduled. While selecting the day from the calendar will populate the date automatically on the right panel, toggling to the week or day views of the calendar tool will let times be selected as well to be populated for the scheduled observation. This is a great tool to view all other observations that are occurring so no scheduling conflicts occur.
- The Category/Type selection is a single select radio button that allows the observer to choose which observation event they would like to schedule for the targeted staff member. There are some conditions that are configurable within the types that will also control whether or not an email notification will always be sent out, never be sent out, or provide the observer with the option on the bottom left of this pop-up.
- The Date, Start Time, and End Time that is populated here will be what is directly inserted to the observation event upon scheduling. These dates can be populated using the calendar tool or by manually entering the dates and times. The date is a required field while the times are not.
- The Schedule Comments are only used to add any important message to the staff member upon scheduling if and only if an email notification is being sent. These comments are not stored anywhere else, which means that an observer should not use this field unless the plan is to notify the staff member about the scheduled observation event via email.
- The option to Send Email to observee will exist only if the selected "Category/Type" is configured to allow optional email notifications. If this option exists, the default will be unselected which means the scheduling observer will have to remembber to select this checkbox if they plan on notifying the staff member about the scheduled observation.
When the desired selections have been made, click the  button to add the observation to the Calender Layout.
For all scheduled observations, the observer will receive an email notification that will have a subject line that will list the name of the main form and the category/type of observation in a fashion that is very similar to this
[eDoctrina] Observation Scheduled - Teacher Observation - Announced
while the body of the email notification will include the date/time, the entered schedule comment, and the option to add the scheduled event to some external calendar.
Once an observation has been successfully scheduled, the Assignments layout view will update to show a  for any staff member that has been assigned a rubric that has minimum requirements.

Also note that upon scheduling an observation, the observation is actually being created in eDoctrina for future use, therefore this scheduled event can also be found on the Observations Layout View or the Calendar Layout view.


Just remember that as soon as an update that is made by an observer to a Scheduled observation it will change status to Draft.
Printing an Observation
Although all observations that are entered into eDoctrina can be accessed electronically, there are many occassions where the observation form will need to be printed to distribute to the staff member or for general filing purposes. There are many different formats for printing an observation. Each district will have unique default print settings as some will allow the print options to be selected by the end-user while others will set some rigid settings so all observations are printed consistently. Print options can be vary for each rubric assignment and can also be different for each school within the district.
Printing a Single Observation
Observations in eDoctrina can be printed in three different formats: webpage document(.html), Microsoft Excel (.xls document), and portable document format (.pdf). If there is a need to print any single observation, eDoctrina offers many locations where this can be done.
From the OBSeRVE Dashboard
The Assignments and Observations layout views of the OBSeRVE Dashboard offer tools that can help to print individual staff observations.
On the Assignments layout view, individual observation reports can be generated if and only if there is a rubric assignment that has been made and the observation is in Complete status.

On the Observations layout view, all observations that are accessible for the logged in user will be listed and the ability to print is available.

From the Staff Members View
Each staff member in eDoctrina has their own screen where all of their observations will be listed in either a list format or in a side-by-side column format.
There are two ways to access the staff members folder: from the OBSeRVE Dashboard or from the User Accounts screen.
From the OBSeRVE Dashboard
On both the Assignments layout view and the Final Ratings layout view, each staff member will display their name as a hyperlink. Clicking this link will redirect to the staff members view for observations.

From the User Accounts screen
If the logged in user has access to view the teacher and has the permission set to observe them, they will find a  button next to their name on the User Accounts screen. Selecting this button will navigate to the Staff Members view for their available observations.

When looking at the Staff Members view, take note that there are two different modes: Scripting and Traditional.
The scripting mode is where all observations will be listed and the ability to print will be exactly the same as when printing from the Observations layout view of the OBSeRVE Dashboard.

The traditional mode is where all observations will be displayed in a side-by-side manner so more than one observation can be looked at in a single view. Each observation shown on this screen can be printed individually.

From Within the Observation Form
Within each observation form there exists a print button in the top right corner for easy printing as long as the observation form is accessible by the logged in user.

Printing More than One Observation
There are some instances where more than one observation will be printed in one action. THis could be many observations for a single staff member or observations that exist for multiple staff members. Although the Staff Member view does offer the ability to print multiple observations in one action, of course this is limited to only printing observations for a single staff member. With this said, it is usually a good practice to head over to the OBSeRVE Dashboard to print more than one observation at a time.
From the OBSeRVE Dashboard
On the Assignments layout view, the option to print all observations for a single staff member exists by clicking the  button to the left of the staff members name.

On the Assignments layout view, the option to print all observations for a multiple staff members exists by selecting the checkbox to the left for all desired staff members and then using the Individual Teacher Report button.

NOTE: If the report is generated without selecting any checkboxes, the system will generate the report for all staff members that are displayed in the filtered list.
Both options will require that a single rubric is selected so the appropriate default print settings can be applied. You will be provided a prompt if no rubrics are selected or if more than one rubric is selected. This provides a slight limitation that mass printing from the Assignments layout view can only be done for observations that are conducted within the same rubric.
On the Observations layout view, the option to multiple observations for a exists by selecting the checkbox for the desired observations and then using the Individual Teacher Report button. This option provides a little more flexibility as it is possible to only select specific observations for one or many staff members (instead of the entire set of observations for each selected user. Again, the only limitation is that only one rubric can be selected for mass printing.

NOTE: If the report is generated without selecting any checkboxes, the system will generate the report for all observations that are displayed in the filtered list.
From the Staff Members View
Using the same techniques as described above about printing multiple observations, the same can be done from the Staff Members view. Of course, the only limitation here is that you can only print multiple observations for a single staff member.
This can be done from the Scripting view where all observations for the staff member will be listed.

NOTE: If the report is generated without selecting any checkboxes, the system will generate the report for all observations that are displayed in the filtered list.
And can also be done from the Traditional View where all observations are shown in a side-by-side column format. On this view there are no checkboxes for selection, therefor only single observations can be printed or the entire filtered set by clicking the  button on the top of the screen.

Embedding Videos from Google Drive
Videos can be shared within many eDoctrina modules. Due to specific security limitations within Google if looking to share a video through Google Drive the following steps must be taken:
-
Access Google Drive and locate the desired video.

-
Click to open the video and then select the option to "Open in new window."

-
Within the new window select the share option and select the "Advanced" option to make sure that they are set to "On - Public on the web."


-
Once that has been configured select the Save option and then select the "Embed Item" option. This will provide you with a sharable link that can be used within eDoctrina.


-
Once into your eDoctrina module (in this case Assessment) select the Source option within the text editor and paste the shared link to this space.


-
Once complete there should be an icon labeled with the description IFrame.

-
Once selecting the Save and Close button, upon reopening, the video will be embedded within the appropriate section.

For additional questions or support please email [email protected].
Assigning an Observation Rubric / Framework to a Staff Member
Even though observations can always be created for a staff member if there exists an observation rubric for the district, providing each staff member an observation rubric assignment or framework can be considered one of the more essential tasks to perform at the beginning of the year to ensure that each staff member is provided the minimum set amount of observations throughout the year. Each rubric assignment carries with it a minimum set amount for one or many observation categories (i.e. Announced/Unannounced) as well as an easy way to create and monitor the progress of such yearly events.
Assigning a Rubric to a Individual Staff Member
Rubric assignments are done from the Assignments Layout view of the OBSeRVE Dashboard. This is the same location where observation can be created, monitored, and electronically signed, so many consider this view to be the most important. The utility of this screen is vastly improved if there exists a rubric assignment for all staff members that have to be evaluated throughout the year.

On this Assignments layout view, there will be a list of all staff members that the logged-in user has access to provide observations for. This may be limited to the observer's school, their department code, or even assignments to specific staff members. If there has already been a rubric assignment made for the user, the minimum requirements for each category should display in along the right side of the screen next to each staff members name, respectively. If there is no rubric assignment shown for the selected rubric, then this user has not been assigned anything for that rubric specifically.

To make a rubric assignment for an individual staff member, there is a  button that will be shown to the left of the staff member that needs to be assigned a rubric. By default, this button is only available to District Admin user types, but the access to this button can also be extended to other users upon district request. Once selected, a pop-up message should appear prompting to select which of the available rubric assignments should be applied to the target staff member.

NOTE: A single user can be assigned multiple rubric assignments for many rubrics, but they can only be linked to one assignment within each rubric.
After the rubric is assigned to the staff member, it will then display to the right of their name in the Assignments column (if the rubric is selected in the above rubric filters). Make as many rubric assignments as necessary. Once this task is done for this user, then observations are redy to be started.

Assigning a Rubric to a Multiple Staff Members
In most districts, there will be only a few rubric assignments and these will be assigned to multiple staff members. The task of providing each staff member a rubric assignment individually is a cumbersome task, therefore it is a better idea to group the staff members into categories and then assign them all the same rubric assignment to save time.
Providing rubric assignments en masse is also done from the Assignments layout view of the OBSeRVE Dashboard. The only difference from assigning individually is that this action requires that the checkboxes to the left are selected to indicate which users should be assigned the desired rubric. It is recommended to leverage the filters to parse the list by school or some other parameter to ensure no rubric assignments are missed.

Updating or Removing an Observation Rubric Assignment
There are some instances where a rubric has been assigned wrong or a staff member no longer requires observations in the assigned rubric. In these cases, eDoctrina does allow users (with permissions to do so) the ability to update or remove an observation rubric assignment.
Before proceeding with this task, it is important to note that not all rubric assignments have the same categories and minimum requirements, so there may likely be the follow up task of changing the type of the existing observations or copying them to the appropriate rubric. Usually, this is quite easy if the rubric assignment is updated to one that uses the same rubric. But keep in mind that each rubric is unique and if there is a change in the assigned framework to a completely different rubric, the existing observations may have to be moved manually by recreating them and making the original observation items inactive.
If a rubric needs to be updated to an assignment within the same rubric (i.e. update from non-tenured to tenured), then this can be done by simply assigning the rubric again by following the steps outlined above for Assigning a Rubric to an Individual Staff Member
If an observation assignment needs to be removed, find the  button located right next to the actual assignment on the Assignments layout view. By removing the assignment, the observations that exist will not be removed, they will just not be referenced in the rubric assignment anymore. With this said, to keep data clean, it may be necessary to find the existing observations and make them inactive.

NOTE: There is not a current tool that will allow for mass unassign, so rubric assignments can only be removed for individual staff members.
Providing a user the ability to Assign/Unassign
By default, all District Admin users will have access to assign and unassign observation rubrics. If these access rights are desired to be extended to other users or user types within the district, then they can be provided this permission in the Access Control List(ACL) permissions located in the user editor or the district editor.

Email Notifications for Observations
It is not always required to be logged into eDoctrina to stay up-to-date with all that is going on in regards to observations in the system. For many actions in eDoctrina, there can be an email notification that can be configured to be sent out to one person or another. In this document, we will explore the different options for email notifications and their utility.
Where are email notifications configured?
Mostly all of the email notifications regarding observations can be configured in the OBSeRVE Settings within the district settings.
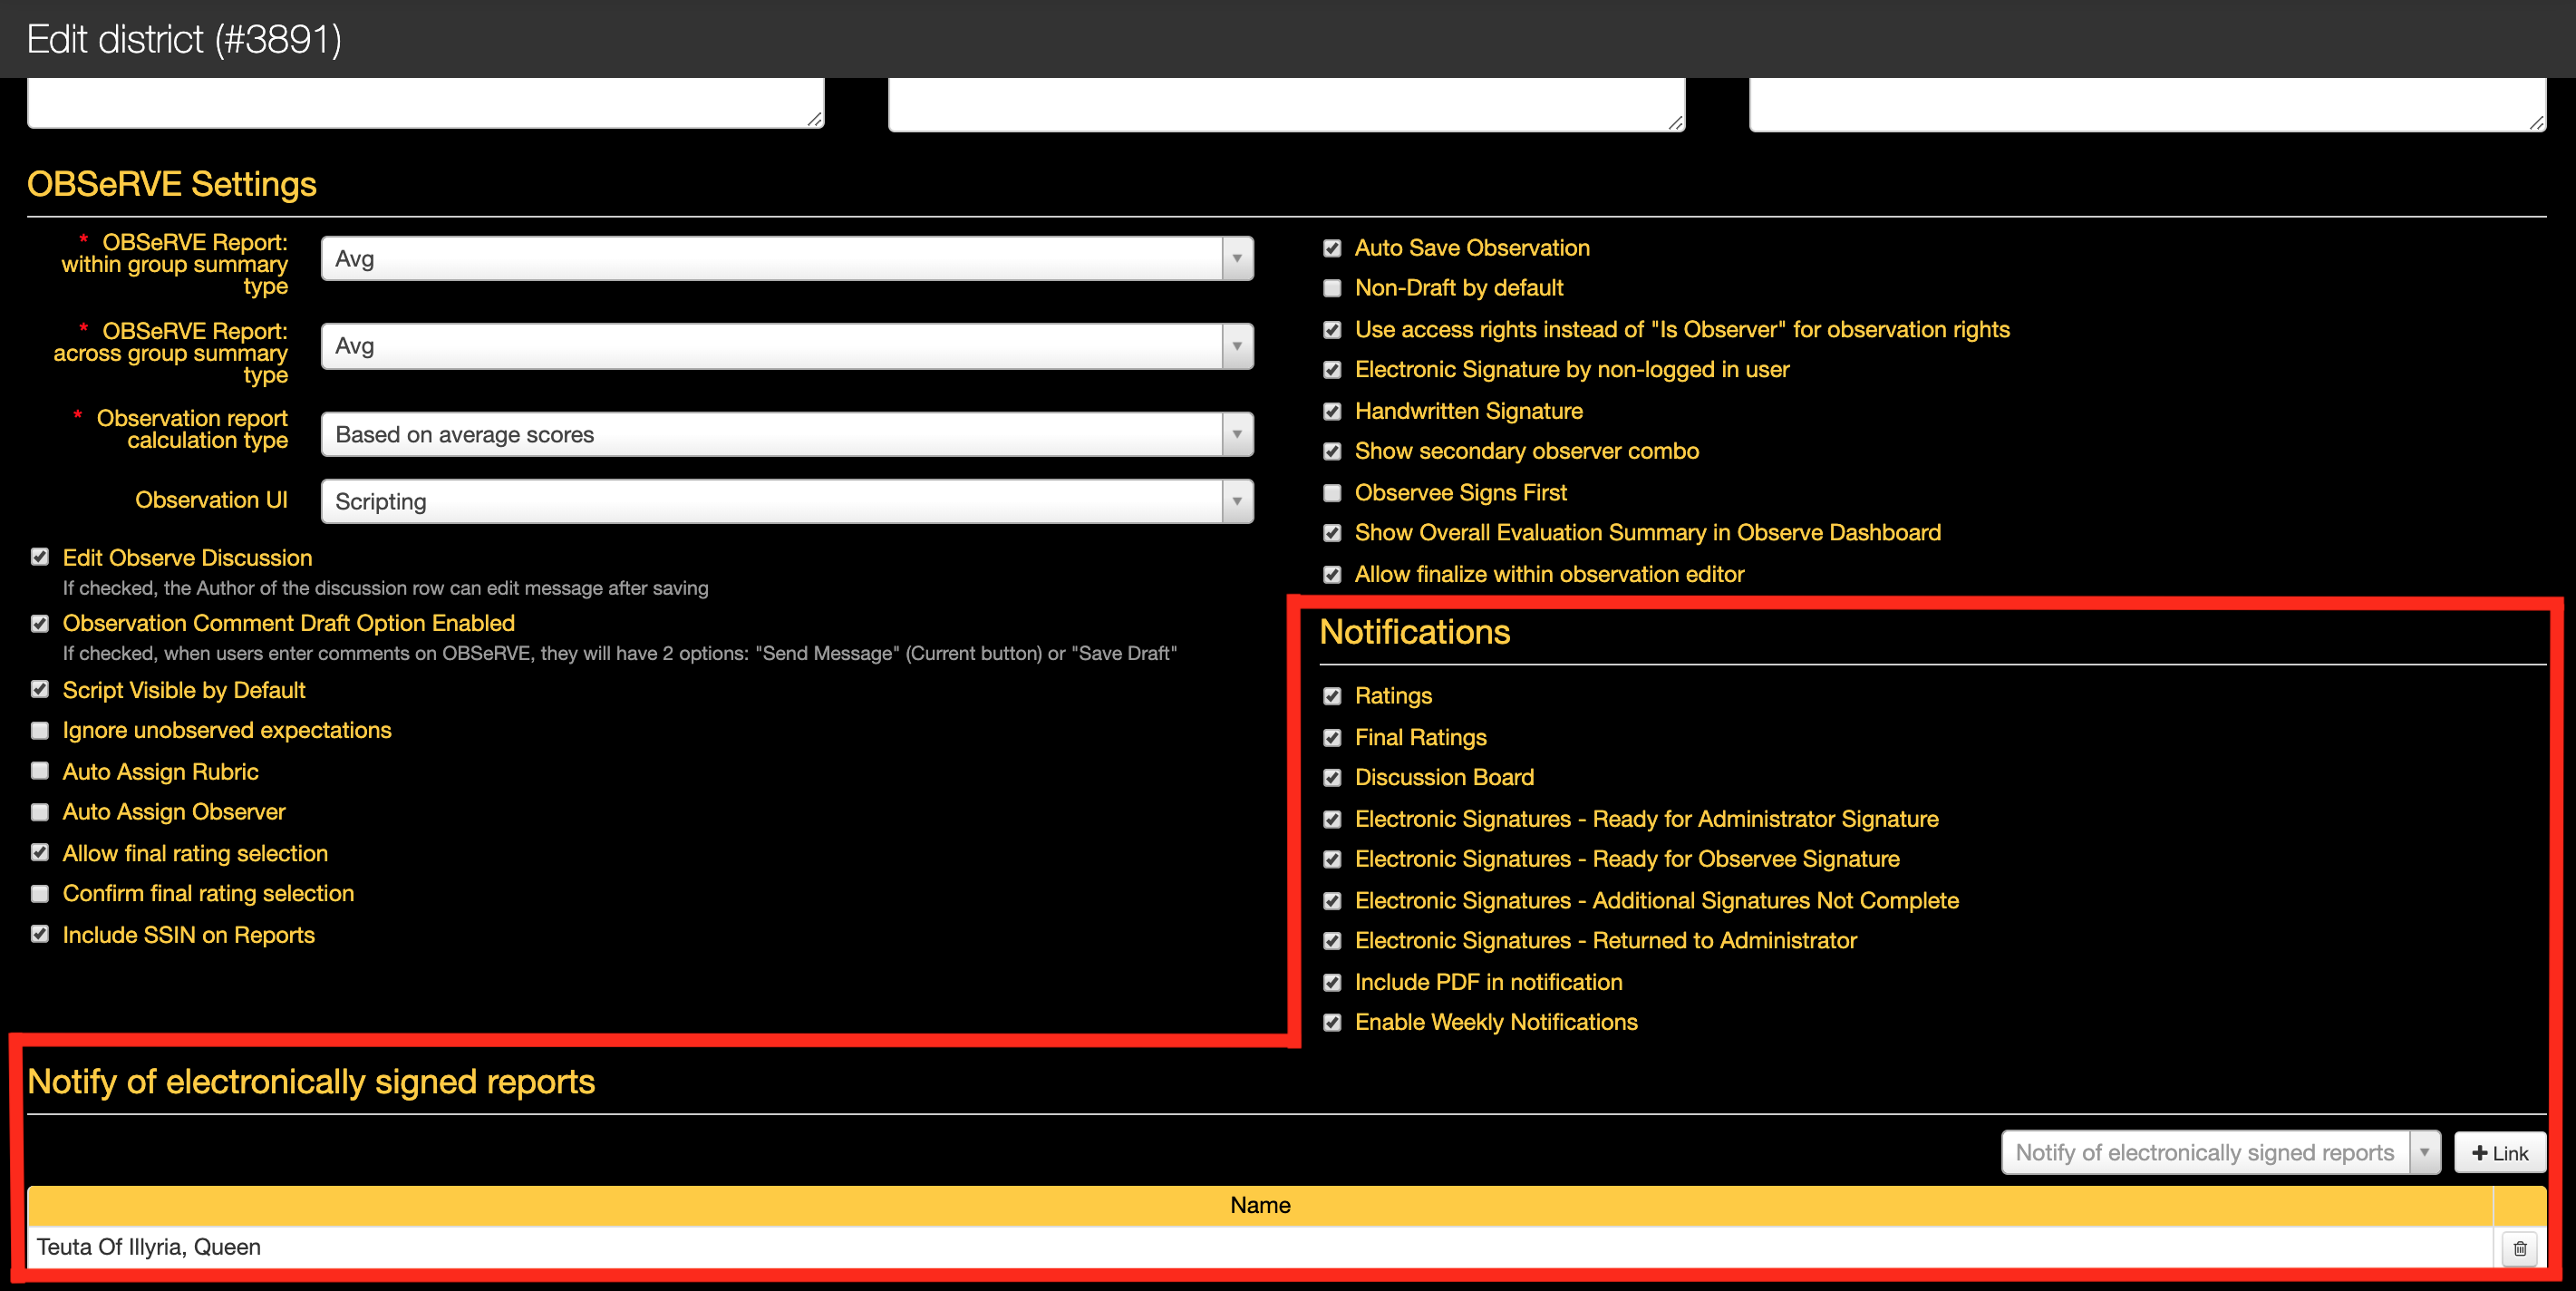
What are the automated email notification options?
- Ratings: The ratings email notification is the primary notification that should be enabled as this is the notification that is sent out when an observation has been updated to a status of Complete(uncheck the "This is a draft observation" checkbox). This email notification is also designed to protect the integrity of observations as further emails notifications will be sent out for updates that have been made to a complete observation as it is only appropriate to notify all parties about changes to observations that were thought to be completed.
- Final Ratings: The final ratings email notification is designed to be sent out when a "Final" score has been applied to any staff member. The definition of what is considered to be Final varies within each district, so it is important to understand the rubric configuration so it is understand if and when this email notification should be sent out.
- Discussion Board: The discussion board email notification will be sent out to all individuals who have a vested interest in the target observation when a "non-draft" comment has been posted. This means that the observer and observee will always get a notification for posted comments, but also any other administrator who has contributed to the discussion thread.
- Electronic Signatures - Ready for Administrator Signature: When a complete observation arrives at a status where the observer is required to apply their electronic signature, this email notification will be sent out (if enabled).
- Electronic Signatures - Ready for Observee Signature: When a complete observation arrives at a status where the observee is required to apply their electronic signature, this email notification will be sent out (if enabled).
- Electronic Signatures - Additional Signatures Not Complete: When a complete observation arrives at a status where the all required signatures have been applied and the user who is required to sign all observations (configured within their user profile) is required to apply their electronic signature, this email notification will be sent out (if enabled). Additional Signatures can be one individual within the district or many.
- Electronic Signatures - Returned to Administrator: The option to Reutrn an observation usually exists for the purposes of letting any of the involved entities to return the observation for edits. This can be necessary if there is an identified mistake or some other dispute. Once the observation is returned, the observer will receive this email (if enabled).
- Include PDF in notification: If this setting is enabled, each one of the automated email messages will include a link to the printed PDF of the observation. To security purposes, the user trying to access the link must log into eDoctrina to view the PDF.
- Enable Weekly Notifications: The weekly notification email is designed to keep observers informed about the status of all observations that have in the system. If enabled, this email will be sent out to all observers that have active observtions within the system and will list the status of each of these observations.
- Notify of electronically signed reports: Once any observation has completed the entire electronic signature workflow, an email can be sent to the indicated user here. Not only will the indicated user receive this email, but also the observer that is linked to the observation. This is a great tool to monitor completion.
Are email notifications sent out upon scheduling an observation?
This depends. Much of what happens in regards to email notifications is dependent on the rubric configuration and which observation type is selected upon scheduling. It is possible for a rubric to be configured to send an email message Always, Never, or provide the scheduling individual with the option. If the option exists, each observer will see an checkbox for Send Email to observee in the bottom left corner (which will not be selected by default so the observer must select this with intent).

NOTE: If the selected type will ALWAYS or NEVER send an email notification, then this checkbox will be hidden, which means it is important to know which type has been configured accordingly.
What are the manual email notification options?
Although the automated message should encompass much of what is necessary to keep all parties informed about the worfklow of any observation, there are some occasions where an email needs to be sent outside of the scope of what is already automatic. To accommodate for this need, there is the internal messaging system that exists within each observation.
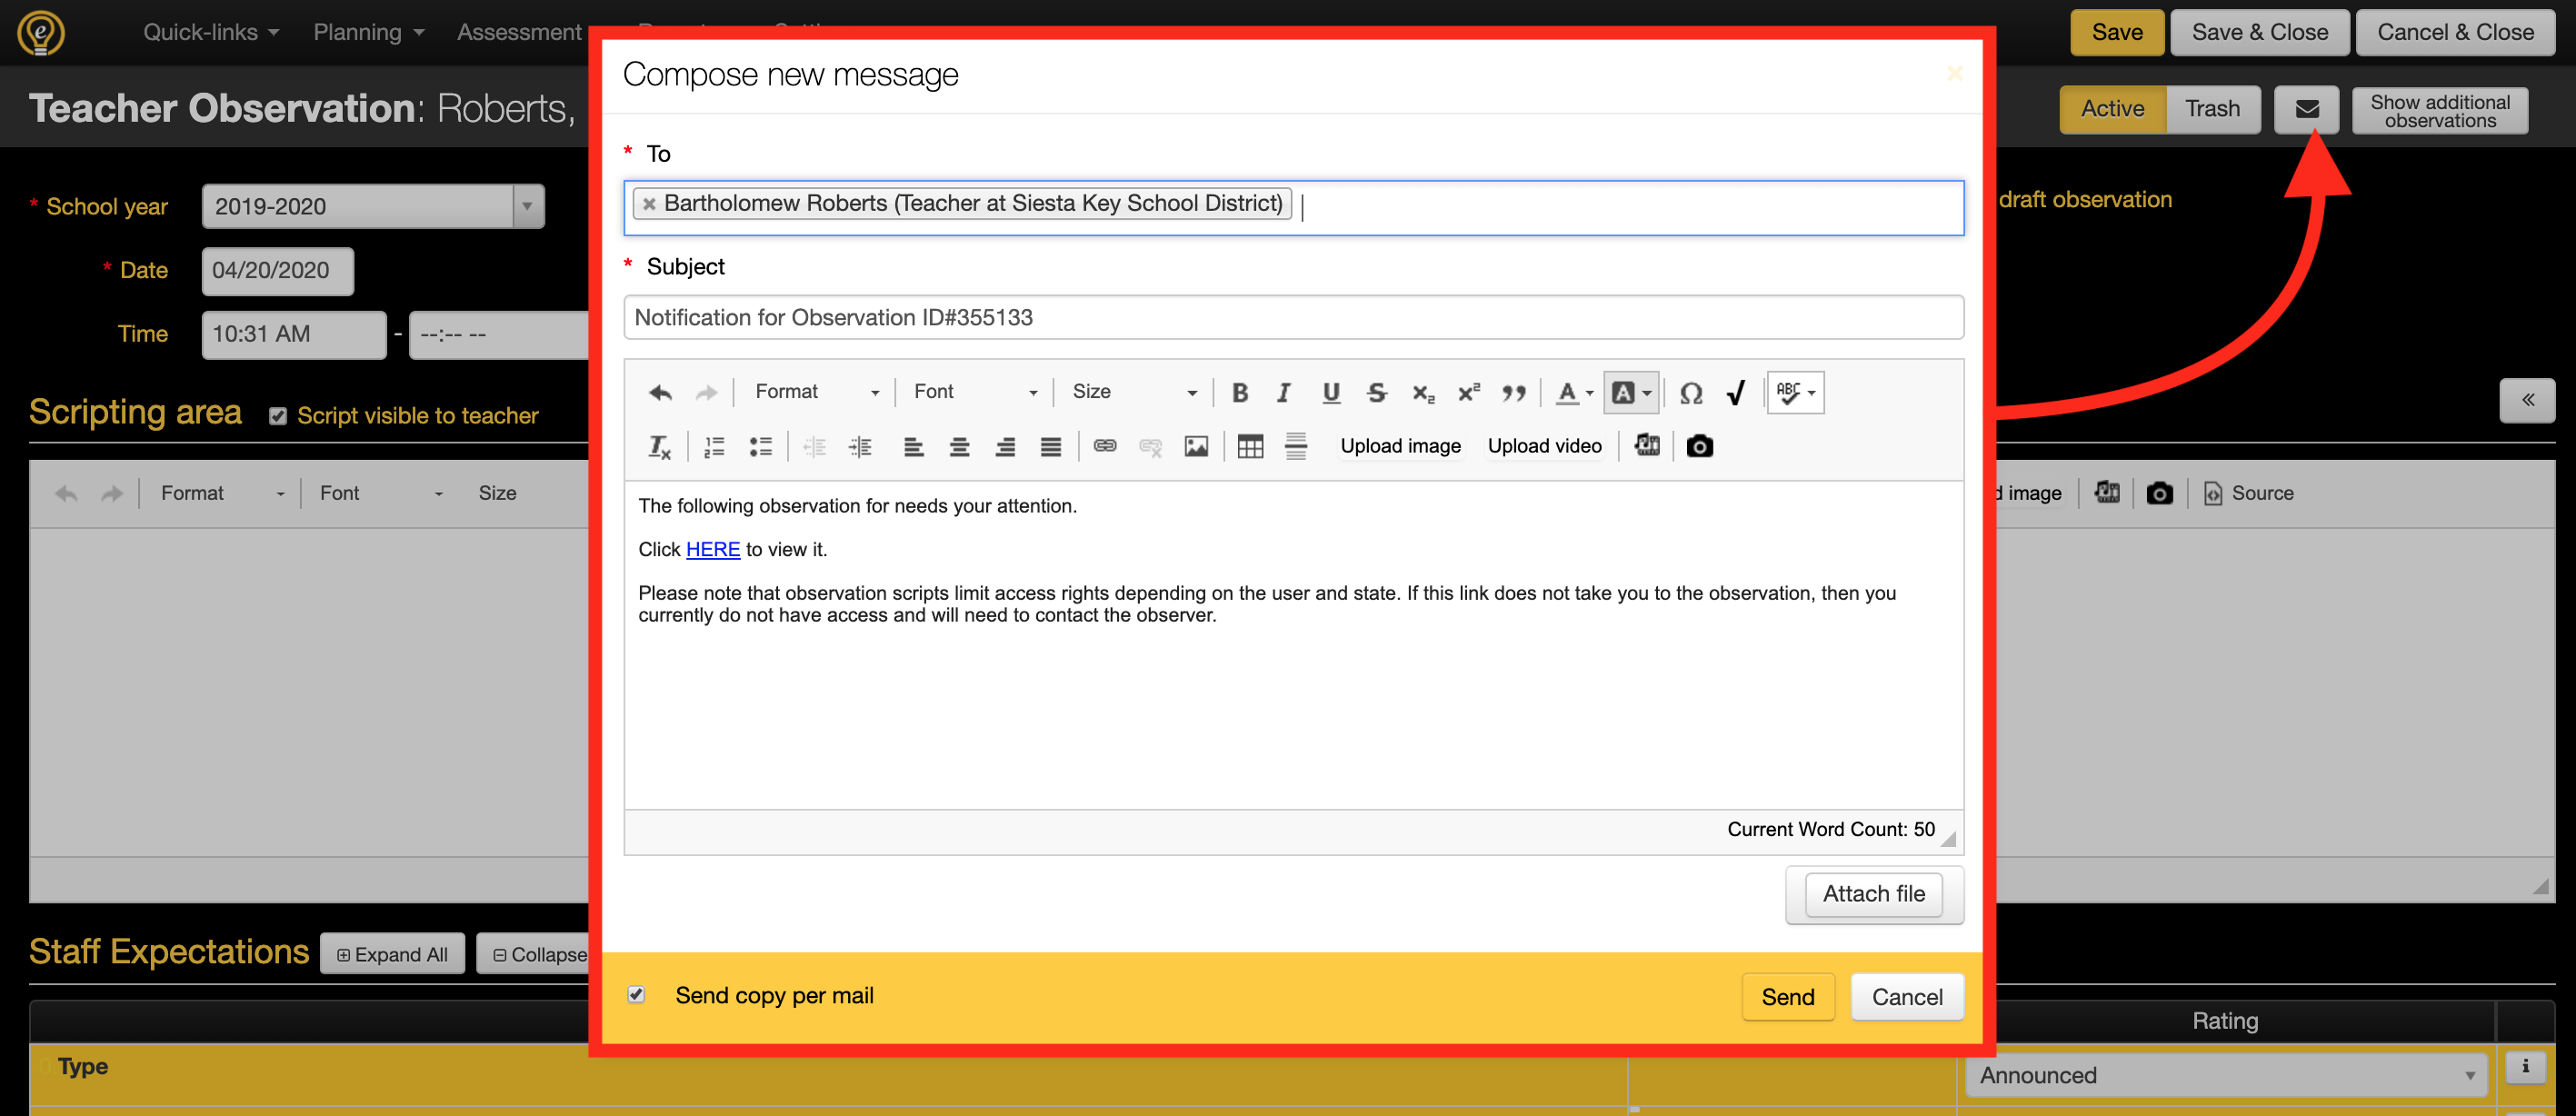
All that is necessary is access to the observation and there will be the option to click the  button in the option located in the top-right of the observation. Conveniently, the TO: message with be populated with the staff members name if the observer clicks this button OR the observer's name will be populated here if the staff member selects this option. If the person clicking the option is neither the observer nor the staff member, both of these individuals will be populated. If this needs to be changed, the users to receive the message can be updated by adding or removing them, but please note that only users who are marked as observers can be selected here.
The email body is also pre-populated with a generic statement and a hyperlink leading directly to the observation within eDoctrina (for easy access). This message can be modified before sending by adding or removing whatever is necessary. There is even a way to include some attachments along with the sent email notification. Please note that this message will only be an internal eDoctrina message if the option Send copy per mail is not enabled, but the default should be enabled for this option.
Is it possible for me to opt out of these email notifications?
Yes, any email notification that is generated through eDoctrina has the option to unsubscribe from it. This can be doen from within the user editor or within each users' My Account settings.
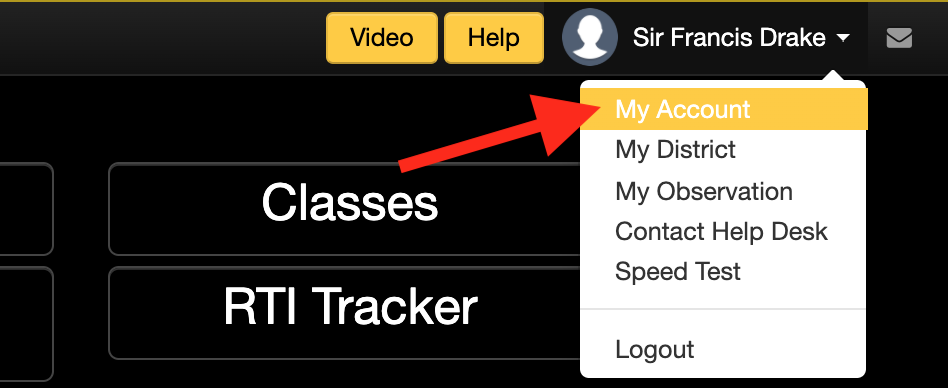
Once on the My Account page, find the Notifications section and uncheck or check any email notification that is desired to be unsubscribed from or subscribed to. In the below image, there are red arrows indicating any email notification message related to observations.
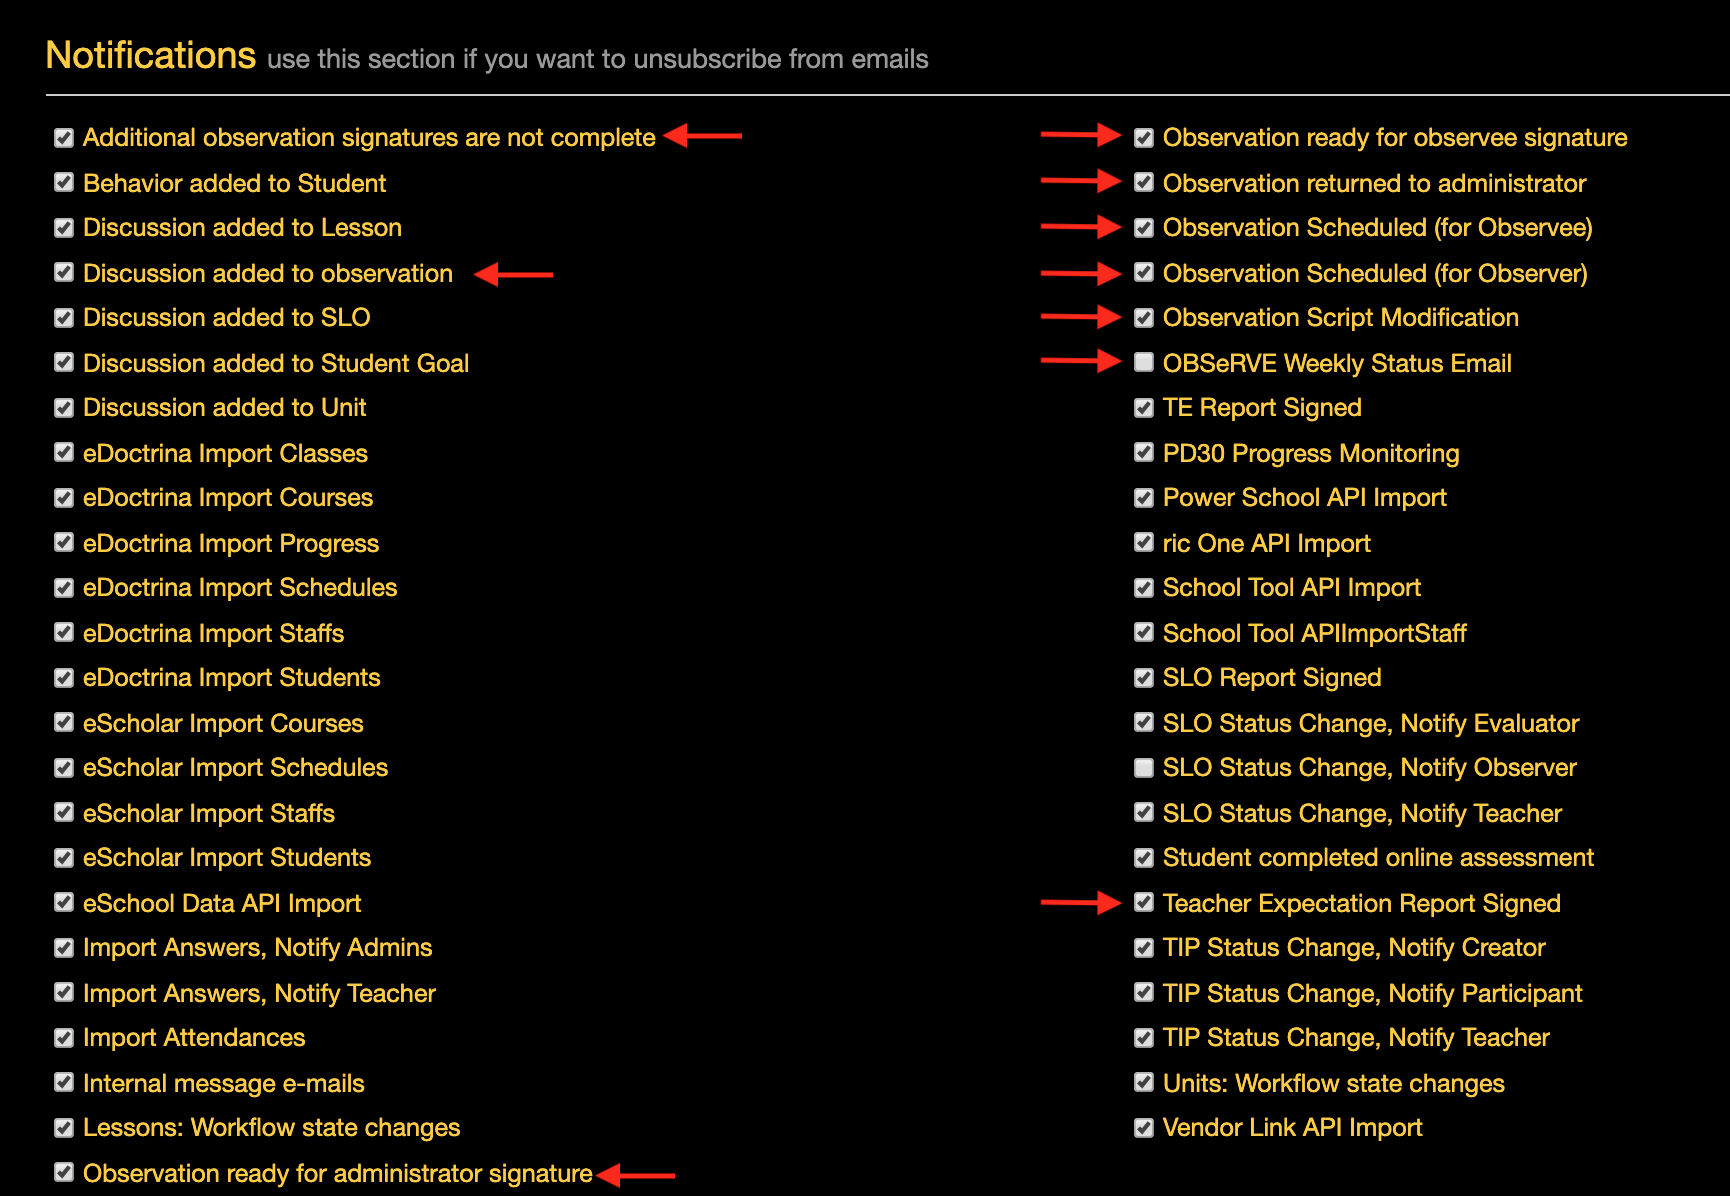
Signing an Observation Electronically
When electronic signatures are enabled in eDoctrina, the most common workflow is to have the observer and observee both sign the observation in a pre-determined order. Some district will have the observer sign first, while other the observee will sign first. In more advanced signature workflows, there may be some other signatures that are required such as a second observer or even a final approval by some district administrator. Regardless of configuration, this document will explain how both the observer and observee can electroinically sign any observation.
For Observees
The first thing to understand about signing an observation is that a signature cannot be applied unless the observation is set to a Complete state. If the observation in not in Completed status, then it is likely that the observation is still being worked on by the observer. I this seems incorrect, then please reach out to the observer to inquire about the status.
The second thing to understand is that a signature cannot be applied in certain workflows if the observer has yet to sign the observation. If this is the case, it is possible to hover over the signature button to check the status.

The third thing to understand is that after an observation is signed by either the observer or the observee, the rating and entered supporting information will be locked for further updates. GThis is designed to protect the integrity of the entered information. If it is found that something is inaccurate or incorrect, then the option to "Return to Administrator" exists so this can be addressed on a case-by-case basis.
Step 1: Navigate to My Observation
Depending on the district homepage, there may be an option to select the Observations button, but if this does not exist the option to select My Observation will always exist in the pull-down menu when the logged-in user's name is selected in the top-right of the screen.

Once selected, this will take you to the screen where your observations will be listed or displayed in a side-by-side manner (these are the different "modes" and the default is determined in district configuration).
List View
The list view will show all observations that are completed and provide a button to provide an electronic signature.
==> If the button looks like this, then all reqired electronic signatures have been completed.
==> If the button looks like this, then this observation is ready for your signature.
==> If the button looks like this, the ability to electronically sign does not exist because the observation either does not require a signature or it is not your turn to provide your electronic signature.

Column View
The column view will show all observations that are completed. The option to sign an observation electronically from this view does not exist, but it is possible to Open Script and then apply your electronic signature from within the observation form itself.

Within the Observation Form
If the observation is in Complete status, it will be possible to open up the observation form from both the "List View" and the "Column View". If viewing the actual observation form, the option to sign the observation will exist in the top-right corner.

Step 2: Provide your Electronic Signature
If the observation is ready for your signature, simply click the button. The following pop-up window will appear.

- Name: When applying an electronic signature, it is important to provide the name that should be linked. This does not need to match anything in eDoctrina, so make sure that this name is correct as desired. There are some occasions where a username will need to be applied instead of a name, but this is only if it is allowed to sign an observation while logged in as another user (usually the observer).
- Password: The password field is required to be entered with the individual's eDoctrina password. Passwords in eDoctrina are case senstive, so be sure that the capslock is not enabled.
- Comment: The comment field is available, but not required, for a note to be applied to the electronic signature. This comment will be linked to the signature only and is best used when returning the observation as this is a great opportunity to provide the reason why you are sending the observation back to the observer for changes.
-
View Observation: This pop-up window offers a comprehensive view of how the printed observation will look when printed. If necessary to view existing signatures, go to the last page where all applicable signatures will be listed.

NOTE: The image above shows with handwritten signature, but this may not be available for your district.
-
Buttons
 ==> The approve button should be clicked if all required fields have been populated (name and password). Once this button is clicked, a result pop-up should be provided stating the "Report has been signed" with the option to view the signed report.
NOTE: Once the signature is applied, you can also view it on the last page of the signed report.
 ==> The option to return an observation exists for the cases where there is an identified mistake or if there is a dispute about one or many of the selected ratings and supporting evidence. In most cases, when the observation is returned an email will be sent to the observer to notify them. It is a best practice to enter a comment on why this observation is being returned to avoid any miscommunication.
 ==> The cancel button will simply close the electronic signature pop-up window.
For Observers
The electronic signature process is very similar for observers as it is for observees, but observers have the option to sign from the OBSeRVE Dashboard.
Although the observer can sign an observation electronically from all the same places as the observee can, the best place for an observer to sign and monitor electronic signatures is from the Observations layout view of the OBSeRVE Dashboard because it is possible to filter for all of the different signature statuses to better monitor all observations that require them. here is where you can filter for all observations that either are "Ready for Administrator Signature", "Reutrned to Administrator", or "Ready for Observee Signature". It is highly recommended to leverge these filters to ensure that all observations are signed within a respectable timeframe.

Student Learning Objective Homepage (SLOs)
Creating and Managing Student Learning Objectives has never been easier. The Student Learning Objectives Homepage is the location where all SLOs can be created and monitored within eDoctrina. Each student learning objective that the logged in user has access to will be listed here so teachers can always view/enter data for their own SLOs, while administrators can review these for all teachers that they have a vested interest in. Each SLO will normally go through a standardized workflow, which is usually defined at the beginning of the school year and these workflow states can be seen, filtered for, and updated right from this page.
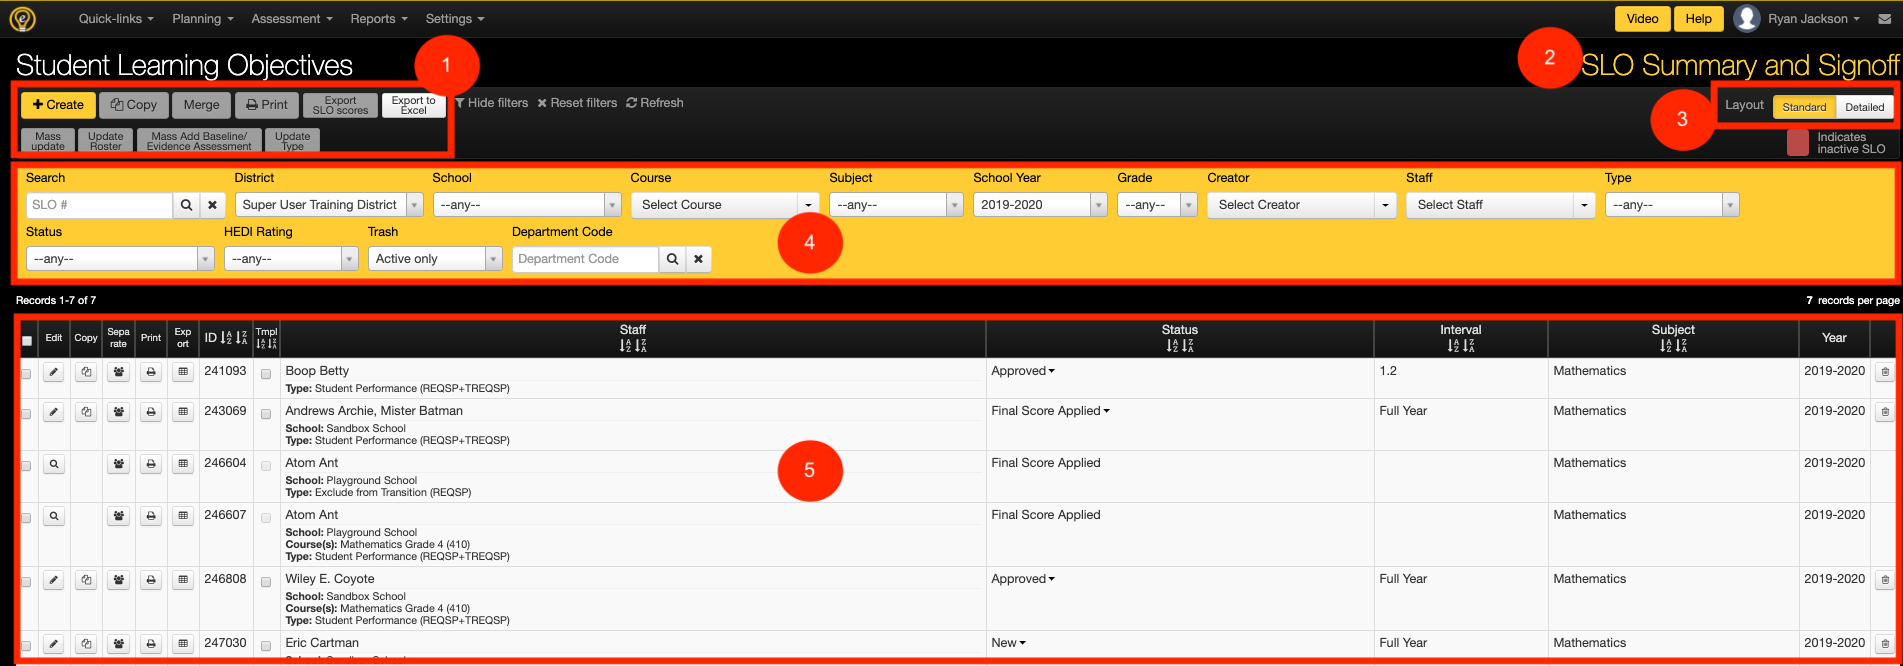
-
Top Buttons
The buttons on the top of any page are usually designed to either perform a mass update action on many items in the list, print many items at once, or generate some other report that references the listed items.

 ==> If a button is marked with this blue icon, then the button is typically not available to teachers.
- + Create: The create button will be available for any user that has the permissions to create a new student learning objective. If this button is unavailable, it usually means SLOs are auto-generated or created/assigned by a district administrator which means there would be no need for an SLO to be created by the logged-in user anyway.
- Copy: Select the checkbox next to each SLO that needs to be copied and use this button to copy all items in one action. Individual items can be copied using the button in the list.
-
Merge :
The Merge button is used to combine one of more SLOs resulting in one target SLO.
- Print: The option to print one or many SLOs exists from the SLO Homepage.
-
Export SLO Scores : All entered scores for the student population can be easily exported to a Microsoft Excel file.
-
Export to Excel : This export to excel tool is one of the more comprehensive tools as there are two different formats with many different fields to choose from. If it is desired to generate some spreadheet of all SLOs in eDoctrina, this could be a great report to include the data that is necessary.
-
Mass Update: The mass update tool currently allows for mass update of the SLO Workflow state for the selected SLOs.
-
Update Roster : The update roster tool is designed to keep the student population within the selected SLOs to be as current as possible. Upon selection, the system will present a pop-up explaining that the application will check all linked teachers, the course, and semester code to add any newly enrolled students or remove any students who have unenrolled.
-
Mass Add Baseline/Evidence Assessment : The mass add assessment tool allows for for easy addition of baseline or evidence assessments to one or many selected SLOs. The option to mass remove does not currently exist.
- Update Type: The type often determines how SLO scores will be calculated and combined. This tool allows for mass update of the SLO Type in the instances where many SLOs need to be updated.
-
Link to SLO Summary Sheet:
The SLO Summary sheet is the page where the selected SLO scores are combined for each staff member and is a great place to manage and monitor how SLOs are calculated for each staff member. This is also a great place for error identification as the scores are able to be filtered and viewed in a nice list format separated by data source. The reason why this link is here for easy toggling between the SLO Homepage and the SLO Summary Sheet.
-
Layout
The layout determines how the Student Learning Objectives will be displayed in the list on the Student Learning Objective Homepage.
-
STANDARD:

-
DETAILED:

-
STANDARD:
-
Filters
Each of the filters available on the Student Learning Objective Homepage allows for filtering the displayed list in accordance with the entered or selected filters. The available filters depend on user permissions and other conditions, so if there is a necessary filter that is shown in the list below that is needed, please contact a district administrator or an eDoctrina team member. Please note that the selected filters will only return items in the list that match all of the selected parameters. If an item cannot be found, try starting over by resetting the filters. They are also "sticky" filters so all previous selections should be preserved if visiting the page again on the same browser and device.- Search: The Search field allows for searching by the SLO ID# only. If a staff member name is being searched upon, then use the "Staff" filter.
- District: The district filter will only be available for users that have access to multiple districts allowing for filtering in accordance with the district that the SLOs are linked to. In most cases, users are only linked to one district so this filter will often be hidden.
- School: The school filter will only be available for users that have access to multiple schools allowing for filtering in accordance with the school that the SLOs are linked to.
- Course: It is possible to filter SLOs by the course that they are linked to. Each user will be able to select one or many courses to filter for as long as they have access to the the course.
- Subject: The subject filter will contain all of the Subject areas that are available within the district to allow for narrowing down the list by specific subject areas. This is a required field for SLOs, therefore all SLOs will be linked to some subject.
- School Year: The default selection for the School Year filter is to be the current year, but this can be updated to view SLOs that may exist in past and future years as well.
- Grade: The grade filter will contain all of the grade levels that are available within the district to allow for narrowing down the list by specific grades. This is a required multi-select field for SLOs, therefore all SLOs will be linked to one or many grades.
- Creator: The creator of the SLO could be different than the Staff that are linked. This is a great filter for individuals who create SLOs for staff members so they can easily obtain a list of SLOs that they have created within the district.
- Staff: The staff filter can be used to select one or many staff members to identify any SLO that they are linked to. This is the best way to find SLOs for specific staff members.
- Type: The SLO Type is how the scores for student learning objectives are linked to a data source and communicated with the teacher effectiveness system. The SLO Type aligns the scores on the SLO Summary and is vitally important to select the correct value for proper categorization. The SLO Types are configured by the eDoctrina team as these are usually consistent for each U.S. State.
- Status: The status filter allows for narrowing down the displayed list to SLOs that are in a specific workflow state. If using SLO workflow states, then each SLO usually goes through a common life cycle that may include some points of approval or other required tasks. SLO workflow states are configured for each district.
- HEDI Rating: The HEDI rating filter allows for quick identification of any SLOs that have a final rating selected, not selected, or even for SLOs that do not have a HEDI/Attainment table.
- Trash: The trash filter allows for filtering for Active, Inactive, or All student learning objectives in the list and this filter will only be available to administrative users.
- Department Code: The department code can be used to filter for all SLOs for staff members that match the entered department code. These codes vary greatly by district, so try to understand what department codes are available within the district before using this filter.
-
SLO List

The edit pencil will be available for all SLOs that the logged-in user has access to. Click this button to enter the SLO Editor for the desired student learning objective.

The copy button is available for all users who have permissions to copy SLOs and will be available for all SLOs that the logged in user has access to.

The separate SLO button is only available to administrative profiles and should be used to create individual SLOs that utilize the same SLO descriptions and criteria as a previously created group SLO.

The print button will be available for all SLOs that the logged-in user has access to providing the ability to print individual SLOs.

The Export button is available for administrative users and allows for the SLO scores for the linked students in the population to be easily loaded into a Microsoft Excel spreadsheet.
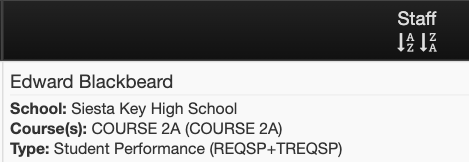
The Staff column will display the names of the linked staff members, the school, the course, and the SLO Type. If more details are necessary, try the Detailed view.
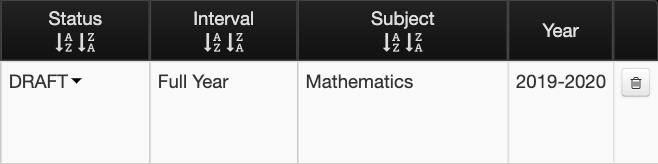
The Status will display the current SLO workflow state for each SLO and there is the possibility for updating this right in the list by selectign the desired workflow state from the pull-down. The Interval will display the entered time period that has been entered for the SLO. This option can be limited to semester codes that have been entered for the district if this selection is to be more rigid. The Subject will display the subject that the SLo is linked to and the Year will display the year that the SLO is linked to.
04. SOLe: A Beginner's Guide to Learning Experiences
10. Electronic Grading: What Are My Options?
09. What Do My Students See? A Tour Through a Student's PROGReSS Account
Copying a Student Learning Objective
Throughout the school year, there may be one of many reasons why an existing Student Learning Objective would need to be copied. Some of those reasons may be that an SLO from last year needs to be copied as a template to start this years SLO or you are simply copying from a district designed template. In any case, if there is a need to copy an SLO, eDoctrina offers the option to copy individual SLOs and also many by using the mass copy button.

Any time one or many SLOs are copied, the following pop-up message will display prompting the user to make some selections to determine what and how the SLO(s) will be copied. Please note that the defaults have been chosen carefully, but these may need to be updated depending on preferences.

By default, everything in the General section will be copied exactly, which includes the Title, Subject, Grade(s), Course, and also the three text boxes that may encompass the Instructional Interval, Progress Monitoring Plan, and/or Rationale.

The Learning Content is related to the learning content description and the linked learning standards or proficiencies that are linked to the source SLO. Learning Content often differs from one SLO to another, so it may be a good idea to uncheck this option before copying the SLO.

NOTE: Any standards that have been marked with the Highlight tool will no longer be marked in the resulting copy.
The Baseline Assessments and Evidence Assessments are considered to the descriptions of the assessments in the text box and the linked assessments. If the copied SLO has the same Baseline or Evidence assessments and assessment criteria, then it is a good idea to copy this information. Just note that any excluded questions will not be copied and may have to be replicated manually.


The HEDI Table is the proficiency or attainment table that is linked to any SLO to determine the overall score. In most cases, this should be copied for every SLO because it is often that a school district has an approved framework for determining final scores.

The Attachments and Discussions are the attachments that are linked directly to the source SLO and the comments that have been made by all users in the discussion board.
The SLO Type is also a very important selection as there are frequent ocassions where this SLO type must be different because there is a maximum constraint for the type or another type of SLO needs to be created to complete the mminimum requirements. Usually, it is a good practice to select the option desired with intent if copying an individual SLO, but the mass copy action may require that the Type remains the same for all copied SLOs. These can always be updated later!
The Target Year is the year that will be linked to the resulting copy or copies of SLOs. The default selection here is to copy within the same year, but this can be updated to copy an existing SLO to a different school year.
Merging Student Learning Objectives
The student learning objective merging tool is used when two or more SLOs need to be combined.
To merge two or more SLOs, simply navigate to the SLO Homepage, find and select the the SLOs that need to be merged. Once selected click the  button. All selected SLOs will be listed in the resulting pop-up and will be summarized by their ID#, the linked Baseline/Evidence Assessments, and the number of students linked. Before proceeding, it is important to tell the application which selected SLO will be the Primary or "target" SLO. This determines which entered information will be used for the resulting SLO as some fields can only use one value. Also, select the HEDI (attainment) table that should be used in the case that these may be different across SLOs.

Before taking on the task of merging SLOs, it is important to know the end result achieved when two SLOs are merged because there will be some element of lost data for one or many SLOs.
Here's what happens when two SLOs are merged:
- The application does it best to combine items from all source SLOs, but for fields that can be assigned only one value the selected primary/target SLO will be used.
- All source SLOs will immediately become inactive as a result of the merge and a new SLO ID# will be assigned to the merged result.
- Most of the General information will use the selected target for the result of the merge, except for the selected grades. In other words, if an SLO can only have one title, we must use the title of the selected target SLO to determine the resulting title.
- If a teacher is linked to any of the source SLOs, then they will also be linked in the resulting merged SLO (This is a primary reason to merge SLOs to combine the SLOs of two teachers and make only one). If specific weighting has been entered in any of the source SLOs, these are reset to 100% in the resulting SLO.
- The Learning Content description will use the selected target, but any of the learning standards that have been linked to any of the source SLOs will also be included in the resulting merged SLO.
- The Baseline and Evidence assessments will be copied if and only if all source SLOs contain the same assessment(s). If there is any mismatch, no baseline of evidence assessments will be copied to avoid conflicts. In these cases, assessments will have to be relinked manually. You should receive a warning message about this if there is some mismatch.

- The student Population section of the SLO will combine all students that exist in all source SLOs, but ensure that each student is only linked once. If the assessment data is sourced from some linked baseline and/or evidence assessments, then each student data should transfer over nicely, but there are some instances where the entered student data has conflicting data entered for the baseline, target, and/or final scores. In these cases, each student that has a conflict will be displays in the Merge SLO pop-up and it will be required for the end-user to select which scores to use for the resulting SLO.

- Any Attachments and Discussion comments will be copied from the source SLOs and combined in the resulting SLO.
Printing a Student Learning Objective
If one or many Student Learning Objectives need to be printed it is possible to do so from the Student Learning Objective Homepage or within the SLO Editor itself. Remember, the print action in eDoctrina generates a PDF first that is formatted to be printed, but don't forget that PDF files can be saved to a local folder and the hyperlinks are unique and can be shared with other eDoctrina users.
To print one or many SLOs, please visit the Student Learning Objective homepage. Here is where all SLOs will be listed that the logged in user has access to. SLOs can be printed individually or many SLOs can be printed using the  button on top.

Once the print button is selected, a PDF will be loaded that offers the option to download to a local file or send to the printer. It should also be noted that the link that is generated is unique and can be shared with other eDoctrina users as they will be required to login to the application to access the printed file.

12. SOLe: Enhancing Learning through Advanced Features
13. Building Advanced Online Assessment Questions
Exporting Student SLO Scores
If the is data entered for the Student Population for any SLO, these values can be exported for one or many SLOs. This tas is usually necessary is scores from an SLO need to be imported into another application, if they need to be saved in some local repository, or for some other reason. eDoctrina does not hold these scores for ransom!
The option to Export SLO scores is available for an individual Student Learning Objective or for many at once. This task is done from the Student Learning Objectives Homepage.

Once the export button is selected, the download of a Microsoft Excel file will initiate and will most likely be added to the downloads folder unless specified otherwise.

The resulting file will contain all students linked to the selected SLOs with their respective Baseline Score, Target Score, Final Scores and whether the target was achieved. The student UID is also included in this export such that imprts to other applications is very easy to do.

Exporting Student Learning Objectives to Excel
The Student Learning Objectives module and the SLOs within often contain a lot of data that needs to be reviewed for quality. The Export to Excel option on the Student Learning Objectives Homepage will export the filtered list or selected SLOs to a Microsoft Excel spreadsheet to provide a more detailed view of the SLOs that exist in the district. All data, besides student data can be exported using this tool.
When exporting student learning objectives, there are two different formats to choose from: the Detailed Report and the Summary Report. The Summary Report is functions just like a users list as it will list each user and their associated SLOs. This is unlike the Detailed Report which will list each SLO. Both have their utility, so try them both to see if the report displays what is needed.


-
District Name:
This is the district name as it appear throughout eDoctrina -
School Name:
This is the school name linked to the teacher for the SLO as it appears throughout eDoctrina. -
School Code:
If entered, this is the school code for teacher's school. -
Teacher:
The allows to show the linked teacher(s) name as one column, opposed to showing a column for first name and last name. -
Last Name:
This is the last name of the teacher linked to the SLO as it appears throughout eDoctrna. -
First Name:
This is the first name of the teacher linked to the SLO as it appears throughout eDoctrna. -
SSIN:
If entered, this is the state identification number of the teacher linked to the SLO. -
E-mail:
This is the email address of the teacher linked to the SLO. -
Username:
This is the username of the teacher linked to the SLO. -
UID:
This is the UID (local ID number) of the teacher linked to the SLO. -
On Leave:
If selected, this will display the on leave status of the teacher linked to the SLO. -
Model:
If a TE model has been assigned to the teacher linked to the SLO for the selected year, then this will display here. -
User Type:
This is the primary user type of the teacher linked to the SLO. -
Year:
This is the year of the SLO. -
Status:
This is the SLO workflow state of the SLO.
The available fields for the Summary Report are as follows:
-
ID:
This is the SLO ID# that is linked to the SLO -
Teacher(s):
This will display all teachers linked to the SLO showing the entered weight as well. -
Course:
This will display the course that is linked to the SLO, if entered. -
Subject:
This will display the subject that is linked to the SLO. -
Grades:
This will display the grade(s) that are linked to the SLO. -
Type:
This will display the SLO Type that is linked to the SLO. -
Interval:
This will display the entered interval for the SLO, if entered. -
Rationale:
This will display the entered rationale for the SLO, if entered. -
Learning Content Description:
This will display the entered learning content description for the SLO, if entered. -
Baseline Description:
This will display the entered baseline assessment description for the SLO, if entered. -
Baseline Tests:
This will display the linked baseline assessments for the SLO if there are any linked. -
Evidence Description:
This will display the entered evidence assessment description for the SLO, if entered. -
Evidence Tests:
This will display the linked evidence assessments for the SLO if there are any linked. -
Population and Target Description:
This will display the entered population and target description for the SLO, if entered. -
# Students:
This will display the number of students linked for the SLO, if any. -
# W/O Data:
This will display the students that are linked to the SLO that do not have any data for the SLO.
The available fields for the Detailed Report that are not also in the Standard Report are as follows:
The Detailed Report also offers a convenient "group by " functionality where it is possible to select one field and acquire the count of SLOs that fit that quality. For example, if School is the only field selected, then an export can be produced counting all SLOs that are linked to each school. There are many different options to choose from to get the detail necessary, so give the SLO export tool a try!
Assigning Select Question Ranges in Online Assessments
Student Learning Objective (SLO) Editor
The Student Learning Objective (SLO) Editor is where all information regarding specific student learning objectives will be entered. Here is where all general and descriptive information will be logged, learning standards and proficiencies will be linked, baseline and evidence assessments can be linked, student population and related data can be entered and managed, and discussion comments can be made.
General Controls
Although SLO templates can vary, there will always be the same default controls offered in all SLOs. These exist to assist in completion of the common tasks that are performed by a typical user, such as printing, saving, and changing the workflow state.
-
Expand All/Collapse All View
One of the key components of the SLO editor is that it is broken up into sections. For each time that an SLO is edited, it is likely that only one or two sections will be worked on. To help nvigate through this, the SLO Editor offers a navigation bar that will jump the screen to the section that is clicked on.

It is also possible to Collapse All and open up only one of the sections at a time.

-
Save, Save & Close, Cancel & Close
It is always a good practice to Save changes as they are made. Although some districts may have auto-save enabled, clicking Save is always still recommended. Clicking will force all recent updates to be saved and stay on the same page. Clicking
  will force all recent updates to be saved and will exit the current browsing tab reutrning to the last visited screen. The
  button will ignore the most recent unsaved changes and exit the current browsing tab.
-
Redo & Undo Text Editing
The and
and  buttons should not be mistaken for back or forward buttons. This basic function of these buttons are to help with entering text in all of the available text boxes by allowing to reapply most recent removed text or remove the most recent applied text.
-
Printing
The button is a quick way to print the student learning objective as a PDF. Please review the help guide on Printing SLOs for more information on printing SLOs.
-
Exporting Student Data
The button will generate a spreadsheet the includes all of the students in the SLO population with their respective baseline, target, and final scores. Other details such as the student notes, the student UID, the student grade and a column the will state whether they achieved the target will also be included. Please review the help guide on Exporting Student SLO Scores for more information.
-
SLO Workflow State
The SLO Workflow states are usually configured in accordance with district SLO processes. It is important to update the status when necessary because there are lots of notifications and permissions that are linked to each state. While one state may be open for edit, another state may be locked while it is being reviewed or even if it is finalized. Some workflow states may require entry of specific fields. For example, all target scores may be required for each student to be able to submit an SLO for review. Administrators will have more options in their pull-down menu, while teachers will be limited to a few that are applicable. Teachers will only be able to move any SLO forward in the workflow states, not back. So if a teacher accidentally updates this, they may need to reach out to an administrator to return the SLO to a previous status. Please review the help guide on SLO Workflow States for more information.

-
Active / Trash
The toggle switch is the control on how any SLO can be made Active or Inactive (trashed).
General Information Section
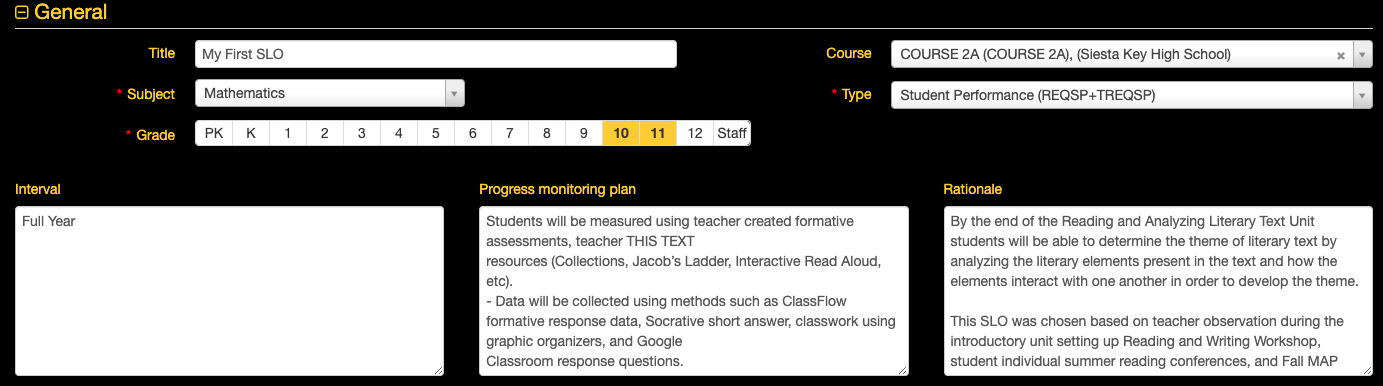
- Title: Although not required, providing the student learning objective with an appropriate name can help label each SLO. The title will be included on the printed SLO, some other reports, and on the SLO listing of the SLO Homepage.
- School: The school selection will only be available for users who are linked to more than one school. If unavailable, the school will automatically be selected as the logged-in user's school. If an SLO scaffolds across schools, it is possible to select "--any--" as the school.
- Subject: The subject is a required field and should be selected to align most appropriately with the subject area that the SLO is addressing. The options in this pull-down will be all subjects that are available within the district. For cases where an SLO may scaffold two different subjects, select the most applicable subject which is usually the one that matches the linked course.
- Grade: The grade selection is a required field. One or many grades can be linked to an SLO, so select all grades that apply to the student learning objective.
- Course: Start typing the course name in this field to find the available courses to link to the SLO. Only courses within the linked school, subject, and grade will be able to be selected. The course is a required field for only some districts, but there is built in logic in the student population that will indicate which students are not enrolled in the linked course and, in some districts, these students will be ignored in the overall attainment calculation. It is a good practice to link the appropriate course for the students that are included in the SLO. This is a single select field, so consider splitting an SLO into two or more if the student population scaffolds across more than one course.
- Type: The SLO Type is a required field and is vitally important for the categorization of the student learning objective and for proper end-of-year score calculations. Some districts may have a maximum number of SLOs that can be submitted per type, so if there is a limitation, simply try to use another type.
- Other Custom Fields: Depending on the state guidelines, there may be some other fields that need to be populated for each SLO. Being that these are custom, please refer to district guidelines if there is a selection that needs to be explained.
- Descriptive Text Boxes: Although most districts will see the same text boxes as what is pictured above, these descriptive text boxes can be different according to the preferences of each district and may follow some specific rules. These are not required to be filled out in accordance with eDoctrina limitations, but these may need to be entered to get the SLO approved by an administrator.
Teachers Section

Non-admnistrative users, such as teachers, will not have access to this section as it is usually only maintained by an administrator. Although teachers may not see this section, their names will be automatically linked to the SLO upon creation or copy of any student learning objective.
The staff selection tool on the right is available to filter and select one or many staff members to be linked to the SLO. Only staff that are linked to the same school as selected in the SLO will be displayed here. To link staff to this SLO, drag the name(s) into the left box. Once successful, their name will display on the left with 100% weight (if the district is using the weighting tool).
When should weighting of teachers be used?
The only occasions when a weight other than 100% should be used is when any staff member has more than one SLO and each of these are considered with a different weight. There is a lot to consider regarding how SLO scores are calculated as each SLO Type can be linked to one or many data sources, so it is recommended to make some changes and evaluate the result on the SLO Summary Sheet.
It is important to know that the checkbox for "Calculate SLO weight based on students linked to teacher's SLO" should be unchecked if it is desired to use this weighting tool. Otherwise, eDoctrina will calculate the weight of the final score of the SLO in accordance with the number of students linked to each SLO (this is actually a more common method). Once unchecked, the system will look at the selected final score and multiply this by the weight to produce the portion of the score that will contribute to the final score for the associated data source.
The Bonus checkbox will only be available to some districts, but this can be used if there will be a set number of points rewarded to the staff members linked to the SLO that will be added on top of the calculated attainment rating. If enabled, the bonus points need to be entered in the student population section and the points will be added to the attainment score to result in an Adjusted HEDI Rating.
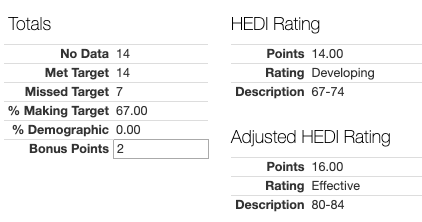
Learning Content Section
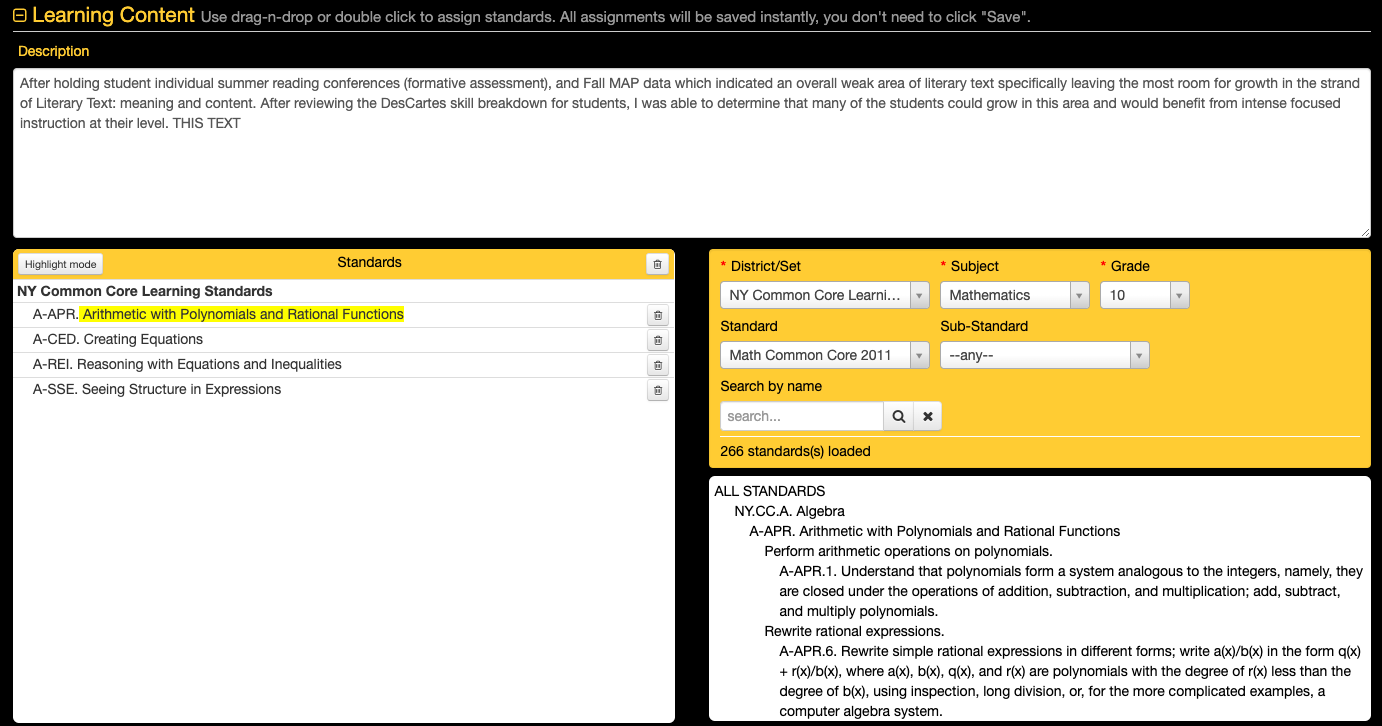
The learning content section is the staff members opportunity to explain what will be taught in relevance to the SLO and to link relevant learning standards or proficiencies.
Here is where the learning content description is filled out and standards are linked. Utilize the standards filters to locate and link a standard (or multiple standards) to the SLO by dragging and dropping them into the standards box on the left.
Once a standard is linked, it is also possible to draw attention to specific text by using the  button. Just remember that the highlighted text will not copy with the SLO.
Baseline Assessments Section
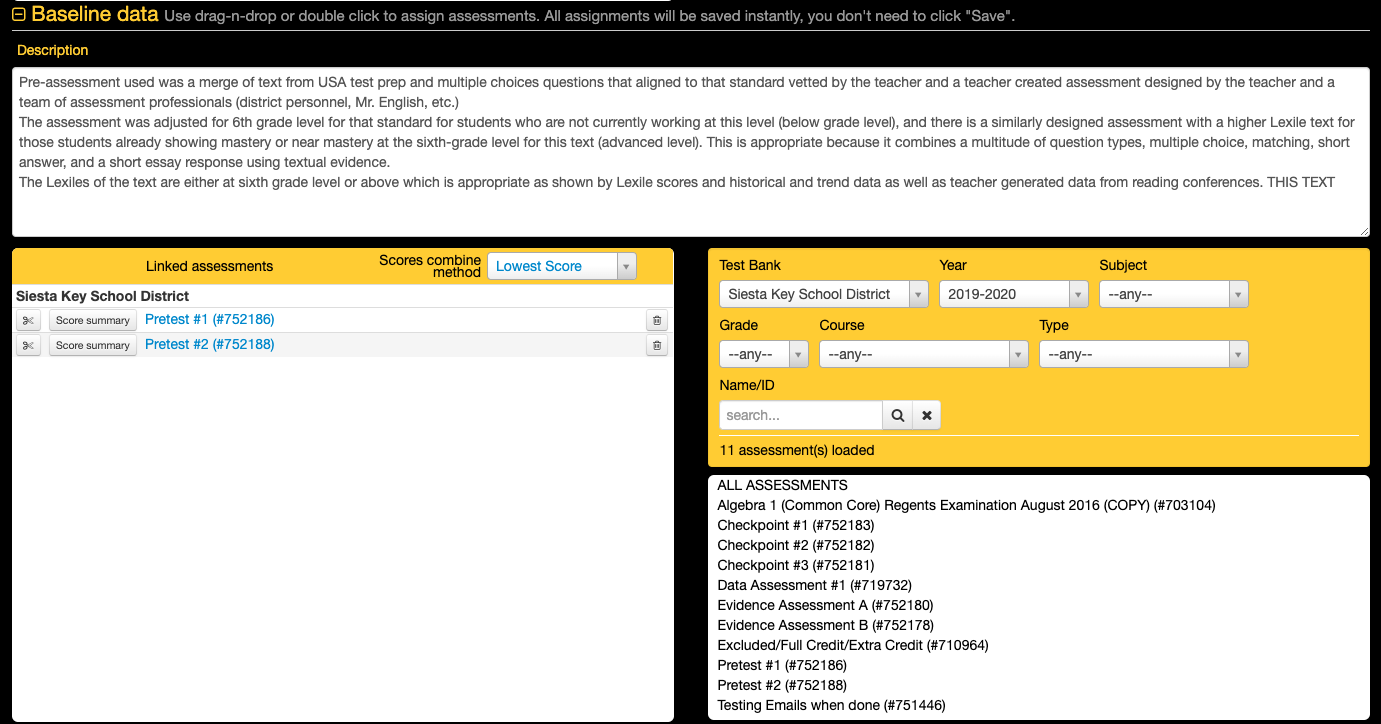
Although it is not required to use an eDoctrina assessment to produce baseline scores for students, the option exists so an assessment can be administered using one of the many assessment tools and the student data will automatically populate. It is also possible to enter scores manually, but this tool can save lots of time by using eDoctrina assessments.
To link a baseline assessment to a SLO, use the filters to find the assessment and drag and drop it into the Linked Assessments box on the left. If more than one assessment is linked eDoctrina will look at the Score Combine Method that is selected to use the Points Average, Percent Average, Lowest Score, or Highest Score
A baseline assessment can be linked to a SLO prior to data being imported or scanned into the program. The data will automatically filter into the SLO once available.
If there is a common set of assessments that will be used for baseline assessments, please consider linking these to a master assessment so all of the baseline assessments can be linked consistently with one action.
Evidence Assessments Section

The evidence assessment section functions in a similar fashion as the baseline assessments section, except for the fact that the student data will be populated in the evidence section.
Student Population Section
The student population section is where all students being measured in the student learning objective will be linked. Once the student is linked to the SLO there will be the opportunity to enter baseline, target, and final scores for each student.
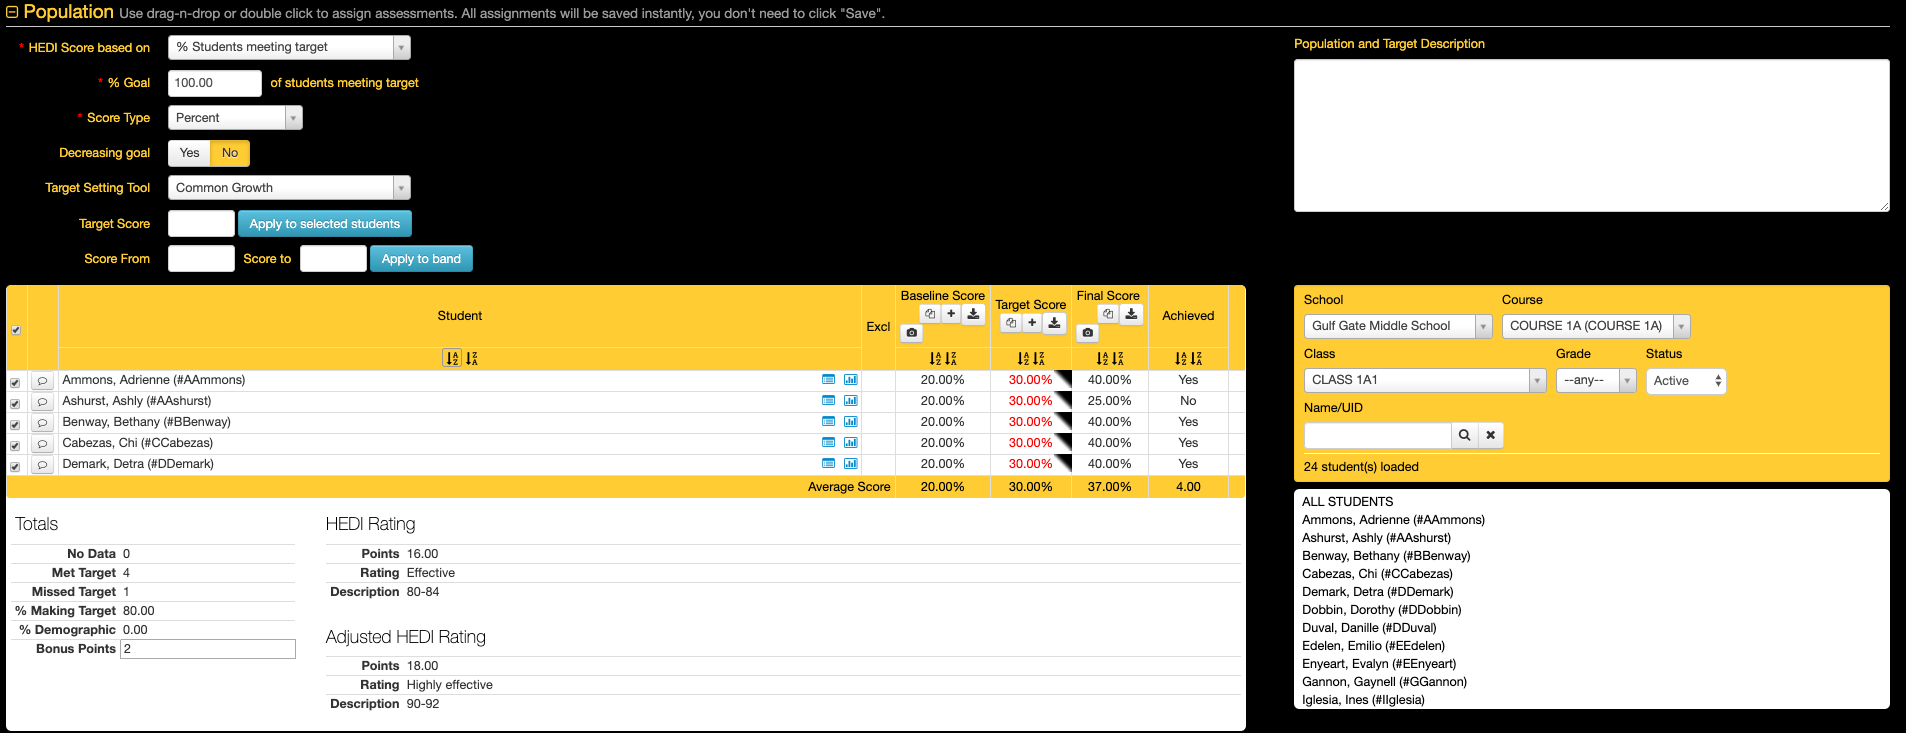
The options at the top determine the basic conditions on the type of data that is used and how the Attainment(HEDI) rating is to be determined.
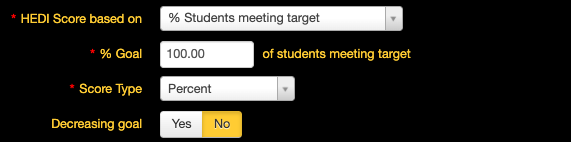
-
HEDI Score based on: This selection is one of the most important selections because it determines the score that will be used to determine what score will be mapped to the linked Attainment(HEDI) table.
-
% Students meeting target:
This selection will look at the final score for each student in reference to their entered target score. The resulting value will be the percent of counted students in the population with final scores greater than or equal to their target score. Required: Target and Final Scores -
Average on final assessments:
This selection will look at all of the entered final scores for the counted students in the population and provide an average value. Required: Only Final Score -
Average growth from baseline to final
This selection will look at the difference between the baseline score and the final score for all of the counted students in the population and then average these values to produce a final score. Required: Baseline and Final Scores -
Average % gap closed:
This selection will look at baseline score and the final score for all of the counted students in the population. The gap value is determined by the baseline score and how many points are needed to reach 100. The final score will be measured against this gap value. For example, if a baseline score is 60%, then the gap to 100% is 40%. If the student gets a final score of 80% then they would have closed 50% of the gap. These values are then averaged to produce a final score. Required: Baseline and Final Scores. -
Average achieved:
This selection will look at the final score for each student in reference to their entered target score. Although very similar to the "% Students meeting target", this varies as the score will be a value between 0 and 1. -
Difference from Goal:
This selection requires entry of a "% Goal" as this is the value that the scores are compared against. The values that this method looks at are the target score, the final score, and the entered "% goal" and provides an overall value that is the percent of students making their set target subtracted from the set "% goal". -
Average Difference from Target:
This selection will look at the final score for each student in reference to their entered target score and use direct subtraction to get the difference for each counted student in the population. These values will then be averaged to produce a final overall score.
-
% Students meeting target:
- % Goal: The entered % goal is only used in some calculation methods as some require that a goal attainment score is entered to find the attainment rating for the SLO. This is an optional setting that can be set to show/or not show when creating a SLO based on the district's SLO settings. This field would need to be formatted if teachers have written goals such as "45% of my students will meet their target." If it is assumed that 100% of students linked to the SLO are expected to meet the target, this option does not apply. **(If % goal is not 100 and is customized to another %, note that the HEDI table score will adjust accordingly.) This feature will not adjust the HEDI score UNLESS there is a setting that is enabled on the back-end for your district.
-
Score Type:
-
Percent
Selecting this score type will set goals based on the student's percentage shown in the Baseline Score column (ex. 5/10 would be 50%). If scores are hand-entered in the Baseline Score column, eDoctrina will treat them as percentages. -
Points
Selecting this score type will set goals based on the student's raw score shown in the Baseline Score column (ex. 5/10 would be 5). If scores are hand-entered in the Baseline Score column, eDoctrina will treat them as points, not percentages. -
Proficiency Table
Selecting this score type will set goals based on the student's grade-table score shown in the Baseline Score column. This option does not apply to hand-entered scores as it needs to reference the proficiency table in the linked baseline and final assessments. -
Scaled Score:
The scaled score option is only used when there are baseline and/or evidence assessments linked to the SLO that utilize a 2-dimensional proficiency table.
-
Percent
- Decreasing goal: This option allows users to set targets for students when target values are smaller/lower than the baseline score. For example, if a student runs a mile in 10:24 minutes for their Baseline Score time, the target time may be set as 8:45. If the Final score time is 8:30 then the student will have met the target.
-
Target Setting Tool: The target setting tool is available for all the various ways that a target score could be set for each student.
-
Common Growth:
The same percentage or point value will be added to all selected students Baseline Scores. Select this option and enter the amount you want each student to grow by in the Target Score cell and then select the "Apply to Selected Students" button. If using the Proficiency Table Score Type, enter the number of levels on the grade table you want the student to grow. So if you have 5 levels in the Grade Table and you want each student to "move up" 2 levels, enter 2 in the Target Score. Note that the value eDoctrina places in the Target Score column will be the minimum raw score needed to reach that target level. -
Growth to Mastery:
The same target will be set for all selected students, regardless of baseline scores. Select this option and enter the amount you want each student to achieve in the Target Score cell and then select the "Apply to Selected Students" button. If using the Grade Table Score Type, enter the relative number of the level on the Grade Table you want the student to achieve. For example, if you had a Grade Table that contains 7 separate levels ("grades") and you wanted all students to achieve at least the 4th level, you would enter a 4 in the Target Score cell. Note that the value eDoctrina places in the Target Score column will be the minimum raw score needed to reach that target level. -
Differentiated Growth:
The user must manually enter a target for each student. Note the Grade Table score type option should NOT be used with Differentiated Growth. If you want to base targets on a grade table, select the Points option and use the minimum scores required to reach a particular level in the grade table as the targets. -
Other:
Same as differentiated growth. -
Gap Closing:
Only used with Percent values. This will close a certain percentage of the gap between the selected students’ baseline scores and 100%. For example, if you select Gap Closing and enter a value of 40% and a student had a baseline score of 20%, the target will be set at 52%, calculated as shown:- Gap = 100% - baseline score = 100% - 20% = 80%
- Percent of Gap = Percent Increase x Gap = 40% x 80% = 32%
- Target = Baseline + Percent of Gap = 20% + 32% = 52%
-
Percent Growth:
This will increase the selected students’ baseline scores by a certain percentage. For example, if a student had a baseline score of 50% and you selected Percentage Growth with a value of 25%, the target would be 62.5%, calculated as follows: Note the Grade Table score type option should NOT be used with the Percent Growth option.- Increase = Baseline Score x Percentage Growth = 50% X 25% = 12.5%
- Target = Baseline + Increase = 50% + 12.5% = 62.5%
-
Common Growth:

- Student Notes: Depending on the workflow state of the student learning objective, the option to add a note may be available allowing both the teacher and the administration team to log comments about students in the population of the SLO. These notes will export with the student data if they exist. Once a note has been entered for a student, the callout button will change to show that there is an existing comment.
-
Student Metadata: Depending on district settings, one or many of these metadata options will appear next to the students in the population.
- The
 means that the student has some extra demographic information that may be worth considering. This will only show if the student demographic information exists in eDoctrina and does require some minor configuration steps in the district settings to decide which demographic information should show here.
 - The
 is a way to create a student goal for the selected student where a specific goal can be set and progress monitoring and intervention data can be logged. If there has already been a goal created for the SLO already, then this button will open the student goal for further data entry. This is a great way to ensure at-risk students work towards meeting the SLO target.
 -
The
 icon will open up an assessment data report for all assessments that are in the same subject area as the student learning objective. This is a great resource to get a quick snapshot of how the student is performing in all related assessments and provide a more informed approach to setting the target score.
- The
-
Tools for Baseline, Target, and Evidence Assessment Scores: Depending on district settings, there may be some tools available for getting scores entered more quickly or to update the nature of how scores are considered.
- The
 button allows a user to scan data directly into the system for this assessment using our document camera scanning option and WEB answer sheets. Please note that the baseline or evidence assessment will need to be linked to the SLO.
- The
 button allows a user to import data directly into the baseline, target, or final scores by using .xls or .csv file that contains the student data in the first column and their respective score in the second column. The great part about entering data this way is that any student that is within the dataset can be added to the the student population automatically, which means this could be a great way to enter baseline scores. Notice in the image below that each student that is not currently in the student population will generate a warning message asking whether the student in question should be added to the population or not.
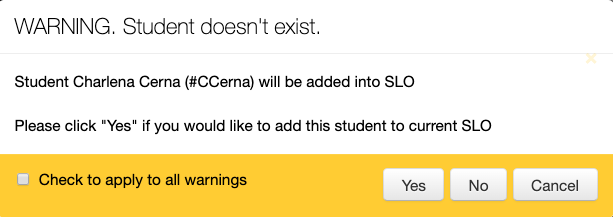
There where also be a warning message presented for students that already exist in the population if the imported score differs from the existing score providing the end-user the option to choose which value should be used as the actual score.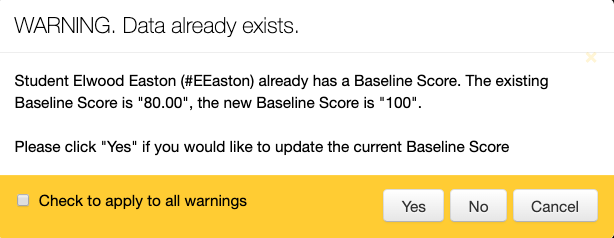
Once imported successfully, there will be an import result pop-up message containing information about the import and any error messages that may have been encountered resulting in lines being skipped. Some of the more common errors are shown in the image below.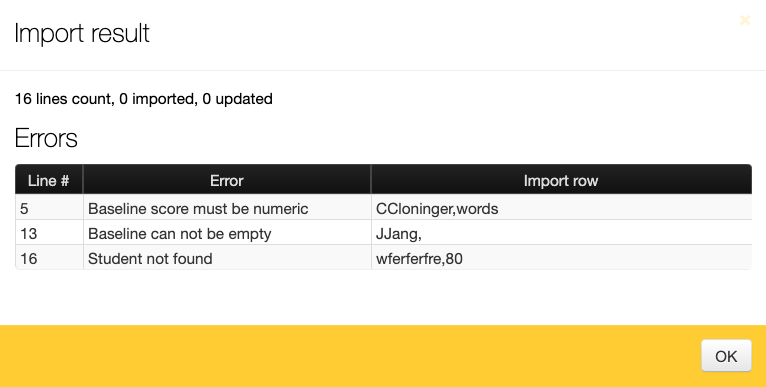
Please remember that if there is a baseline or evidence assessment linked to the SLO and there is existing data for any student, then this score will be the one that counts. Any imported or manually entered scores will only be for the SLO and will be pushed to the background when data shows up in a baseline or evidence assessment. It is possible to have mixed data within the population so some students can be measured using an eDoctrina assessment and others can have imported or manually entered scores (there just can't be both methods for the same student - The
 button allows a user to enter multiple entries for both the baseline assessment and the target score. Once more than one column is added for either the baseline or target, there will be some changes in the behavior of how some features of the student learning objective. For example, when using the target setting tool, it will be possible to select which score(s) to base the logic on (lowest, highest, average, etc..).
- The
 button will exist for only some districts as the function is controlled by a district setting. When enabled, this copy action allows for baseline, target, and final scores to be copied from another existing SLO into the current SLO. This will only work for SLOs that have scores not based on a linked eDoctrina assessment.
- The
Attainment (HEDI) Table Section
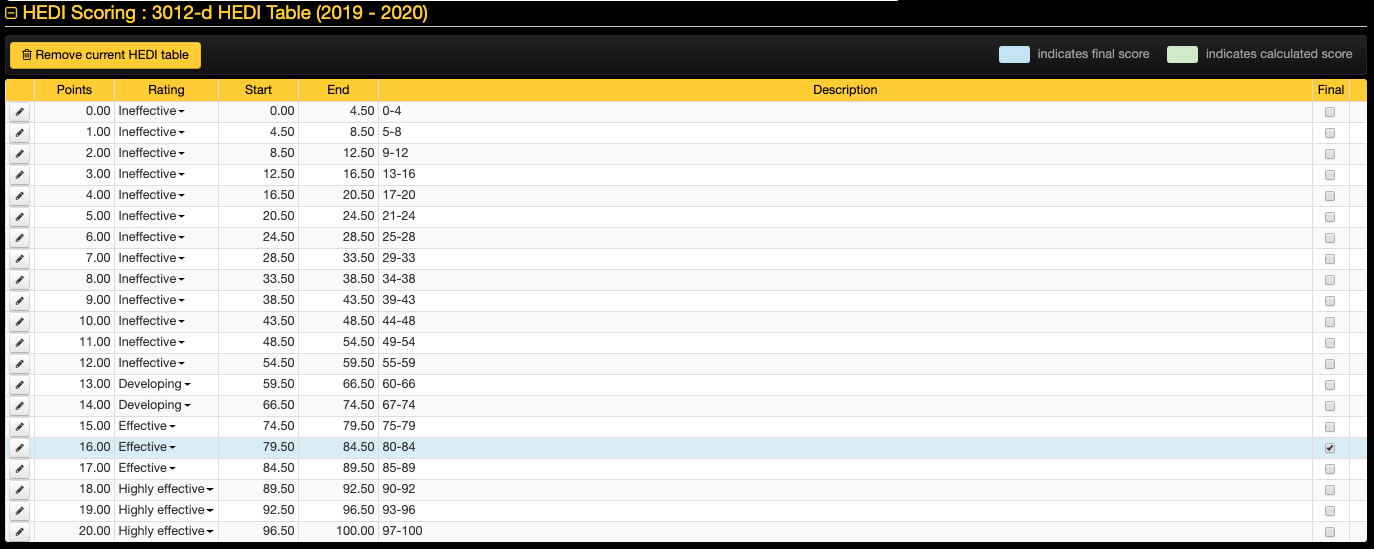
The Attainment (HEDI) Table section is where the calculations of the student learning objective are mapped to a rubric score or attainment value. These HEDI/Attainment tables can vary greatly by state, by district, and even by each SLO, so it is important to link the appropriate table such that the SLO is scored properly. If a default has been set by the district, all newly created SLOs will be automatically linked to this the set default table, which means setting a default can save lots of time. Access to add or update the table depends on the SLO workflow state, so there are some statuses that will not allow modification here, while others do.
If an attainment table is not linked by default, a user can select the appropriate table from the "Copy Attainemnt/HEDI table from" dropdown menu. This will link the selected table to this SLO.
In accordance with the linked table, the sytem will automatically highlight the calculated value in a GREEN background. Once a final score is selected for any of the rows, then the background will update to BLUE.
If an SLO is to be counted towards a staff member's student performance score, a Final score must be selected. There are some districts that have these final scores selected manually while other choose to have this final checkbox selected when the SLO workflow state is updated to some final status.
Discussion Section

The discussion section is optional and is a great place to document feedback/comments about the student learning objective. Depending on the district, this discussion board can be made available to only administrators, or it can used to be an open discussion between the staff member and the administration team. Once a comment has been posted, an email notification will be sent.
Attachments Section

The attachments section is designed for linking any additional documents or resources related to the student learning objective. Documents can be attached by both teachers and administrators using the  button, or resources that can be found by visiting a specific website can also be linked using the
  button.
Changes Audit Section

This changes audit section documents any workflow state changes that were made to the SLO by all users by displaying the author's name, the date of the change, the action name, the old value, and the new value. This is a great place to check investigate when an SLO was moved to a specific workflow state and by who.
SLO Summary & Sign off Sheet
The SLO Summary Sheet is where all of the staff member SLO scores come together to arrive at a total score for each of the applicable data sources. This is a great screen to visit to monitor the progress of any SLOs that will be contributing to an overall student performance rating for each year. If electronic signatures are enabled for student learning objectives, this will also be to location where staff and administrators sign off on their SLOs. Although many districts bypass the SLO signatures as it is also possible to electronically sign the Teacher Effectiveness Reports, some districts will choose to utilize SLO signatures if they are only using eDoctrina to manage their student learning objectives across the district.
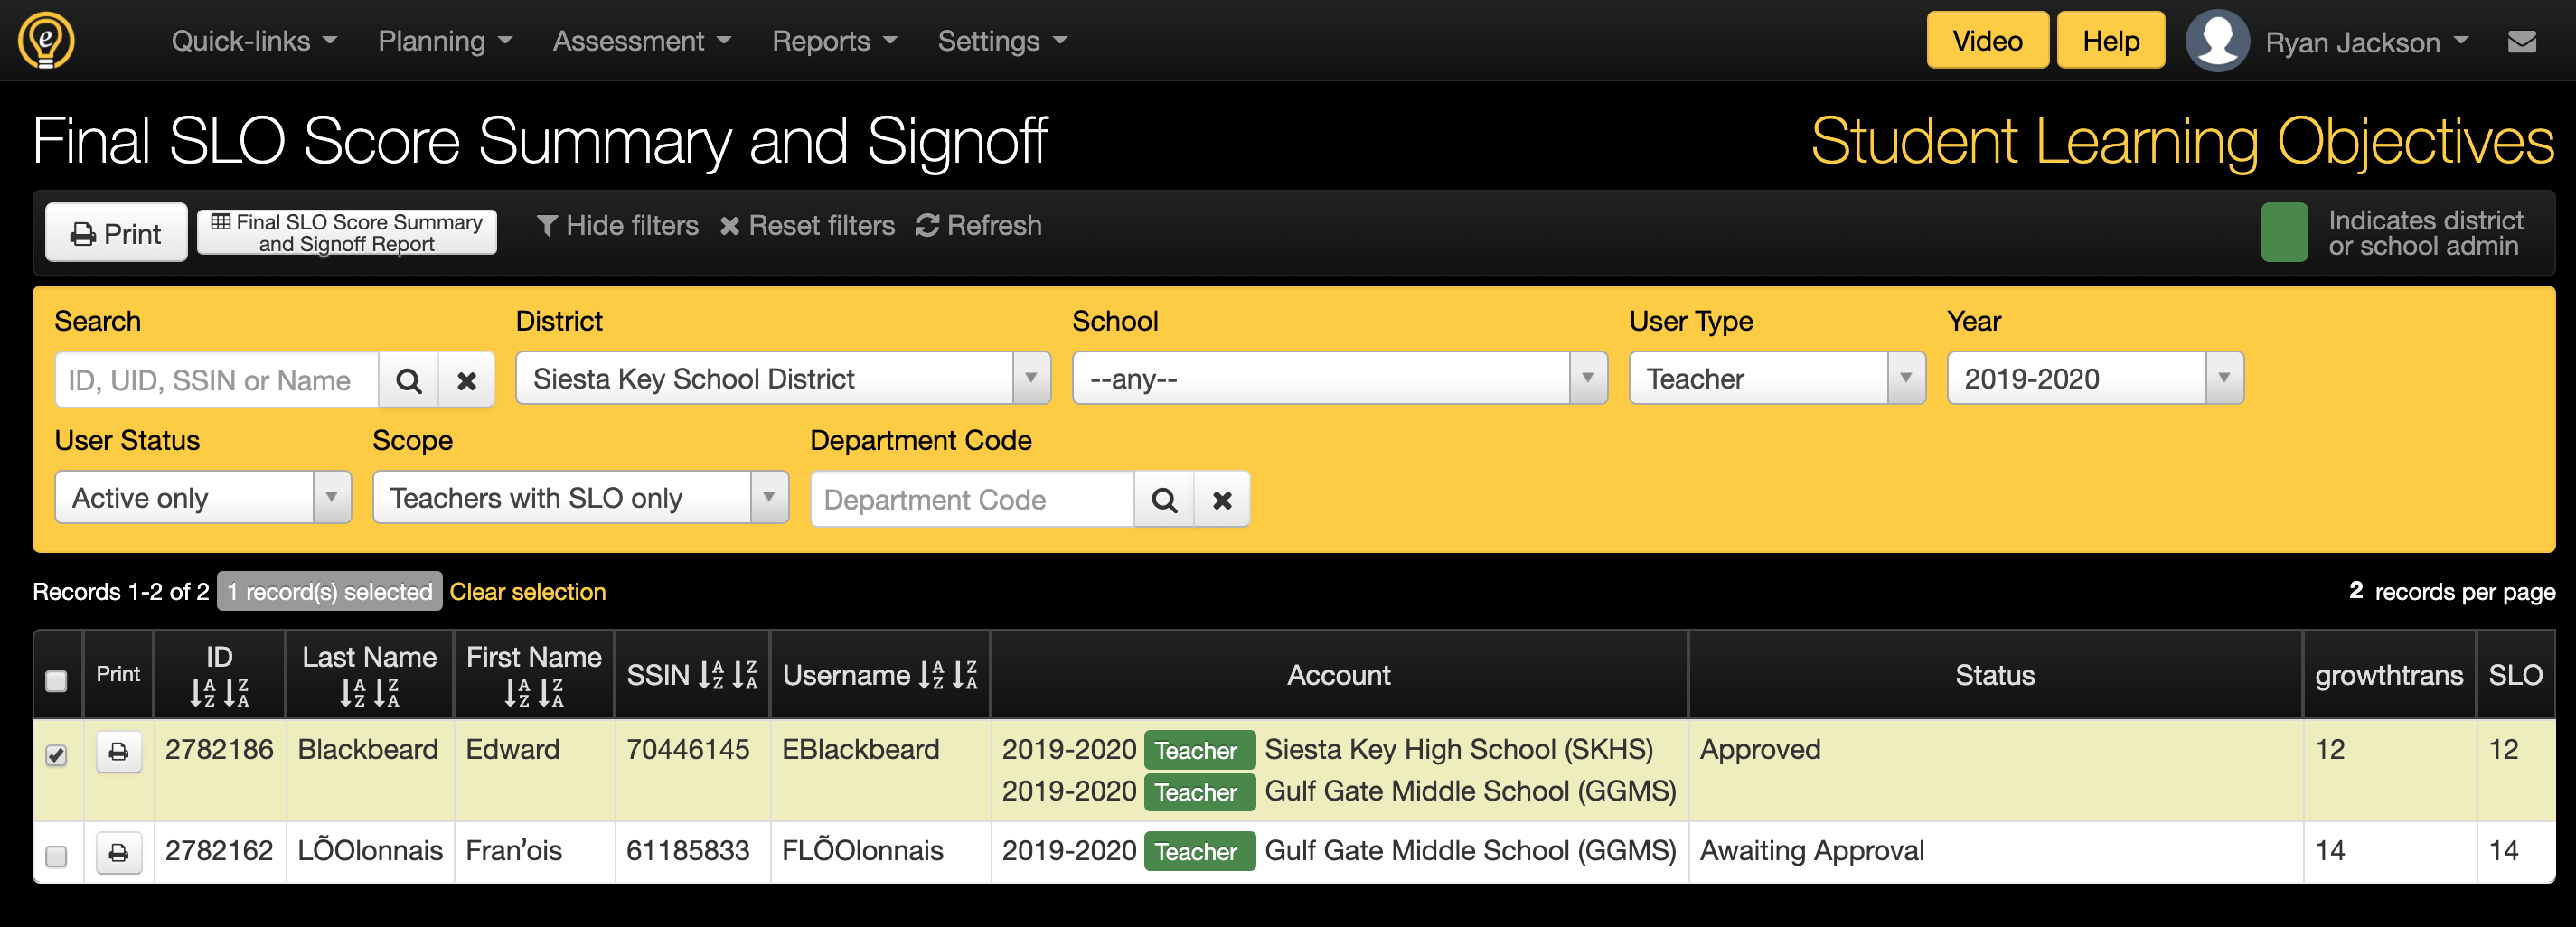
Buttons
The print button allows the user to print one or many SLO Summary Sheets for the selected users. Each staff member's SLO summary sheet can be printed individually by clicking the  button. A typical summary sheet will outline all of the SLOs that are contributing to the displayed scores. Printing these individually enables the end-user to see which SLOs are causing any calculation errors.
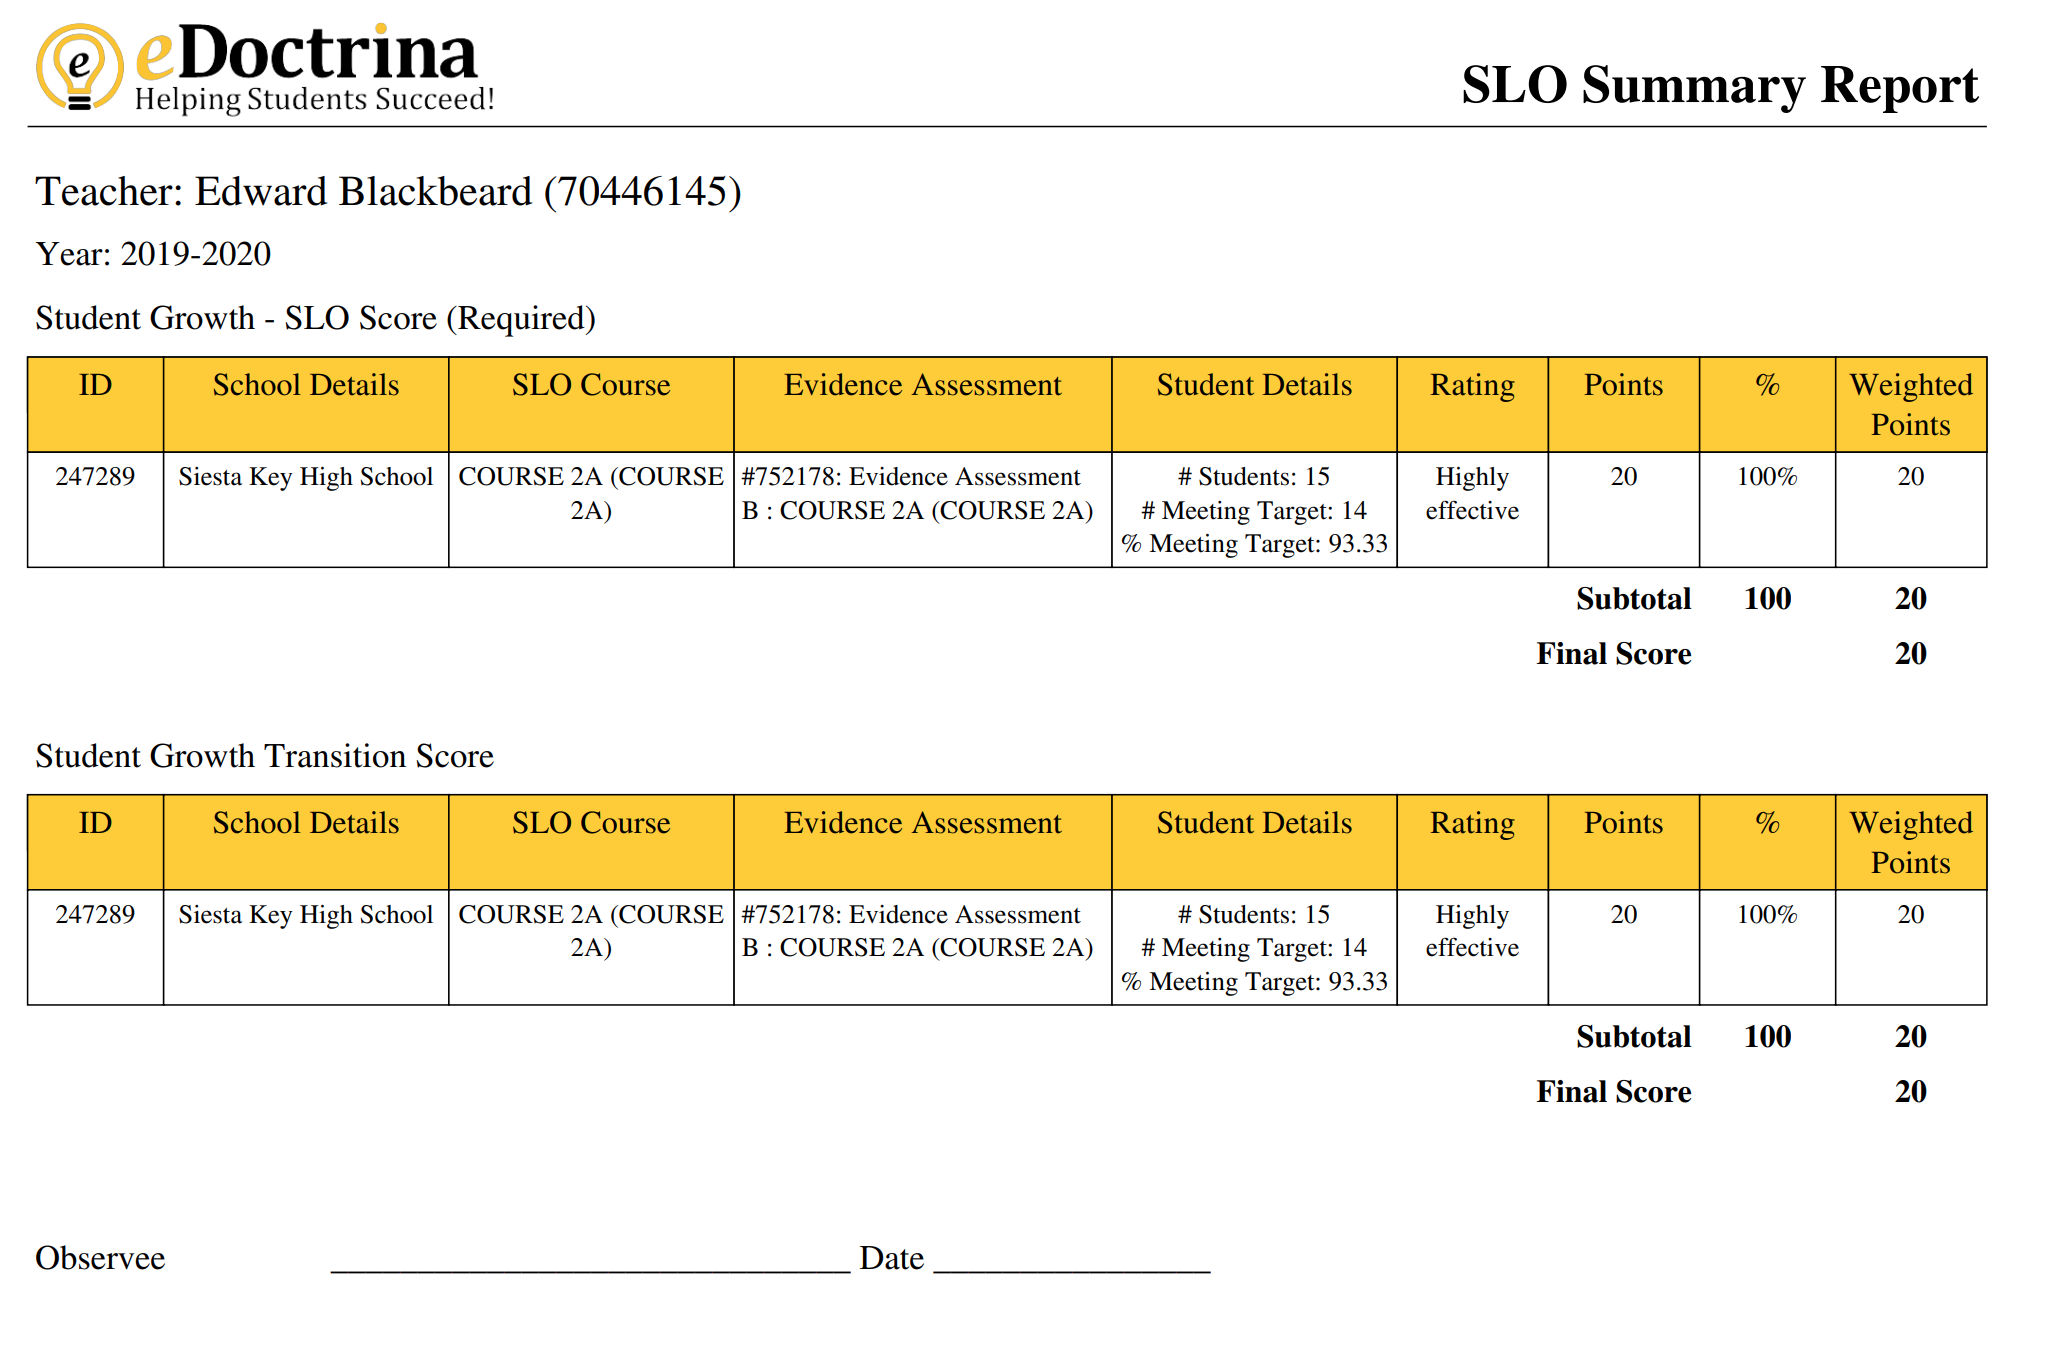

The Final SLO Score Summary and Sign Off is a Microsoft Excel export that will include any of the selected staff members or the filtered selections (when no staff is selected). Some of the data included in this spreadsheet will be the school name, school code, last & first name, state ID#, username, user type, SLO status, and the related scores.


The Import Scores to TE button will be available if and only if SLO scores are not being automatically sent to the teacher effectiveness system. It is generally a good idea to review scores before sending them, but larger districts prefer to reduce the amount of maintenance required to get scores on the final reports and will rely on other admins to ensure that scores are correct. Either way, this button is available to transfer the SLO scores from the SLO module to the appropriate data sources within the Teacher Effectiveness System
Filters
- Search: It is possible to search for one or many users using the user's ID#, UID, SSIN, or Name. If a user does not show up when searching, try resetting filters and only using the search.
- District: The district filter will only be available for users that have access to more than one district so they can toggle between them.
- School: The school filter will only be available for users that have access to more than one school so they can toggle between them to see only users in the selected school.
- User Type: The user type filter allows for filtering by user type so it is possible to only include "Teachers" in the list.
- Year: Scores for student learning objectives are different from year to year, so this year filter allows for looking back or forward to other years to view the respective scores.
- User Status: The user status is an important filter as there may be some user that has left the district and has become inactive. The default selection here is "Active Only", but there are some times when viewing inactive users is necessary.
-
Scope:
-
If NOT using electronic signatures
- -ALL- :All users in the district will be listed on this page even if they do not have an active SLO in the selected year.
- Awaiting Approval: This filter is a great tool to filter for all staff members that have SLOs that have yet to make it to a Final Approved status. Use this filter to work through all of these SLOs with the goal to get each staff member to the Approved status.
- Approved: Use this filter to view all users that have SLOs and ALL of them are in a status that is final.
- Teachers with one or many inactive SLOs: If a staff member is linked to an SLO and it is currently inactive, selecting this filter will show these staff members.
- Teachers with SLO Only: The is a great filter to reduce the displayed list to include only staff members that have an SLO in the selected year.
- Teachers with no SLOs: This filter can be used to view a list of staff members that do not have an SLO created for them to help identify which users need to create one.
-
If using electronic signatures
- Not ready for teacher signature : This filter is the same as Awaiting approval as all staff members with active SLOs in the selected year will show as this status until each of their SLOs has arrived in a final workflow state
- Ready for Teacher Signature: If all of a staff members SLOs are in a Final workflow state (and there is no minimum/maximum viloation)then the status will update to this status. A staff member will not be able to sign their SLO summary sheet until this status is reached.
- Ready for Admin Signature: Each summary sheet is to be signed by the teacher first. After they have provided their signature, then the status will update to one where the administrator will need to sign. Use this filter to find all staff members that require an administrator signature.
- Returned to Teacher: If an administrator finds that there is some reason that one or many SLOs are incorrect, then they will have the option to return the SLO to the teacher and specify which workflow state to return one or many of their SLOs to so corrections can be made. Use this filter to find such staff members who need further attention to SLOs.
- Signed by Administrator: This status is comparable to the Complete status if not using electronic signatures. Once the teacher and admin both sign off on the SLO Summary Sheet, then the status will be updated to this one.
- Department Code: The department code filter can be used if and only if users have a department code entered for them, which is usually something that is managed through imported data.
Electronically Signing an SLO Summary Sheet
If electronic signatures are enabled in the district SLO settings, then electronic signatures will be required when all active SLOs in the selected year have been updated to a "final" status. When enabled, the teacher will need to sign off of their SLOs before the administrator.
For a teacher to sign their SLO Summary Sheet, they should login to eDoctrina and navigate to the SLO Summary Sheet option located in the Staff Evaluation Reports options in the Reports menu.

On the SLO Summary Sheet page, the teacher should be able to find their information and will have the option to sign if their SLOs are ready to be electronically signed.
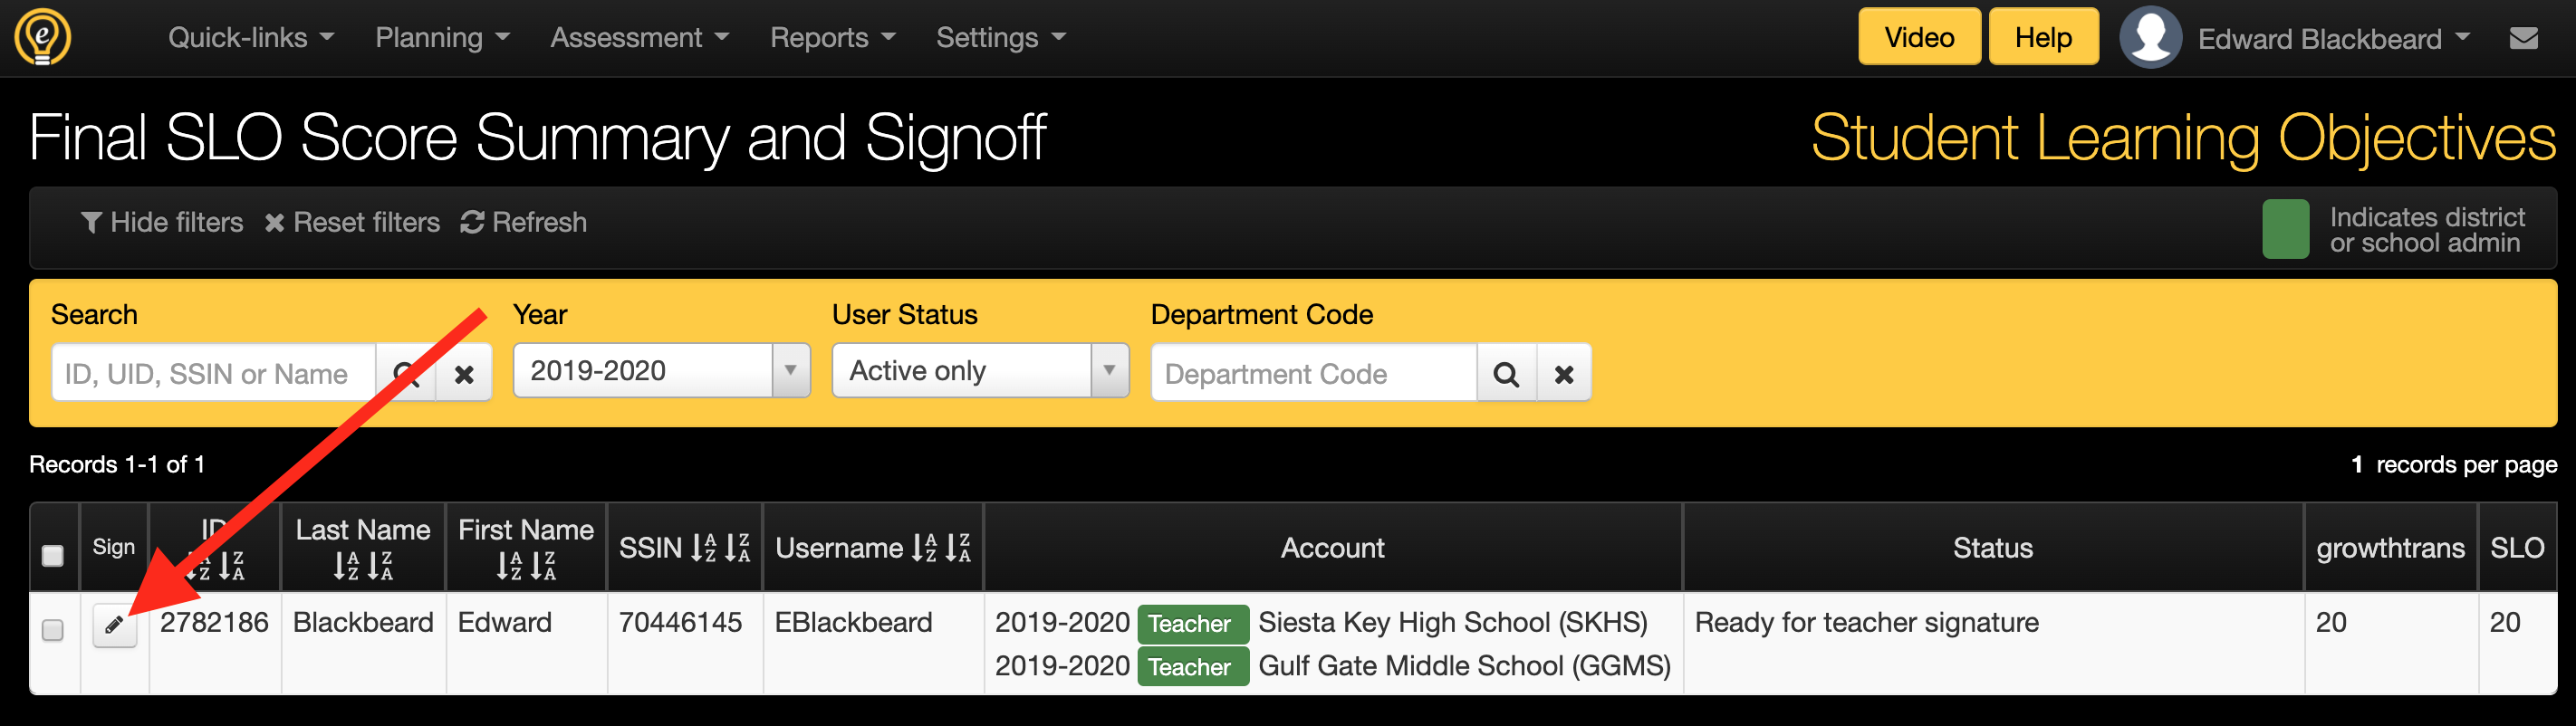
Once the signature button is selected, the following pop-up will appear where the teacher should enter their name as they would like to sign with and their eDoctrina password.

A successful electronic signature will always be able to be viewed when printing the signed report and will be located at the bottom of the report.

After the teacher has signed their SLO Summary Sheet, it will be up to the administrator to sign in and apply their electronic signature to approve the SLO. If there are any errors or data inaccuracies within the SLOs, there will be the opportunity to  the SLO summary sheet. If returning, the administrator must leave a comment and select the "Check to Unlock" checkbox to indicate which SLO(s) should be sent back and to which SLO workflow state to send them back to. Otherwise, the administrator should enter their name and their eDoctrina password and select the
  button to move the SLO Summary sheet to the status of "Signed by Administrator" to complete the signature process.
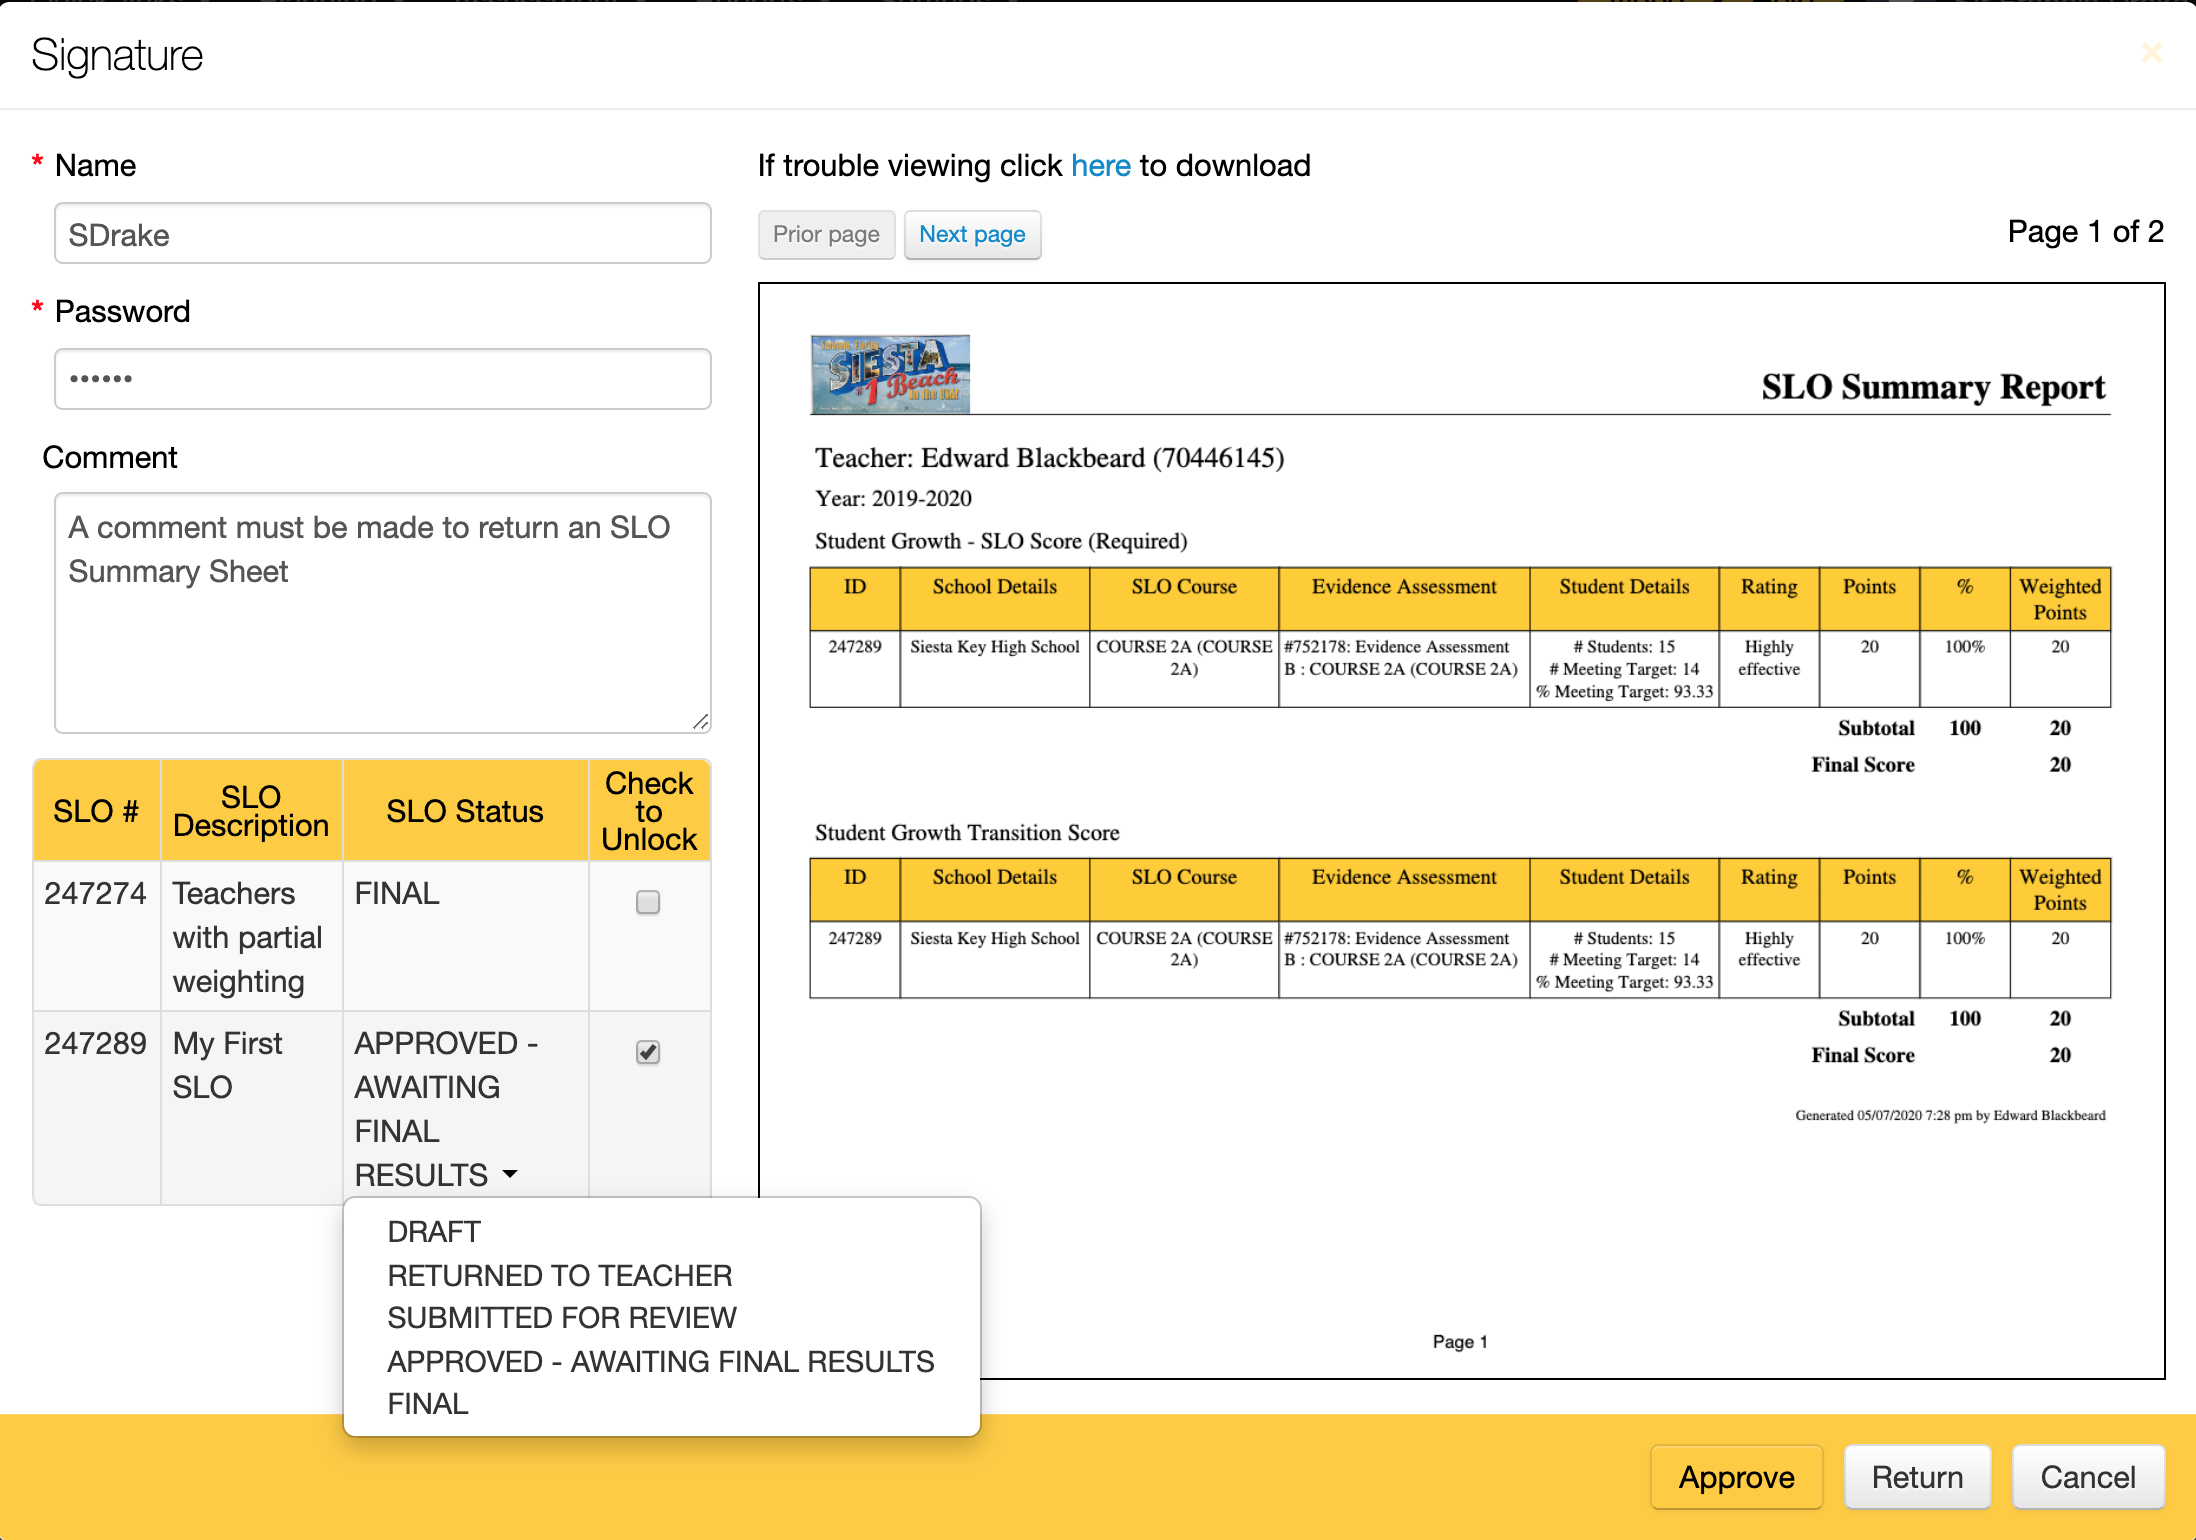
Webinar Wednesdays: Assigning and Managing Online Assessments
Webinar Wednesdays - 5/20: Online Assessments: Creating Remote Content
5/21: Online Assessment for Fruitland Primary Teachers
Webinar Wednesdays - 5/27: Managing My Students
Webinar Wednesdays - 5/27: Student Learning Objectives (SLOs)
Webinar Wednesdays - 5/27: Conducting an Observation
eDoctrina Deep Dive Session 2: Assessments
The Observation Form
The observation form (observation-script.html) page is where all ratings and supporting information for teacher observations or evaluations will be entered. This form offers a flexible scripting area that enables observers to easily enter observed information as well as many other tools that can support the workflow of any observation/evaluation event. The Staff Expectations section is always a customized form that must be designed and configured and can have various features available depending on district preference. Each observation form also offers and Discussion Board and a Supporting Documentation section.


Although it is not a common use case to move an observation to a prior or future year, the option does exist for unsigned observations to move them from one year to another.

The date should be entered as the day that best describes the observation event and will default to today's date when a new observation form is created.

The time fields may be available for some forms and not for others depending on whether the time is important or not. Some districts may even require that a time is entered before they are allowed to move the observation from to a completed status.

The observee field should show the staff members name who is the subject of this observation form. Only districts/users with permissions to update this field will be able to change this from the staff member that the form was started for.

The observer should be the primary observer that will be conducting the observation or evaluation. The logged in user that starts the observation will be the name that is in this field and only districts/users with permissions to update this field will be able to change this from the observer that has started the form.

The secondary observer is a field that will be available to districts that allow for collaborative observations. The indicated secondary observer will maintain the same access rights as the observer.

This checkbox is the MOST IMPORTANT control as Draft observations are meant to be private to the observer. Only the observer will be able to access their Draft observations and this is the default state for any observation forms that have started. Once the observation form is ready to be shared this checkbox should be unchecked to share the form with other observers, the observed staff members, and the district dataset. A notification may be sent to the observee via email (depending on district settings) and there will be a pop-up that displays to the end-user asking them to confirm the change into a Complete status.

General Controls & Buttons

The save button will always be available to save the current state of the observation form. To successfully save a form there must be an establish internet connection. If the application detects that there is not an active connection, you will be warned with the following errors.

Please note that changes can still be made while disconnected from the internet, but do not close the browsing tab until a the form saves successfully.

This button should be used upon completion of data entry as this will save the form with the most recent changes and close the current browsing tab.

Although this button loses some functionality when auto-save is enabled, The general function of this button would be to exit the current browsing tab without saving the most recent changes.

When auto-save is enabled, the date and time of the most recent save will be shown at the top of the form to let the observer know when the last time this form was successfully saved.
It is possible that the same observation form to be open and active on more than one device, but simultaneous changes cannot be made. If one device or browser detects that an observation was changed in a different browsing session, then it will display the following message and force a refresh such that all changes are registered and and all active browsing sessions reflect the most recent changes on any device.


For an observation or evaluation form to count towards any minimum requirements for any staff member it will need to be active. The application will not delete any observations and can only be removed permanently by contacting support. If the observation or evaluation is supposed to count towards any calculations or minimum requirements, the it should be active. Otherwise, toggle this to inactive and this is the same action as deleting the observation by clicking the trashcan. This tool may not be available depending on district user type permissions.

The OBSeRVE mailing system allows observers and observees to send a message to specified users within the eDoctrina messaging system with the option option to send a copy to the respective email addresses. The message will be pre-populated with a subject containing the observation ID# and a body that contains a link that will lead the user directly to the observation form. The recipients avaliable for selection will contain all active observers in the district, while the observee will be the only non-observer available.

NOTE: The "Send copy per mail" will be checked by default

It is possible to print any observation from within the observation form. When this button is clicked, this will generate a unique snapshot of the observation so it can be printed. The form usually initiates in web page format (HTML), but this can then be exported to a PDF or Excel file. These printed forms should not be used as official documents unless there is a signature applied to them, which can be done electronically through eDoctrina (if enabled). If you want to learn more about different report options, please see our OBSeRVE Report Dashboard help guide. Just note that some districts will set defaults to ensure all forms are printed consistently.


This option will allow the observer to pull up other observations for the chosen staff member in aligned columns so other ratings in other completed observations/evaluations can be viewed. Although this can serve as a great reference tool, some districts choose not to allow this while others will only allow it for final evaluations.
The Scripting Area
The scripting area is a flexible text entry tool with a number of features that are designed to make entry of supporting evidence easier.


This could be considered one of the more important controls of the observation form because it determines whether the information in the scripting area should be displayed to the teacher or not. When enabled, the observee will be able to see the contents within the scripting area, but this should be unchecked for observers that prefer this to not be shared as it could be simply drafted content. There does exist a setting where this feature can be set to be enabled or disabled by default.
Generally speaking, the scripting area is meant for easy text entry while conducting an observation so the entered text can be utilized for supporting information. But there are also some other tools are available to enhance the observer's experience, such as the built-in camera and the time stamp tool. Any content that is entered here, which includes text and images, can be linked to the supporting evidence in the observation form by simply highlighting the text and then telling the application which element to attach the content to. A  button will appear next to any element that text is allowed to be linked. It is also possible to link by right-clicking the highlighted text or link to many elements in one action using the button that appears above the scripting area.
Quick Sentences
The ability to manage add a quick sentence will be available for users to quickly add common comments or statements to the scripting area. Please see our guide on Observe Quick Sentences
Staff Expectations
The Staff Expectations section is where the contents of the observation form will be located. This form is custom for each type of observation and will have a different look and feel for each district and even each observation form or type. Because of the high degree of customization, it is impossible to show how any one observation form will look. Each staff expectation can be a pull-down menu for rating selection, a checkbox, a text editor, and much more. It is best to review district documentation about this section and how an observation/evaluation should be filled out. Below you will find only details about the general tools that may or may not be available.

One of the more important components of conducting an observation is to provide a score or rating for each staff expectation. In this section, observers will select ratings from pull-down menus, select check boxes where evidence is applicable, enter supporting information to validate rating selection, attach supporting files or links, make comments to a discussion board, and a lot more. This section of the observation form varies significantly by district, but there are many features that are available across all rubrics in eDoctrina.
Rating Selection
If an observer sees a pull-down menu in the staff expectations section of the OBSeRVE Editor, it means that a rating can be selected for that staff expectation. Some of these selections serve a qualitative purpose while others are quantitative and will be included in the calculated values. The names and points tied to each of these selections will vary by district. Here are some examples.


If descriptions exist for any of these ratings, it is possible to view those descriptions to make a more informed decision when selecting a rating. Next to each rating selection pull-down, there will be an  button that, upon clicking, will display the descriptions of any ratings that have them.

Supporting Information
Each staff expectation is unique and may look different by district and with a specific observation rubric. eDoctrina offers many ways for observers to enter supporting information to accentuate and/or explain the rationale behind certain ratings inside a particular observation.
Some staff expectations could display the option to add attachments or links or even a mini-discussion board for notes.:
-
 : Adding notes will serve as a mini-discussion board within the specified expectation.
 -
 : Attach various types of files to serve as supporting evidence within the specified expectation.
 -
 : Add the URL of any website or document to serve as supporting information within the specified expectation.
Any information that is entered in these tools will be stored within this staff expectation solely. If it is desired to attach a file, link a website, or post a comment to the whole observation, please find the options at the bottom of the OBSeRVE Editor.
It is possible for all observers to key in extra supporting information for each staff expectation that has been set up to allow it. These fields can be utilized to enter text, upload images, or include any other information that is applicable.
Some staff expectations have been set up to only allow supporting information and will be displayed on the OBSeRVE Editor as shown below.

While others will be coupled below the rating selection as shown here.

Although these two fields have a different appearance in the OBSeRVE Editor, they will present themselves they same way when generating a printable document. For more information about printing, please refer to our OBSeRVE Report Dashboard help guide.
Discussion Board
The discussion board can be enabled for specific observation forms to be available for involved parties to post a comment and trigger an email notification. Each discussion board can be configured to be specific to any single observation or it can be used as a discussion board for the teacher (where all comments in any form for the observation rubric will be available in any other related form). There is the option to limit the discussion board to only be for observers as well.

If enabled for the district, draft comments can be posted. Draft comments will be private to the person making the comment and will not print. These comments will show in the discussion board, but will be highlighted with a blue background to show a difference between the two different types of comments.

Supporting Documents
If enabled, the supporting documents section will allow the end-user to upload any local files from their computer as well as enter a website address to include any documentation and/or resources that should be used to support the observation/evaluation.

Quick Sentences for Observations
Quick Sentences are used to enter standardized comments or text strings with a single click or using some keyboard shortcuts.
Quick Sentences can be added to both the scripting area and each element in the rubric.
Within the scripting area, quick sentences can be added by expanding the tool with the  button to display all the available quick sentences.
Once open, quick sentences can be added to the location of the cursor in scripting area by double clicking or using the keyboard shortcut ALT + {letter next to quick sentence}.

For elements within the rubric, one or many quick sentences can be added by clicking the  button for the desired rubric element and then selecting the checkbox(es) next the the desired sentence(s). The reslt will be that the quick sentences will be added to teh supporting information text box (comma separated if many).

Users can also create their own quick sentences from within the observation form by clicking the button near the location where the sentences are listed.

Once a quick sentence has been added here, they will be available in the Observe Quick Sentences tool which is located in the Settings menu on the top navigation bar within Database Setup and Staff Evaluation.

Just note that the logged in user will usually only be able to update or remove quick sentences that have been created by themselves. Other available quick sentences are items that have been created by other users and have been marked by a district admin to be available to all users. This is done from the same screen.

Student Form Templates
This help guide was designed to show users how to create a form for a student based on district forms that have been uploaded for their district.
- From the eDoctrina homepage, users should select the “Planning” drop down, followed by “Student Forms”.

- Once the Student Forms page has opened, users will see all students that they have access to in eDoctrina listed. The top row of filters can be used to find the student that the user is looking to fill in a form for. Once the student has been found in the list, users should select the plus icon next to their name to add a new student form.

- Once the form page opens, the "form" dropdown can be used to find and select which form is being filled out for the student. Please keep in mind that while multiple forms can be filled out for a student, they should be done one at a time. The form selected will populate below, and users can enter the information right in the form itself.

- The rest of the filters can be filled in accordingly. Please note the following:
*Added participants will have access and editing rights to the student forms if the district opts to utilize that setting. These users will also get notified of any discussion board comments made (again, if the district opts to utilize that setting). Please note these settings can also be turned off.
*The creator of the form should list whoever will be primarily responsible for filling in/editing the form as the “Responsible Person”.
*The creation date can be added, though note it is not mandatory.
*A form can also be set to a “closed” status. This is a visual indicator that the form is no longer relevant, or no longer in need of being edited.

- At the bottom of the forms editor there is a discussion board where users that have access to edit a form can add comments and feedback. Adding a discussion board comment prompts a notification to be sent to participants linked to the form. The user can also add additional users to receive notification of discussion comments at the bottom of the page. This will allow them to make sure all appropriate staff receive notification of comments without necessarily having to link them as a participant. Discussion comments can be added and linked to just the open form, or the All Forms in Same Year icon can be selected so that the comment will link to all active forms for that student.

- Once the form is complete, users can save and close. The new form will populate next to the student's name on the Forms page. The form can now be printed, edited, or deleted if necessary.

Class Comparison Report
How to Use the Class Comparison Report
This report gives educators the ability to compare class results on common assessments — whether the comparison is of different teachers or one teacher who is teaching multiple sections of the same course. The report comes in four versions, one that splices data by question, one that does so by standard, another that uses scaffolded or rewritten skills/standards (if that work was done), and finally, a combined report that includes the question, standard, and standard description (if one exists).
The intent of this report is to facilitate positive discussions between teachers about what is working/not working in their classrooms.

After selecting this report from the “Teacher Dashboard" (shown above), a pop-up is prompted.

- Users can select a color scheme for the report data. A number of pre-loaded schemes can be selected. If a district-specific scheme is desired (perhaps unique benchmarks are being targeted), an eDoctrina representative should be contacted to set up the table. The scheme used in this report is scheme #4 - Administrator Snapshot.
- Users can select a data format. The default will be to show the score/out of and percentage, but users are able to select a different option such as # of student, proficiency level score, and many others.
- The average format will also default to Pts/out of and percentage, but users can update this to be just a percentage, just a score, or the points followed by the percentage.
- Checkboxes are available to include different types of metadata in the report, if the metadata exists for the assessment. Users can also choose to hide classes or show excluded questions on this report.
Once options have been selected, the report can be run. The first version of the report is the Class by Question. This will break down class data question by question and compare scores by each class selected to be included in the report. The data will also be compared with the school and district report averages.

The next versions of the report listed will be the Class by Standard and Class by Standard Descriptions. These versions will break the class data down by standards linked within the assessment, or by the standard description (if such exist).

The Class Comparison Combined Report (located as the last page of the report) is the most popular report format. This report compares how each class performed on learning standards and questions on the assessment. It is a combination of the first three versions of the report.

OBSeRVE Email Notifications
The OBSeRVE module offers many different email notifications that can be configured within the district depending on their workflow. It is not the expectation that each administrator will be signing into eDoctrina every day to check the status of their observation in the system, so many districts rely on email notifications that come from the system to notify their staff members about specific events or actions that have happened within the system. Email notifications are a great tool to help you administrative team stay up to date and on top of all the tasks that they need to perform in the system to complete their observations for the year.
Most of the email configuration settings for OBSeRVE exist within the District Settings, which will only be accessible to District Admin users in the district. Settings can be updated here, but changes will not retroactively send email notifications when made.

Ratings
The Ratings email is sent when an observation is taken out of Draft status and moved to Complete Status. This is an importnt email because it marks when the observee or staff member will have access to the observation form electronically. Further email notifications will be sent if there are any changes made to the Completed observation form to ensure that all parties are properly informed about any changes to an observation or evaluation that was thought to be complete.

OBSeRVE Mailing System
The OBSeRVE mailing sytem is an easy way to send any observer or the targeted staff member (observee) a message about a specific observation. By default, the message will be an internal message within eDoctrina and the recipient will be greeted with a pop-up containing this message upon next sign in. But there is the option to send a copy per email and the following message will be sent. This is a flexible tool as the subject and the body of the email can be updated prior to sending.

Discussion Board
If the discussion board is enabled within the observation form, it is possible to configure the sytem to send an email receipt of any comments that have been posted there. Comments made by the observer will send an email to the observee/staff member while comments made by the observee will send an email to the observer. If, for some reason, another individual has posted a comment in the discussion, then they will be sent an email for any comments that occur within the same dicussion board thereafter.

Observation Scheduled - For Observer
Scheduling email notifications are configured within the observation rubric configuration with regards to the specified observation type. Some observation types will automatically send scheduling emails, some will provide the option, and others will never send an email (i.e. Unannounced). By default, the scheduling person will always receive the following email notification, which includes a link to be able to add this event to any external calendar.

Observation Scheduled - For Observee
If an email is prescribed when an observation is scheduled for an observee, they will receive the following email message, which will include a link to add their observation to any external calendar.

Final Rating
IF a Final Ratings email is configured to be sent, the following email message will be sent to the Observee upon Final rating assignment. This is an end-of-year tool that can assist with informing the district staff about any Final Rating that has been assigned to them.

Electronic Signatures - Ready for Observee Signature
When an observation is ready for the staff member to sign electronically, the following email will be sent, which includes a link that will send the recipient directly to the observation that needs their signature.

Electronic Signatures - Returned to Administrator
The option to return and observation upon signature exists for any staff member that decides it is not appropriate for them to provide their signature for one reason or another. If the staff member returns the observation, then the following email message will be sent to the observer so they can attend to the issue more promptly.

Electronic Signatures - Ready for Administrator Signature
When an observation is ready for the observer to sign electronically, the following email will be sent, which includes a link that will send the recipient directly to the observation that needs their signature.

Notify of electronically signed reports
This is a monitoring email notification where a single user can be selected to receive an email when any observation in the system has been completed and all required signatures have been applied. The email message will always be sent to the indicated users, but an email will also be sent to the observer to notify them of the completed observation.

Viewing My Observations
Each staff member and administrator will have their own page where all available observations for them will be available. this is the page that teacher and other staff members will navigate to to view, update, electronically sign (if enabled) or print any observations for themselves.
To get to your observation folder, there may be a button on your homepage that will lead you here, but there will always be the option to select "My Observation" in the pull-down menu when you click your name in the top-right corner.

This will take you to a page where you will see your name listed in the title of the page and all observations that are available for viewing, signing, or printing. There are two different modes and some districts will choose one or the other by default: scripting(list mode) or traditional (column mode).
Scripting (list mode)
The list mode provides a quick and easy way to see all of the available observation or evaluation forms that have been conducted on you. This page offers the ability to view, update, print, and electronically sign your observations.

Traditional (column mode)
The column mode does offer similar functionality as the list mode as all of the available observations can be viewed, edited, and printed; but this view offers a way to see all related observations in a side-by-side column arrangement to make it easy to compare selected ratings from one observation to another. To electronically sign an observation from this mode, the observation form will have to be opened.

TE Data ==> Data Sources
Data Sources are containers for yearly data for any non-student users. Data can arrive to any data source from different locations throughout the system. Most frequently, data sources are configured to hold the overall student learning objective score as well as the overall observation/evaluation score. For data included within data sources to be presented to the end-user, a model must be configured to organize how this data will be shown. Data can arrive to each data source for each respective user by sending the scores from the SLO or Observations modules, but data can also be imported using the TE Ratings import tool.
All of the available data sources will be listed in the Data Soucres page located within the TE Data menu within the Setting pull-down on the top navigation bar. Typically, only District Admin user types will have access to this.
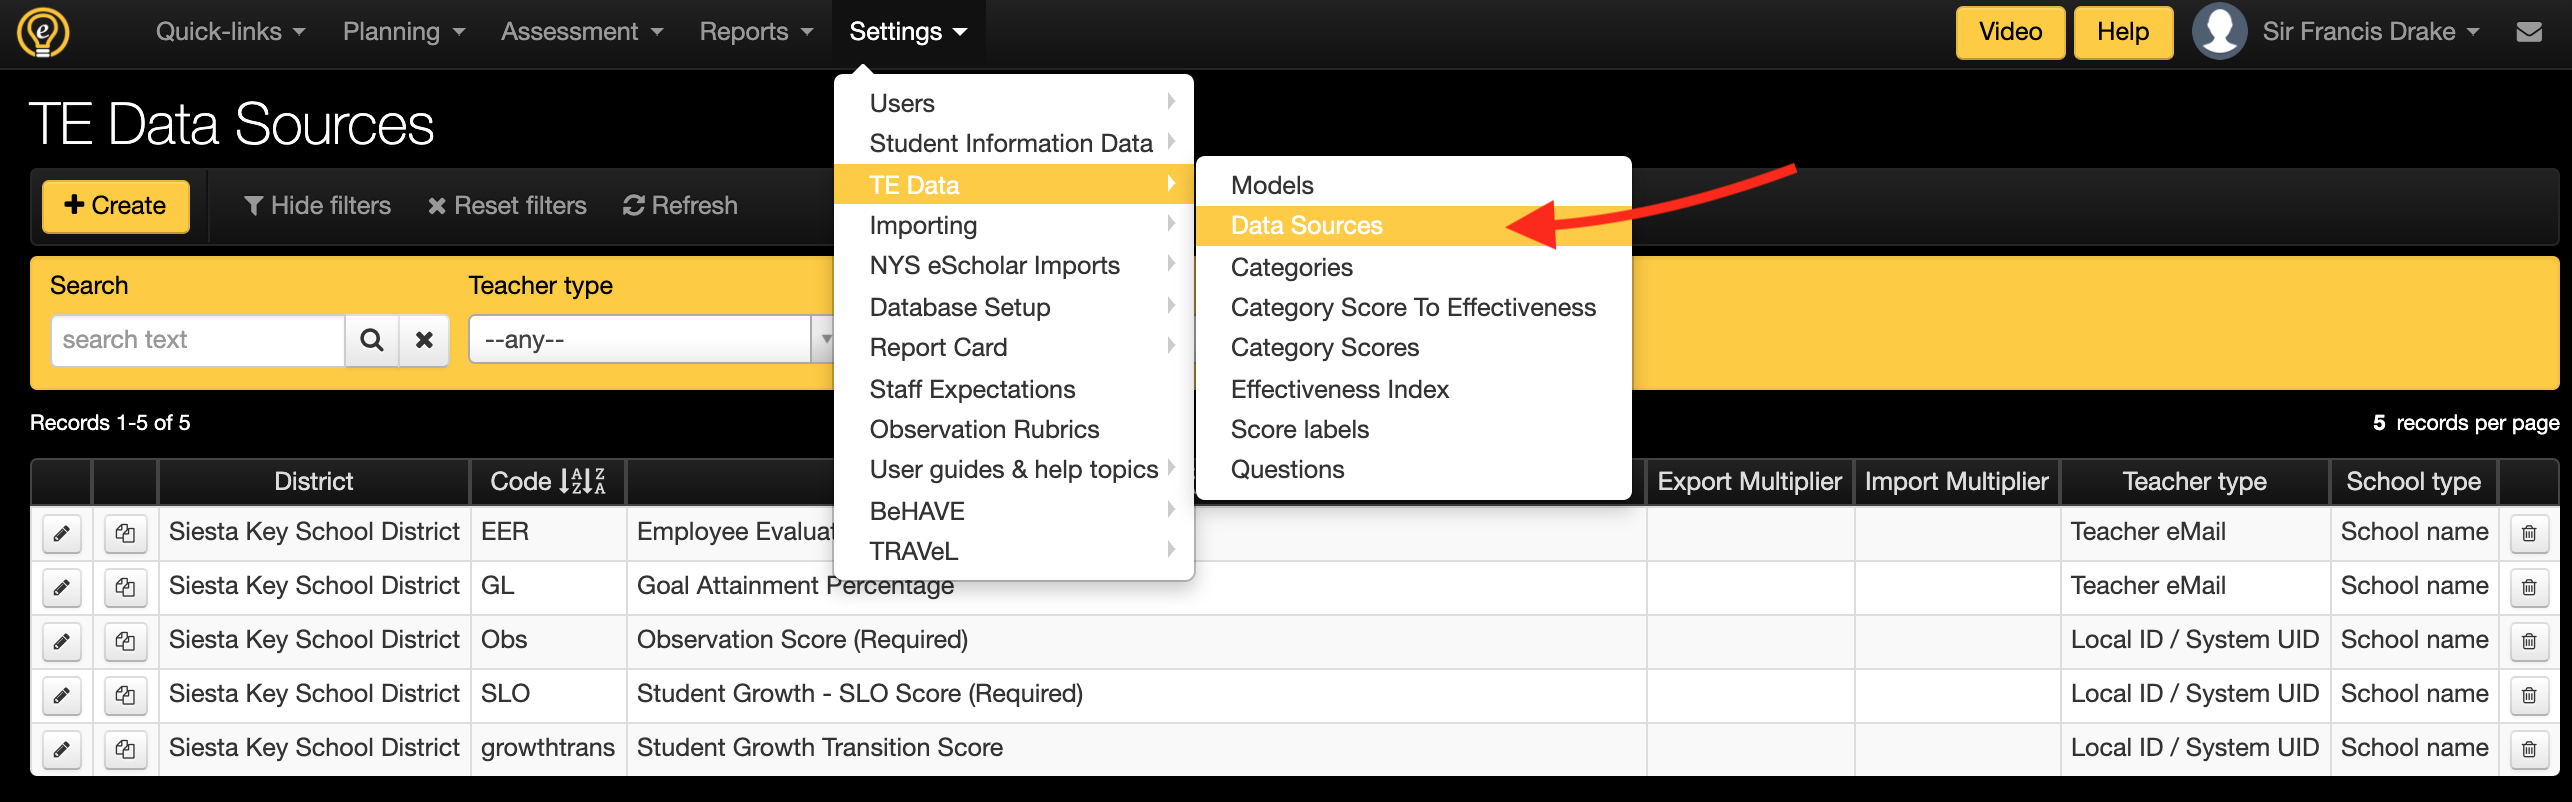
On this screen, all of the available data sources for staff members will be listed.

- Code: The code is the value that can be used for imported data into each data source using the TE Ratings Import tool. Each data source can contain one value per year per staff member, so some district will import some values that do not originate from the eDoctrina application. The code is also what displays on the column header in the SLO Summary Sheet.
- Name: The name is the how the Data Source will appear throughout the system. For a data source to be able to be pulled into a report, it must be linked to a Category that is configured within a TE Model.
- Export Multiplier: There are a number of exported reports that can be generated through the eDoctrina application. The export multiplier will take the value that is in the data source and multiply this by the entered export multiplier to produce a different scaled value on the resulting report.
- Import Mulitplier: There are some instances where imported data needs to be scaled up or down. THe import multiplier will take the values that are being sent to each data source and multiply them by the entered value to produce a different scaled value within the data source.
- Teacher Type: The teacher type indication marks what identifier can be used to import values into the data source using the TE Ratings Import tool. The available selections are 'Local ID / System UID', 'State ID' and 'Teacher eMail'.
- School Type: The School type is selected to determine how the school should be displayed on the resulting reports that use this data source. The current options are 'School Code' and 'School Name"
Creating a new Data Source
There are many reason to create a new data source as there may be a new report that you are looking to create or you are looking to pull in some data from other resources. Data sources are yearly data placeholders for staff members.
Click the  button to create a new data source.
A resulting pop-up should appear where all the information about the data source can be entered.
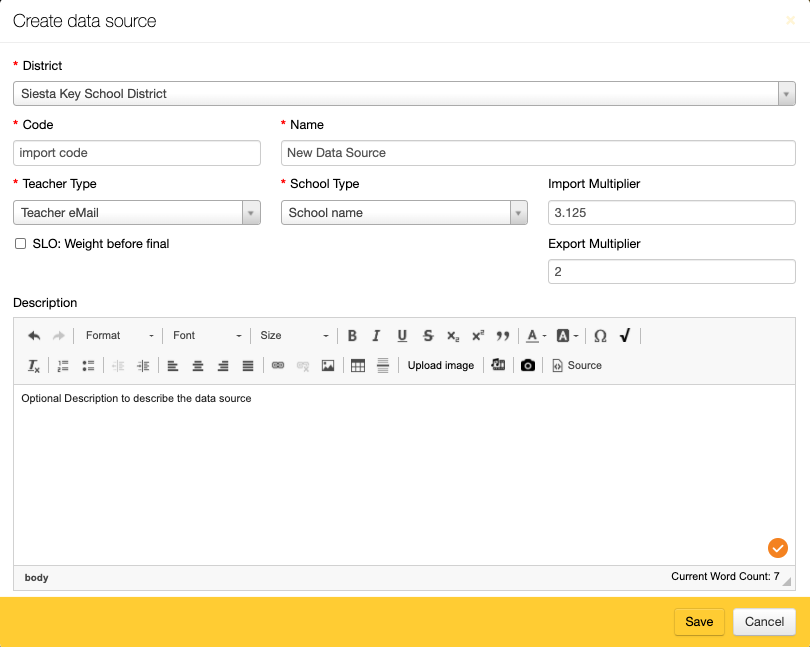
You will only be able to create data sources for the Districts that you are linked to.
A description field is available to explain the data source, but is not currently used anywhere else in the system.
TE Data ==> Models
The TE Model can be best described as the report that a staff member will receive at the end of the year. Each model is configured to align with district requirements, so it is important to assign the correct model to each staff member on the user accounts screen before reports are sent out or made available. The model is where all of the TE categories and data sources come together to make a nice formatted report that can be printed or signed electronically. There are many rules and configuration options available for each TE Model that can be defined in the other TE configuration modules, such as Category Scores to Effectiveness, where cut scores can be defined for each data sources.
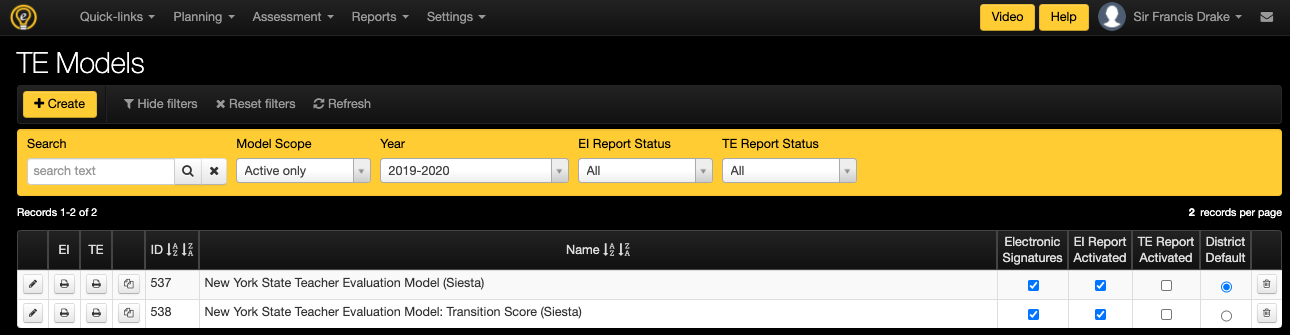
 Clicking the edit pencil button will result in a pop-up where all of the details of the TE Model can be viewed or updated.
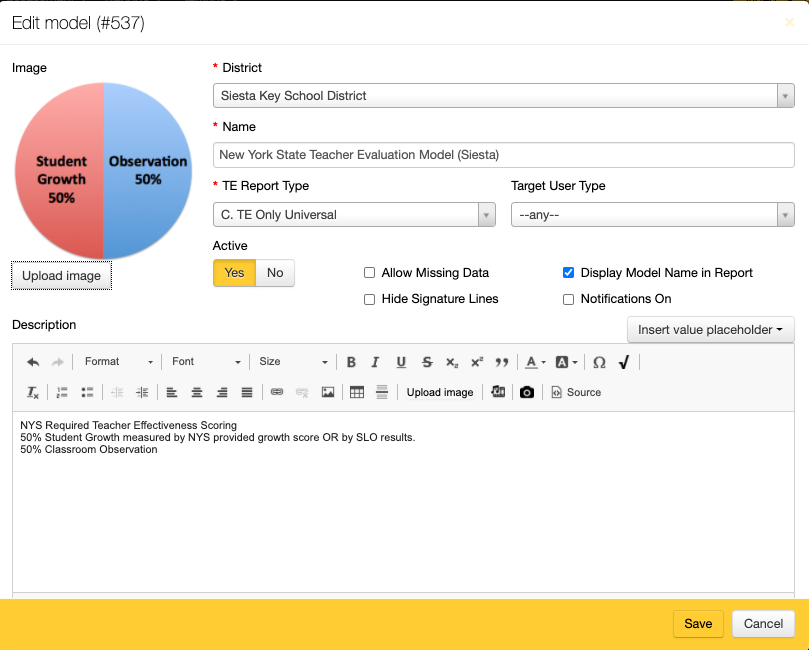
- Image: The image option allows for a single image to be uploaded to be included in the report when applicable.
- District: The district pull-down is available in the case where some District Admin or Support user is linked to more than one district. By default, the only district listed here should be the one that the logged-in user is linked to.
- Name: The name is how the Model will display throughout the eDoctrina application.
- TE Report Type: The Report type is where the customization of reports takes place. Most of the available report types are ones that are standard within the state, such as the NY Teacher Effectiveness Report. If there is a need for a different report type, please contact the eDoctrina team for a consultation.
- Target User Type: There are some attributes on reports that refer to a specific user type.
- Active/Inactive: The active/inactive toggle allows for a model or report to be Active and ready to use or inactive and unavailable throughout the system. Making a model inactive will make the model unavailable to be assigned to staff members, but it will not remove any existing model assignments. Inactive reports will also not be able to be printed in the case where a model is already assigned and it has since become inactive. This is a great way to lock a report until it is ready to be published.
- Allow missing data: This control will prevent a TE model report from being printed for a specified user is there is some missing data in one or many of the required categories. This is a great option to enable if reports should not be printed unless all of the required data to achieve a completed report has been added to the related data sources.
- Hide Signature Lines: If electronic signatures are enabled, signature lines will not be included on the printed TE Model report. But there are some TE Models that do not have electronic signatures and will not require a signature at all. Enabled this feature will ensrue that the TE Model report does not include signature lines in any case.
- Display Model Name in Report: The model name will display on the printed TE Model report if this setting is enabled, Otherwise, the name will only be for the user interface and will not be included on the printed report.
- Notifications on: Email notifications can be sent to the involved individuals when a TE Model report has been signed or returned upon electronic signature. Enabling notifications is a great way to keep users informed about any changes in a report.
-
Description: The description field exists for basic explanation and can be included on a TE Model report (if designed as such). There is the option to include any data source that has been configured to pull in the values that exist for the target year by clicking the
 option. When selected, a placeholder will be added to the current location of the cursor in the description field. This is a great way to pull in data from data sources to include in a printed report.
 Clicking the copy button will create an exact copy of all the details included in the source model, which includes copying the TE Category, TE Category Score to Effective, and Effectiveness Index. When this button is clicked you will be provided the opportunity to name the new model and update the data sources that are linked to the configured categories.
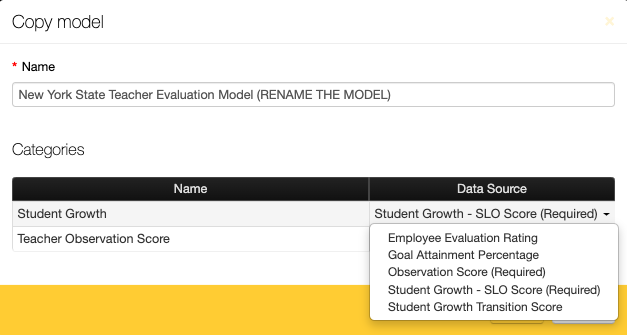
 The print buttons for both the Effectiveness Index (EI) and Teacher Effectiveness (TE) Reports will do the best it can to show how the configured report will display to the user. Some reports will show will the format exactly, while others may not be able to as they are based on actual data. In short, these buttons serve as a print preview of the configured report without any actual data.
Name
The name of the model is how it will display throughout the application and on any printed reports.
Electronic Signatures
This checkbox is where electronic signatures for TE model report can be enabled or disabled.
TE/EI Report Activated
This checkbox determines which type of report will be activated as the EI report and TE report have minor differences depending on the model.
TE Data ==> Categories
The TE Categories is the place where the different available data sources can be organized in some structure that meets specific report requirements. Each category can be set up as a standalone category or in a parent-child relationship. Each category can can be linked to a single data source the values or produce another calculated value based on other category scores. The categories are the items that display on the reports and all of the data entry screens.
Here is a typical TE Category configuration for a NY district Teacher Effectiveness Report where the Observation data source is combined with the SLO data source, which are both weighted at 50% of the overall effectiveness score.
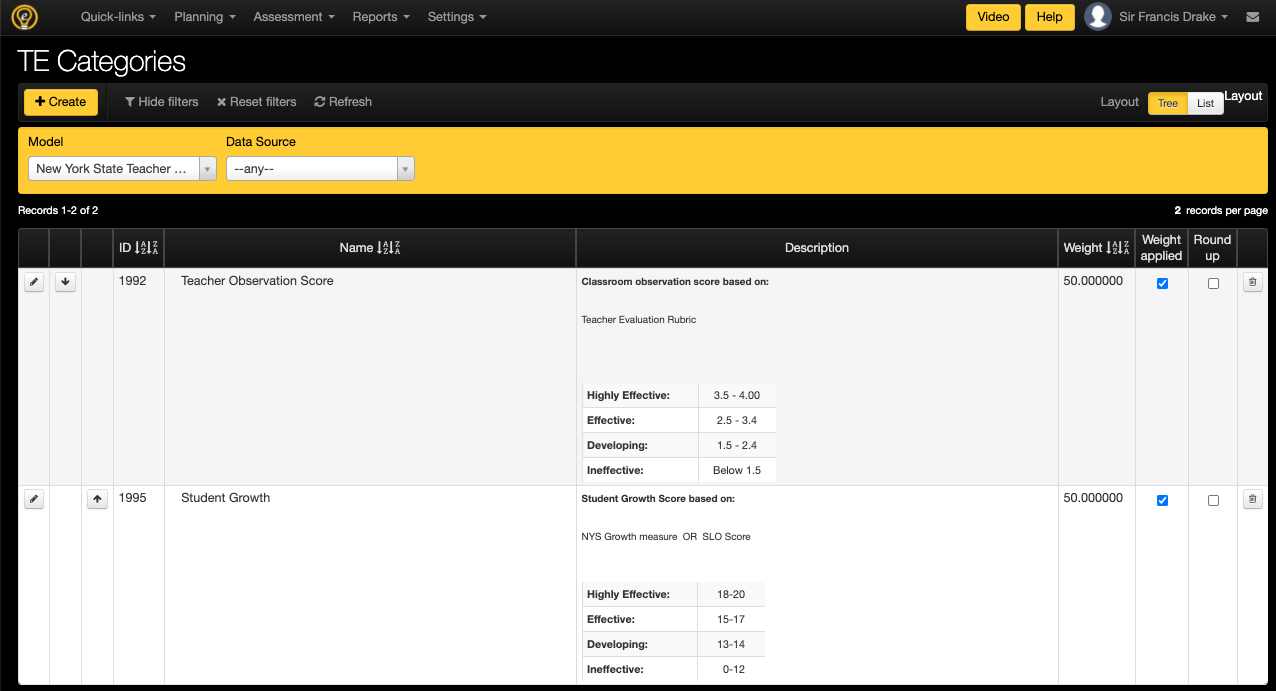
In other configuration, the overall education score may be based off a combination of other scores. In the example below you will find specific Domain scores as child categories to the the overall observation score as well as individual SLO scores that produce a value for the overall SLO score.
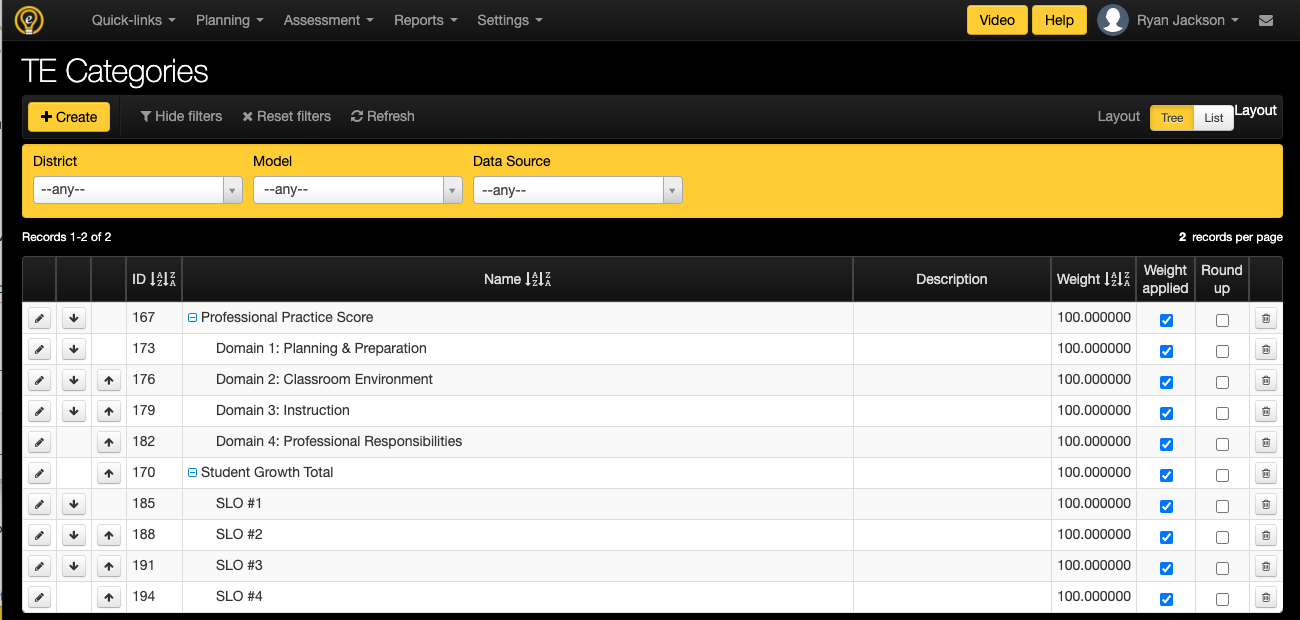
These are just two ways to configure the TE Categories based on Observation scores and SLO scores, but there are many other configurations to consider for other types of reports as well that can include a variety of different data sources.
Clicking the edit pencil button will result in a pop-up where all of the details of the TE Category can be viewed or updated.
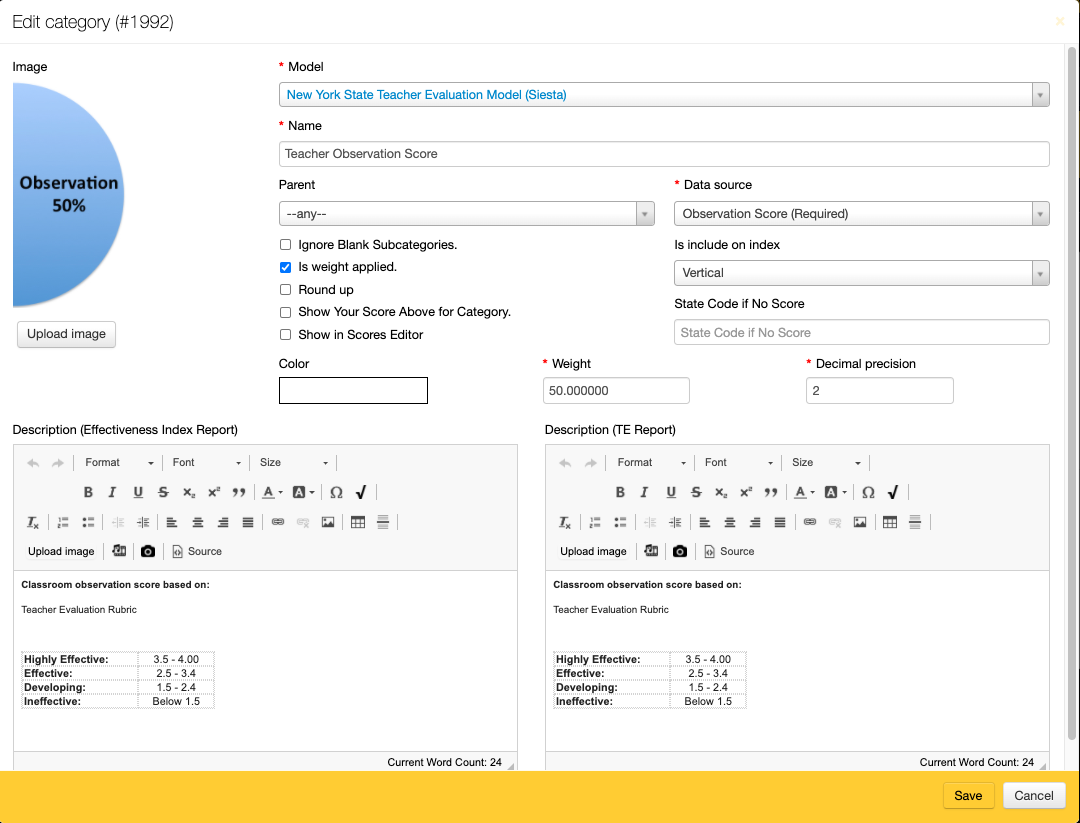
- Image: The image option allows for a single image to be uploaded to be included in the report when applicable.
- Model: It is required that a TE Category be linked to a Model that currently exists. In the pull-down is where all of the available active models can be chosen to link the category to.
- Name: The name is a required field and should reflect the name of the data that will be within this respective category. The name is how this Category will display throughout the system for printed reports and for data entry screens.
- Parent: If the Category is a subset of another value, then it is important to configure a parent-child relationship. Each Cateogry can be configured with or without a parent category and all of the existing categories will be available to select.
- Data Source: Each category is required to be linked to a Data Source so it can call upon this existing value for the model/report. All existing data sources can be selected to link to any category, but please note that each data source can only be used once per model/report.
- Is include on index: This selection is required if a Category is to be combined with another in some type of array. The available selections are 'Not Included', 'Vertical', and 'Horizontal'. For NY districts, the Observation category should be configured to be the Vertical index while the SLO score should be configured to be the Horizontal index (so the scores can be combined in a grid to arrive at an overall effectiveness rating. In other category configuration, the index is less important, but some will require that all categories be configured on the Vertical index. Select not included if the score is to not be combined with any other values.
- State Code if No Score: If the district is using the TE System to produce a state reporting file, this field becomes important if and only if empty scores are to be reported as well. Otherwise the state reporting codes are entered within the Category Scores to Effectiveness page. The code entered here will be the code that is linked to staff members that do not have a value in the data source for the target year.
- Ignore Blank Subcategories: This is a control that will allow a score to be calculated without all of the child categories being present. If this is not selected, the category scores will be calculated with a score of 0 if there is no score. If selected, the existing category scores will be calculated such that the weights are applied considering only the categories that have existing data.
- Is weight applied: The weight field will only be applicable when this checkbox is selected. Otherwise, the score will be displayed as it exists within the data source.
- Round Up: The selection works in correspondence with the decimal precision. If selected, the application will display existing values in the linked data source, but round them up to the next closest value in accordance with the entered decimal precision. For example, if the decimal precision is entered as 2 and the value is 3.452, the resulting value will be 3.46 to round up for two decimal places.
- Show You Score Above for Category: This is a specific control for some models that will display the scores of the categories in the report in a separate section. In example, some report may only consider the Observation and SLO score, but there may be a need to show the subcomponents in some other section.
- Show in Scores Editor: By default, any category that is configured will allow data to be entered manually through the Cateogry Scores page. This option exists in order to hide specific categories from being able to enter data manually. This is often used for calculated scores (parent categories).
- Color: To enhance the look and feel of any report, a category can be assigned a color for display purposes only.
- Weight: If weights are being applied for a parent, each child expectation should be provided their respective weight that should be assigned to to each category such that the overall value calculates in accordance with reporting guidelines.
- Decimal precision: This field should be populated if and only if the data source values should be rounded to a specified number of decimal places.
- Descriptions: Some models/reports are configured to include this description.
TE Data ==> Category Scores
The Category Scores page is where all staff that have been assigned a TE Model will be listed with all of the available categories for the assigned models. Any scores that have arrived at any of the related data sources will be displayed here. The data that displays here will be the data that displays on the resulting reports in the Teacher Effectiveness System. Scores can be manually entered here for maul override.

What scores are shown here?
If you have reached this screen, it is assumed that there is a TE Model that has been configured and all of the staff that are supposed t receive this model/report have been assigned a model on the User Accounts screen. Once this is completed, each of the TE Categories that are linked to the TE Model that has been assigned for each respective user will be displayed here as their own line to display the data that exists.
If the district is using the Observations module or the Student Learning Objectives module, it is possible for the scores for these items can be sent to the TE System to end up here on the Category Scores screen. For any reports that are generated within the TE System, the values displayed here will be the ones that are shown on the report.
Entering Data Manually
If permissions are granted, it is possible to update a score or add a new score by manually typing it in the Value field. It will be just a matter of using the filters to find the line that is in need of an update.

Please note that this value will not be able to be updated if there has been an electronic signature applied to the Teacher Effectiveness Report as this is designed to protect the integrity of a signed report. To update, you will need to unlock the Teacher effectiveness report and then proceed to make the update.

Mass Entering Data
It is possible to enter a sinlge value for one or many Categories on the Category Scores screen. If desired, just select the filters for the Model and Category, select the checkboxes for the line items that will need to be updated, then click the  button and the following pop-up will be presented where the value that needs to be entered for the multiple staff members can be entered.

TE Data ==> Category Score to Effectiveness
The Category Score to Effectiveness page is where specific cut scores are set for specific categories. The tools on this page allow for ranges to be set for each TE Category and define what rating score and/or name should be provided when a staff member achieves a specific value within each respective Category. This screen is also the location where state reporting codes for a specific level can be added if the district is utilizing eDoctrina to generate any data reports to be submitted to the state or somewhere else.

For a typical End-of-Tear report, the Category Score to Effectiveness usually determines which earned score in a category should be mapped to a Ineffective, Developing, Effective, or Highly Effective rating.
Here is an example report for NY as it shows a Category Score of 17 for the 'Student Growth' category, which is mapped to a Category Score to Effectiveness of 'Effective' (which would typically have an index score of 3).

Other states or report can be configured in a number of different ways. Another example can look something like the following.

Creating/Editing

- Model: Each line on this page must be linked to a Model as these parameters are set to be specific to a single model/report.
- Category: Each line on this page must be linked to a Ctegory that is configured within the selected model as each category should have cut scores defined (if applicable) to ensure that the proper Effectiveness Rating is applied for the scores that each respective staff member has earned.
- Performance min/max: The minimum and maximum values should be set to define the ranges of which Category Scores should be mapped to which Rating. There should not be any gaps or overlaps to configure this properly. Each consecutive Effectiveness Rating should start with a performance min that is equal to the performance max of the prior Effectiveness Rating. In example, if Ineffective has a minimum 0 and a maximum 1.5, the Developing rating should have a minimum of 1.5 (in this case an earned category score of 1.5 will be mapped to the higher rating).
- Rating Name: The rating name determines how the earned Category Score will be displayed in reports throughout the application.
- State Reporting Code: A state reporting code should be entered in the case that the district will be using eDoctrina for state reporting purposes. If a state reporting code is entered, then this code will be linked to the earned category score throughout the system. It is not a required field and if left empty, then any earned score that falls at this level will be left off of any generated state reports.
- Index Score: The index score is used if an only if the earned category score to effectiveness will be combined with another category score to effectiveness to generate a combined rating that considers at least two ratings that have been earned. For NY, the Observation Score and the Student Growth Scores are combined to generate an overall teacher effectiveness rating.
- Do not export Index Score: If this checkbox is checked, then an earned score that falls within this level will not be included in the state reporting files that are exprted from eDoctrina.
TE Data ==> Effectiveness Index
The Effectiveness Index page is where combined Effectiveness Ratings for two categories can be brought together to produce a single rating. To be able to configure this page, it is assumed that the TE Model, the TE Categories, and the TE Category Scores to Effectiveness have been already been configured.

An example report would like similar to the following where the H-score and V-score are both 3, which gets mapped to an overall score of 'Effective'

Creating/Editing
The first thing to consider is which Category should be on the Vertical Axis(V) and Horizontal Axis (H). This is done when configuring the TE Categories. In example, this model configuration is set to have the Observation Score be on the vertical axis within this Category configuration.

Next, it is important that each Category is provided with an Index Score within the Category Scores to Effectiveness page. This is the value that is used to map to the appropriate Effectiveness Rating.

When these two components are brought together, the application will then look at the Effectiveness Index to determine the overall score by looking at each index score for the vertical and horizontal axis for the earned category scores for each respective staff member and provide an overall effectiveness rating with the corresponding state reporting code as well as a color for report display.

TE Data ==> Score Labels
The TE Score labels page can be described as a way to modify an earned index score for a category, which is an integer value, and display it as a different name or value on the resulting report.

Without score labels, the default is to display the earned index score, which is defined in the Category Scores to Effectiveness page. If a model/report is configured with score labels, the index scores that are defined will be updated to reflect the name that is configured here.
Without Score Labels

With Score Labels

Staff Evaluation Rating Report
This page is best described at the location where all of the reportable teacher effectiveness data comes together in a format that best reflects the requirements set forth by the reporting agency that the district will submit their data to. For NY, the current utility of this tool is to best align with the Level 0 data submission to NYSED.

This page allows for filtering by school, year, user type(s), department code, and model so it is possible to include specific subsets of data in the resulting report. The lines of date will show the:
- Local ID: This value is the UID of the user in eDoctrina and usually is the ID that comes directly from the user account in the local student information system.
- State ID: This is usually the code that identifies the user with the state certifying agency. Sometimes these values are replaced with de-identifying numbers for data privacy. This value comes from the SSIN field within each user's account and can be imported if necessary.
- School: The w\school displayed here will be the school that is linked to each user's primary account.
- Name: The name displayed here is often not included on the file export, but is shown for reference.
- State Reporting Code: The state reporting code is the value that will accompany the submitted evaluation rating points to define which category the value belongs to. These state reporting codes are defined in the TE Data configuration within the Category Score to Effectiveness page and the Effectiveness Index page.
- Evaluation Rating Points: The values shown here will reflect the values shown for each user on the Category Scores page for each user that has been assigned the selected model. When using the Effectiveness Index, there may not be a need for a value in this field as the state reporting code with reflect the categorical data.
Exporting the Data
The most important consideration before exporting data is to ensure that the filters are selected in accordance with your expected results. Remember to reset your filter before generating each new report. Once this is done, the list will return all lines for all active users that have a model assigned for the selected year. Depending on the time when this report is generated, it may be necessary to also include Inactive users as they may have been active in the reported year but are currently inactive in the district.
Depending on the required format for submission, there is the option to choose which format that the file should be generated in.


Upon clicking the export to CSV button, there will be a few options to select as a .csv file for convenience as it is not as easily manipulated as an Excel file.

It is important to remember to open the file with a text editor to view the file as it will be formated as a .csv. Often the default application to open a .csv file is Microsoft Excel.
03.L. Utilizing Assessment Access Controls
When setting up an assessment in eDoctrina, the creator has the ability to update the access controls which will in turn control who has permission to see, copy, and/or edit the assessment.
Upon creating a new assessment or opening an existing one, the Access Controls will be available directly beneath the General Settings.

Please see below to better understand the functionality of each of these controls, as well as which user types have access.

-
Team Can Edit: If this option is checked, any other teachers within the user's building, that are linked to the same course(s) as the assessment, will have editing rights by default.
-
Do Not Share - Exclude From List: Selecting this option will hide the assessment in the records list from other teachers in the user's building. Admins and "Shared With" users will still be able to see the assessment listed.
-
Do Not Allow Copy: This action will remove the copy icon from other teachers within the user's building, including admins, meaning they will be unable to copy the content for themselves.
-
Hide From Teachers Not Teaching Linked Course: This permission is a mix between Team Can Edit and Do Not Share - Exclude From List. When checked, the assessment will be hidden in the records list from all users except those that are linked to the same course(s) as the assessment.
-
Do Not Allow Teachers to Assign as Online Assessment (ADMINS ONLY): This option can be used by admins if an assessment is created that should not be given online. In selecting this option, teachers will get an error message if they attempt to assign the assessment online to their students.
- Shared With: The Shared With field allows the most flexibility in terms of sharing permissions. Users can enter the name(s) of other teachers within their district in the text field and those teachers will be granted editing rights to the assessment. PLEASE NOTE: this field works at a district level, not just by school!
Webinar Wednesdays: Creating and Communicating Lessons Content
Interactive - Locked
An assessment view in eDoctrina that opens up many possibilities!
03.B.2.Question Bank
Using questions that are already created can save a significant amount of time when creating assessments. eDoctrina offers multiple question banks to alleviate the task of creating an entire assessment from scratch. Each district will have a district-specific question bank that contains all visible questions created within the district as well as the "eDoctrina Item Bank" question bank that contains thousands of pre-loaded questions based of the NYS Regents assessments, grades 3-8 NYS Math and ELA assessments and more. There is also the opportunity to make other question banks available as an add-on module that can be purchased, but this varies by district.
The Question Bank can be accessed directly from the pop-up when creating an assessment:

or from within the Assessment Editor for a specific assessment:

As a result, a question bank “Setup” screen will open in a new tab. Here you will be able to access the Question Bank of your choice to continue building your assessment.

Use the drop-down menu in the upper left-hand corner to choose the Question Bank you wish to search. Use the Search Bar for a simple way to find questions. The results will automatically adjust to meet the criteria of your search. To add a question to your assessment simply click on the green +(plus) button on the question tile.

To take a closer look at a question, click on the magnifying glass in the upper right-hand corner of the question you want to see. A box will open showing the entire question, including tabs to click to see details like standards linked to the question, and where the question has been used on other assessments.

If you select an item that is tied to a passage, you will automatically get a pop up asking if you would like to easily add additional questions to your assessment that are linked to the same passage.

To complete a more advanced search, use the “More filters” button.

This button opens a window with a variety of additional filters and criteria to use to search to find the kinds of questions you are looking for. To learn more about specific filtering options shown on the screen below, click here.

In the upper right-hand corner of each question box you will see a green (+) plus sign, or a red trash can. The red trash can indicates the question has been added to the assessment. To remove that question, you can simply click the red trash can. To preview all questions that have been added to the assessment in one place, click on the “View Questions” button in the upper right-hand corner of the “Setup” screen.

A new box will open displaying all questions selected and linked from the Question Bank to the assessment. You can use the red trash can to remove any questions you may no longer wish to use or that have been added in error. When you are finished viewing the questions, simply click “Dismiss” and you will be returned to the “Setup” screen.

The questions added to your assessment are able to be used for online testing. To preview what these questions would look like when given online, click the “Preview Online” button.

A new tab will open to show the “Online test preview.” Here you will see exactly what students would see if they were taking the assessment. The number of questions are listed on the left. Each numbered box links directly to its corresponding question. You are also able to toggle between questions using the arrows on either side of the question displayed on the screen. When you are finished previewing the assessment online, simply close the tab.

Once you have navigated back to the main question bank page and have completed adding all of your selected items to your assessment, click the “Back to test” button.

You will be instantly redirected to the assessment editor where you can layer on student response tools, modify assessment items, reorder questions, link learning standards and more! For more details about our robust assessment editor features, click here.

03.H.7. Passage Annotation Tool
Click HERE to view the Help Video
The new passage annotation tool is a wonderful feature that allows students to "mark up" a passage when taking an assessment online. This provides students with the ability to highlight, draw, underline etc. any type of passage that is linked to one or more questions.
Essentially, it makes the passage completely editable - yes, even text passages that were entered as images!
Navigate to the Assessment Editor
Once your assessment has been created and your passage(s) are linked to questions, you will select the Online Settings tab at the top of your screen.
When the online settings section appears, simply scroll to the very bottom of the first section: General Tools. Next, click the checkbox to the left of Enable Passage Annotation, save your changes and you are all set!

Student View
When the students are logged into eDoctrina to take an assessment, the passage will show with the option to Annotate if the student wishes to do so:

Activating the Annotate button turns the passage into a sketch pad, allowing the student to free draw, underline, highlight, add text etc. Also, if the text was typed in, the students can have the text read to them by clicking the play button
 to the right of the Annotate button.

Teacher View
When the students have completed the assessment, the teacher can see the annotations left on any of the passages. To do so, the teacher would navigate to the CHECK Student Answers screen from the Teacher Dashboard:

Next, click on the black triangle in the corner of a question where you know a passage was linked. When the scoring window opens, select the Passage tab and you will see any annotations done by the student!

Happy Annotating!
Managing Student Accounts
After logging in to eDoctrina, under the Settings navigate to > Student Information Data > Classes homepage.

select the students icon next to the class name.
Select “Enrolled Students Only”

Users can see the username, last login and test assignments for each student in the class selected.
Please note due to a district setting, teachers may or may not have the ability to reset a students password.

Adding Teacher Feedback/Comments
Teachers are able to provide feedback to students using the Feedback/Comments section or clicking the thought bubble next to feedback.
<img style="border: 6px outset gold;"src ="https://s3.amazonaws.com/docs.edoctrina.org/uploads/images/5/f/7/f/c/5/5f7fc532a9f06d8c5fdc9bdae9ecb638.png)
After clicking on the thought bubble, you can enter your own comment or select from the quick comments on the right hand side.

To add a new quick comment, select the plus icon  to create a new comment.
Enter your new comment and select save.

The new comment will appear in the list. To delete a comment, click the trash can icon next to that row.

Happy Feedback!
03.M. How to Build: Matching Questions and Ordering Questions
For instructions on creating this type of question, click here to view the Help Video
The new question types of Matching and Ordering are wonderful features that allow teachers to create interactive questions for students aside from traditional multiple choice and open-ended questions.

Other Ways to Use this Question Type
To begin creating a Matching Choice question simply select the “Add questions” option on the left side of the assessment editor and select Matching Choices (Online only) from the Type dropdown:


Once you have added the matching question type, you will need to add answer choices as well as the corresponding matching items:

SETUP SCREEN
In the Test Editor click "Create New Question" and select "Classification: Drag and Drop"

Using the Preview online button in the top right corner of your screen will allow you to see how the question looks in the online test format:

Partial scoring can be assigned by changing the scoring type to “multiple correct answers, partial scoring” and assigning the appropriate point value to each matching item:

ORDERING QUESTIONS
To begin creating an Ordering Choice question simply select “Add questions” and select Ordering Choices (Online only) from the Type dropdown:

Add the question and answer choices by selecting “Add Ordering Row.”

Preview online to view how a student will answer this question in the correct order. Students simply click and drag on the answer choices to order the options correctly:

You can change the top and bottom labels the student will see on the online test by selecting Online Tools for the question and entering in the top and bottom label.

Equation Editor: Question Creation and Student Responses
The equation editor options in eDoctrina allow for the creation of questions that will meet the needs of all grade levels for mathematics.
Question Creation
To create a question, navigate to the Questions tab of the Assessment being edited. The Questions view will allow for the content of questions to be created, viewed and edited. Simply click under the word Question to begin. This will cause a toolbar of options to pop onto the screen.

To access the equation editor options, click on the icon shown in the image below.

The editor will pop up providing access to the tools and symbols necessary to create the question. When finished, click Ok.

The equation editor window will close, and the question content will now show in the Question box on the Assessment.
This same process can be used when creating answer choices for multiple choice questions.

To edit a question or answer choice that was created using the equation editor, simply double click on the text to re-open the editor and adjust as needed.
You will see the equation editor text outlined in a dotted box with re-sizing squares:

Questions to Simulate CBT Experience
The NYS CBT's set up many math questions with a "Show your work" field preceding an answer field. The image below is from one of the released practice assessments NYS has made available:

In order to create questions that simulate the CBT experience for students, select Teacher Scored as the question type.

Click under the word Question in the editing box and enter the content of the question, including the phrase, “Show your work.” and the word, “Answer.”

Put the cursor at the end of the phrase, “Show your work.” On the toolbar click the Answer Tool icon shown below.

From the Answer Tool drop down menu select Equation Editor. Then, select the grade level band editor needed for the Assessment. Click Ok.

This will create a box under “Show your work.” that says, “Equation Input.” This is where the CBT editor will appear during the Assessment for the student.

Next, place the cursor after the word, “Answer.” Select the Answer Tool icon again from the toolbar. Leave the Answer Tool set to “Input.” Change the “Width Fixed, in pixels” to 50. Click Ok.

This will create a box next to the word “Answer” that says, “Text input 2.” This is where students will be able to type a final answer to the question.

To preview the question, click Save in the upper right-hand corner of the screen. Then click, “Preview online.”

This will open a window to show the exact appearance and experience of the student for the Assessment.

eDoctrina® Scanning Setup
Using eDoctrina® scanning requires schools/districts to send scanned images to via FTP, or File Transfer Protocol. Below are settings required for the FTP, followed by typical scanner settings that result in the successful processing of answer sheets.
We will work with you to optimize scanner settings. Ideally, you can have a one-touch button set up on your scanner that sends images with the identified settings via FTP.
If a scanning technician is coming in to set up your equipment, let us know so that we can be available to support the process and process test scans.
FTP Settings
FTP IP: scan-ny.edoctrina.org (The fixed IP address is 52.201.195.90 and should only be used if the device does not support URL's as this IP address may be subject to change)
Port: 21 or 22
- NOTE: Ensure ports
22,21and20are open through your firewall bi-directionally.
Username: Will be provided separate from this document: ______________________________________
Password: Will be provided separate from this document: _______________________________________
- if you do not have your username and password, send an email request to [email protected]
MODE: PSV (passive)
Scanning Settings
- File type: Tiff (required – must NOT be compressed) single-page per file is recommended.
- Image type: Text (usually there are options of “photo,” “photo-text” or “text”).
- Resolution: 400 DPI is recommended / 300 DPI minimum
- Color: Black and White (required) (DO NOT USE GREYSCALE or COLOR)
- Image Quality: Medium or High
- Sharpness: Highest setting available recommended if available.
- Contrast: Normal (recommended)
DO THE FOLLOWING BEFORE SETTING UP YOUR COPIER
Prior to setting up your copier, it is recommended that you try to connect to our server from a computer to confirm there are no firewall or content filter settings blocking the connection.
- Go to a computer on your network and open any browser.
- Type ftp://scan-ny.edoctrina.org into the browser.
- You should be prompted for a username and password. If you are not prompted for a username or password, then your firewall is blocking the connection. Work with your network administrator to help open traffic to our FTP server.
- After you enter your username and password you should see your FTP folder and be able to place files into this folder. If your login does not work, double check it with your support person. If it still does not work, your firewall or content filtering (Barracuda, Lightspeed, etc.) may be blocking the connection, please contact your network administrator for assistance.
If you were successfully able to connect to our servers with a computer, attempt to setup your copier and send a test scan to us.
Scanning Test Page
Please scan a page with the following information filled out. After scanning, send an email to [email protected] alerting us of the scan and we will check for it:

Person Scanning: ______________________________________________________________
District: _______________________________________________________________________
School: ________________________________________________________________________
Contact Email: ________________________________________________________________
Scanner / Copier Location: _____________________________________________________
If you are having trouble with setup or connection, please review our Scanning Trouble Shooting Guide to make sure everything is configured correctly.
Feel free to email us at [email protected] for assistance with scanning or information about configuring you scanning device.
03.C.4. Searching for NY Released Content in the eDoctrina Question Bank (Regents & 3-8 EngageNY)
eDoctrina provides a bank of individual Regents and Engage NY questions which you can select to add to your own assessments.
First open the Question Bank from either an existing assessment or a new assessment:
Open the Question Bank by either:
- Creating a new assessment Click the "Create" button on the "Assessments" page
- Editing Existing Assessments Click the "Edit" button for a row on the "Assessments" page
Filtering Questions in the Question Bank
There are three main ways to search for NY question content described below. You can use one or a combination of methods.
- A) By Assessment in which the state released the question
- B) By Standard each question was assigned to
- C) By Topic that each question falls under
1. Set the Question Bank filter to "eDoctrina Items Bank"
2. Click the "More Filters" button.

3A. Search by Assessment
(1) Click the "Assessment" tab in the pop-up window.
(2) Change the "Assessment Bank" to: (Question Bank) NY Regents Questions
(3) Filter by Subject and/or School Year to find specific exams.
(4) Select checkbox(es) for any assessment(s) you want to include in the search.


3B Search by Standard
(1) Click the "Topics/Standards" tab.
(2) Change the "District/Set" filter to: (eDoctrina) Standards
(3) Click the  icon to the left of each folder in the standards tree to expand the folders organized by Subject Area, Standard Set, Course, and Grade Level.
(4) Select the checkbox of each standard you want to include in the search.

Please Note:
Selecting the checkbox for a folder (parent item) will automatically include all standards within that folder. You do NOT need to individually select each standard.

3C Search by Topic
(1) Click the "Topics/Standards" tab
(2) Change the "District/Set" to: (eDoctrina) Topics
(3) Filter by Subject and/or School Year.
(4) Select checkbox(es) for any topics(s) you want to include in the search.

4. Click "Apply" after filtering questions.
The Question Bank will refresh and display the filtered questions.
5. Click the  button on each question you wish to select for your assessment.
If you wish to adjust the filter options, click the "More Filters" button.
button on each question you wish to select for your assessment.
If you wish to adjust the filter options, click the "More Filters" button.
6. Once you are done selecting questions, click "Back to Test" button.
If this is not the first year that your organization will be using eDoctrina for observations or evaluations, it is likely that your rubric frameworks will already be available to you when you want to begin setting up the new school year.
If you are new to eDoctrina, it is expected that you work with the eDoctrina team to ensure that your organization is setup with all evaluation rubric frameworks that are necessary to evaluate the desired staff members.
If you need any additional frameworks loaded into the eDoctrina application, the expectation is that you will share these forms with an eDoctrina team member so an implementation plan can be put together to get these additional frameworks loaded and ready for use.
The normal procedure upon the beginning of each school year (with the assumption that no changes will be made from last year's configuration) is that the eDoctrina team will make all rubrics and and rubric assignments available in the upcoming school year mid-August. In most cases, the rubric configuration is handled by eDoctrina team members for all frameworks that have specific calculation methods linked to them. This is done so no changes can be made by district users that could potentially jeopardize how overall ratings are calculated in the agreed upon performance review plan.
To check whether your observation rubric frameworks are available, navigate to the OBSeRVE Dashboard and check the rubric and rubric assignment filters for the current year.
Although there may be a button on your homepage, all users with access granted as and observer/appraiser should have the OBSeRVE Dashboard available in the Quick Links option in the main navigation bar (at the top of the screen).
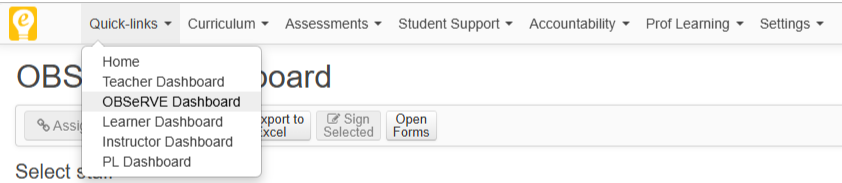
Once in the OBSeRVE Dashboard, you will find a page that offers many different views:
- Assignments
- List
- Calendar
- Final Rating
To check the available rubrics in the district, start by ensuring that you are viewing the correct year. NOTE: Showing more filters will make the year filter appear.

This means that:
- Selecting a specific year will show only rubrics that are linked to the specific year.
- Selecting a specific rubric will show only rubric assignments, forms, and observation types that exist within the specific rubric.

If the expected rubrics and rubric assignments are existing, then the next step is to assign each of these assignments to some teacher to see if the minimum required evaluation items are shown in the "Assignments" column in the displayed list where staff members will be listed.
To do this, click the chainlink button and choose the item that is being confirmed.
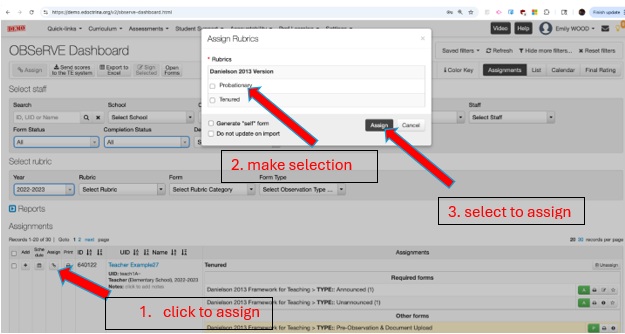
In example, see how the "Tenured" assignment holds a minimum of one(1) Announced observation and one(1) Unannounced observation, but the "Probationary" assignment holds a minimum of two(2) Announced observations and one(1) Unannounced observation.
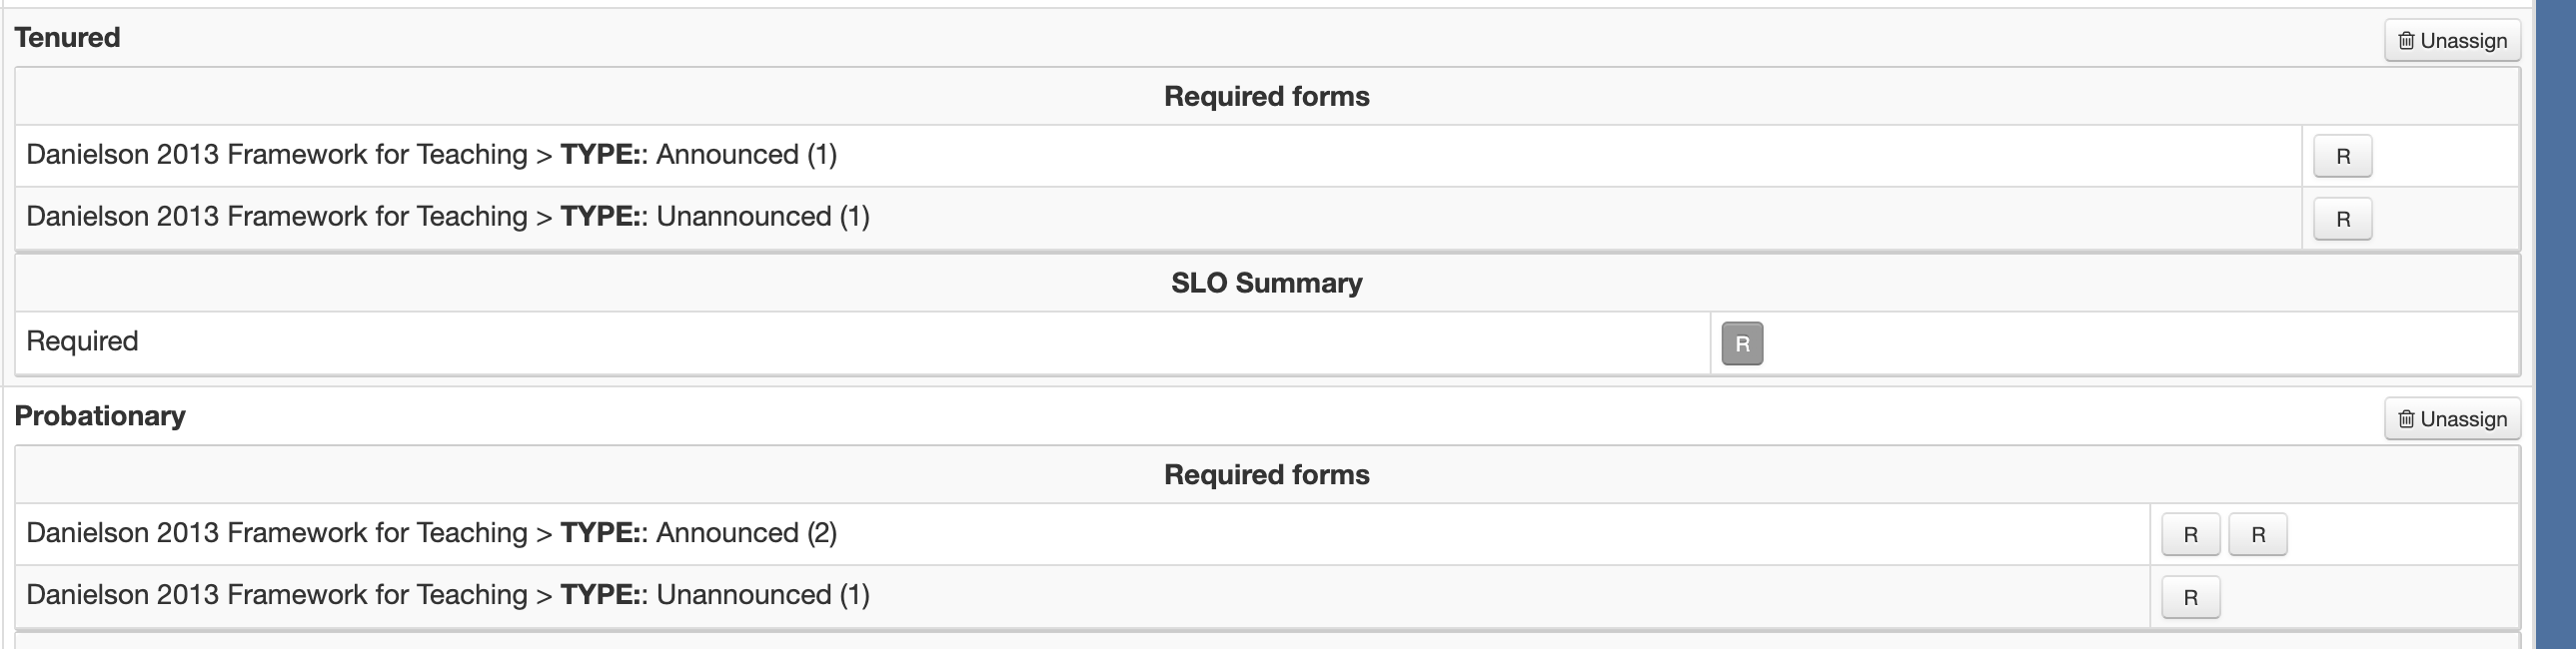
There are two pages in eDoctrina where a rubric assignment can be made:
- User Accounts page
- "Assignments" view of the OBSeRVE Dashboard
To keep things concise, here is a screen-shot of the current design, with a quick reference guide to the related tools.
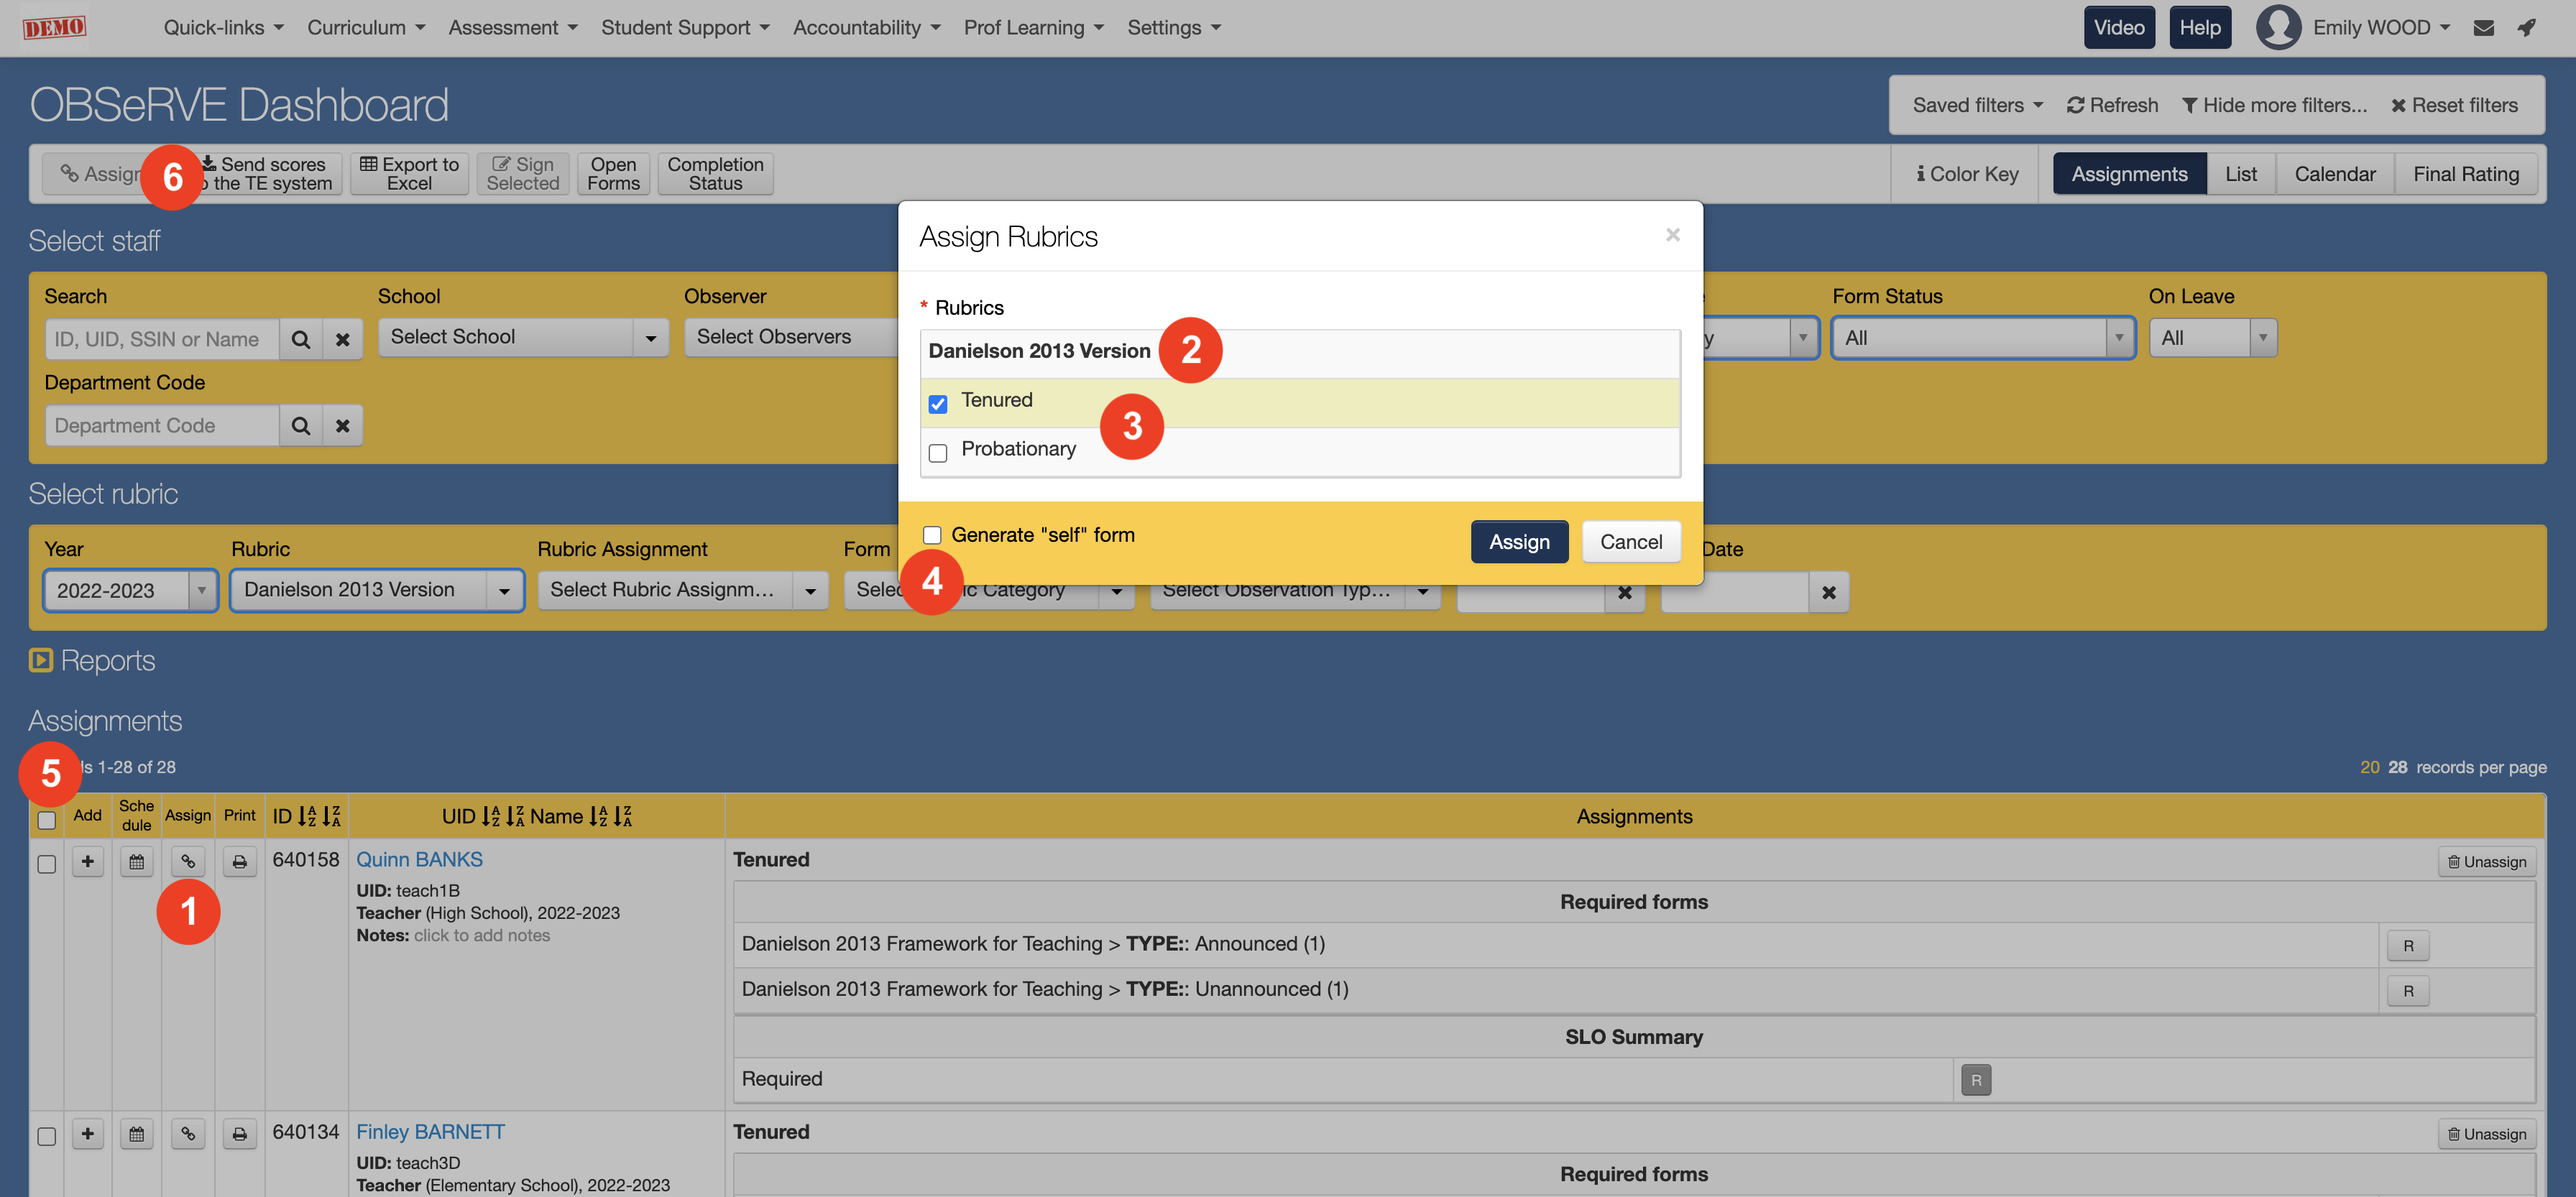
- The chain link button is how to "link" or add a new rubric assignment. When the button is clicked, a pop-up window will appear, making it possible to add one or many rubric assignments to the respective staff member.
- The darker font text will list the name of the rubric. All rubrics that can be assigned will be listed here.
-
The rubric assignments exist underneath their rubric and should be selected as the item to assign.
-
Key considerations:
- Only one rubric assignment can exist within each rubric for each staff member. For example, a teacher can be either "probationary" or "tenured", not both.
- There can be as many rubric assignments with each rubric to fulfill assignments for all staff members and their minimum yearly requirements.
- If an option does not exist for a specific staff member, it is possible that they have an assigned rubric code that is preventing the assignment from being made.
- The ability to assign a rubric is permission-based and may not be available to all users. District admin accounts are granted this permission by default.
-
Key considerations:
- The Generate "Self" Form checkbox is a feature specifically designed for forms that the appraisee or staff member will be filling out themselves. These could be forms related to lesson delivery, reflection, pre-/post- observation meetings, self-evaluation, goal-setting, or some other form that is being used in the organization. When the "self" form is generated, the result will be all self-forms within the rubric assignment will be automatically generated in a status that can be viewed/edited by themselves and viewed by their observers/appraisers.
- The checkbox exists next to each staff member's name, so actions or data reports can be generated for more than one staff member en masse. Select one or select all using the checkbox in the column header.
- If one or many staff members have the checkbox selected next to their name, the mass Assign button will illuminate to allow one or many rubric assignments to be made for many staff members in one action. Using the other filters on the OBSeRVE Dashboard can limit the staff members in the list, making the mass Assign action a great tool to reduce the time it takes to assign rubrics to the entire district or school.
It is also possible to view and make rubric assignments from the User Accounts page.
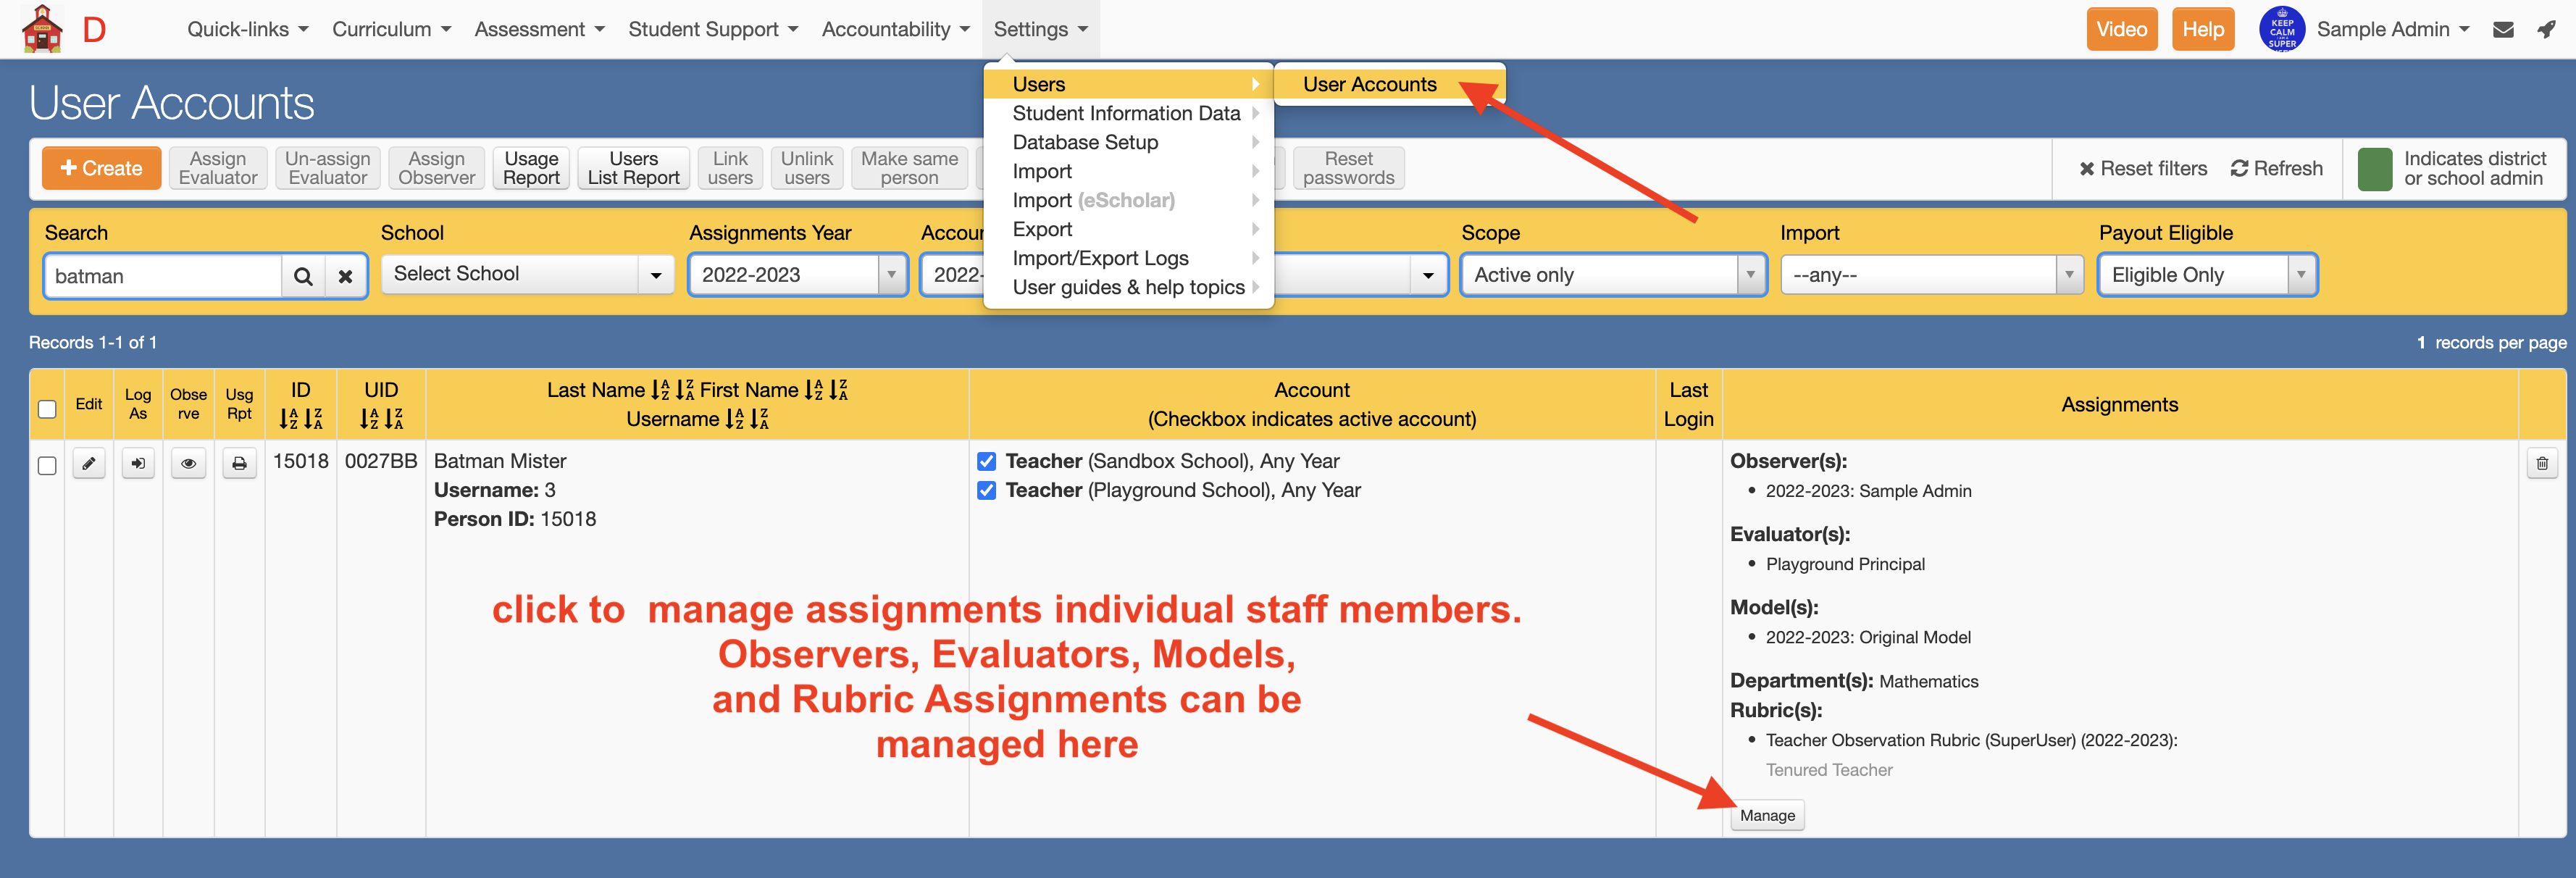
In this location, it is possible to:
- Assign a specific observer to staff members.
- Assign a specific evaluator to staff members,
- Assign a teacher effectiveness model (final evaluation report) to staff members.
- Assign an evaluation rubric assignment to staff members.
We should note that the observer, model, and rubric are yearly assignments and can be viewed in each individual year by choosing the year in the "Assignments Year" filter.
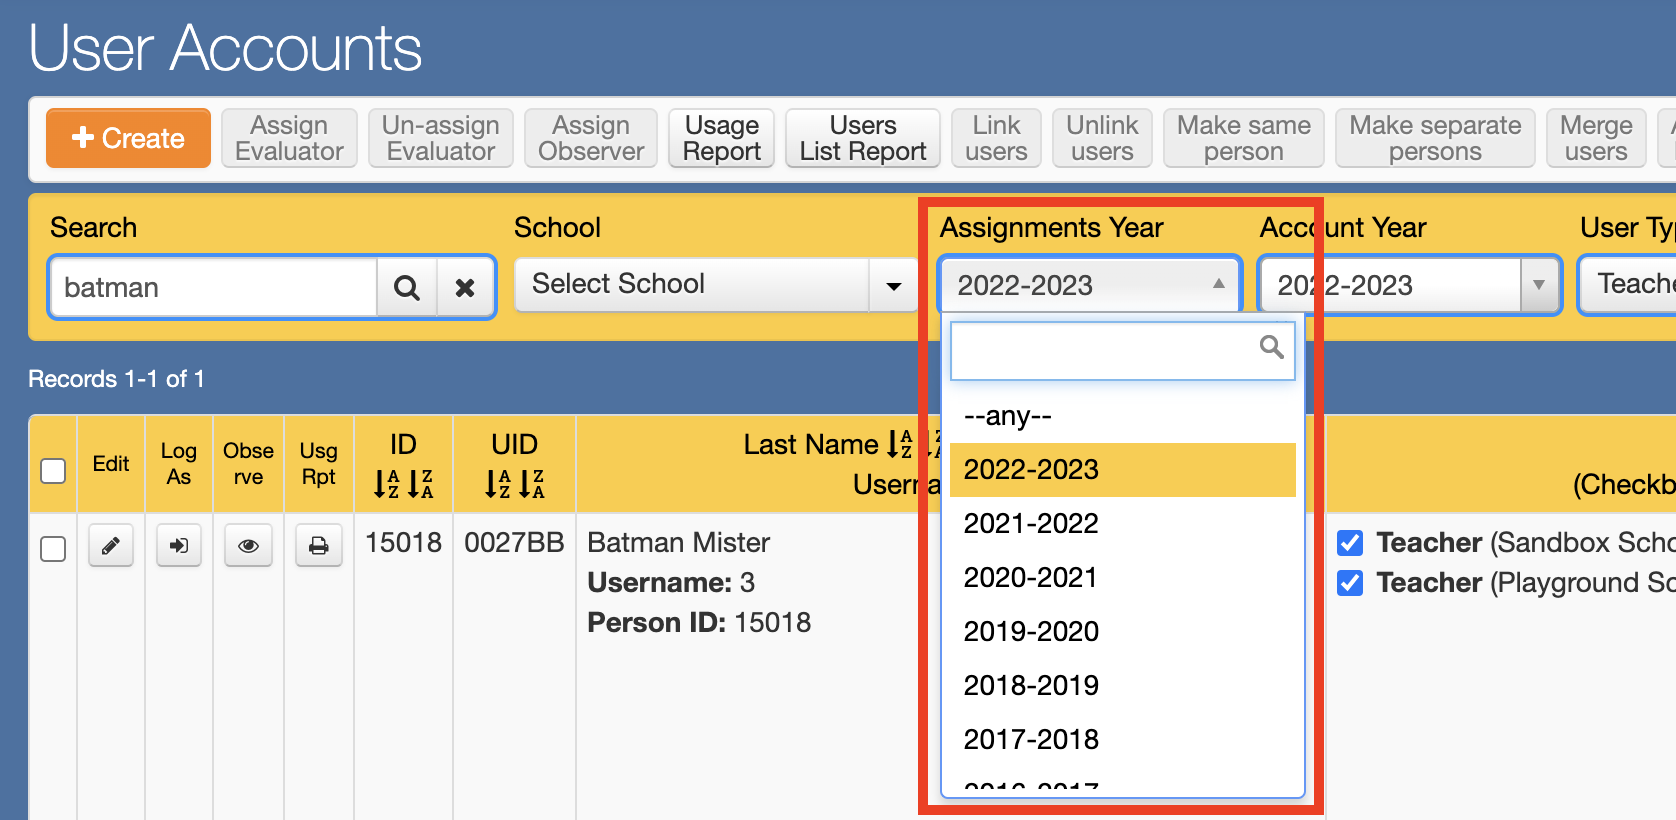
Clicking the "Manage" button will produce a pop-up where specific assignments can be made. For rubric assignments, choose the Rubric tab and then click the assign button to add a new rubric assignment.


If the desire is to have these rubric assignments managed through the automated nightly import of the staff within the district, it is possible to do this if and only if a rubric code can be provided within the staff file for each staff member, respectively.
If your district would like to enable this feature, please contact [email protected]
USER TYPES OF EDOCTRINA
The first thing to understand is that there are three base user types in eDoctrina:
- District Admin
- School Admin
- Teacher
A district admin will have full access to the entire district and will be able to see all staff members (and students). This user type should usually be limited to staff members who should be able to see everything and everyone.
A school admin will have full access to all staff members within the schools/locations that they are linked to. This user type is usually reserved for building principals or assistant principals as they should be able to view, create, and monitor all staff members in their associated locations.
A teacher will not have any access to other staff members by default. This user type is usually reserved for those who will be evaluated.
Any district utilizing the accountability suite of products of eDoctrina will have the option to create as many user types as needed to fulfill the evaluation goals of the district. For example, some districts may add additional user types to differentiate between the user groups that may exist within the district. This provides great flexibility to create user types for observers and observed staff members to differentiate between the groups and assign the respective access rights.
Some general user types that come to mind are:
- School service provider (to accommodate counselors, psychologists, speech pathologists, etc...)
- Support staff (to accommodate clerical, building & grounds, custodial, etc...)
- Assistant Principal or Principal (will sometimes be used if there is an evaluative relationship that exists between these two groups and the school admin user type no longer fits the requirements)
- Department Chair (to accommodate those who will only evaluate those within their specified department)
If new user types are created in the district, it is important to understand who should be able to see these users as well as who these users should be able to see in the application.
The possibilities are endless in configuration, but the overall goal of user configuration is to ensure that any observer has the access necessary to complete their evaluation activities within the year and not be able to see those who are not within the scope of responsibility.
If any district wants to explore the possibility of evaluating more user groups (outside of teachers), then it is recommended to contact the eDoctrina support team or your partner success manager so guidance can be provided.
SETTING A USER AS AN OBSERVER
In some district configurations, the access rights to be an "observer" are embedded within the user type. For example, the following user type is configured in a way that access is calibrated in a way to provide them with specific access to other user types or base user types in the district. The example below provides an example of a very specific user type configuration that can be read as follows.
| Base user type Teacher Or User type Director Principal/Lead Appraiser Assistant Principal/Appraiser Manager/Supervisor Associate Superintendent |
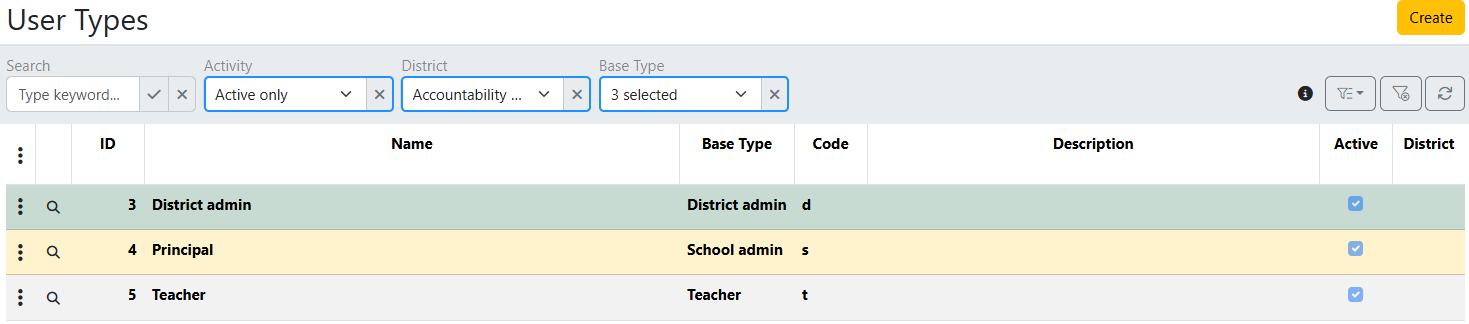
Of course, this is a more advanced configuration and it has been expressed to help understand how eDoctrina can be configured to accommodate all evaluative relationships between staff members at any district.
These advanced configuration options may not be fit for all districts as many partners of eDoctrina will elect to assign and manage observers manually. In these cases, setting a specific user as an observer can be done by checking the "Observer" checkbox in the user editor.
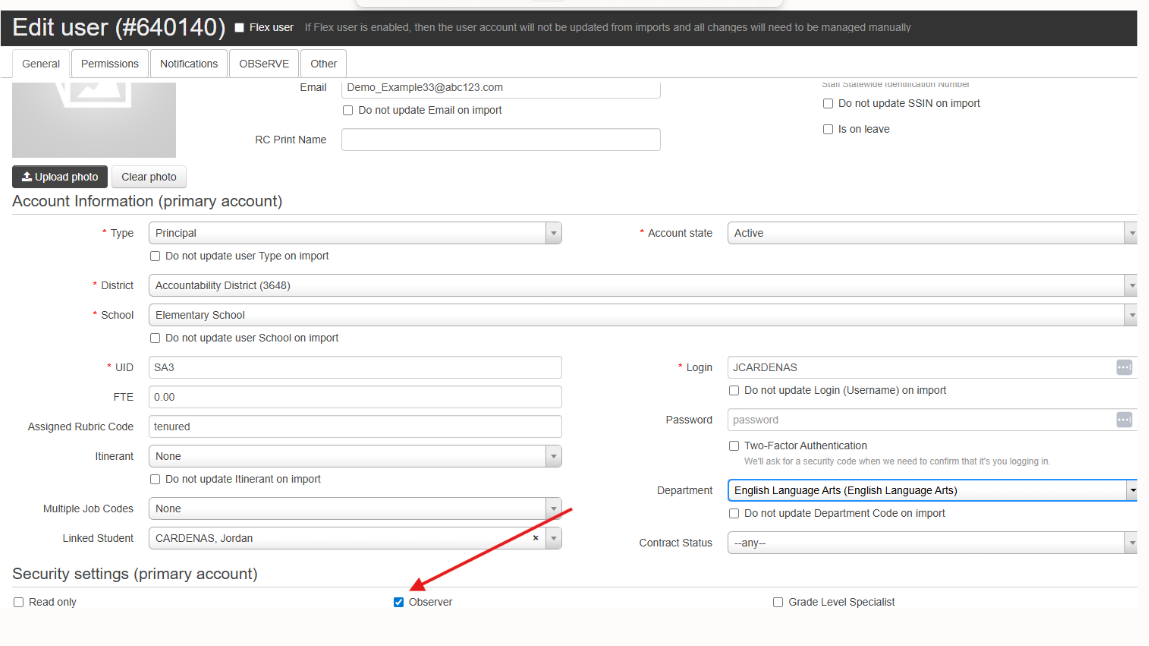
NOTE: This option will not be available if your district is using the advanced configuration options.
It is assumed that if the district is using the "Observer" checkbox to assign observer access to a user, then they will follow the default access assigned to their role. This means that a School Admin marked as an "Observer" will be able to observe all staff in their location or school and any District Admin marked as an "Observer" will be able to observe all staff in their district.
It is recommended to follow a more advanced configuration if the district has a need for teacher observers as there will be extra configuration steps to ensure that teachers can only see data and provide feedback to peers whom they are assigned to.
SPECIAL SCENARIOS
Now that the basics have been covered, it is important to know what steps can be taken to expand or limit the access of a specific evaluator, as the default settings in user types often do not fulfill all evaluation scenarios.
To make this easier to understand, here are a few scenarios and how to accommodate them through user configuration.
A school admin user is asked to evaluate a single staff member in a location that they are not linked to.
In this scenario, it is important to understand the default access of the observer. By default, an observer with school admin base user type will already have access to all staff linked to their location/school. This scenario usually appears when some school admin from a different location is needed to observe some staff member in a different location.
To accomplish this, navigate to the User Accounts page, identify the staff member that needs to be observed, and then find the "Manage" button in the Assignments column.
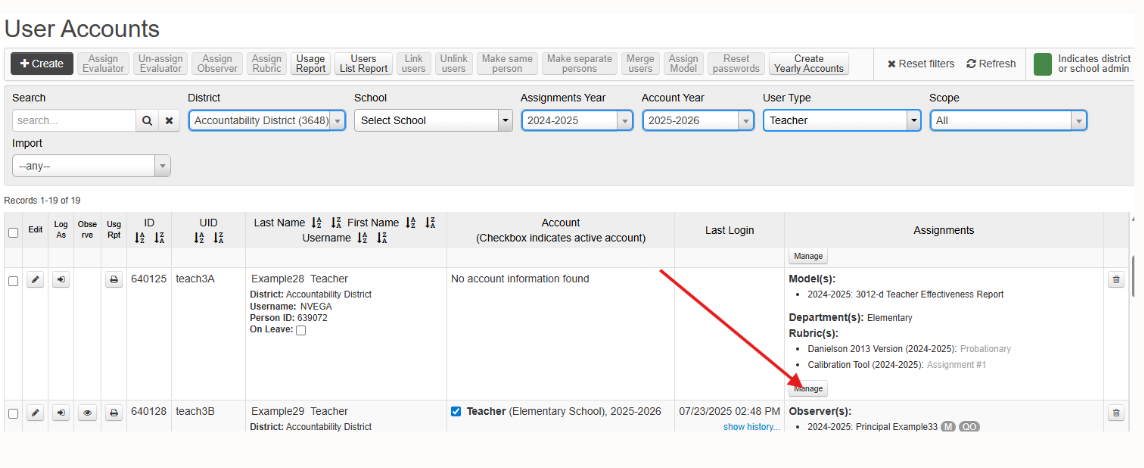
Upon selection of the "Manage" button, a pop-up will appear to assist with making specific assignments to staff members in the district, such as observer(s), model(s), and rubric assignments.
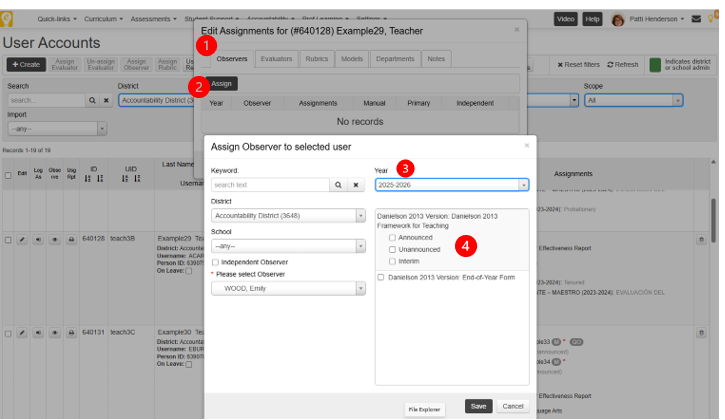
To assign an observer to some staff member:
- Select the "Observers" tab within the pop-up window.
- Click the "Assign" button.
- Select the observer that needs to be assigned to this staff member by search by staff ID, first name, or lastname.
- Choose the year that this person should be able to observe this staff member.
- OPTIONAL - If the assigned observer is only supposed to view or create observations for a specific category, then select the observation type that they should be able to manage.
Please note that a specific observer assignment with a specific type selected will limit the observer to only be able to view and manage observations for the selected types. If the observer should be able to view the entire set of evaluation activities for the staff member, do not select a specific category/type to ensure that the assigned observer can view all related evaluation activities for the staff member.
It is important to note the "Observer" filter on the OBSeRVE Dashboard as this is a filter that can be used to identify:
- all staff members where the selected observer is assigned to through the steps outlined above.
- all staff members where the observer has started an observation for, regardless of observer assignment.
A school admin user is asked to evaluate staff members in a location that they are not linked to.
In this scenario, it is important to know the difference between access to staff members at a specific location and access to students at the same location. Many districts will utilize eDoctrina for assessments, curriculum, student goals, and other modules (in addition to the accountability modules). To remain FERPA compliant, it is important that we do not grant access to a school admin to students in a school that they are not linked to.
To accommodate for this specific scenario, navigate to the User Accounts, identify the observer that should be granted access to other locations, and click on the edit pencil to enter the user account editor.
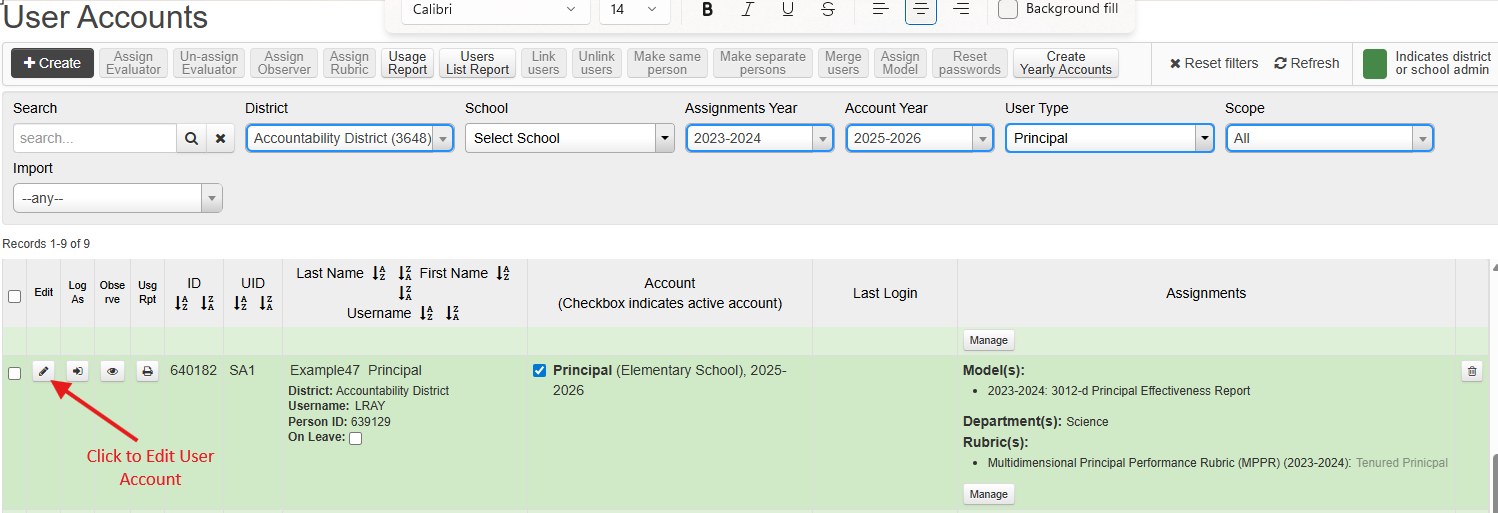
In the user editor:
- Navigate to the "OBSeRVE" tab
- Find the section called "Additional schools to provide observations for" and click the "Add school" button.
- Select which schools/locations that the observer will need access to.
- Click Save.
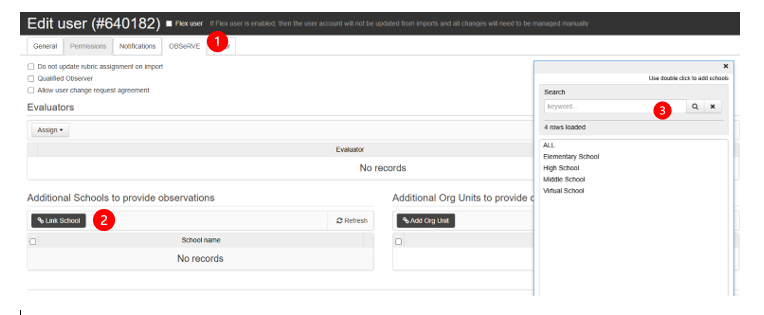
The result should be that the school will appear on the list for these observers. Please note that this item is excluded from any automated import logic for staff users, so this will need to be managed manually.
An external observer is asked to provide observations for a specific observation type, such as an unannounced observation or walkthrough observation.
In this scenario, the same steps should be followed as outlined in SCENARIO #1 where the observer assignment should be made on the User Accounts page.
The only difference with this type of scenario is that the assigned observer should only be able to access and create observations for the selected observation type or category. This scenario is closely related to having an external evaluator come in and perform the Walkthrough or Independent Observation events.
To accomplish this, take the same initial steps as mentioned in SCEANRIO #1 to navigate to the User Accounts page and identify the observer in this list and clicking the manage button.
But this time when assigning the observer, select the specific observation type that the observer should be limited to.

The result of this assignment will look different upon assignment as the specific observation type or category will be listed in the Observers column.
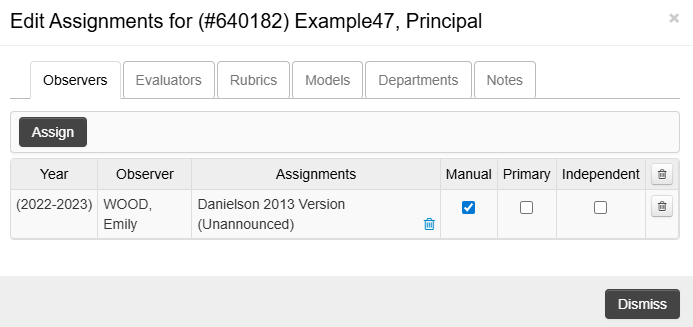
For assistance, contact [email protected]
Assigning a Teacher Effectiveness Model
To be able to provide reportable staff members with a summary report displaying their overall effectiveness rating
The first step for configuring eDoctrina to produce teacher effectiveness reports is to assign a TE Model report to each staff member that is subject to your APPR plan and should be reported to Level 0 (zero).
The end result we are looking for is a report that looks as displayed below where we place the HEDI score for Observations on one axis and the Student Learning Objectives score on the other axis to produce an Overall Effectiveness Rating for the staff member as prescribed in your district's APPR plan.
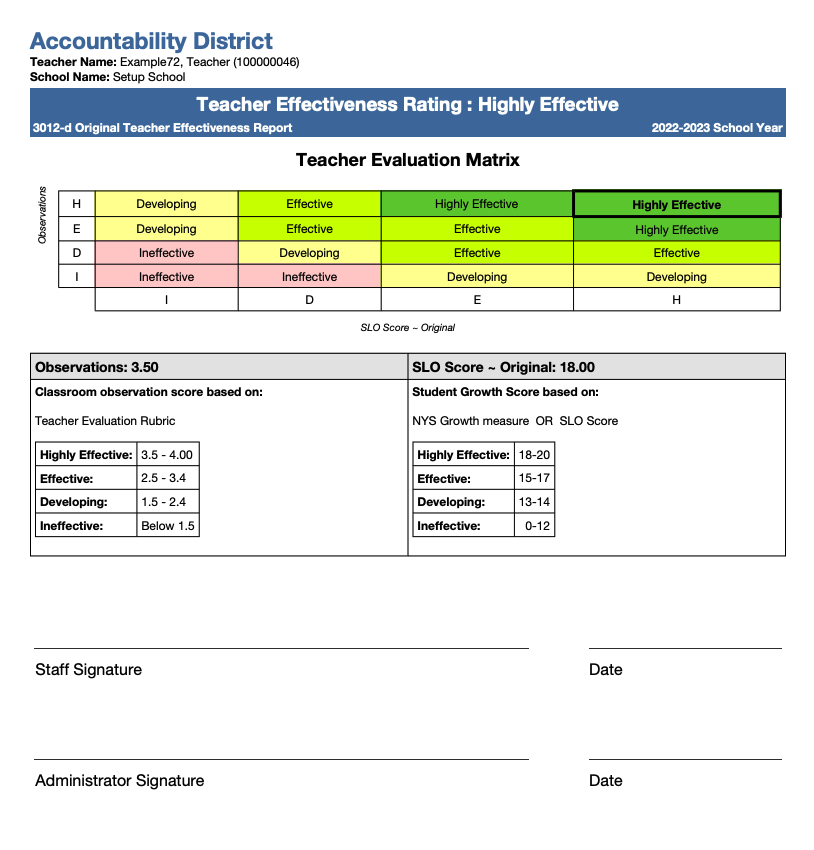
Upon implementation of the Accountability Suite of eDoctrina, these Effectiveness Models have been configured to be in compliance with your district cut scores for both Observations and Student Learning Objectives, as well as overall effectiveness ratings.
The only step that someone in district must take is to assign these models to the teachers or other staff members that will be receiving this report. This is your opportunity to choose who will be receiving this report and then be reported to Level 0.
To manage this in eDoctrina:
- Navigate to the User Accounts page.

- Find the "Assignments" column. This is where the associated model will be listed.
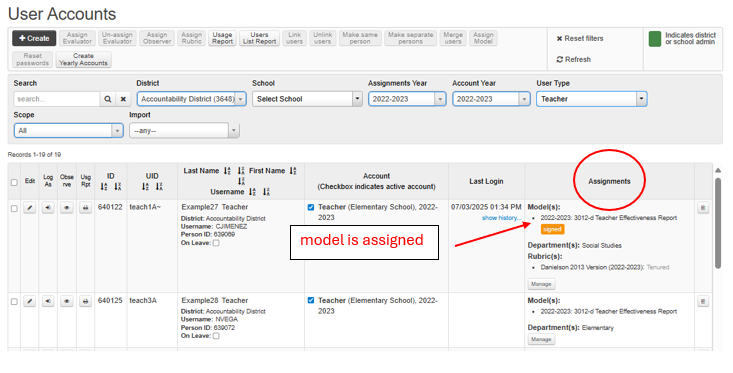
- Assign the model individually by selecting the check box for the desired staff member, then clicking "Manage"in the assignements column for that staff member. Next, on the pop up choose "Models", choose the desired model and click "assign".
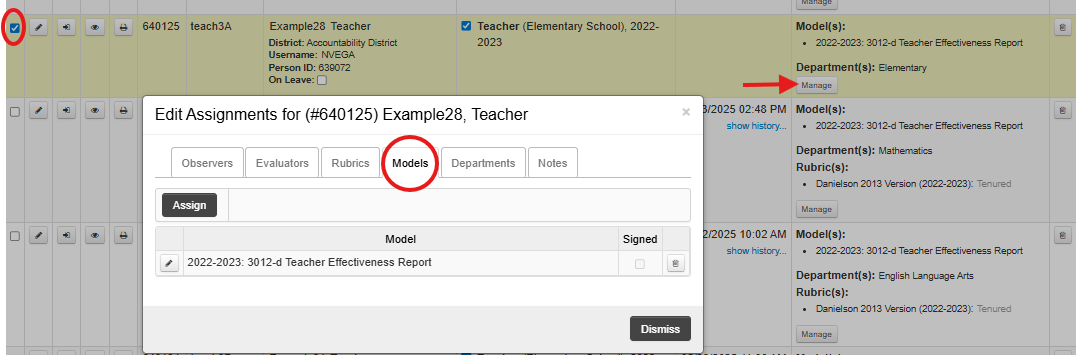
- To mass assign, select multiple staff members by clicking the box to the left of their names, then Click the assign button and select the desired model for the group.
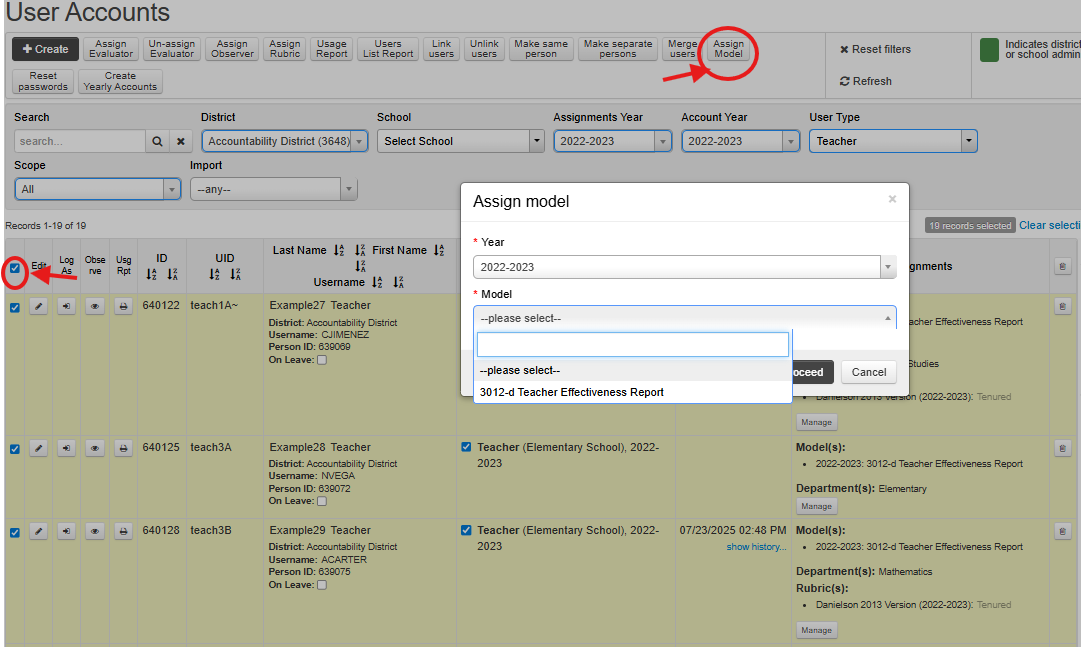
- Once assigned, you will find this staff member on the Teacher Effectiveness Reports page where this report will be made available to the staff member within eDoctrina.
The Yearly Report Data Entry page is the page where scores can be managed. Please take note that scores on this page can be manually entered or they can be produced from the OBSeRVE module and/or the Student Learning Objectives module within eDoctrina. Each district may manage this in their own unique way.
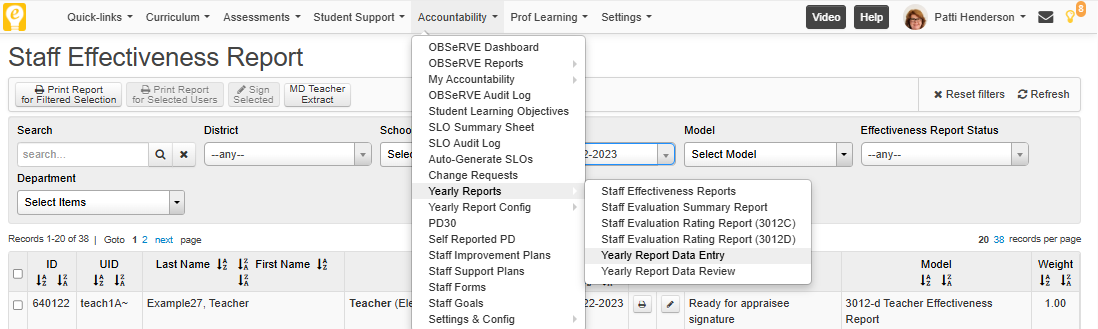
Next, it is time to get the Observations and SLOs scores into the TE System. Once this step is completed, your district will be prepared to produce reports for each staff member.
Some notes on configuration of TE models
- TE Models are configured in the Yearly Report Config menu
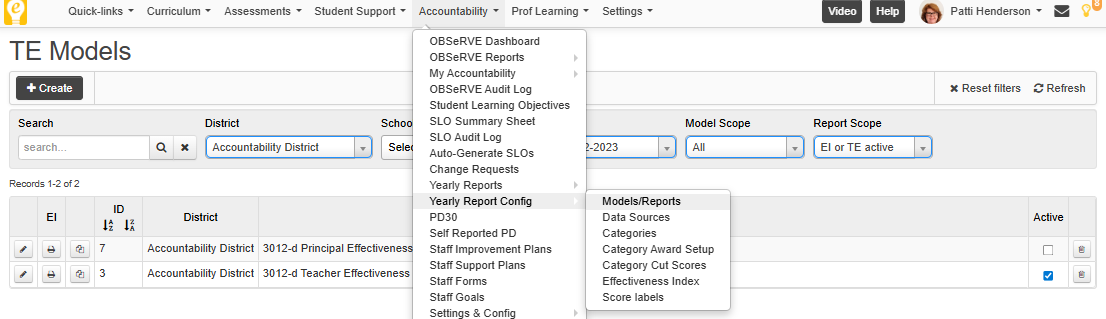
- If electronic signatures are desired, you can enable this in the model editor.
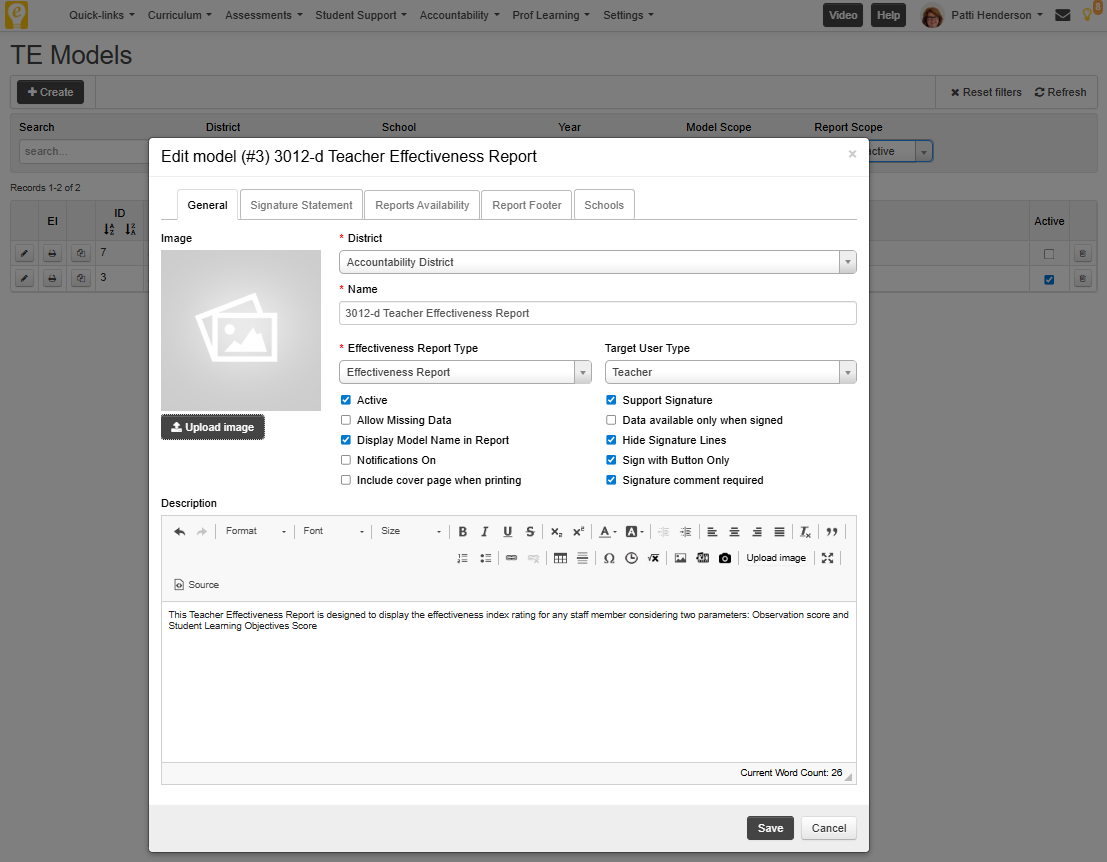
- If you would like to confirm cut scores and the effectiveness rating index, then you can always visit any one of these configuration pages.
- Observation and Student Learning Objective Scores have their own cut scores with your HEDI scale listed
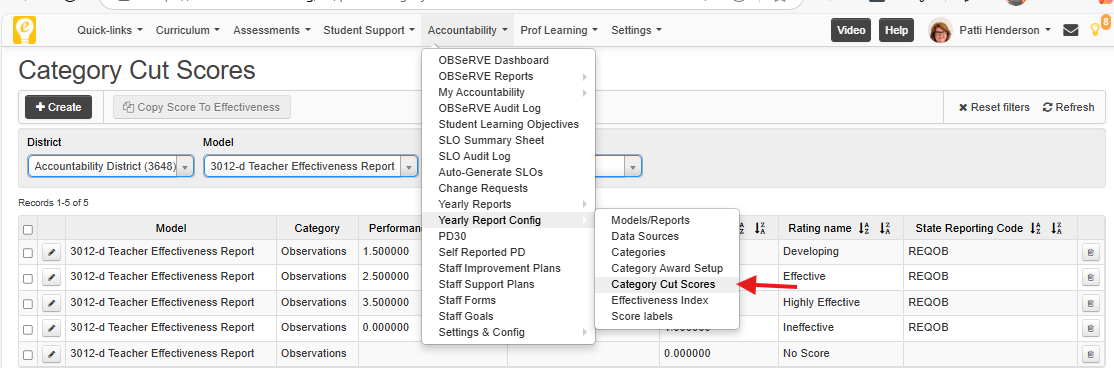
- The Overall Effectiveness Rating is then mapped in accordance with the cut scores for Observations and SLOs, respectively.
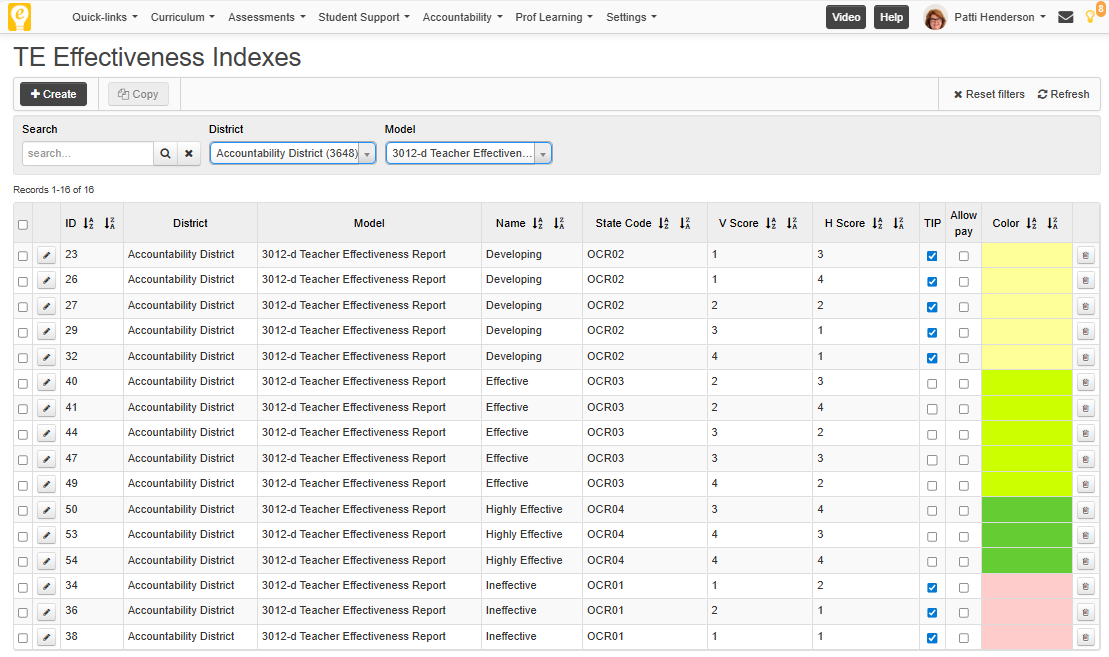
NOTE: If, at any time, you are unsure about the configuration, please reach out to the eDoctrina support team.
- Allow missing data when enabled allows reports to be viewed and printed even if there is some missing score for Observations or Student Learning Objectives. This is a great tool to prevent scores from being released to staff before both scores have been entered.
- Notification on is related to electronic signatures as staff members will receive an email when their report has been signed by an administrator.
- Support Signature is where electronic signatures are enabled. At this point, when enabled the report will require an admin signature first, then the staff signature.
- Data available only when signed is a feature that will prevent staff members from seeing a completed report until an administrator has provided their e-signature. This is a great work flow tool to ensure accuracy of published reports.
- Sign with Button Only simplifies the signature process as it only requires a button click to sign the form. Otherwise, the signing official will need their eDoctrina password to sign. This tool is recommended for any district utilizing single-sign-on as the eDoctrina password is not readily available to district users.
- Signature comment required will require the signing official to make a comment upon signature.
- Signature statement tab will allow you to include a disclaimer, directional text, or some other information to display on the signature pop-up for all signing officials to see upon applying their signature.
-
Reports availability tab allows you to chose which years the effectiveness report will be released to. If not available in the target year, the Teacher Effectiveness Report will display as "Report Released by District Administrator". This is a great way to prevent all users from seeing the report until it is completely ready to be published.
Key configuration settings
Reports Availability can be found by choosing "Accountability", then "Yearly Rport Config", then clicking on "Models/Reports" as shown below.
- Observation and Student Learning Objective Scores have their own cut scores with your HEDI scale listed
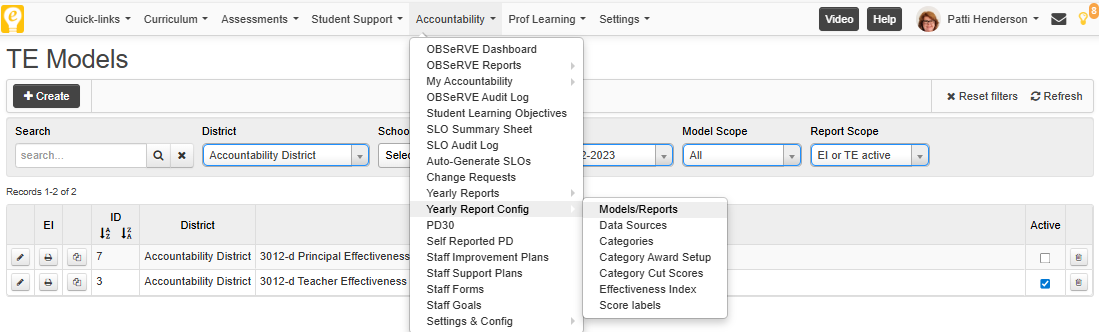
Then choose the tab "Reports Availability"
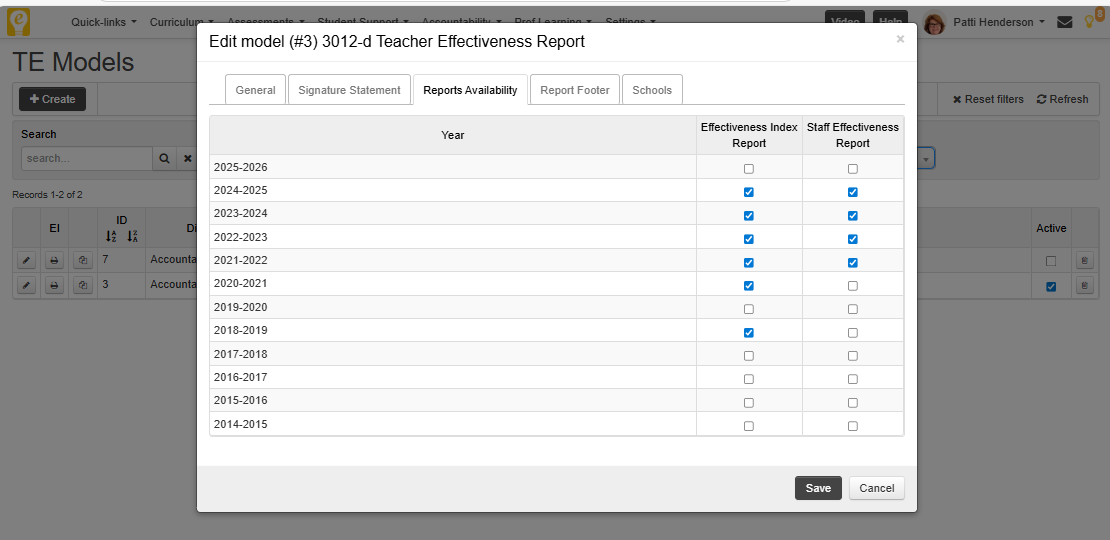
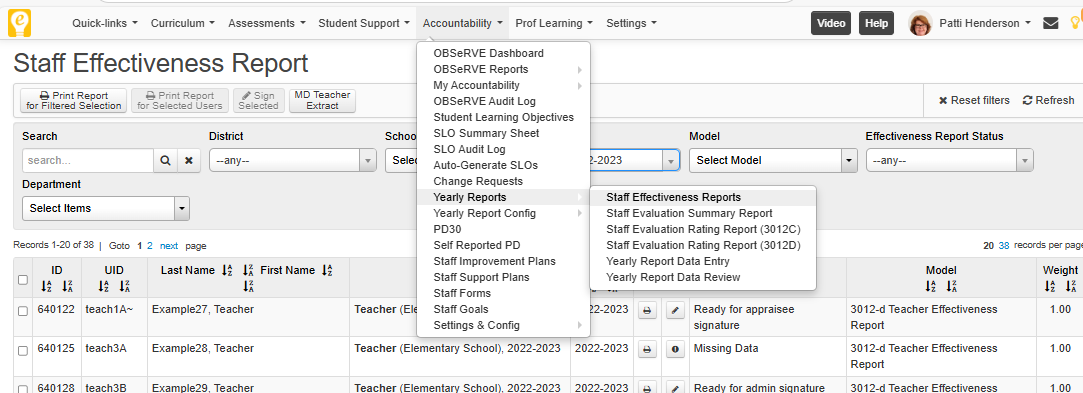
Managing & Finalizing Student Learning Objectives
The student learning objectives score is one of the two scores necessary to be able to assign an overall effectiveness rating to teachers or other reportable staff members. Each district may follow their own process, but the common theme that is seen across all districts under their respective APPR plan is that Regents teachers and Grade 8 Science teachers must write their own SLOs. Other teachers or staff members will simply be assigned the calculated district-wide growth score. All of this can be managed within eDoctrina as the Student Learning Objectives module comes fully loaded with the options to satisfy all district processes and workflows.
Ensuring SLOs are finalized means that the necessary steps have been taken to calculate the SLO score that will be included on the staff members Teacher Effectiveness Report.
If your district is not leveraging the Student Learning Objectives module of eDoctrina, this does not mean that you cannot use the Teacher Effectiveness System to generate the Effectiveness Reports for teachers and generate the Level 0 CSV extract. All this means is that SLO scores will be calculated elsewhere and can then be entered into the "Data Entry & Review" screen to produce reports in accordance with your APPR plan.
-
Finalizing SLO scores in eDoctrina means:
- Final rating has been selected for all reportable SLOs
- All reportable SLOs have been moved to a Final workflow state.
Selecting a final score for an SLO
Any SLO in the reported year should have a HEDI table linked to it. Once the student population is entered with associated target and final scores eDoctrina will recommend a Final Rating in accordance with the student attainment. It is the responsibility of the approving official to make sure that they review the SLO for data quality and then select the Final Score checkbox next to the respective score that will be assigned to this SLO. Please note that some districts will have this score automatically selected based on the change of the SLO status to some "Final" workflow state.

The recommended score, in most cases, will be based of the the logic of the Student Population table. This logic is configurable, but most SLOs will be based off of an achievement model where attainment for any individual student is based on their final score being greater than or equal to the target that has been set for them. In the example below you can see that one student missed the target score and the overall attainment percentage is calculated accordingly.

The key component to any SLO is the teacher(s) that are linked to them. Please note that one or many teachers can be linked to any SLO. For Regents teachers, it is likely that they will be the only one linked to their SLO, but in cases where teachers are grouped we may have many teachers linked so they all receive the same score (i.e.;District-wide growth score).

The other important checkbox is called "Calculate SLO weight based on students linked to the teacher's SLO". If this checkbox is selected, we will calculate the overall SLO score based on the students linked in the population. This allows for teachers to hold more than one SLO and their overall score to be calculated in accordance with the number of students in each SLO. This means an earned SLO score for a SLO with 100 students will be weighted more heavily than an SLO with 10 students.
If this checkbox is NOT checked, then eDoctrina will calculate the overall score for each teacher based on the earned score and the weight of the score that will be applied for that earned score respectively.
In the example below, you will find the linked teacher is set to a weight of 50% and the checkbox is NOT check. This means that this teacher will receive 50% of this SLO score and there should be another SLO created that will represent the other 50%. We often see this example if a teacher should write their own SLO for 50% of their score and then also receive the other 50% by being linked to the district-wide SLO score.

The part that will vary dramatically across districts is their SLO workflow state configuration, which is usually designed in consultation with a district leader so we can configure the eDoctrina SLO module to play within the constraints of district approved processes. The main goal of any SLO workflow states is to ensure that student rosters are loaded and target scores are set at the time when it is required for the district. The secondary goal of an SLO workflow state configuration is to set it up so those responsible for writing the SLOs and approving the SLOs are following the steps necessary to ensure data quality. We will find that many districts follow a process that is similar to the one seen below.

It is important to have your district leaders and fellow administrators aware of these workflow states as they have many controls. If you wish to visit or revisit these SLO workflow states, we recommend getting in contact with an eDoctrna team member to discuss the options and how they can be used to capture the most value out of your SLO process.
If you wish to take a look, please visit the Settings & Config menu for SLOs. Here you will find many options that define how each workflow state will behave in regards to notifications, visibility, availability, update access, and much more.

Generally, any district should be configured with at least two workflow states, with one being the "Final" or "Approved" state. This will help to send the scores to the TE System once we have all SLO in some "Final" status.
Managing & Finalizing Observation Scores
One of the valuable aspects of utilizing eDoctrina's OBSeRVE module is that the overall or final scores are automatically calculated in accordance with district approved methods. For a typical observer, the only task that is required of them is to complete the minimum assigned observation/evaluation events that are linked to the evaluation frameworks that are linked to each respective staff member. Once the required events are logged and marked as "Complete", eDoctrina will put it all together to produce all that is necessary to generate the end of year reports with all of the necessary data regarding a staff observation and/or other professional practice activities.
In a typical district configuration, the finalization of observation scores is usually a task that will need to be completed by a district admin or some system admin such that scores can be reviewed and confirmed before sending them over to the final evaluation reports and the eDoctrina TE System for state reporting to Level 0. Other districts may require school admins or building admins to finalize scores for those linked to their respective schools.
Either way, the task of finalizing observation scores will be performed from the Final Rating view of the OBSeRVE Dashboard.

The goal of this task will be to take the "Calculated Rating" and apply it as the Final Rating.
Most districts who will be applying the exact calculated value will need to get the Final Rating value into this column for each staff member.

Final Ratings can be manually entered in the cases where the calculated rating should not be the Final Rating, but the preferred process would be to utilize the "Apply Recommend Ratings as Final Ratings" button to mass assign the calculated ratings as final ratings.
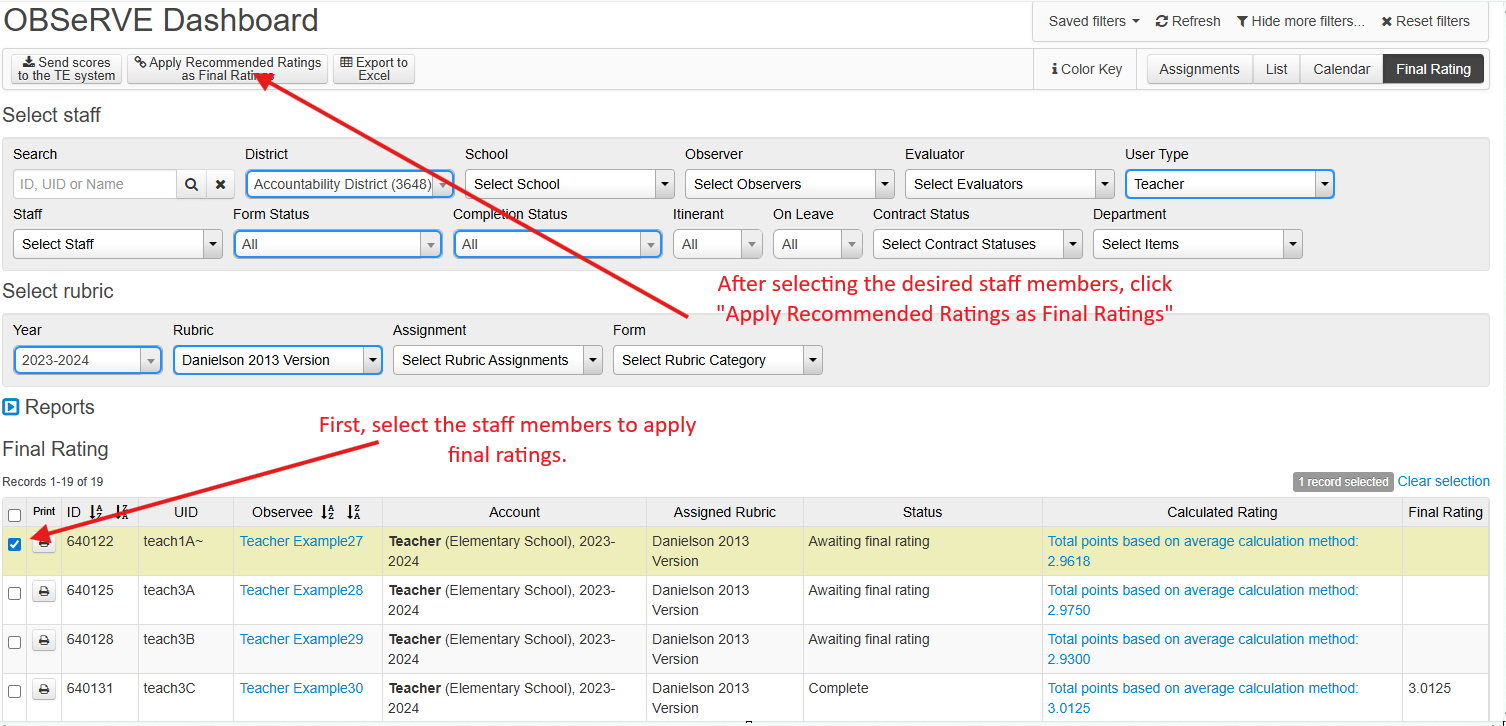
Other districts may require selection of the Final Rating in accordance with the cut scores determined in the configured evaluation framework. This method is usually employed when calculated scores are used as a reference and the teacher is to be assigned some preset value that could be Highly Effective (4 points), Effective (3 points), Developing (2 points), or Ineffective (1 point). This could also be configured to apply the earned score rounded to one decimal place. Here is a look at how this may appear for final rating selection in such configurations where the end user will have to select and Save the rating.
In both processes, the main objective each year would be to create a final rating for all staff members that will be reported to Level 0.
To better mange this, the OBSeRVE Dashboard Final Rating view does provide some information that can assist you with understanding the status and where the calculated rating is coming from.
Key Understanding #1
If the calculated rating link shows up as red, then it means that the minimum required observation forms have not been completed and the calculated rating could be incomplete.
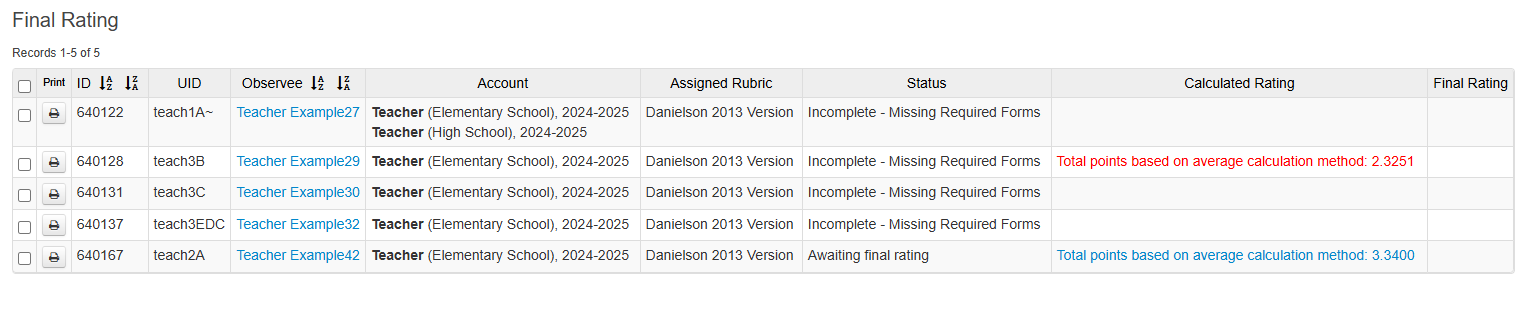
Key Understanding #2
Clicking on the link for the Calculated Rating should print out all forms that you have access to and show individual staff reports on how the calculated rating was comprised. Many districts will have a calculations page appended to the bottom of this report.
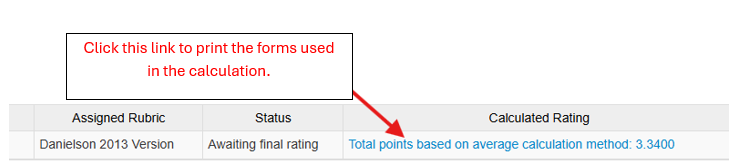

Key Understanding #3
Even though there are many filters, they all can be used to help you perform the tasks necessary. The "Form Status" filter will help to narrow down the list so you can work with only specific staff members in a status that is, for example, complete. Another valuable selection here would be to work with those that are "Require Are Complete" as you will know that the minimum requirements have been met for these respective staff members and a final rating is ready to be applied.
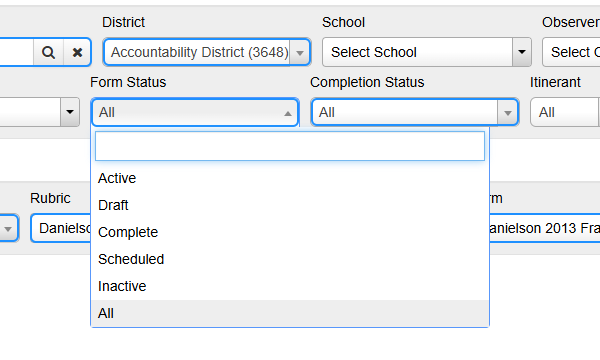
Key Understanding #4
Setting a Final Rating does create an observation form as a placeholder for the value. So you may need to trash this if the score changes.
Key Understanding #5
If a staff member is missing required items for any assigned framework, there is a risk that the calculated score will only be partial. For example, the Announced could be worth 90% of the total score and the Unannounced could make up the other 10%. If we are missing the Unannounced for any staff member in the configuration a score of 4.0 on the Announced will display as 3.6 because this is 90% of the total score. So if you are wondering why a score seems incorrect, the reason is most likely related to the fact that we are missing an observation for one of the required items.
Sending Observation Scores to Teacher Effectiveness System
The final step to completing or finalizing observation scores is to send the final rating from the OBSeRVE Dashboard to the Teacher Effectiveness System. The Teacher Effectiveness System, or TE System, is the eDoctrina module responsible for generating final evaluation reports and producing any state reporting files to submit to Level 0 (zero).
You can see in the image below that the observations score for this staff member has been finalized and has been sent to the TE System. This provides one of the two components to be able to determine the staff member's overall effectiveness rating in accordance with your districts cut scores. The SLO component will arrive either from the eDoctrina SLO module, or by manual entry or import of scores.

To send the final ratings for staff to the TE System, you will need to navigate to the "Final Ratings" view of the OBSeRVE Dashboard. Assuming that the prior step has been completed and final ratings have been "locked in", this step becomes rather simple as the task can be completed with a few clicks.
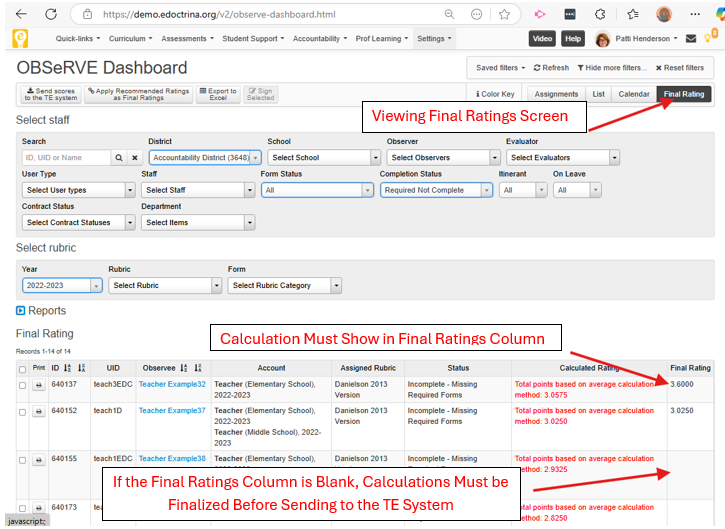
If all Final Ratings have been applied and scores are listed in the Final Ratings column, all that is necessary for this task to be completed is to send all necessary scores the the TE System by clicking the "Send scores to the TE System" button.

Please note that it is possible to send scores for the filtered selection (in the case where no specific staff member has been selected) or to send scores scores for specific staff members by selecting the check box next to their name.
It is a requirement to select the Rubric prior to sending because this defines how the scores will be sent and to which data source. In this case, we are sending the scores to the "Observations" data source to represent one of the two required scores to determine the staff member's overall effectiveness rating.
After the process completes, a pop-up result should appear summarizing what has happened. Depending on the district configuration, the number of sent items can be different than what is shown below.

To review what has been sent (or to find the location where these Final Score values were sent to), you can visit the "Yearly Report Data Entry" screen (known as the TE Category Scores page) where all staff who have been assigned TE Models will display.
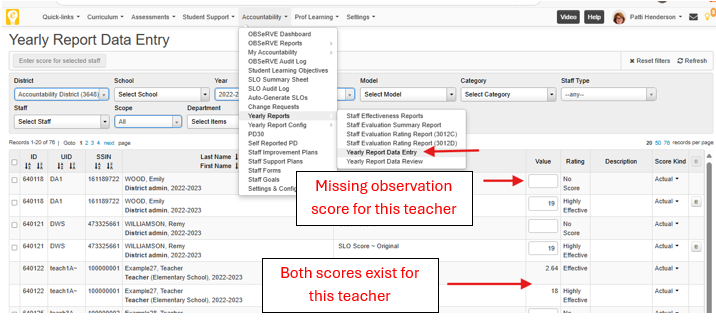
This page represents all data that is to be included on the Teacher Effectiveness Reports and the Level 0 extract. It is, by default, available to only District Admin users as scores can be updated within these fields as well. If you would like assistance, contact [email protected]
One of the more important steps in closing out an evaluation year is to produce a final teacher effectiveness report for those that are reported under 3012d. At this point in the evaluation cycle, your district should have scores entered in the TE System within eDoctrina for both the Observation score and the Student Performance Score.
If these data points exist, then reports can either be printing or made available electronically for the evaluated staff members to view.
You will find these final evaluation reports in the Staff Effectiveness System in eDoctrina.
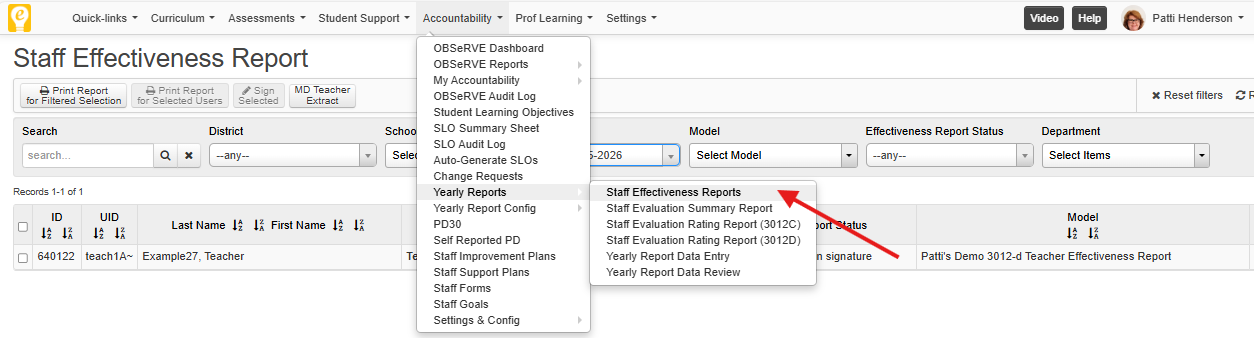
In regards to access to these reports, you will find that any District Admin base user will have access to all reports for all staff members. A School Admin base user will have access to all reports for all staff members in their school. Teacher base users access to their own report.
We should also note that reports available to evaluated staff members will be available within the same menu option indicated above, but they will also find the same report if they find the "My Yearly Evaluations" option in the top right corner when they click on their name.
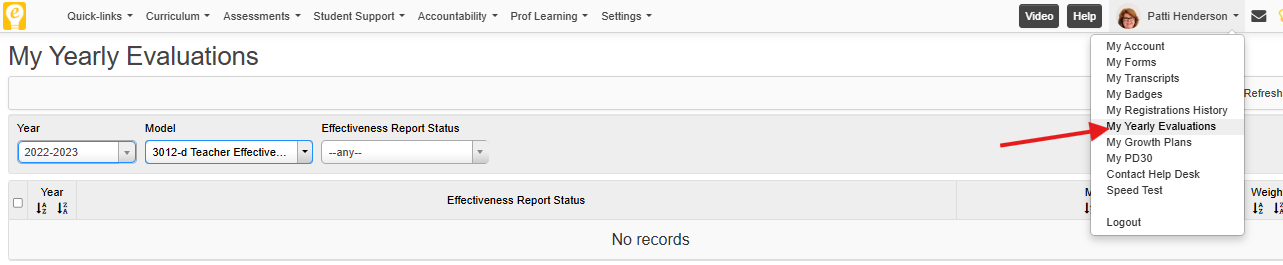
From an administrative perspective, it is important to understand how your Teacher Effectiveness Reports are configured as this will be important for access to the reports and electronic signatures. Depending on each reports configuration, you may find a unique look & feel that is specific to your districts work flow and/or preferences.
In the screen shot below you will find that this district is configured where they do not allow missing data on their reports and they leverage electronic signatures. You can note the status in the "Effectiveness Report Status" column, where you will also be able to filter accordingly.


Considerations in Configuration of TE Reports
All Teacher Effectiveness Reports are configured to your districts' preferences. To find the configuration options, look for the "Models/Reports" option in the "Yearly Report Config" menu located in the main "Accountability" menu.
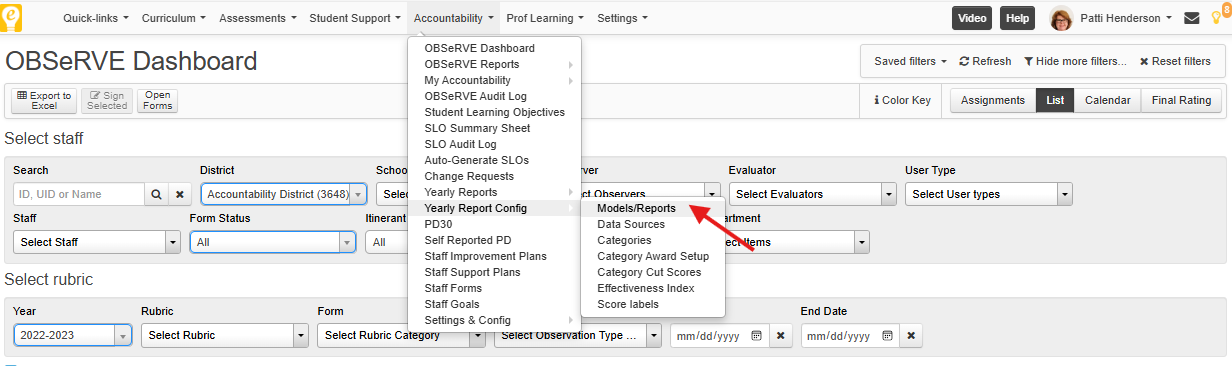
Here you will find your yearly reports that are available. Click on the edit pencil to find your configuration options.
On the General tab
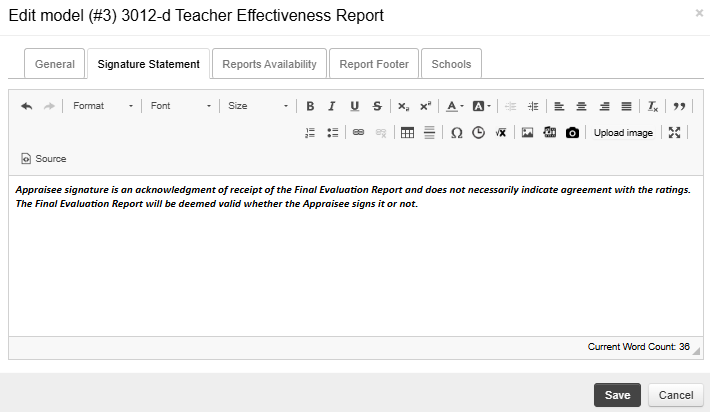
- You will find:
- Name: this defines the name of the report as it will display throughout eDoctrina.
- Effectiveness Report Type: NY districts will use the "Effective Report" option for teachers to align with the overall composite score calculation based on the two dimensions. If a more advanced report is necessary, then we have the "Custom Report" option, which should only be used after consulting with an eDoctrina team member to explain the tool and how it works.
- Target User Type: this defines the group that this report will be mostly used for and reports will reference this such target user. This is not required.
- Active: If the report is inactive, no reports will be able to be printed. If active, the report will be available. Most reports needed will be active and older reports should be made inactive.
- Allow Missing Data: For teacher effectiveness reports, there are two data points required to be able to generate a complete report. If "Allow Missing Data" is selected, then reports will be able to be printed in whatever status the report is in, which means users will be able to print to view their report if only the observations score is there. It is recommended to have this checkbox unselected as reports will not be able to be printed until both the Observations and Student Performance data points have arrived.
- Display Model Name in Report: If this option is selected, then you will see the model name on the report with the school year that the report is linked to. In most cases, this should be selected.
- Notifications On: this feature works in collaboration with having electronic signatures enabled as an email will be sent to the evaluated staff member after an admin has signed the report.
- Include cover page when printing: In most cases, a cover page has not be configured, but it is possible to include some extra details to your effectiveness reports by configuring a cover page. It is recommended to consult with an eDoctrina team member to best understand how this can be used to capture the most value.
- Add page break after cover page: If enabled, the cover page will be printed on page 1 for each staff member, followed by the effectiveness index report on page 2. For NY districts, it is recommended to use the page break in cases where a cover page is configured.
- Support Signature: If enabled, the effectiveness reports will be able to be signed electronically. The current signature workflow is one where some admin signs first, then the targeted staff member. Electronic signatures are a great feature to ensure quality and compliance.
- Data available only when signed: This feature works in collaboration with electronic signatures. If this option is enabled, the target staff member will not be able to view the effectiveness report until some admin has signed it. This option is a great option to prevent from exposing data electronically to staff members until some admin has signed the report.
- Hide signature lines: If a physical copy of an effectiveness report is necessary and actual signatures are required, this option allows for the Signature lines to be hidden or not.
- Sign with Button Only: This option, when enabled, will reduce the steps required to apply electronic signature to be only a button click (as opposed to entering your name and password to sign). This option is used to reduce steps and is actually a required item if your district logs into eDoctrina with some signle-sign-on(SSO) tool.
- Signature comment required: This feature works in collaboration with electronic signatures. Signature will only be accepted if a signature comment is entered.
- Description: Enter a description to explain the purpose of the model or any other notes for this model.
On the Signature Statement tab
- You will find:
- A place to enter the signature statement or disclaimer for electronic signatures.
This is the screen users will view when they login to sign the report.

This view will also appear above the signature records when printing the reports.

On the Reports Availability tab
- You will find:
- The main switch on whether an effectiveness report is available in a specific school year. It is important to have the "Effectiveness Index Report" checked in each year that your district will be using the report. If any report is not checked to be available in a specified target year, then the report will display as "Released by District Administrator". In this case, reports will not be able to be viewed or printed. Otherwise, the status will be displayed accordingly.
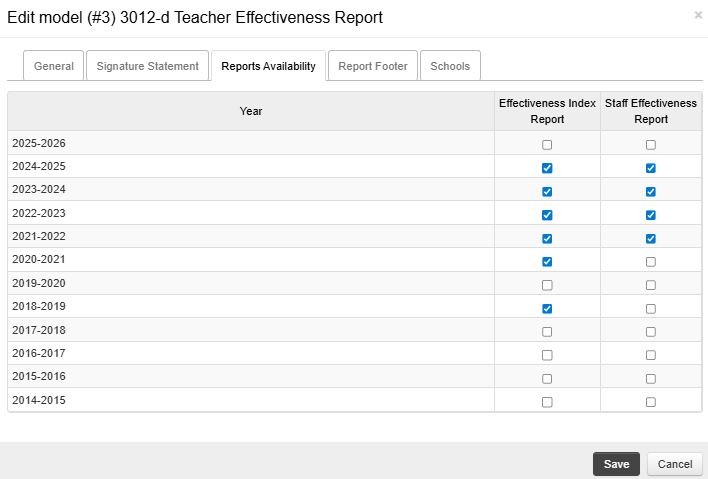
02.G. Linking Existing Units to a Curriculum Map
Curriculum Maps allow you to gather together all the units for a course so that they can be found and managed as a unified set. Use the steps below to bundle units together for each of your courses.
1) Click the Curriculum Map option from the Curriculum dropdown menu at the top of the screen.
2) Click the "Create" button on the Curriculum Map grid.

3) On the "General" tab, enter the following required and recommended fields:
Required Fields:
-
Name: The name displayed for all curriculum for a certain course (Example: "Grade 4 Math", "ELA Grade 1", "Chemistry", "US American History I")
- Description: Longer description of this curriculum map
- Year: School-year when this curriculum will be used
- Subject: general area for this curriculum
- Workflow State: status that determines if the curriculum map is complete and ready to use viewed by others. Values will depend on your district's configuration.
Recommended Fields:
- Course: Link one or multiple courses that will use this curriculum map.
- Grades: Link the grade level(s) that this curriculum map is intended for.

4) Click the Units tab
5) Click the "Link Units" button.

6) Use the search fields on the pop-up to find the units you wish to house within this curriculum map. You can select a unit by double-clicking it.
- Please Note: A unit can be linked to one and only one Curriculum Map. If a unit is already linked to a different map you can either unlink that unit from the map it is currently associated with OR you can copy the unit and link the copy to another curriculum map.

- Please Note: If you are not sure which units should be part of this curriculum map because the Unit names are not descriptive enough, you can open the Units screen and inspect your units more closely. Once you find the correct units you can copy the Unit ID numbers.

- Then return back to the Unit tab of the Curriculum Map and paste the Unit ID into the "Search" field and click the 'magnifying glass' icon to search for the appropriate unit.

7) Once the units for this curriculum map are all displayed you can use the 'up' and 'down' arrow buttons to arrange the units in the correct order. You can also rename your Units or update Start Dates and End Dates directly from this screen without needing to open the individual units.

8) Once your have made your changes, click "Save & Close"
9) Follow these steps for each course Curriculum Map that you would like to create.
As more assessments are added into eDoctrina, organization becomes more important to let your district staff be able to quickly find the assessment they are looking for in eDoctrina.
One of the more unrepresented tags is the "Assessment Type" selection. The assessment type is a required selection when creating and managing assessments; and let's you quickly filter to identify assessments that are created with a specific type.
As districts have grown in their usage of the assessment module in eDoctrina, it has become more important to tag assessments with the appropriate type that represents the nature of the assessment and it's administration to students.
As a result of customer feedback, it was requested that we limit the "high stakes" assessment types to a limited group of users (i.e., District Admin should only be able to select the "District Benchmark" option).
If you would like to learn more about this new feature and be guided through the best practices of using Assessment Types to capture the most value in your district, please reference the video below.
Unit Content Viewer
Click here to view the Help Video
The Unit Content Viewer allows a concise method for viewing, analyzing, and exporting the content from Curriculum Units. It is similar to the Scope and Sequence Report but offers more flexibility when displaying curriculum information.
You can access this screen by selecting Curriculum > Reports > Unit Content Viewer

Screen Overview
-
 icon: offers "Group by" and other display options
 - Curriculum Map: filter units that are displayed by selecting curriculum maps
- Unit Template: determines which templates are available in the Unit Content dropdown
- Unit Content: determines which content columns are displayed and the order they are listed
- More filters: offers additional ways to filter units such as by year, subject, grade, or course. Also includes the Show in name column which displays unit information under the Units column such as Course, Curriculum Map, Year, or Workflow State.
- Actions: exports the report to Excel or HTML
Steps to Create a Curriculum View
There are three main steps to creating a report on this screen.
- Select Units to include
- Select content columns to display
- Export to Excel or HTML
Step 1: Selecting Units
The easiest way to select Units is to use the Curriculum Map dropdown. Select one or more Curriculm Maps and all units that are linked to those maps will be displayed.
Please Notes: In order to use Curriculum Maps, your district will need to first create a set of maps and link the existing units to the appropriate map. There are several advantages to using Curriculum Maps including easier methods to organize, find, and display your curriculum units. For more information on Curriculum Map click HERE.
If you are not yet using Curriculum Maps, you can manually filter for your units using the options under 
- Year filter: select units by School Year The default will be the current school year.
- Subject filter: select units by subject area
- Grade filter: select units by grade level
- Course filter: select units by the course they are linked to
- Unit filter: Search for and select and select individual units you want to include
- Show in Name Column dropdown: this does not filter or select units. This setting determines what information is displayed undernearth the name of the unit in the "Unit" column.

Step 2: Selecting Content Columns
Once you have filters your units, you can now decide which columns of unit information you wish to display. The available options will differ based on which Unit Templates your district is using.
First select one or more Unit Templates from the "Unit Template" dropdown. The selected Unit Templates will display in the "Unit Content" dropdown and allow you to choose the fields from those templates.
PLEASE NOTE: if you are using Curriculum Maps, the Unit Templates will be selected for you automatically. This is another advantage of using Curriculum Maps.
Second, from the Unit Content dropdown, select the items that you want to display in the grid. The order that you select the unit items will determine the order of the columns in grid. You can reorder the columns by using the up and down arrow icons  . Remove columns by clicking the
  to the right of the item.
Notice that content items that are common to all units are displayed under the Unit attributes heading while elements particular to a Unit Template are displayed under the template name (example near  below)

Grouping & Sorting Units
To sort the rows, move your mouse cursor over the column headers and click the buttons to sort ascending or descending.

In order to group the rows, first click then use the Show in name column to select items to diplay in the Unit column. These selections will determine your grouping options.
Then click the icon in the top-left of the grid and select a Group By option.


Grouping by Curriculum Maps is highly recommended for a neat, organized display of units as shown here.

Step 3: Exporting Unit Content
Once you have selected your unit rows and columns and have grouped and sorted to your liking, it is time to export the curriculum view. The Curriculum Content Viewer offers two export options:
- Export to HTML:produces a scrollable, read-only report.
- Export to Excel: produces an excel file that can be edited.
To export your content view, click  in the top-right and then select either Export to HTML or Export to Excel

An example of an HTML export. Users can scroll through all content you have include and Export to Excel using the button on the top-right.

And example of an Excel export.

Utilizing the Level 0 (Zero) Export Button
After Teacher Effectiveness scores are finalized, navigate to Accountability>Yearly Reports>Staff Evaluation Rating Report (3012D), as shown below.
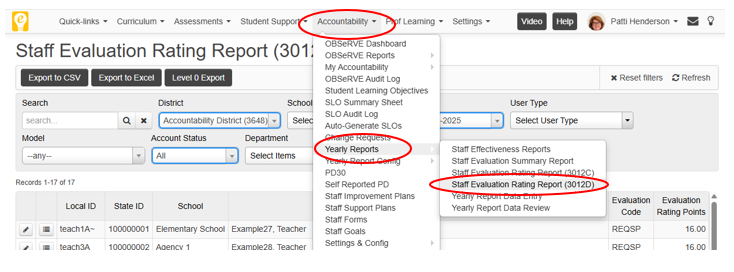
Select the desired School Year, Model, and Account status.


Upon completion of the Level 0(zero) export, the download is formatted as required by NYSED and ready to upload.
For assistance, contact [email protected]
Copying an Observation Rubric to a New School Year (with No Changes)
This document will guide you through the steps to copy rubrics from one school year to the next WITH NO CHANGES. If you need to make changes to a rubric, please contact [email protected] .
1.Navigate to Accountability>Settings & Config>OBSeRVE>Observation Rubrics
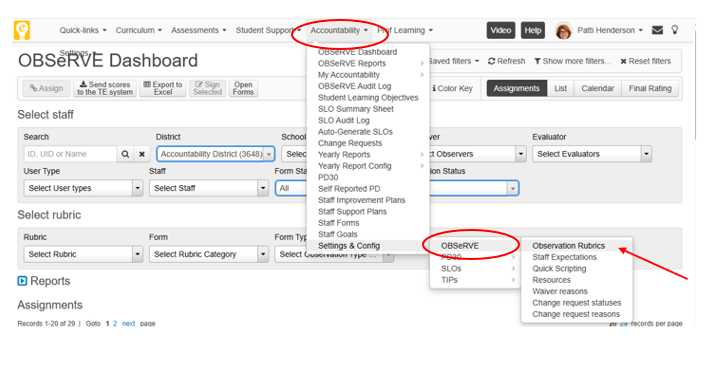
2.Click the Pencil icon, for the rubric you wish to copy.
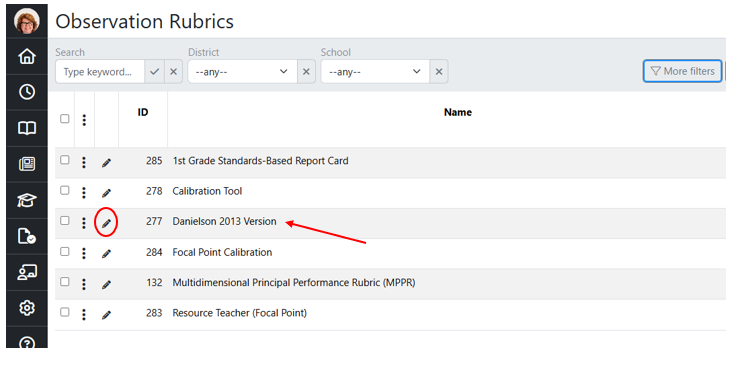
3.Next, verify you are viewing the Assignments tab. Copy the title of the rubric you wish to replicate, click on the three dots, choose copy
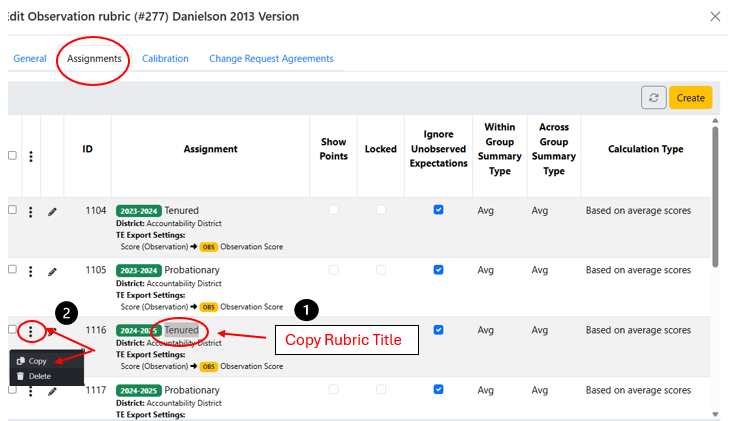
4.Paste the rubric title copied from the previous screen into the Name field. Your district name will pre-fill. Click the Year drop-down and choose the next school year. Then choose specific schools, if desired. Lastly, click the blue Copy button.
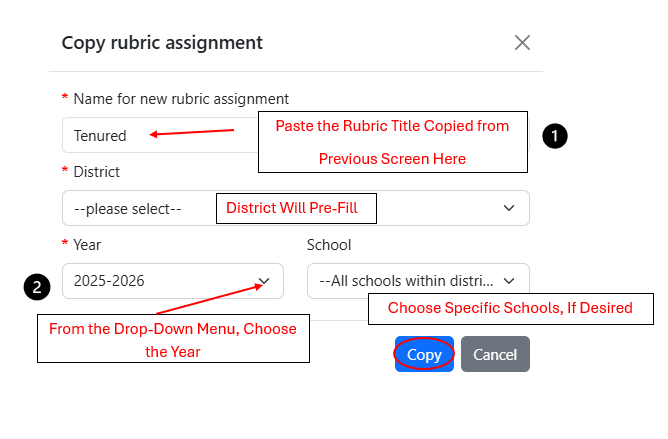
How to Mass Sign Teacher Effectiveness Reports
When observations have been completed for a all staff members or a group of staff members, there is an option to mass sign them. It is important to verify the accuracy of scores through the "Yearly Report Data Review" page before completing the mass signing activity. The mass sign activity is an option must be turned on for administrators. If your district wishes to mass sign teacher effectiveness reports, please contact [email protected]
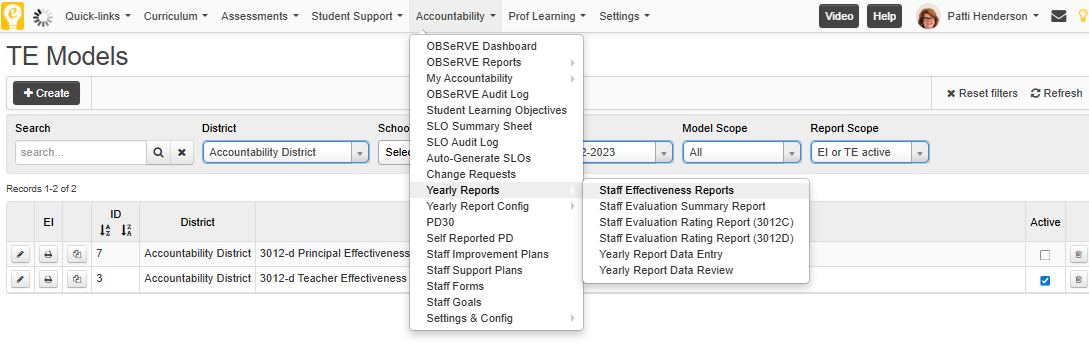
To access the "Mass Sign" feature, from the Accountability drop-down, choose Yearly Reports, then Staff Effectiveness Reports as shown in the screenshot above.
In the filters area, chooses the correct model and "Ready for Admin Signature" as shown below.
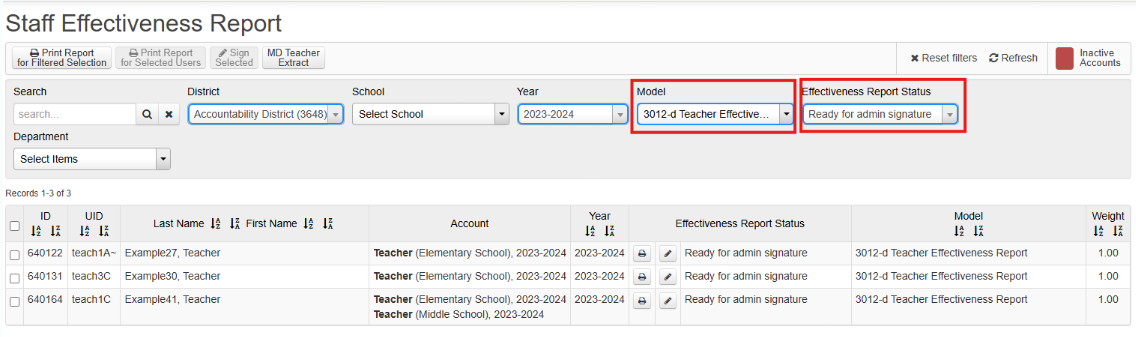
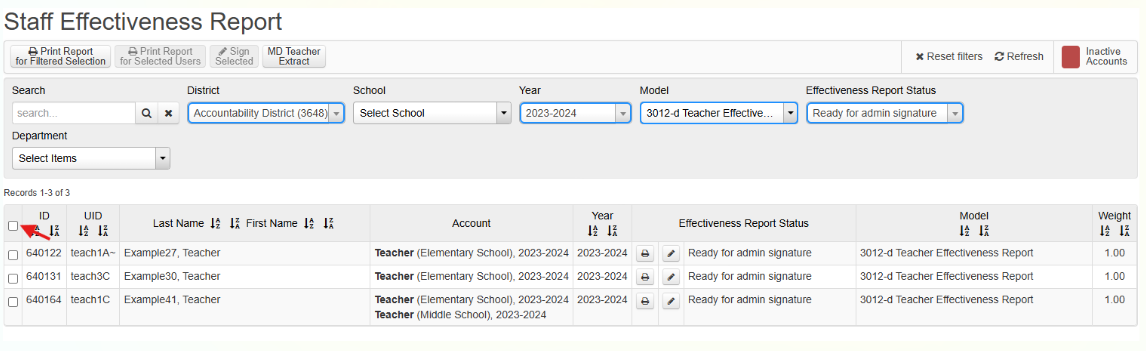
After desired participants are chosen, the "Sign Selected" box will be active. Click this command.

Complete the required fields on the "Signature Options" page. Note that comments are required. Click "Sign"

Once you click "sign" you will see a pop up that will allow you to view the signed report which shows the date, time, and name of the administrator completing the task.
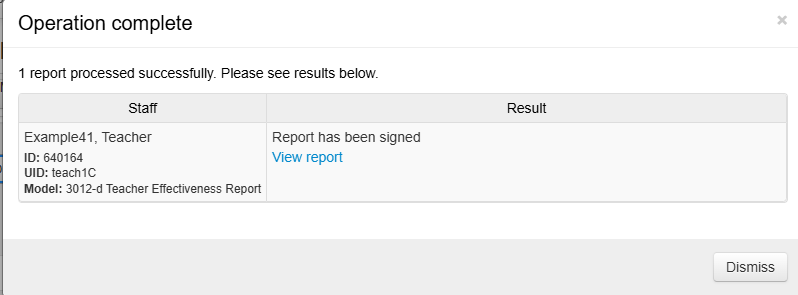
How to Make Staff Assignments
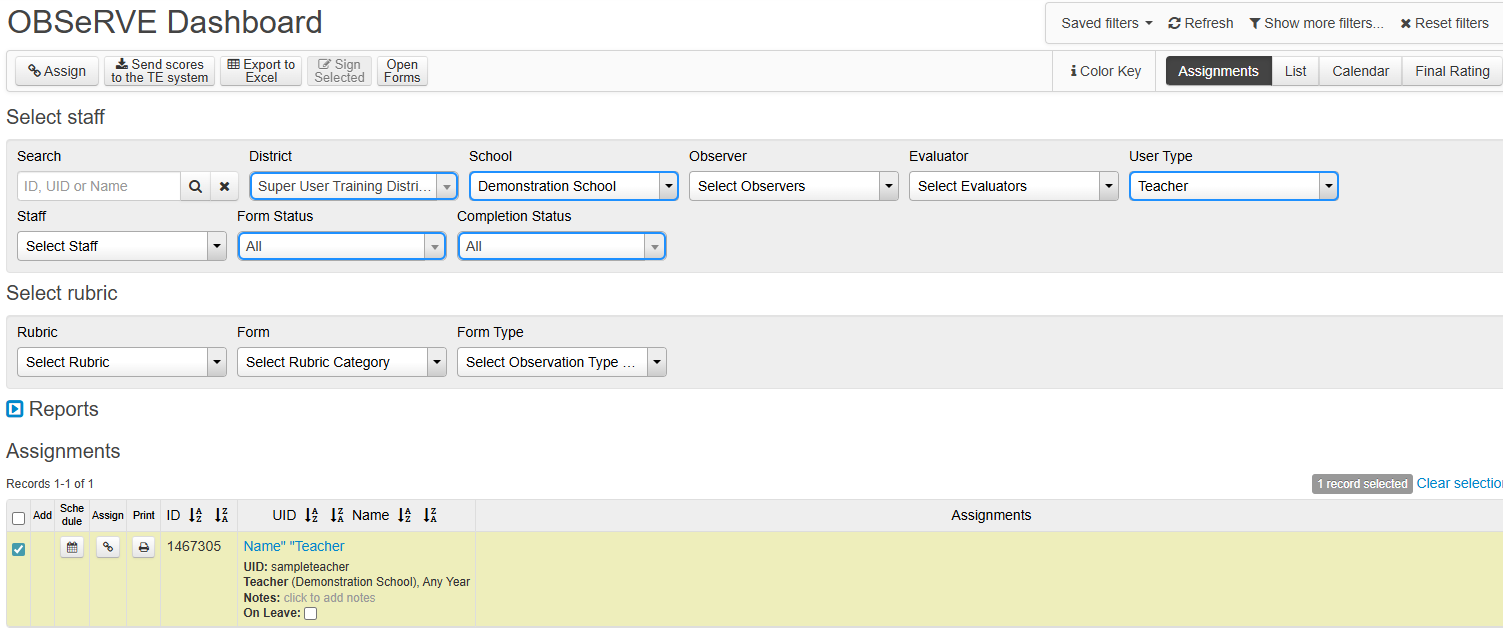
The most efficient way to perform this task for multiple staff members is to click the box allowing you to choose all staff members listed.
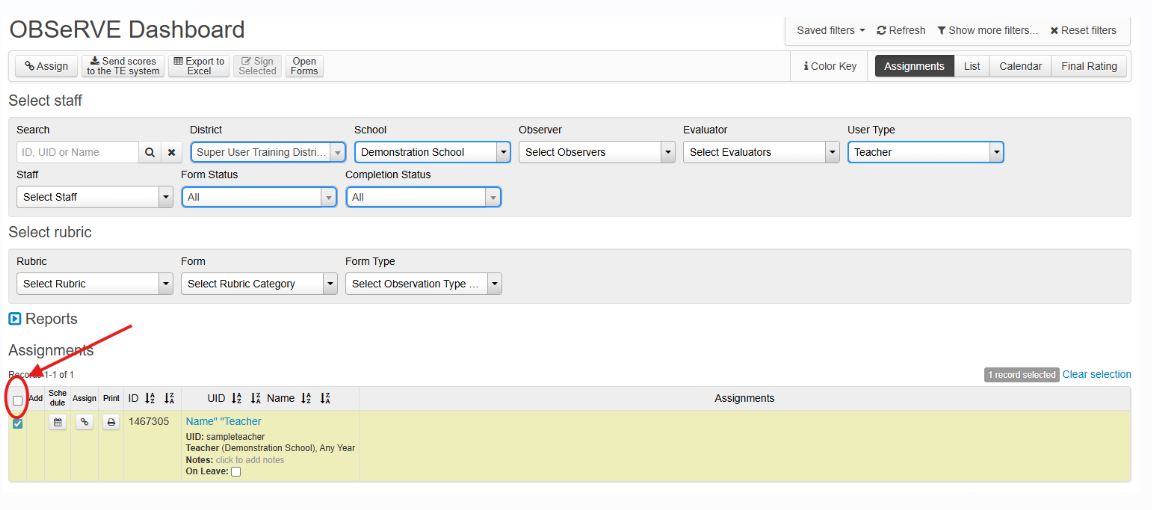
Next, click on the "Assign" button located on the top left of the screen. Next,click the items you wish to assign. Finally, click the "Assign" button in the pop up screen.
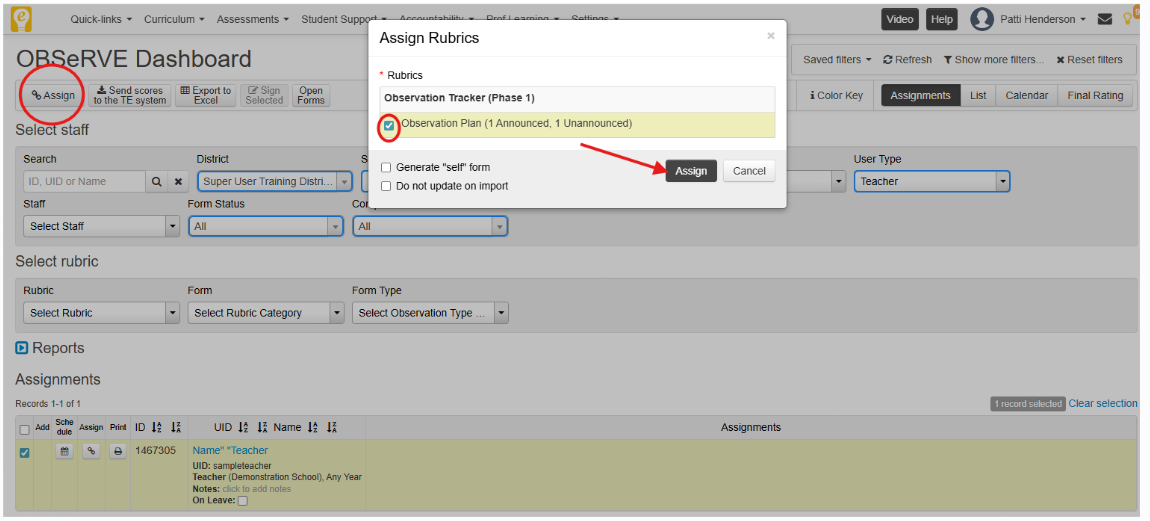
Accountability: Steps for a Qualified (non Administrator) to complete a Teacher Observation
eDoctrina's OBSeRVE module allows specific users within the district (usually School and District Admins) to observe, rate, and communicate with staff members at their associated school or district. There are situations in which a qualified non administrator might complete an observation for a teacher. In this case, assignments must be made by a district administrator to allow a non administrator to make required observations.
Starting an Observation with Assignments
It is a best practice to begin all observations from the Assignments layout of OBSeRVE Dashboard. Navigate to OBSeRVE Dashboard by finding the the link under the "Quick Links" menu in the navigation bar.
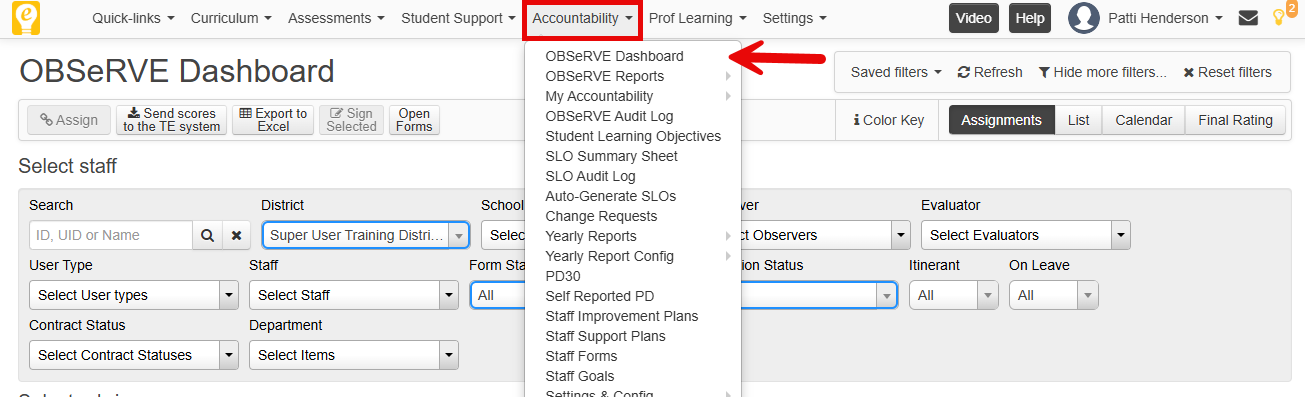
After successfully arriving at the OBSeRVE Dashboard, it is important to ensure that the Assignments layout view is selected because this is where observations will be managed if assignments have been made. While all filters have a utility that cannot be understated, it is ultimately very important to select the appropriate rubric in the filters because assignments will ONLY display for each selected rubric. If the appropriate rubric is not showing, the observer should contact an administrator for assistance.
If the assignments have been made and the filters have been selected properly, the required observations for each respective observee should display in the list in a manner that looks very similar to the image below. Each logged in user will only be able to find staff members that they have access to which is determined by role or specific assignment. If it is necessary to observe or evaluate a staff member that is not accessible, please reach out to a district admin or the eDoctrina team for assistance.
To begin a required observation, simply click on the appropriate to enter into the OBSeRVE Editor.
For information about how to use the observation form, please see our help guide regarding the Observation Form here.