 Save as PDF
Student Learning Objective (SLO) Editor
The Student Learning Objective (SLO) Editor is where all information regarding specific student learning objectives will be entered. Here is where all general and descriptive information will be logged, learning standards and proficiencies will be linked, baseline and evidence assessments can be linked, student population and related data can be entered and managed, and discussion comments can be made.
General Controls
Although SLO templates can vary, there will always be the same default controls offered in all SLOs. These exist to assist in completion of the common tasks that are performed by a typical user, such as printing, saving, and changing the workflow state.
-
Expand All/Collapse All View
One of the key components of the SLO editor is that it is broken up into sections. For each time that an SLO is edited, it is likely that only one or two sections will be worked on. To help nvigate through this, the SLO Editor offers a navigation bar that will jump the screen to the section that is clicked on.

It is also possible to Collapse All and open up only one of the sections at a time.

-
Save, Save & Close, Cancel & Close
It is always a good practice to Save changes as they are made. Although some districts may have auto-save enabled, clicking Save is always still recommended. Clicking will force all recent updates to be saved and stay on the same page. Clicking
  will force all recent updates to be saved and will exit the current browsing tab reutrning to the last visited screen. The
  button will ignore the most recent unsaved changes and exit the current browsing tab.
-
Redo & Undo Text Editing
The and
and  buttons should not be mistaken for back or forward buttons. This basic function of these buttons are to help with entering text in all of the available text boxes by allowing to reapply most recent removed text or remove the most recent applied text.
-
Printing
The button is a quick way to print the student learning objective as a PDF. Please review the help guide on Printing SLOs for more information on printing SLOs.
-
Exporting Student Data
The button will generate a spreadsheet the includes all of the students in the SLO population with their respective baseline, target, and final scores. Other details such as the student notes, the student UID, the student grade and a column the will state whether they achieved the target will also be included. Please review the help guide on Exporting Student SLO Scores for more information.
-
SLO Workflow State
The SLO Workflow states are usually configured in accordance with district SLO processes. It is important to update the status when necessary because there are lots of notifications and permissions that are linked to each state. While one state may be open for edit, another state may be locked while it is being reviewed or even if it is finalized. Some workflow states may require entry of specific fields. For example, all target scores may be required for each student to be able to submit an SLO for review. Administrators will have more options in their pull-down menu, while teachers will be limited to a few that are applicable. Teachers will only be able to move any SLO forward in the workflow states, not back. So if a teacher accidentally updates this, they may need to reach out to an administrator to return the SLO to a previous status. Please review the help guide on SLO Workflow States for more information.

-
Active / Trash
The toggle switch is the control on how any SLO can be made Active or Inactive (trashed).
General Information Section
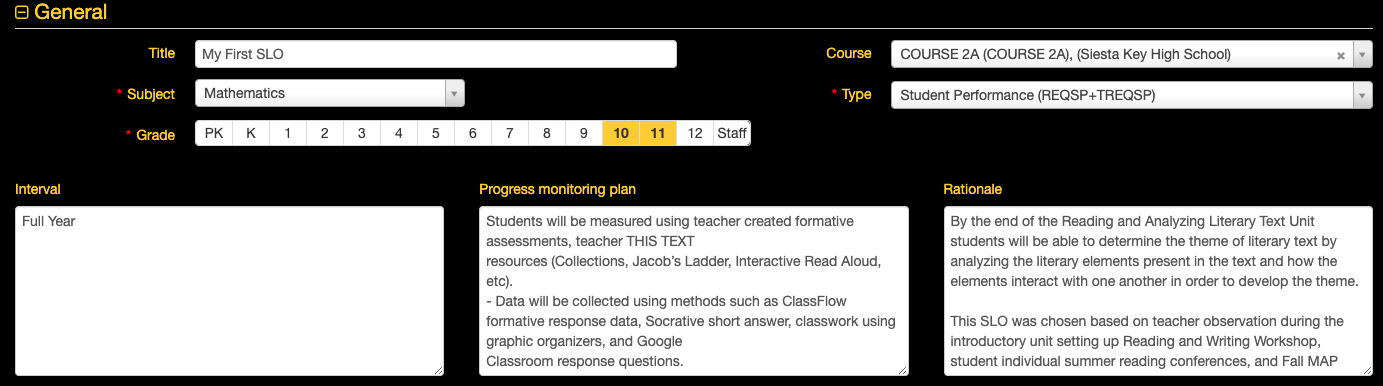
- Title: Although not required, providing the student learning objective with an appropriate name can help label each SLO. The title will be included on the printed SLO, some other reports, and on the SLO listing of the SLO Homepage.
- School: The school selection will only be available for users who are linked to more than one school. If unavailable, the school will automatically be selected as the logged-in user's school. If an SLO scaffolds across schools, it is possible to select "--any--" as the school.
- Subject: The subject is a required field and should be selected to align most appropriately with the subject area that the SLO is addressing. The options in this pull-down will be all subjects that are available within the district. For cases where an SLO may scaffold two different subjects, select the most applicable subject which is usually the one that matches the linked course.
- Grade: The grade selection is a required field. One or many grades can be linked to an SLO, so select all grades that apply to the student learning objective.
- Course: Start typing the course name in this field to find the available courses to link to the SLO. Only courses within the linked school, subject, and grade will be able to be selected. The course is a required field for only some districts, but there is built in logic in the student population that will indicate which students are not enrolled in the linked course and, in some districts, these students will be ignored in the overall attainment calculation. It is a good practice to link the appropriate course for the students that are included in the SLO. This is a single select field, so consider splitting an SLO into two or more if the student population scaffolds across more than one course.
- Type: The SLO Type is a required field and is vitally important for the categorization of the student learning objective and for proper end-of-year score calculations. Some districts may have a maximum number of SLOs that can be submitted per type, so if there is a limitation, simply try to use another type.
- Other Custom Fields: Depending on the state guidelines, there may be some other fields that need to be populated for each SLO. Being that these are custom, please refer to district guidelines if there is a selection that needs to be explained.
- Descriptive Text Boxes: Although most districts will see the same text boxes as what is pictured above, these descriptive text boxes can be different according to the preferences of each district and may follow some specific rules. These are not required to be filled out in accordance with eDoctrina limitations, but these may need to be entered to get the SLO approved by an administrator.
Teachers Section

Non-admnistrative users, such as teachers, will not have access to this section as it is usually only maintained by an administrator. Although teachers may not see this section, their names will be automatically linked to the SLO upon creation or copy of any student learning objective.
The staff selection tool on the right is available to filter and select one or many staff members to be linked to the SLO. Only staff that are linked to the same school as selected in the SLO will be displayed here. To link staff to this SLO, drag the name(s) into the left box. Once successful, their name will display on the left with 100% weight (if the district is using the weighting tool).
When should weighting of teachers be used?
The only occasions when a weight other than 100% should be used is when any staff member has more than one SLO and each of these are considered with a different weight. There is a lot to consider regarding how SLO scores are calculated as each SLO Type can be linked to one or many data sources, so it is recommended to make some changes and evaluate the result on the SLO Summary Sheet.
It is important to know that the checkbox for "Calculate SLO weight based on students linked to teacher's SLO" should be unchecked if it is desired to use this weighting tool. Otherwise, eDoctrina will calculate the weight of the final score of the SLO in accordance with the number of students linked to each SLO (this is actually a more common method). Once unchecked, the system will look at the selected final score and multiply this by the weight to produce the portion of the score that will contribute to the final score for the associated data source.
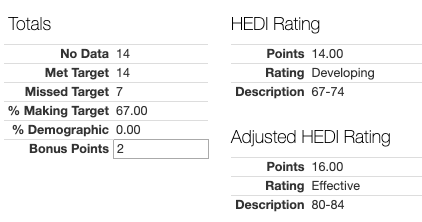
The Bonus checkbox will only be available to some districts, but this can be used if there will be a set number of points rewarded to the staff members linked to the SLO that will be added on top of the calculated attainment rating. If enabled, the bonus points need to be entered in the student population section and the points will be added to the attainment score to result in an Adjusted HEDI Rating.
Learning Content Section
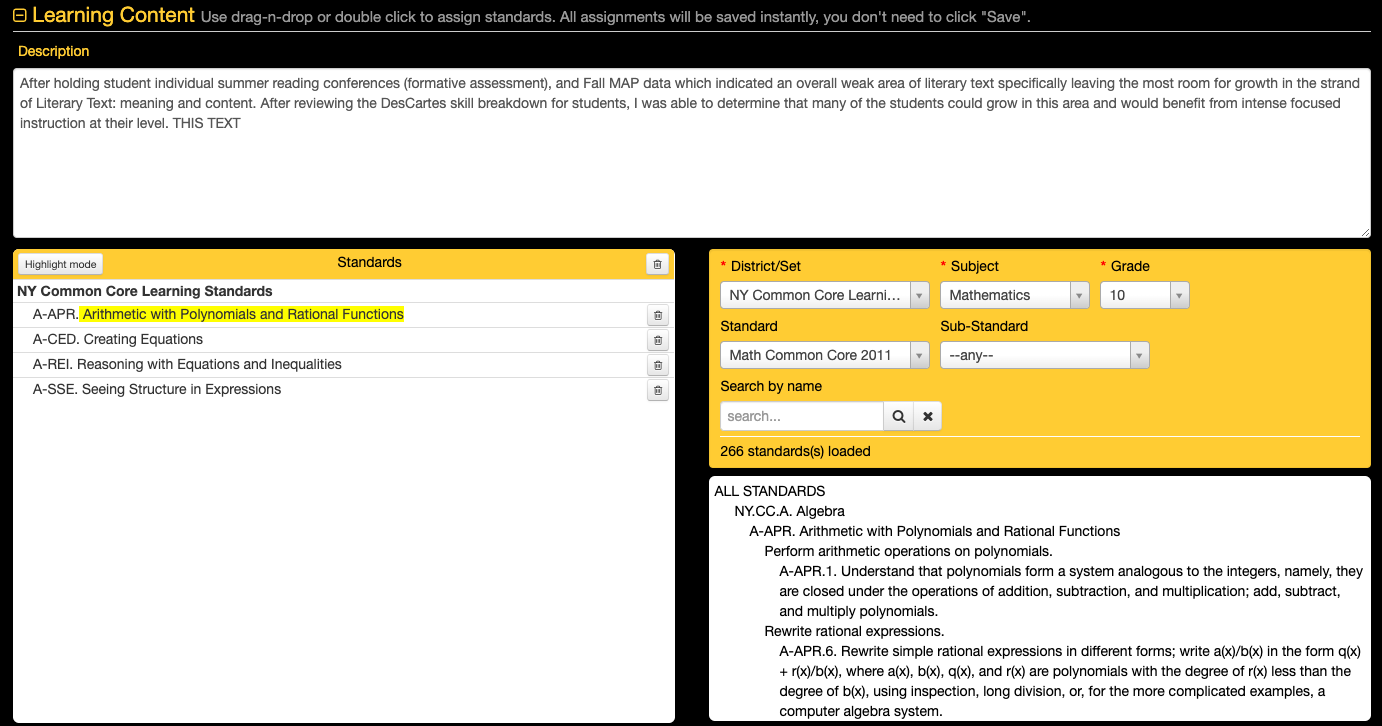
The learning content section is the staff members opportunity to explain what will be taught in relevance to the SLO and to link relevant learning standards or proficiencies.
Here is where the learning content description is filled out and standards are linked. Utilize the standards filters to locate and link a standard (or multiple standards) to the SLO by dragging and dropping them into the standards box on the left.
Once a standard is linked, it is also possible to draw attention to specific text by using the  button. Just remember that the highlighted text will not copy with the SLO.
Baseline Assessments Section
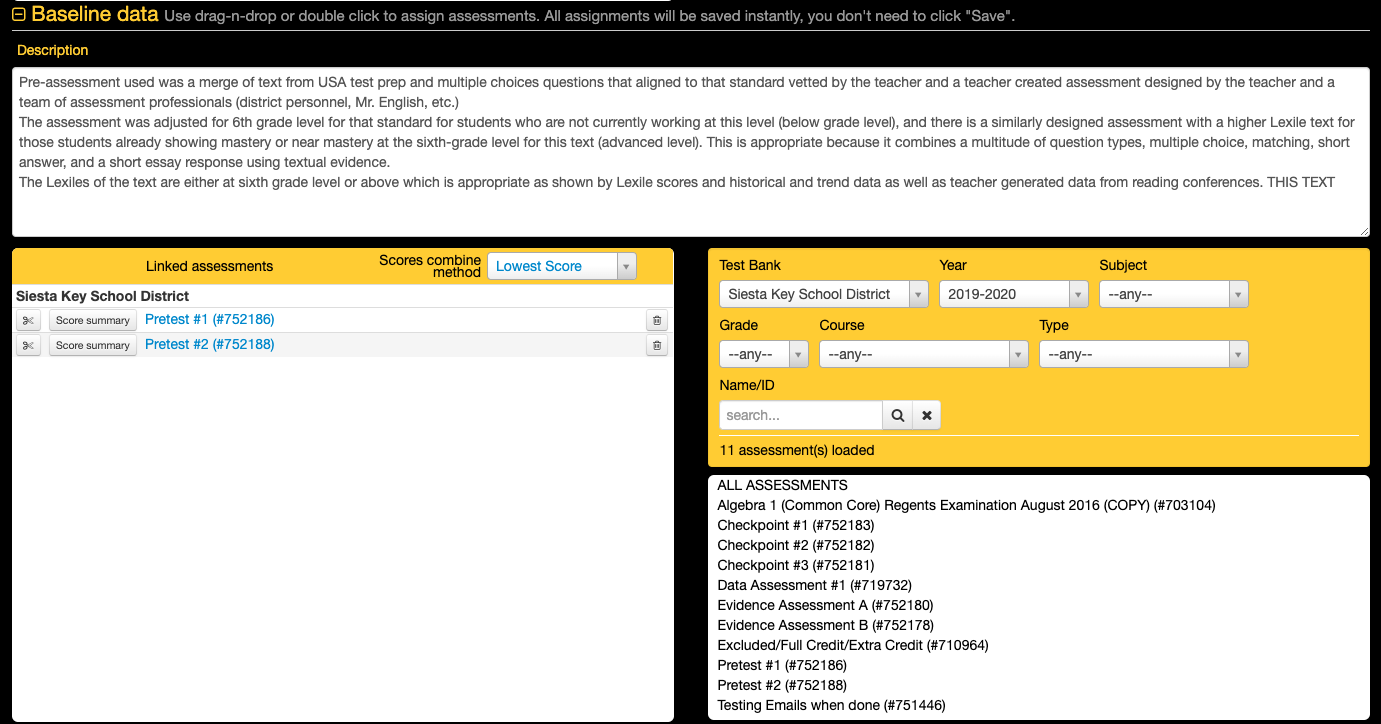
Although it is not required to use an eDoctrina assessment to produce baseline scores for students, the option exists so an assessment can be administered using one of the many assessment tools and the student data will automatically populate. It is also possible to enter scores manually, but this tool can save lots of time by using eDoctrina assessments.
To link a baseline assessment to a SLO, use the filters to find the assessment and drag and drop it into the Linked Assessments box on the left. If more than one assessment is linked eDoctrina will look at the Score Combine Method that is selected to use the Points Average, Percent Average, Lowest Score, or Highest Score
A baseline assessment can be linked to a SLO prior to data being imported or scanned into the program. The data will automatically filter into the SLO once available.
If there is a common set of assessments that will be used for baseline assessments, please consider linking these to a master assessment so all of the baseline assessments can be linked consistently with one action.
Evidence Assessments Section

The evidence assessment section functions in a similar fashion as the baseline assessments section, except for the fact that the student data will be populated in the evidence section.
Student Population Section
The student population section is where all students being measured in the student learning objective will be linked. Once the student is linked to the SLO there will be the opportunity to enter baseline, target, and final scores for each student.
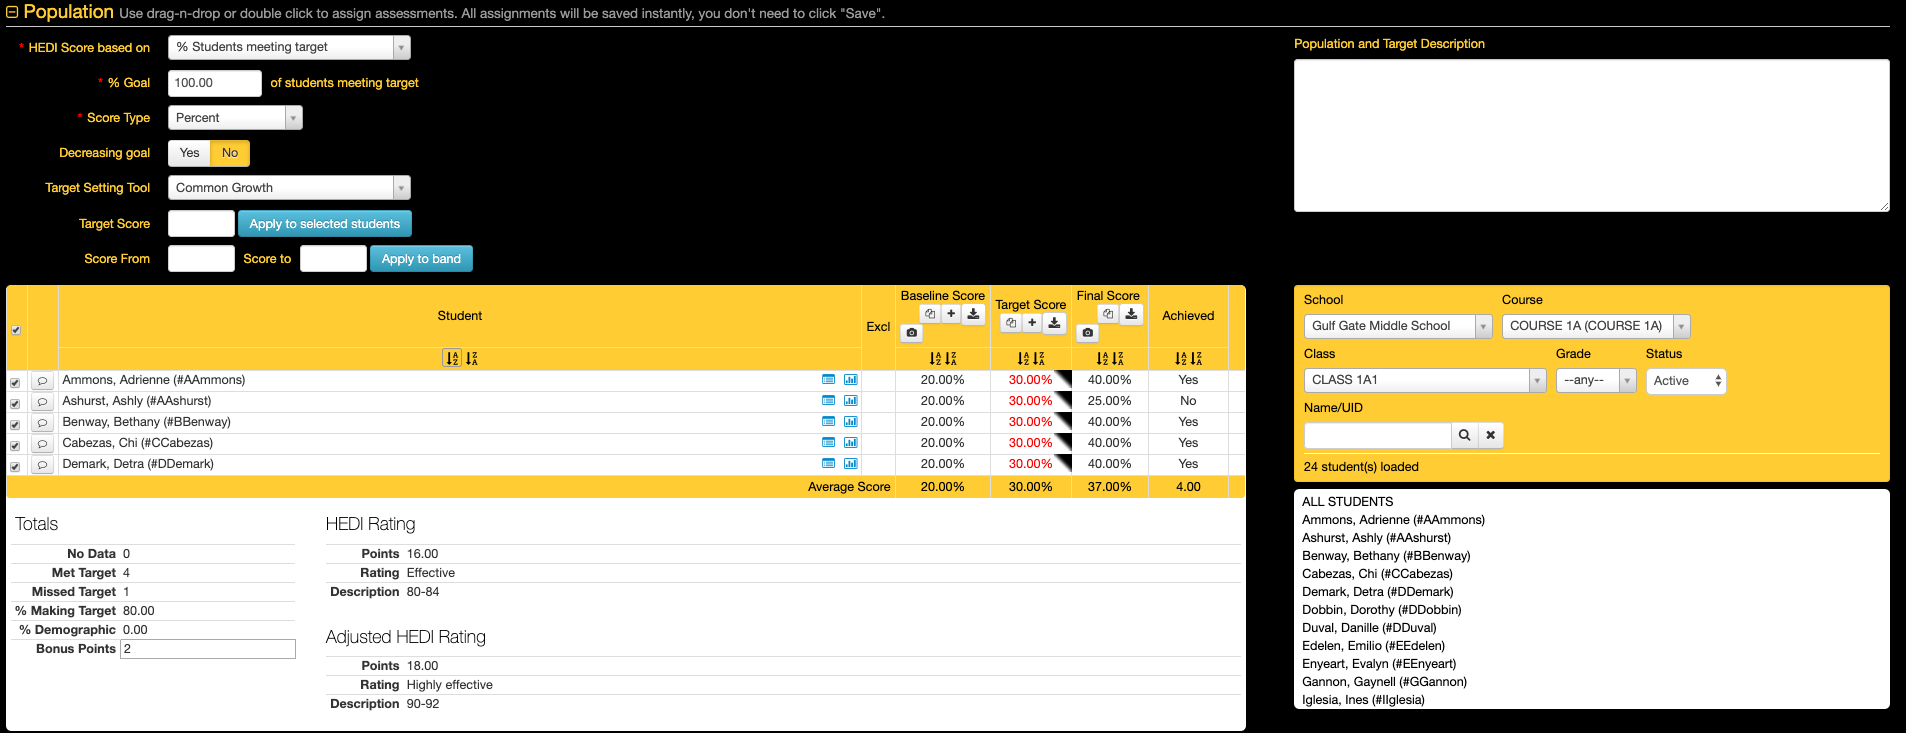
The options at the top determine the basic conditions on the type of data that is used and how the Attainment(HEDI) rating is to be determined.
-
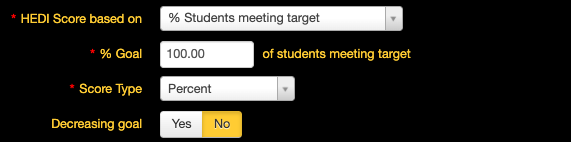
HEDI Score based on: This selection is one of the most important selections because it determines the score that will be used to determine what score will be mapped to the linked Attainment(HEDI) table.
-
% Students meeting target:
This selection will look at the final score for each student in reference to their entered target score. The resulting value will be the percent of counted students in the population with final scores greater than or equal to their target score. Required: Target and Final Scores -
Average on final assessments:
This selection will look at all of the entered final scores for the counted students in the population and provide an average value. Required: Only Final Score -
Average growth from baseline to final
This selection will look at the difference between the baseline score and the final score for all of the counted students in the population and then average these values to produce a final score. Required: Baseline and Final Scores -
Average % gap closed:
This selection will look at baseline score and the final score for all of the counted students in the population. The gap value is determined by the baseline score and how many points are needed to reach 100. The final score will be measured against this gap value. For example, if a baseline score is 60%, then the gap to 100% is 40%. If the student gets a final score of 80% then they would have closed 50% of the gap. These values are then averaged to produce a final score. Required: Baseline and Final Scores. -
Average achieved:
This selection will look at the final score for each student in reference to their entered target score. Although very similar to the "% Students meeting target", this varies as the score will be a value between 0 and 1. -
Difference from Goal:
This selection requires entry of a "% Goal" as this is the value that the scores are compared against. The values that this method looks at are the target score, the final score, and the entered "% goal" and provides an overall value that is the percent of students making their set target subtracted from the set "% goal". -
Average Difference from Target:
This selection will look at the final score for each student in reference to their entered target score and use direct subtraction to get the difference for each counted student in the population. These values will then be averaged to produce a final overall score.
-
% Students meeting target:
- % Goal: The entered % goal is only used in some calculation methods as some require that a goal attainment score is entered to find the attainment rating for the SLO. This is an optional setting that can be set to show/or not show when creating a SLO based on the district's SLO settings. This field would need to be formatted if teachers have written goals such as "45% of my students will meet their target." If it is assumed that 100% of students linked to the SLO are expected to meet the target, this option does not apply. **(If % goal is not 100 and is customized to another %, note that the HEDI table score will adjust accordingly.) This feature will not adjust the HEDI score UNLESS there is a setting that is enabled on the back-end for your district.
-
Score Type:
-
Percent
Selecting this score type will set goals based on the student's percentage shown in the Baseline Score column (ex. 5/10 would be 50%). If scores are hand-entered in the Baseline Score column, eDoctrina will treat them as percentages. -
Points
Selecting this score type will set goals based on the student's raw score shown in the Baseline Score column (ex. 5/10 would be 5). If scores are hand-entered in the Baseline Score column, eDoctrina will treat them as points, not percentages. -
Proficiency Table
Selecting this score type will set goals based on the student's grade-table score shown in the Baseline Score column. This option does not apply to hand-entered scores as it needs to reference the proficiency table in the linked baseline and final assessments. -
Scaled Score:
The scaled score option is only used when there are baseline and/or evidence assessments linked to the SLO that utilize a 2-dimensional proficiency table.
-
Percent
- Decreasing goal: This option allows users to set targets for students when target values are smaller/lower than the baseline score. For example, if a student runs a mile in 10:24 minutes for their Baseline Score time, the target time may be set as 8:45. If the Final score time is 8:30 then the student will have met the target.
-
Target Setting Tool: The target setting tool is available for all the various ways that a target score could be set for each student.
-
Common Growth:
The same percentage or point value will be added to all selected students Baseline Scores. Select this option and enter the amount you want each student to grow by in the Target Score cell and then select the "Apply to Selected Students" button. If using the Proficiency Table Score Type, enter the number of levels on the grade table you want the student to grow. So if you have 5 levels in the Grade Table and you want each student to "move up" 2 levels, enter 2 in the Target Score. Note that the value eDoctrina places in the Target Score column will be the minimum raw score needed to reach that target level. -
Growth to Mastery:
The same target will be set for all selected students, regardless of baseline scores. Select this option and enter the amount you want each student to achieve in the Target Score cell and then select the "Apply to Selected Students" button. If using the Grade Table Score Type, enter the relative number of the level on the Grade Table you want the student to achieve. For example, if you had a Grade Table that contains 7 separate levels ("grades") and you wanted all students to achieve at least the 4th level, you would enter a 4 in the Target Score cell. Note that the value eDoctrina places in the Target Score column will be the minimum raw score needed to reach that target level. -
Differentiated Growth:
The user must manually enter a target for each student. Note the Grade Table score type option should NOT be used with Differentiated Growth. If you want to base targets on a grade table, select the Points option and use the minimum scores required to reach a particular level in the grade table as the targets. -
Other:
Same as differentiated growth. -
Gap Closing:
Only used with Percent values. This will close a certain percentage of the gap between the selected students’ baseline scores and 100%. For example, if you select Gap Closing and enter a value of 40% and a student had a baseline score of 20%, the target will be set at 52%, calculated as shown:- Gap = 100% - baseline score = 100% - 20% = 80%
- Percent of Gap = Percent Increase x Gap = 40% x 80% = 32%
- Target = Baseline + Percent of Gap = 20% + 32% = 52%
-
Percent Growth:
This will increase the selected students’ baseline scores by a certain percentage. For example, if a student had a baseline score of 50% and you selected Percentage Growth with a value of 25%, the target would be 62.5%, calculated as follows: Note the Grade Table score type option should NOT be used with the Percent Growth option.- Increase = Baseline Score x Percentage Growth = 50% X 25% = 12.5%
- Target = Baseline + Increase = 50% + 12.5% = 62.5%
-
Common Growth:

- Student Notes: Depending on the workflow state of the student learning objective, the option to add a note may be available allowing both the teacher and the administration team to log comments about students in the population of the SLO. These notes will export with the student data if they exist. Once a note has been entered for a student, the callout button will change to show that there is an existing comment.
-
Student Metadata: Depending on district settings, one or many of these metadata options will appear next to the students in the population.
- The
 means that the student has some extra demographic information that may be worth considering. This will only show if the student demographic information exists in eDoctrina and does require some minor configuration steps in the district settings to decide which demographic information should show here.
 - The
 is a way to create a student goal for the selected student where a specific goal can be set and progress monitoring and intervention data can be logged. If there has already been a goal created for the SLO already, then this button will open the student goal for further data entry. This is a great way to ensure at-risk students work towards meeting the SLO target.
 -
The
 icon will open up an assessment data report for all assessments that are in the same subject area as the student learning objective. This is a great resource to get a quick snapshot of how the student is performing in all related assessments and provide a more informed approach to setting the target score.
- The
-
Tools for Baseline, Target, and Evidence Assessment Scores: Depending on district settings, there may be some tools available for getting scores entered more quickly or to update the nature of how scores are considered.
- The
 button allows a user to scan data directly into the system for this assessment using our document camera scanning option and WEB answer sheets. Please note that the baseline or evidence assessment will need to be linked to the SLO.
- The
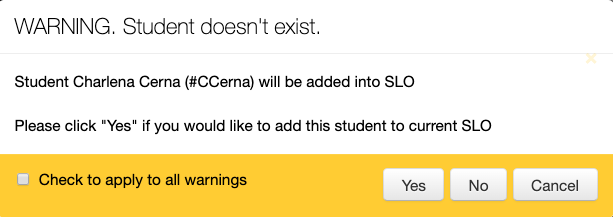
 button allows a user to import data directly into the baseline, target, or final scores by using .xls or .csv file that contains the student data in the first column and their respective score in the second column. The great part about entering data this way is that any student that is within the dataset can be added to the the student population automatically, which means this could be a great way to enter baseline scores. Notice in the image below that each student that is not currently in the student population will generate a warning message asking whether the student in question should be added to the population or not.
There where also be a warning message presented for students that already exist in the population if the imported score differs from the existing score providing the end-user the option to choose which value should be used as the actual score.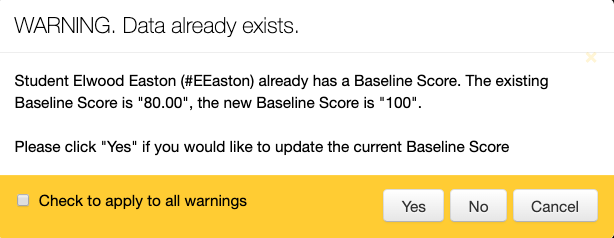
Once imported successfully, there will be an import result pop-up message containing information about the import and any error messages that may have been encountered resulting in lines being skipped. Some of the more common errors are shown in the image below.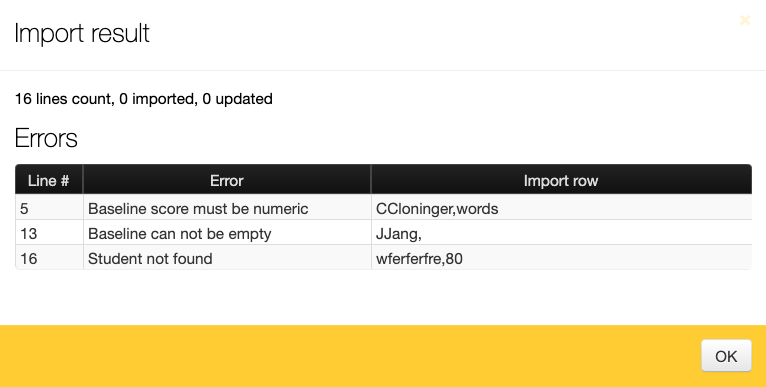
Please remember that if there is a baseline or evidence assessment linked to the SLO and there is existing data for any student, then this score will be the one that counts. Any imported or manually entered scores will only be for the SLO and will be pushed to the background when data shows up in a baseline or evidence assessment. It is possible to have mixed data within the population so some students can be measured using an eDoctrina assessment and others can have imported or manually entered scores (there just can't be both methods for the same student - The
 button allows a user to enter multiple entries for both the baseline assessment and the target score. Once more than one column is added for either the baseline or target, there will be some changes in the behavior of how some features of the student learning objective. For example, when using the target setting tool, it will be possible to select which score(s) to base the logic on (lowest, highest, average, etc..).
- The
 button will exist for only some districts as the function is controlled by a district setting. When enabled, this copy action allows for baseline, target, and final scores to be copied from another existing SLO into the current SLO. This will only work for SLOs that have scores not based on a linked eDoctrina assessment.
- The
Attainment (HEDI) Table Section
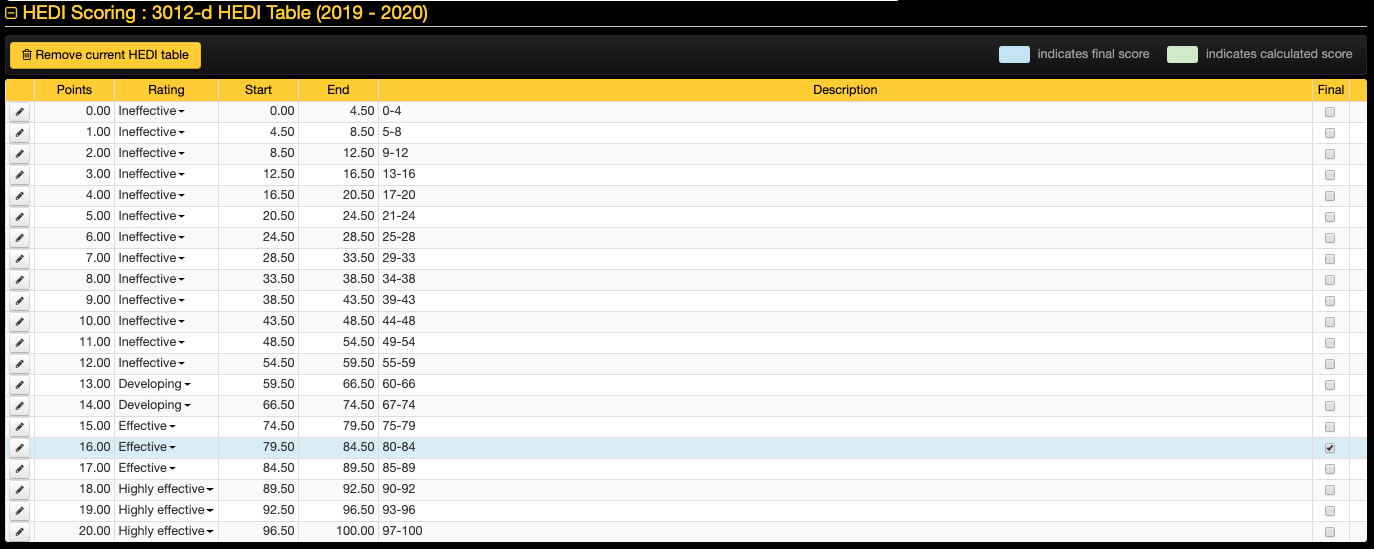
The Attainment (HEDI) Table section is where the calculations of the student learning objective are mapped to a rubric score or attainment value. These HEDI/Attainment tables can vary greatly by state, by district, and even by each SLO, so it is important to link the appropriate table such that the SLO is scored properly. If a default has been set by the district, all newly created SLOs will be automatically linked to this the set default table, which means setting a default can save lots of time. Access to add or update the table depends on the SLO workflow state, so there are some statuses that will not allow modification here, while others do.
If an attainment table is not linked by default, a user can select the appropriate table from the "Copy Attainemnt/HEDI table from" dropdown menu. This will link the selected table to this SLO.
In accordance with the linked table, the sytem will automatically highlight the calculated value in a GREEN background. Once a final score is selected for any of the rows, then the background will update to BLUE.
If an SLO is to be counted towards a staff member's student performance score, a Final score must be selected. There are some districts that have these final scores selected manually while other choose to have this final checkbox selected when the SLO workflow state is updated to some final status.
Discussion Section

The discussion section is optional and is a great place to document feedback/comments about the student learning objective. Depending on the district, this discussion board can be made available to only administrators, or it can used to be an open discussion between the staff member and the administration team. Once a comment has been posted, an email notification will be sent.
Attachments Section

The attachments section is designed for linking any additional documents or resources related to the student learning objective. Documents can be attached by both teachers and administrators using the  button, or resources that can be found by visiting a specific website can also be linked using the
  button.
Changes Audit Section

This changes audit section documents any workflow state changes that were made to the SLO by all users by displaying the author's name, the date of the change, the action name, the old value, and the new value. This is a great place to check investigate when an SLO was moved to a specific workflow state and by who.