 Save as PDF
The OBSeRVE Dashboard
eDoctrina's OBSeRVE module is designed to be a central location for everything related to staff observations. This page allows School and District Administrators to observe, rate, communicate with staff members, and monitor the status of accountability data throughout the year. After a district has been configured with their observation rubrics/forms and the appropriate assignments have been made, this dashboard will be the central location for observers to visit for anything related to observations.
After the observation rubric(s) in the district have been configured accordingly, it is important to understand how these rubrics can be put into use. If more information is needed on observation rubric(s) set up, please visit the help guide on How to Setup an Observation Rubric.
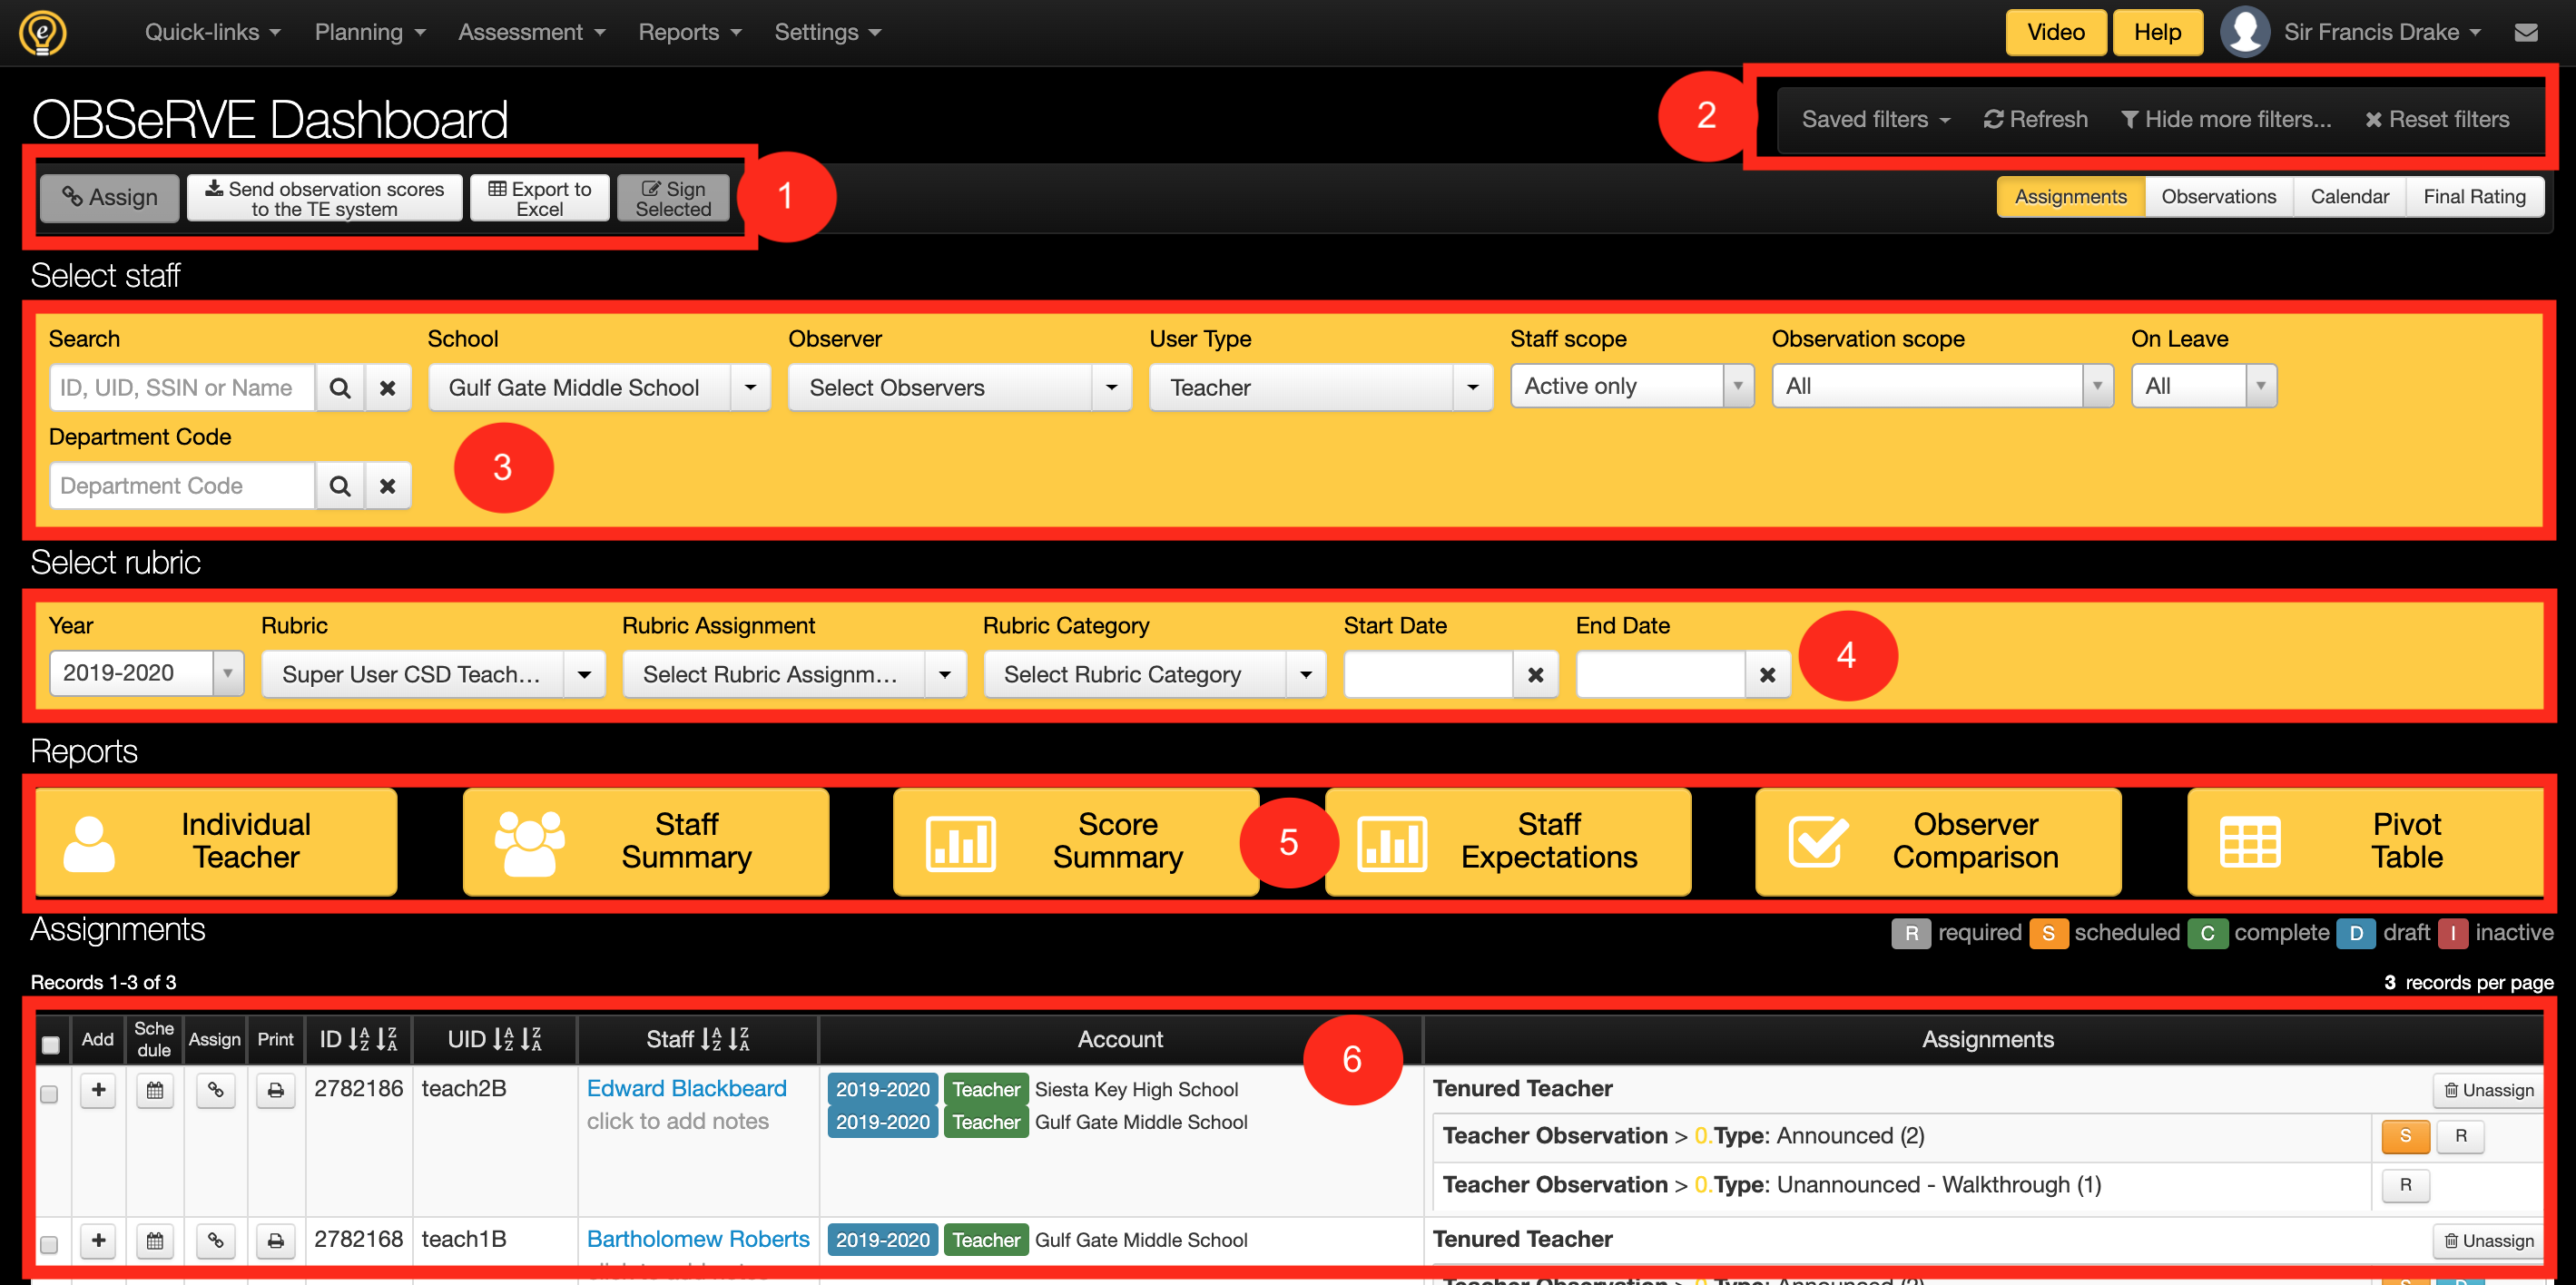
Assignments Layout
In most cases, there is a required number of each type of observation for each observee in the district. In all cases, it is a good idea to have a way to track the status of and how many observations have been performed for a specific observee. Although the full utility of the Assignments layout view is observed when all rubric assignments have been made so progress can be monitored, there are still some other tools on this view that can help manage observations for staff members.
-
Main Buttons: Each page in eDoctrina usually has a number of main buttons that allow for tasks to be completed more quickly. Each of these options can be used either by filtering the list or by selecting the checkboxes for each item that the task should be applied to.
- Mass Assign Button: The assign button allows for one or many users to be assigned a rubric in one action. Select the staff members that need to be assigned the rubric and choose this button to assign one of the current rubrics for the district.
- Send observation scores to the TE System: A vital component of managing observations in eDoctrina is connecting the scores with the TE Sytem (which is used for end-of-year reports and state reporting. This option exists to ensure that scores be sent to the appropriate data sources when scores are ready to be finalized. This button is only available to users with the appropriate permissions.
- Export to Excel: The export to excel option can be used to generate a spreadsheet that is comparable to the displayed list. If no specific staff members are selected, then the resulting export will include all users in the filtered list. If selections are made, these will be the only items that will be included in the export.
- Sign Selected: Unlike the other main buttons, sign selected exists for the observations layout view only as it is designed for signing more than one single observation at a time.
-
Filter controls
- Saved Filters: There are many filters in eDoctrina and selecting the same ones to get the same results as last time this page was visited can often be a difficult task. Even though selected filters are remembered if the same device/browser is used, leveraging the saved filters can help to reduce the amount of time selecting filters if the same subsets of filters are used on a frequent basis.
- Refresh: The refresh option will ensure that the displayed list is updated to the most recent selections without having to refresh the actual browser window.
- Show/Hide More Filters: The default displayed filters are designed to show less to make the selection of filters an easier task, but do not include some other filters, such as the rubric year, that are needed when looking at historical data or for more advanced reports. This option exists to allow the user to toggle between showing more or less filters depending on the task or preference.
- Reset Filters: Yes, you will need to do this a time or two in eDoctrina. It is recommended to all users in the case where they cannot find something in the list to reset theri filters as there is often something selected that is filtering out the desired results. Resetting filters allows the user to start from the beginning with all filters being cleared to their original defaults.
-
Staff Filters
- Search: Searching for a specific staff member can be done by first name or last name (not both), the staff ID#, the staff UID#, or their state identification number (if it exists in the system). Using the search is the quickest and easiest way yo find an individual staff member as no other filters will be necessary to be selected.
- School: It is possible to filter the displayed list by one school or many schools. The school filter will reference both the primary linked school for each user or any other active schools that the user is linked to.
- Observer: The observer filter will return a list of all staff members that have been observed by the selected observer(s) or any staff member that has be assigned to be observed by the selected observer(s).
- Evaluator: The evaluator is an indication that is made on the user accounts screen to assign an administrator to a staff member as an evaluator. While some districts may have this filter hidden, other districts leverage this as an extra filter to help find specific groups of staff members.
- User Type: It is possible to filter the list for one or many user types to exclude unnecessary staff members or staff types from this list.
- Staff Scope: The default for this filter is to search for Active staff members, but it is sometimes necessary to view staff members that are now inactive in the case of pulling historical reports or even if the staff member has recently left the district.
- Observation Scope: The observations scope filter is arguably the most important filter on the Assignments layout view because it allows for filtering upon the assigned observation rubrics. Generally, observers will want to select the Require Not Complete option and try to get this list down to 0 items by the end of the year meaning that there are no more required observations to be done. Other filters include Awaiting Signatures, which is a great filter to ensure that all observations have been signed off electronically.
- On Leave: This filter should only be used in the cases where the district is actively managing this status as it is sometimes important to exclude any teachers that are "On Leave" when pulling data reports.
- Department Code: If imported or entered for staff members, the department code can add another layer of data for filtering. Not only can department code control access rights, but it can also let a department head use the filter to find only staff members that exist in their department.
-
Rubric Filters
- Year: Showing more filters will allow for the year filter to be selected. This filter allows for toggling back to prior years to view historical observation information.
- Rubric: For many tasks, such as printing, the rubric is required to be selected because there are ofter some configuration options linked to the selected rubric. One or many rubrics can be selected to filter down the results and display the desired rubrics in the list below.
- Rubric Assignment: Each rubric can have one or many rubric assignments, such as Tenured or Non-tenured. Each of the rubric assignments may have different minimum requirement and/or settings. Filtering for the assignment can help to narraw down this
- Rubric Category: Some rubric configurations have one or many rubric categories. These categories represent the main categories of the rubric, which depend heavily on the rubric configuration.
- Start/End Date: If it is necessary to only view staff members that have been observed on a specific date or date range, utilize the start/end date filters to update the list to all staff mmebers with an observation within the selected dates.
- Report Options For more information about the report options, please reference the help guide about the OBSeRVE Report Dashboard
-
Staff Assignments List
- Add: Even if an observation rubric assignment does not exist or if the minimum requirements have already been met for a staff member, an observation can always be created by using the Add button.
- Schedule: The only way to schedule an observation for a staff member is to used the Schedule button on the Assignments layout view. Observations can always be scheduled and will remain in this state until the observer enters the observation and makes updates.
- Assign: Although this Assign button may only exist for District Admin users, this button is used to create or update the rubric assignment for an individual staff member.
- Print: This print button will print all observations for the year for the selected staff member (even if no rubric assignment exists).
- ID/UID: The ID is the unique ID number that eDoctrina provides each user in the system, The UID is usually the local ID number for the staff member that is imported from the district's student information system.
- Staff: The staff member will display in this column as a hyperlink that leads directly to the staff members observation folder. There is also a place where notes can be entered about a staff member as another way of communicating to other users some other details. These notes will print on the exported excel spreadsheet.
- Account: The account column will display the details about the staff members user account. Some staff members will display with two schools, other staff mebers will have different user types in different years, and some will even have different user types to control what access rights that they may have.
-
Assignments: To initiate an assigned observation, click on the
 for the desired observation that needs to be conducted. Please visit our help guide on Conducting a Teacher Observation for more details.
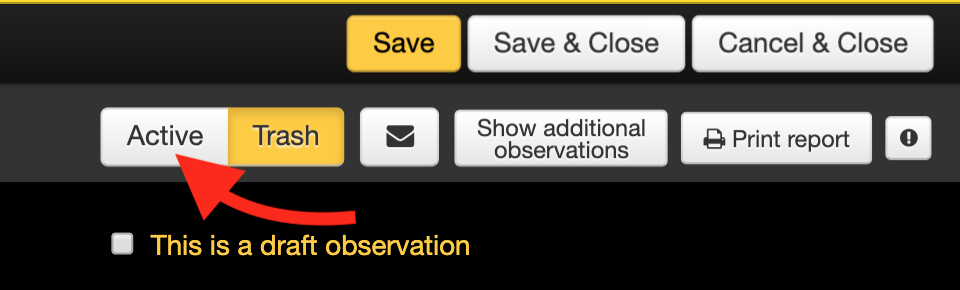
Once an observation has been initiated by any school or district admin, they will be the only users that will be able to modify the contents contained within the observation itself. If the observation is in "Draft", no user in eDoctrina will be able to view the contents until it has been marked as "Complete".
If an observation is in Draft, Scheduled, or Completed state; simply hover over the observation from this view to see the date of the observation and the observer who is responsible.
for the desired observation that needs to be conducted. Please visit our help guide on Conducting a Teacher Observation for more details.
Once an observation has been initiated by any school or district admin, they will be the only users that will be able to modify the contents contained within the observation itself. If the observation is in "Draft", no user in eDoctrina will be able to view the contents until it has been marked as "Complete".
If an observation is in Draft, Scheduled, or Completed state; simply hover over the observation from this view to see the date of the observation and the observer who is responsible.

Observations Layout
The observations layout displays a list of all observations that the logged in user has access to in accordance with the selected filters. If an observation has been scheduled, drafted, deleted, or completed; there will be line item on the Observations layout view that exists for it. Similar to many other modules within eDoctrina, the displayed list is dependent on the filters that are selected. Carefully select the filters and use the "Reset Filters" option if an observation is not displaying. It is sometimes best to only use the Search to identify the desired observee.
The observer can access any one of their performed observations from the Observation Layout by selecting the respective ![]() button. They will also be able to delete an existing observation by clicking the
button. They will also be able to delete an existing observation by clicking the  button. Deleting an observation does not permanently remove the observation, it simply makes it inactive. An observation can be reactivated by toggling the Active/Inactive switch back to Active from within the OBSeRVE Editor.
All completed observations can be printed from the observations layout. Please visit the help guide on the OBSeRVE Report Dashboard for more information about printing.
Observation can also be signed electronically (if applicable) from the observations layout view. For more information on Using Electronic Signatures, please visit our help guide.
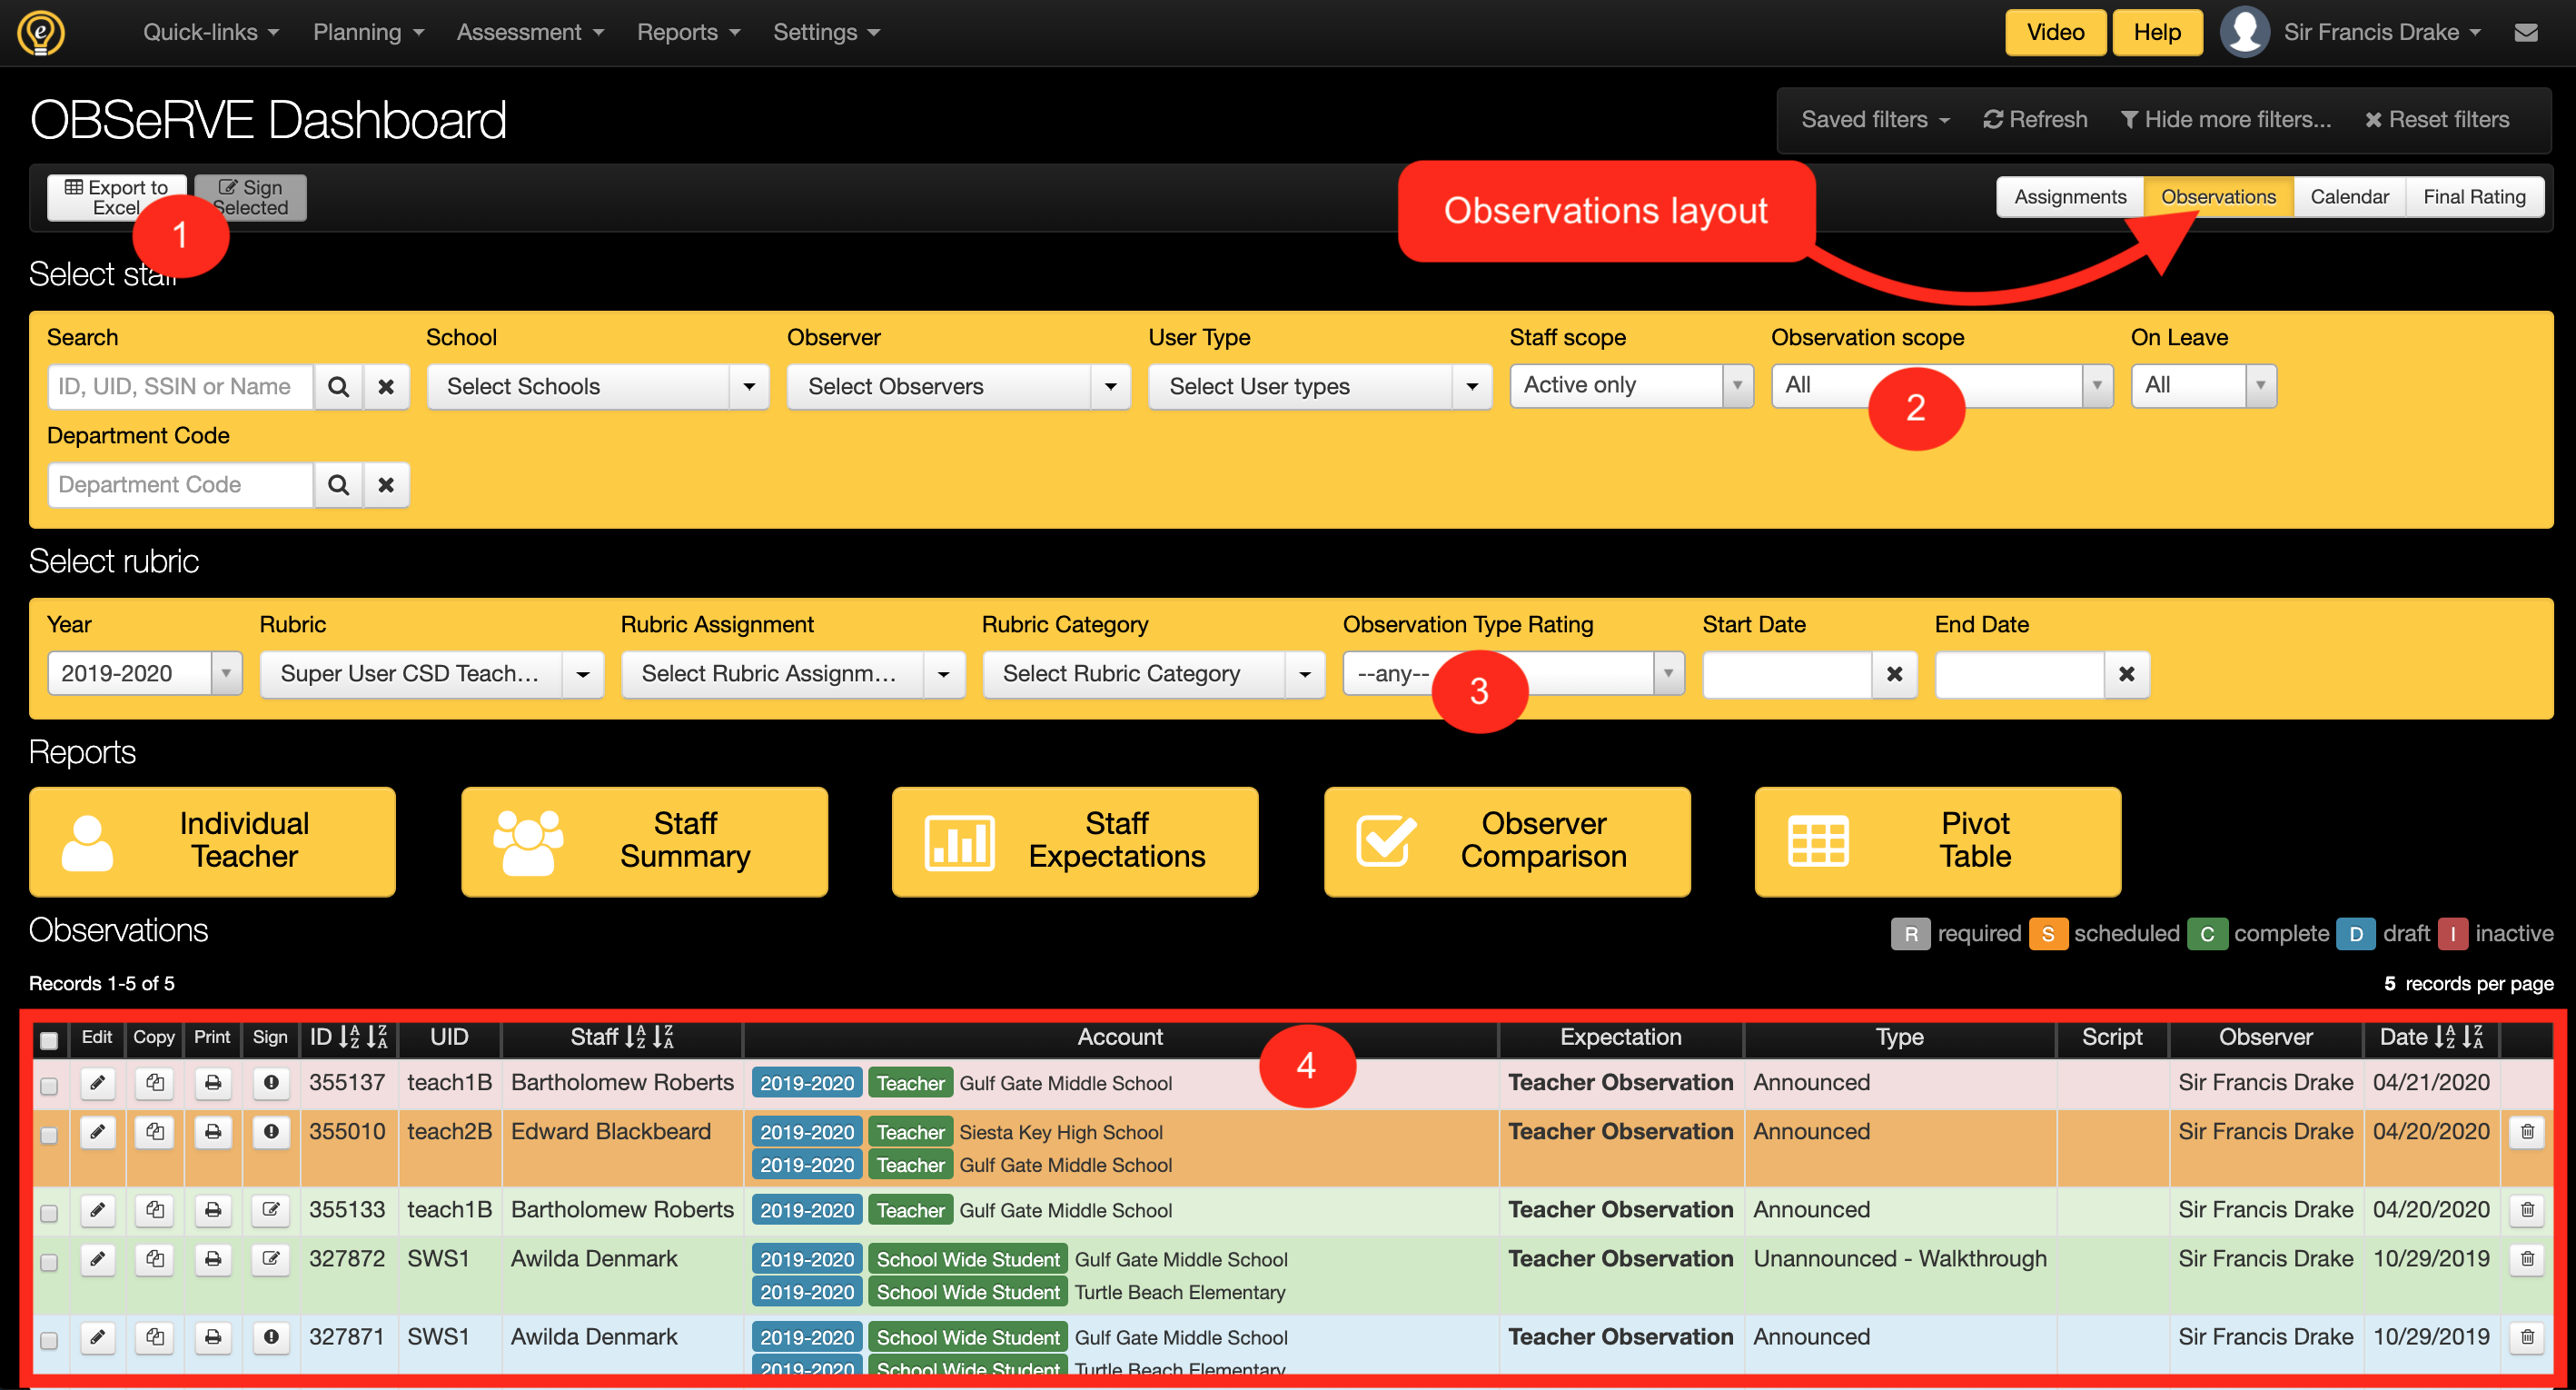
NOTE: Each observation will be highlighted with the color that indicates the status.
To avoid redundancy, we will only point out the differences of the Observation Layout view with reference to the Assignments layout view. If some feature or option is not explained here, please see above where it is likely explain the tool or feature.
-
Export to Excel: There exists two different available format for the Export to Excel tool on the Observations layout view: the Observation List and the Observation Status Report. The Observation List serves as a direct export of how the observations are listed while the Observation Status Report includes important dates regarding the life-cycle of the observation, such as when it was created, made available to the teacher, first and last updated, and all electroinic signature information.

- Observation Scope Filter: The Observation scope fitler on the Observations layout view allow for filtering for statuses of any observation that is accessible by the logged-in user. This is a great filter for monitoring existing observations and finding the ones that need some attention. Filtering for observation status or electronic signature status are both part of the functionality of this filter.
- Observation Type Rating: Unlike the Assignments layout view, the observations layout view offers one more filter to help reduce the list to the desired set of observations. Being that the design of this screen is to list each observation uniquely, it is possible to filter for the observation type.
-
Observation List
- Edit/View: If the logged-in user has access to edit or update the observation the they will see an "Edit Pencil" button here. If the report is locked by signature or if the logged-in user does not have update permissions, then there will be a "Looking glass" button here.
- Copy: The ability to copy an observation is dependent on user access rights, but this option allows for any observation t be copied exactly. once this option is selected, there will be a pop-up prompting to select the target year that new copy should be linked to.
- Print: The print button exists here so each individual observation can be easily printed. Depending on the observation rubric configuration, clicking this option may prompt to select different report options or it will simply generate a PDF of the observation that will be print ready.
- ID/UID: In the observations layout view, the ID is the unique identification number for the observation, while the UID is the staff members local ID that usually comes from an upload from the district's student information system.
- Staff: The staff name will be listed here as it displays throughout eDoctrina. Like many other columns, this column can be sorted but only by staff member last name.
- Account: The account column will display all years, user types, and schools that the staff member is linked to.
- Expectation: The expectation is best described as the category of observation. This expectation will vary by district as it is dependent on rubric configuration.
- Type: This column will display the type of observation, such as "Announced" if this is a selection that is necessary for the observation rubric.
- Script: If the Script is entered made visible, then this column is a quick way to scrool through in the list view to see the entered contents in the scripting area of the observation.
- Observer: This column will display the linked observer or observers if there is the possibility to link a secondary observer in observation form.
- Date: The date column displays the entered date within the observation. This date can be updated by the observer if the observation is not locked. If more dates are needed to explore what has happened with an observation, it is recommended to generate the "Observation Status Report"
Calendar Layout
The calendar layout is designed to help observers manage the observations that they need to complete. To use the calendar layout it is necessary to schedule observations within eDoctrina first.
From the Calendar Layout, the observer will be able to view all observations on a calendar that can be viewed by month, week, or day. Similar to the other layouts in the OBSeRVE Dashboard, the displayed observations are dependent on the filters selected.
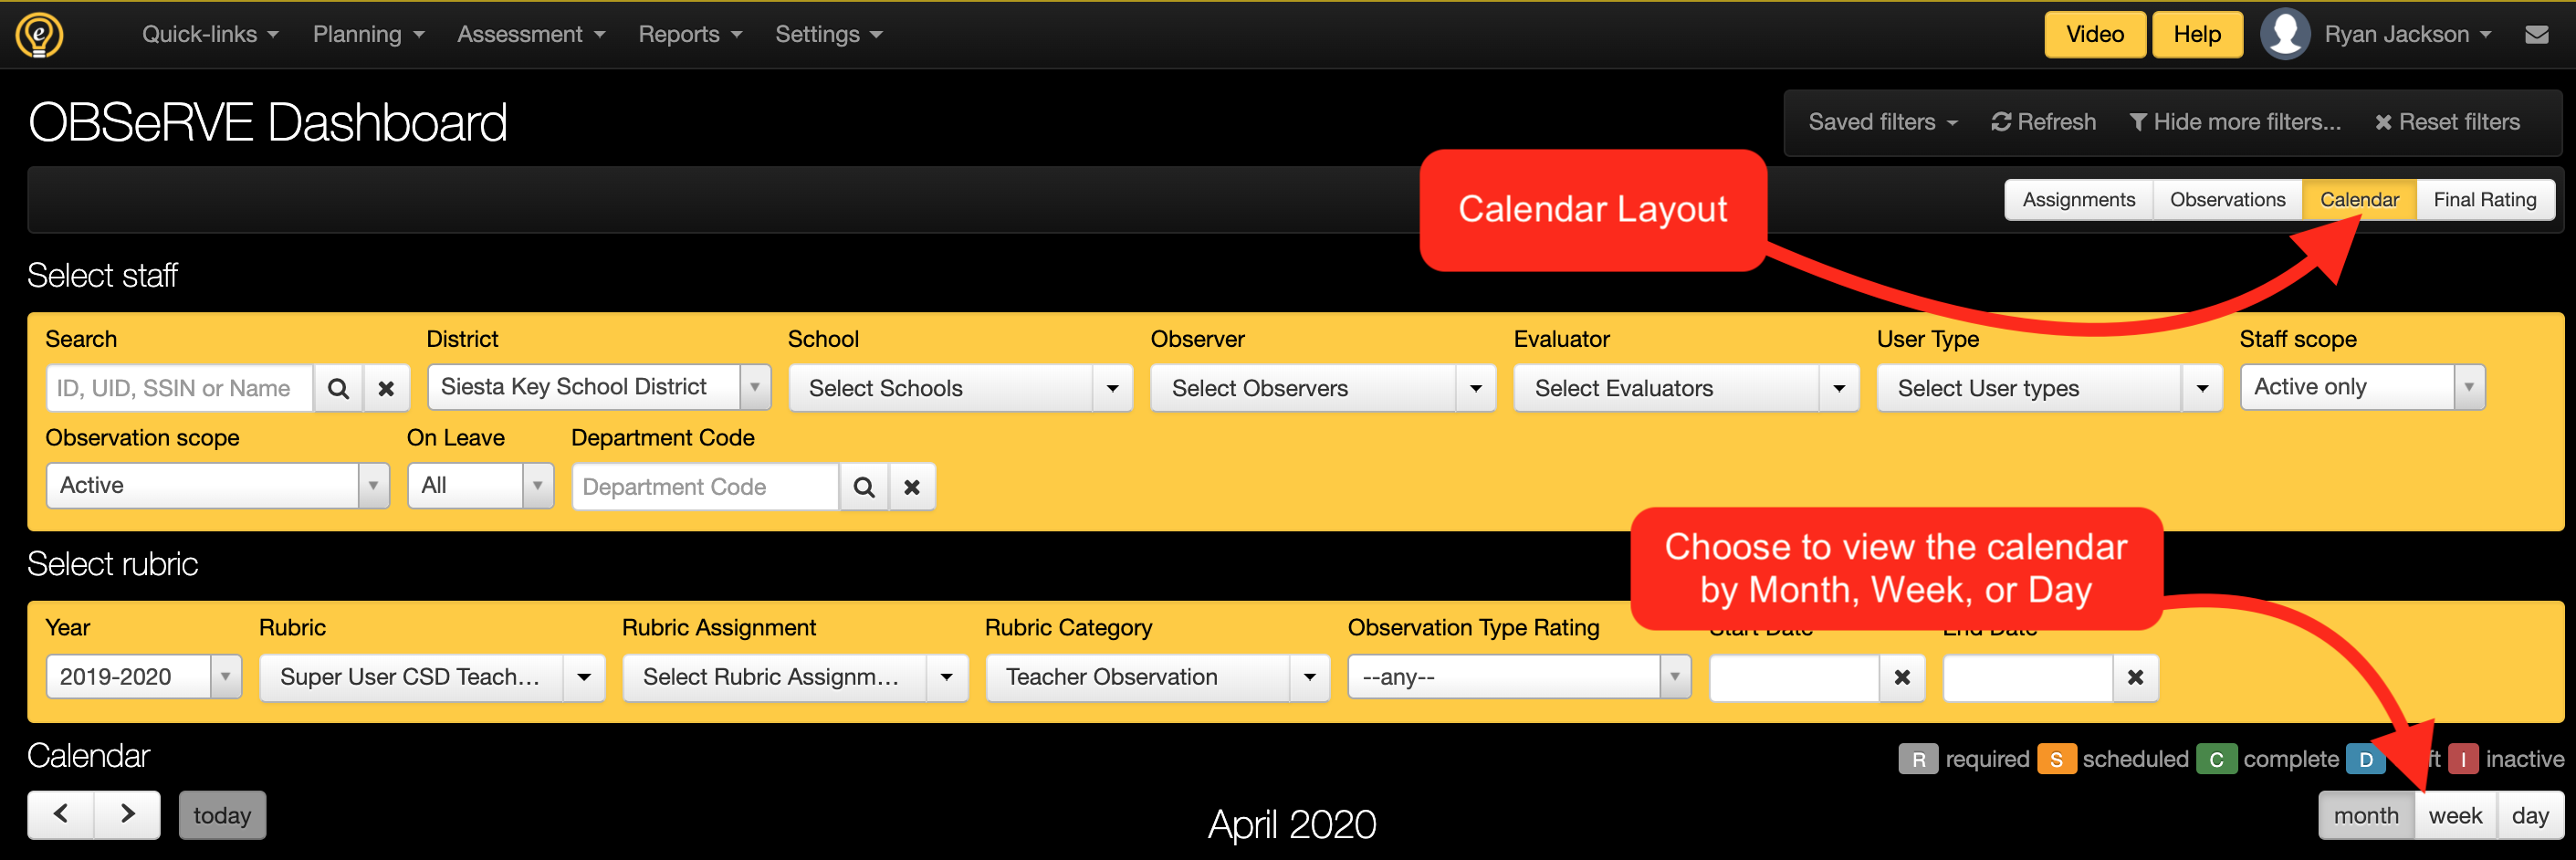
NOTE: Click on the observation to enter directly into the OBSeRVE Editor.


To add/edit a time into an observation without going through the scheduling process, simply enter it within the OBSeRVE Editor. eDoctrina will recognize military time and AM/PM. Therefore, 2:00PM should be entered as 14:00 or 2:00PM. eDoctrina will not recognize 2 or 2p.

NOTE: If the entered time is not recognized when saved, eDoctrina will default to display 7:00PM for the selected day.
Final Rating Layout
The Final Rating Layout can be used to track the workflow status of Observations in the district or school. An Observer can use this feature to see which Observations are complete and which still need some components addressed. Some of the settings in this layout are dependent on the setup of each individual rubric and vary by district.

If any staff member has a rubric assigned to them, there will be a status indicating what status of the observation within the process. If no assignments have been made, the status column will be populated with No Rubric Assigned.
- Here is a list of the potential statuses:
- No Rubric Assigned: This status will show if the person does not have any rubrics assigned.
- Incomplete (Missing Required Observations): This status will show if not all required components of assigned observation for the Staff Member are complete.
- Awaiting Final Rating: This will show if all required components are complete EXCEPT for a Final Rating.
- Awaiting Admin Signature: This will show if Final Rating has been selected, electronic Signatures are required, and the Admin has not signed the final rating yet.
- Awaiting Teacher Signature: This will show if Final Rating has been selected, electronic Signatures are required, and teacher has not signed the final rating yet.
- Complete: This will show if final rating has been applied and if teacher signature is done (if required).
Some districts will be automatically calculating the final ratings for teachers, while other districts will be selecting the final rating from the pull-down menu in the far right column. If the status is "Awaiting Final Rating", select the corresponding pull-down for the desired teacher and select the value that is appropriate for the observee. The options available within this pull-down will vary by district.