 Save as PDF
This version of the guide is now obsolete
CLICK HERE! to open the NEW eDoctrina "How to Guide"
How to Use This Guide
Welcome to our new, online "How to Guide." This page will walk you through the process of using the guide. (Yes, we see the irony in creating a "How to" page on using the "How to Guide"!)
Each page of our previous "How to Guide" has been made into a separate doc. Each has at least one image at the top with the explanation of each particular process below it. A few features:
"Save as PDF." Located at the top of the screen, this option allows you to print a hard copy of an individual doc, a few, or all of the docs.
The "Theme" option at the top right allows you to change the look of the docs. Experiment with the themes that are available and locate the one you prefer. The theme in the image above is called "Spacelab."
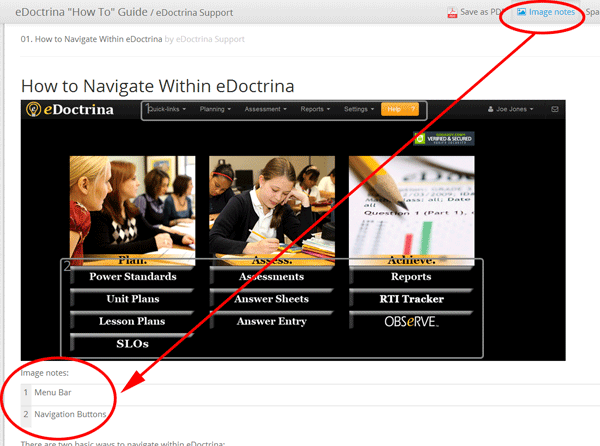
If there is a gray box on an image, that means there are notes available. When you hover over the box with your mouse, its edge becomes a red, dashed line and the notes become viewable. In the example above, the "Menu Bar" is being highlighted on the "Navigation" doc. Note that there is another section of the image that contains notes atop the individual tool buttons.
When the "Image Notes" button at the top of the screen is clicked, it will cause all of the hover-over notes to be listed immediately below that image. This allows for viewing without having to use the mouse (see below). In the example below, the notes "Menu Bar" and "Navigation Buttons" can be seen without hovering over them.
If, after reviewing all of the docs, you have any suggestions for processes that could be added to the "How to Guide" contact us at [email protected].
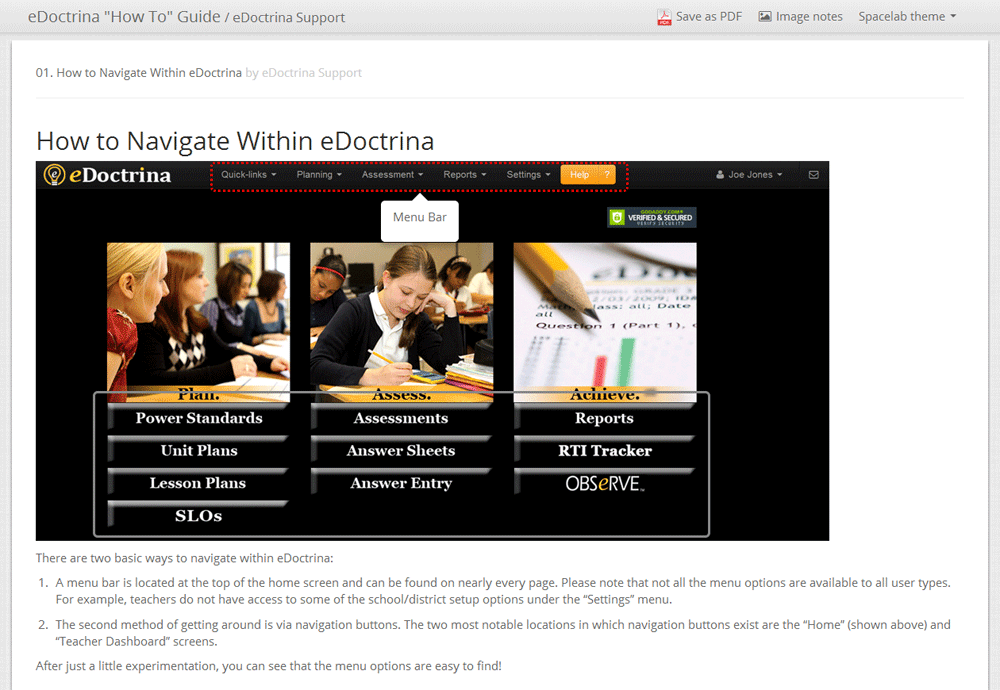
How to Navigate Within eDoctrina
There are two basic ways to navigate within eDoctrina:
A menu bar is located at the top of the home screen and can be found on nearly every page. Please note that not all of the menu options are available to all user types. For example, teachers do not have access to some of the school/district setup options under the “Settings” menu.
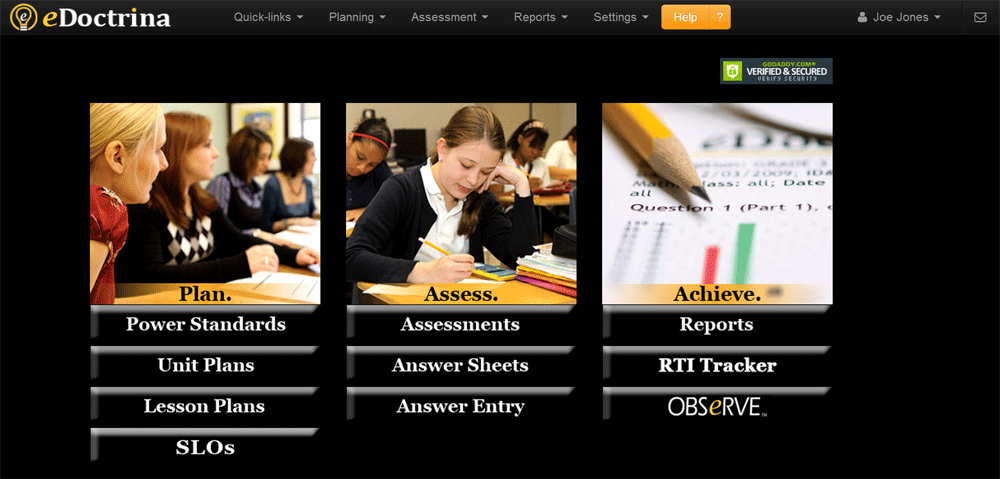
The second method of getting around is via navigation buttons. The two most notable locations in which navigation buttons exist are the “Home” (shown above) and “Teacher Dashboard” screens.
After just a little experimentation, you can see that the menu options are easy to find!
How to Identify Common Action Buttons

One of the reasons eDoctrina is so user-friendly is that it relies on repetition. That is, many of the screens resemble each other. In fact, most of its pages feature Common Action Buttons, icons that, when clicked, carry out the same function on every page.
The most frequently used Common Action Buttons are identified and explained above
How to View and Print the Unit Plan Report
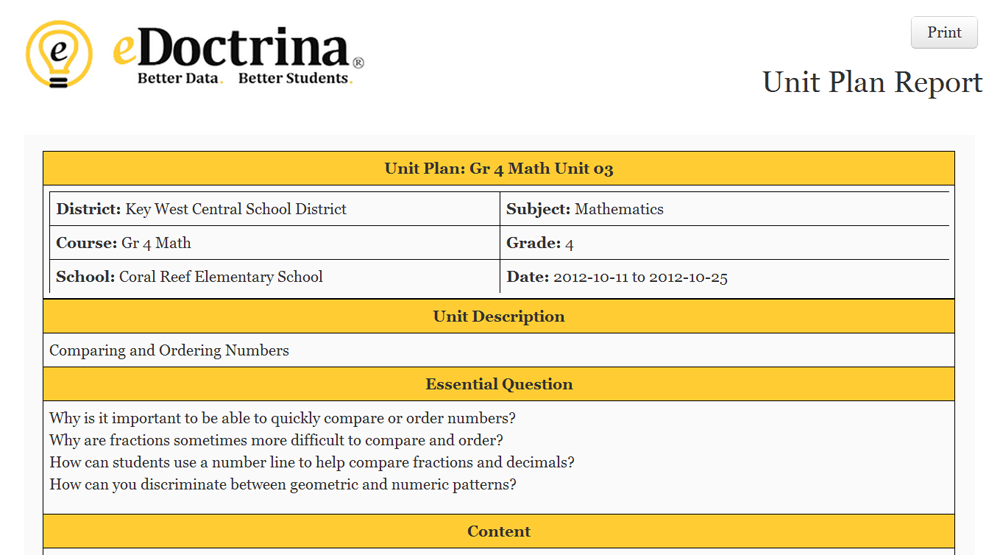
The Unit Plan Report is a handy tool that can be printed and used by classroom teachers, administrators, substitute teachers and event student teachers. It summarizes all of the information that has been inputted into a particular unit.
To print the report:
1.Locate the printer icon on the “Unit Planning” screen (see below) and click it.
2.When the report is visible, click the "Print" button located at the top right of the screen and follow the instructions on the familiar printing prompt.
How to Create a Full Assessment w/Questions
Creating an assessment completely in eDoctrina — including writing new questions — is a straight-forward process.
1.Click the “Insert” (plus) button from the “Assessments” screen
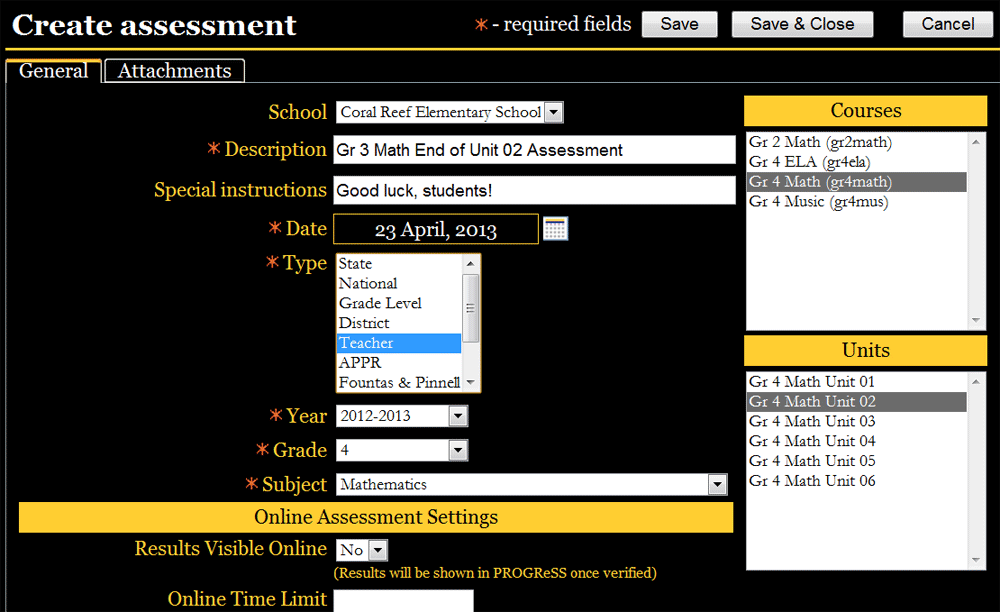
2.Enter the assessment’s general information on the “Create Assessment” screen (see above). Mandatory fields are denoted with a red star. “Description” would be the name of the assessment. The bottom of this screen includes a number of options for those schools/districts that use eDoctrina’s online assessments and standards-based report cards tools.
3.Courses and units can be linked to a particular assessment by selecting them from within the boxes located to the right of the screen. To choose one, simply click it. Multiple courses/units can be selected if desired using the "Shift" and/or "Ctrl" keys. When completed, click “Save.”
4.A number of new tabs are now viewable at the top of the page. Click the first, “Questions.”
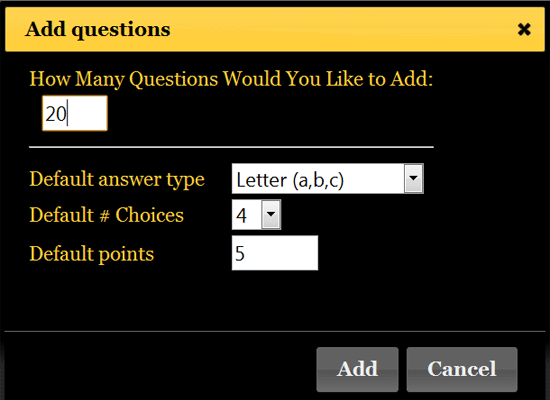
5.Click the “Add Questions” (plus) icon located at the screen’s upper left. This will produce a pop-up menu labeled “Add Questions” (see below). Here, users enter the number of questions on their assessment as well as the most-commonly used question type, the most common number of choices for each question, as well as the default point value of each question. Click “Add.”
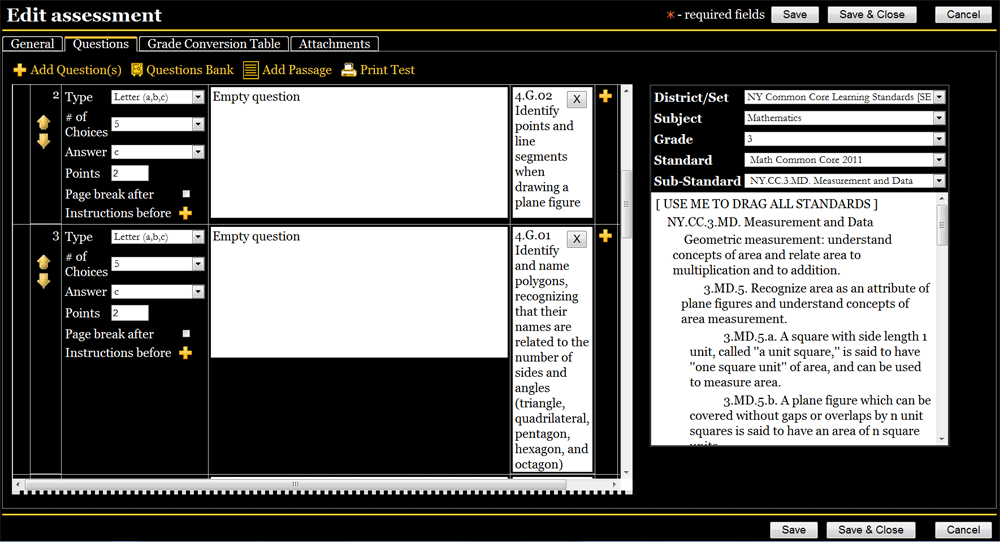
6.Once the screen refreshes, users can scroll back up to question one and start to write that question. To do so, click the gold “plus” button located to the right of the white “Standards” box. This opens the “Create Question” screen (see below).
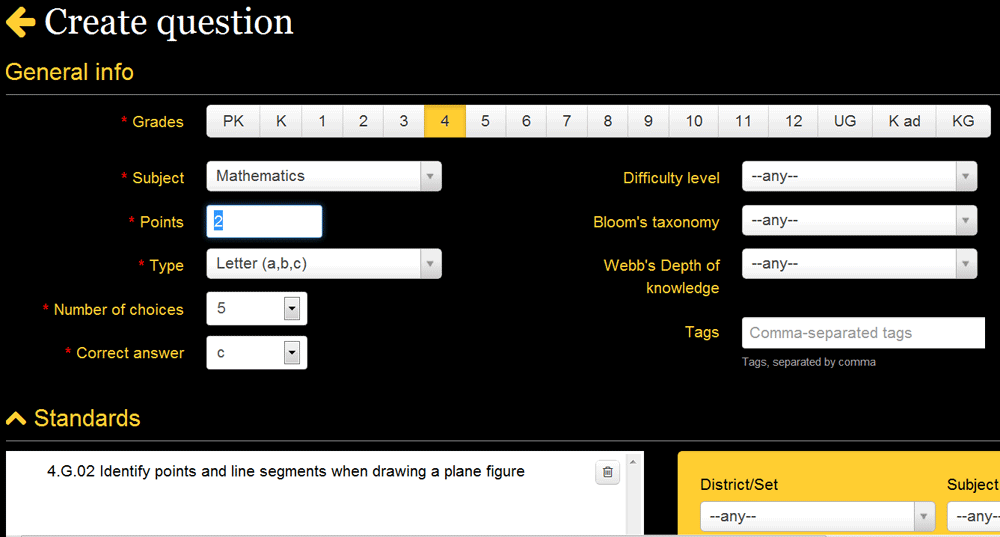
7.At the top, fill out the fields that describe the question, including the five mandatory fields (marked with a red star) — Subject, Points (value), Type, Correct Answer and Grade(s).
8.Users have the option of linking the question to standard(s) next or can scroll down to the “Question” interface to begin writing the question before managing standards. Learning standards can be located by manipulating the filters located within the gold box and simply dragging-and-dropping them from right to left (to the white box labeled “Standards”).
9.The “Question” interface (see below) offers users the flexibility to utilize different colors, font styles (bold, italics) and even import images. A powerful equation editor (“square root” icon) also exists here. Each answer (the number of interfaces corresponds to the number of responses that are needed) also uses the same interface, and, thus, can have similar properties.
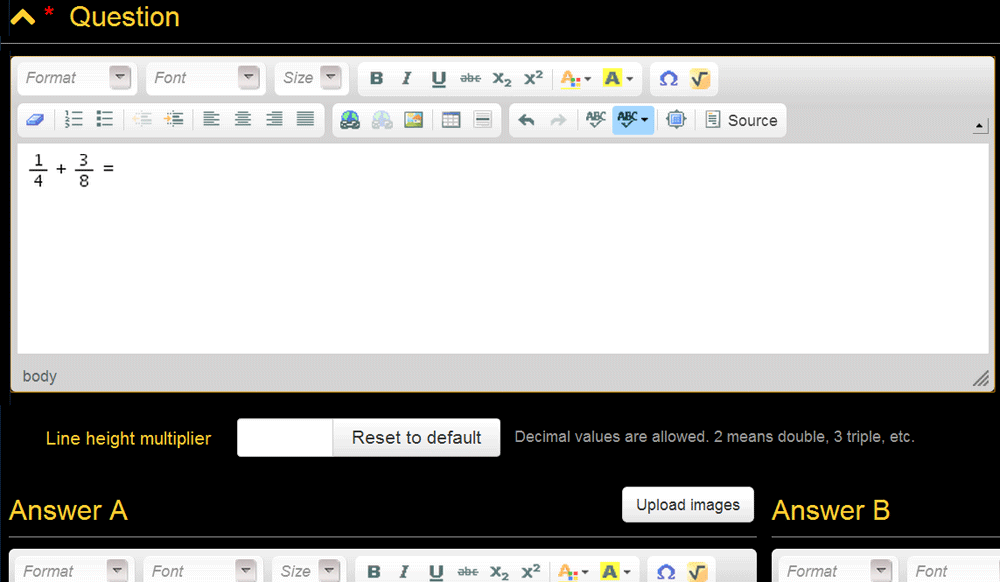
Please note that if you are cutting/copying text or images into the "Question" interface, be sure to use the "Eraser" icon to remove unwanted formatting script that may come with the pasted item. To do so, simply highlight the item brought in and click the icon.
10.Once done linking standards and entering the question/answers, click the “Save & Close” button. The “Create Assessment” screen will refresh and the new question — including the correct answer and any linked standards — will show up.
11.This process should be repeated until all of the questions are written
How to Create a Passage-Based Question
eDoctrina gives users the ability to create assessment questions that consist of diagrams and/or writing passages with multiple questions linked to them. To do so:
1.The Passage Editor tool can be accessed either of two ways. First, while building assessments, users can click the "Add Passage" link at the top right of the screen. Or they can navigate to Assessments > Passage Editor from the menu bar at the top of most eDoctrina screens. Either way, the "Passages" page comes up and includes a list of the passages in the system (if any exist).
2.Click the gold "Insert" (plus) button and the “Create Passage” pop-up screen appears (see below).
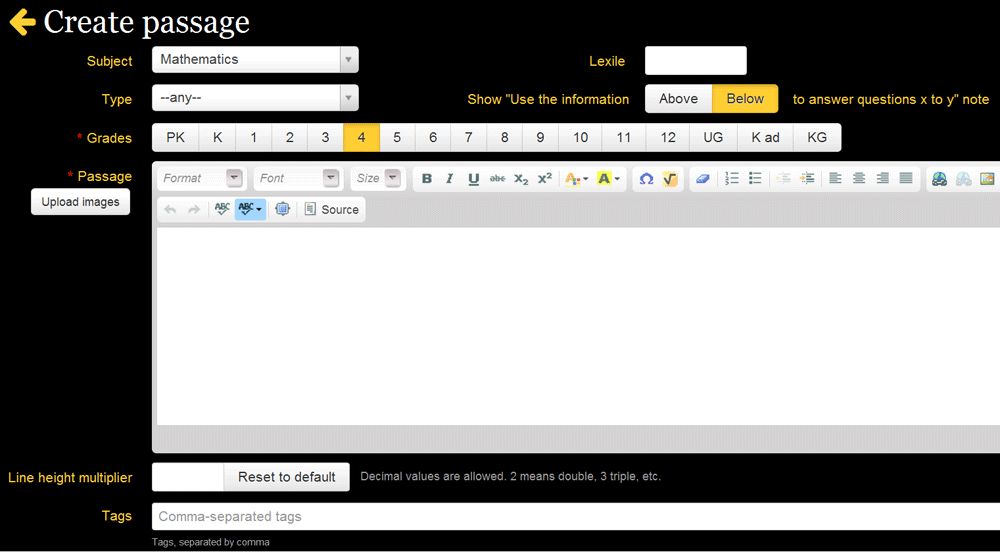
3.This screen will look familiar to those who have already created a question in eDoctrina. Users first fill out the top portion of the screen paying particular attention to those prompts that include a red asterisk (they are mandatory fields). Please note that the "Above/Below" option gives users the ability to decide if the instructions "Use the information in this passage to answer questions X to X" is printed above or below the actual passage.
4.The passage (or graph, chart, map, etc.) can be entered by either typing it in, uploading an image from a desktop (use the "Upload images" button), or cutting/pasting from another source. If cutting/pasting, using the "Eraser" icon to delete unwanted formatting data is highly recommended. Just highlight the pasted item and click the icon.
The "Tags" text block can be used to enter key words that will help users locate this particular passage at a later date.
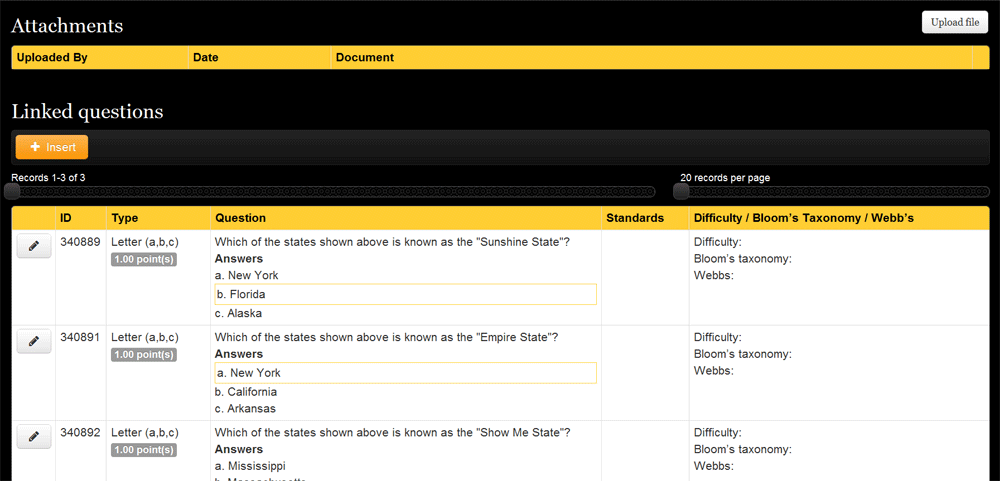
5.The lower portion of the "Create Passage" screen (see below) includes the ability to add an attachment and linked questions. To do the latter, click the gold "Insert" (plus) button and the "Create Question" screen will appear. For information on how to create a question, check out page "09. How to Create a Full Assessment w/ Questions" in this guide. Once those steps -- that include filling out mandatory fields, linking standards and writing the questions and responses -- have been completed, clicking the "Save & Close" button will take users back to the lower half of the "Create Passage" screen and the recently created question is now viewable. Additional questions can be added by clicking "Insert."
6.When the passage has been entered and all of the linked questions written, complete the process by clicking "Save & Close."
How to Add/Edit Question Bank Items

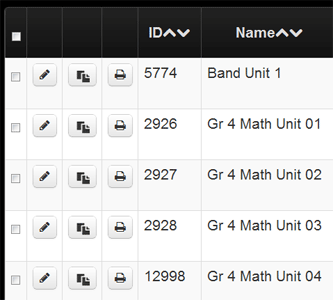
Users have the ability to create and/or edit items that reside within eDoctrina’s Question Bank. Question sets can be accessed through the menu bar located on every screen. Navigate to Assessments > Questions Bank. The “Questions” page (see above) comes up.
To create a new question:
1.Click the gold “Insert” (plus) button located at the top-left of the screen.
2.From here, the “Create Question” page (see below) appears. This screen will look familiar to those who have already created a question. The top contains general information, with those fields with a red asterisk being mandatory and, thus, needing to be filled.
3.Locate and link learning standards to the question by manipulating the filters and dragging-and-dropping from right to left.
4.Write the question in the next white text block labeled “Question.” An image can be added via the “Upload Images” button. Users can also paste content into these boxes by pressing CTRL+C (or “Apple”+C). If pasting items in, be sure to use the "Eraser" icon to delete unwanted formatting data. To do so, highlight the information that was pasted in and click the icon.
5.Depending on the number of responses to the question that was entered at the top of the screen, a corresponding number of “Answer” text blocks will be found. For example, if this is a “Letter (a,b,c)” question with two responses (“A” and “B”), then two “Answer” blocks will be editable here.
6.When done, click “Save” to continue work on this question or “Save & Close” to move on.
To edit an existing question:
Locate the appropriate question by utilizing the filters at the top of the page. Please note that the first pull-down menu relates to the particular bank in which the question is located, while the second correlates to the particular set of state standards used by each bank.
To make changes, click the “Edit” (pencil) icon located to the left of each question. If this question is being used within an assessment already, a WARNING pop-up menu presents three choices: Continue with the editing, Make a copy of this question to allow for editing without affecting the current assessment, and Cancel.
The “Question” screen will then come up (see above) and will be populated with all of the question’s general information, standards, and responses. Changes can be made to any of these options.
Click “Save” to continue work on this question, “Save & Close” to move on.